Introduction to the Toolkits Menu
What Are Toolkits?
Toolkits in ELITEA are modular integrations that connect your agents to external platforms and internal services. Each toolkit provides an interface for configuring connection parameters (like API keys, URLs, or credentials) and setting options specific to the target service. Once configured, toolkits can be assigned to agents, empowering them to automate tasks across different systems and domains.Navigating the Toolkits Menu
The Toolkits menu is accessible from the main platform navigation. Upon entering the Toolkits section, you’ll see a dashboard listing all available toolkits, along with their configuration status.
- Toolkit Cards: Each card provides a brief description, current status, and toolkit type.
- Search and Filter: Quickly locate a toolkit using the search bar or filter by type.
- Create Toolkit Button: Use the
+ Createbutton to add a new integration or configure an existing one.
Toolkits Dashboard
The Toolkits dashboard provides multiple ways to view and manage your toolkits: View Options- Card View - Visual cards displaying toolkit name, type, and key information. Ideal for browsing and quick identification.
- Table View - Organized list format with columns for detailed toolkit information. Better for managing large numbers of toolkits.
- Search Bar - Quickly find toolkits by typing the toolkit name or related keywords
- Filter by Type - Filter toolkits by their type/category (e.g., show only GitHub, Jira, or Slack toolkits). Select one or multiple types to narrow down the list.
- Locate the toolkit you want to pin
- Click the pin icon (📌) on the toolkit card or in the table row
- Pinned toolkits will appear at the top of the list, separated from unpinned ones
- Click the pin icon again to unpin the toolkit
Creating a New Toolkit
You can add new integrations to the platform by creating a new toolkit through the Toolkits menu. **How to Create a New Toolkit Follow these steps to add a new integration to the platform:- Open the Toolkits Menu: Go to the Toolkits section from the main navigation bar.
- Click
+ Create: Find the+ Createbutton at the top right of the sidebar.
Only users with the necessary permissions can create or configure toolkits. If the
+ Create button is disabled, contact your platform administrator.
Configuring Toolkit Details
Once you’ve selected a toolkit type, you’ll need to configure the following fields: Main Configuration Fields:- Toolkit Name - A clear, descriptive name for your toolkit
- Description - A brief description to clarify the toolkit’s purpose and usage
- Credentials Configuration - (varies by toolkit type) Select or create credentials for the integration
- For toolkits that require credentials (e.g., Jira, GitHub), open the Credentials dropdown and either create new credentials or select an existing one
- For toolkits without credential requirements (e.g., Artifact), configuration fields will be shown directly on the create toolkit page
- PgVector Configuration - Select or configure a PgVector connection to enable vector storage capabilities for document indexing and similarity search
- Embedding Model - Select an appropriate embedding model configuration to enable text processing and semantic search features
- Parameters - (varies by toolkit type) Additional integration-specific parameters such as:
- URLs and endpoints
- Project identifiers
- Custom configuration options
- TOOLS - Select which specific tools and actions to enable for this toolkit
- Review available tools carefully and enable only those needed for your use case
- Enabling only necessary tools improves security (principle of least privilege) and optimizes performance
- Make Tools Available by MCP - (optional checkbox) Enable this option to make the selected tools accessible through the external MCP clients to use the toolkit’s capabilities
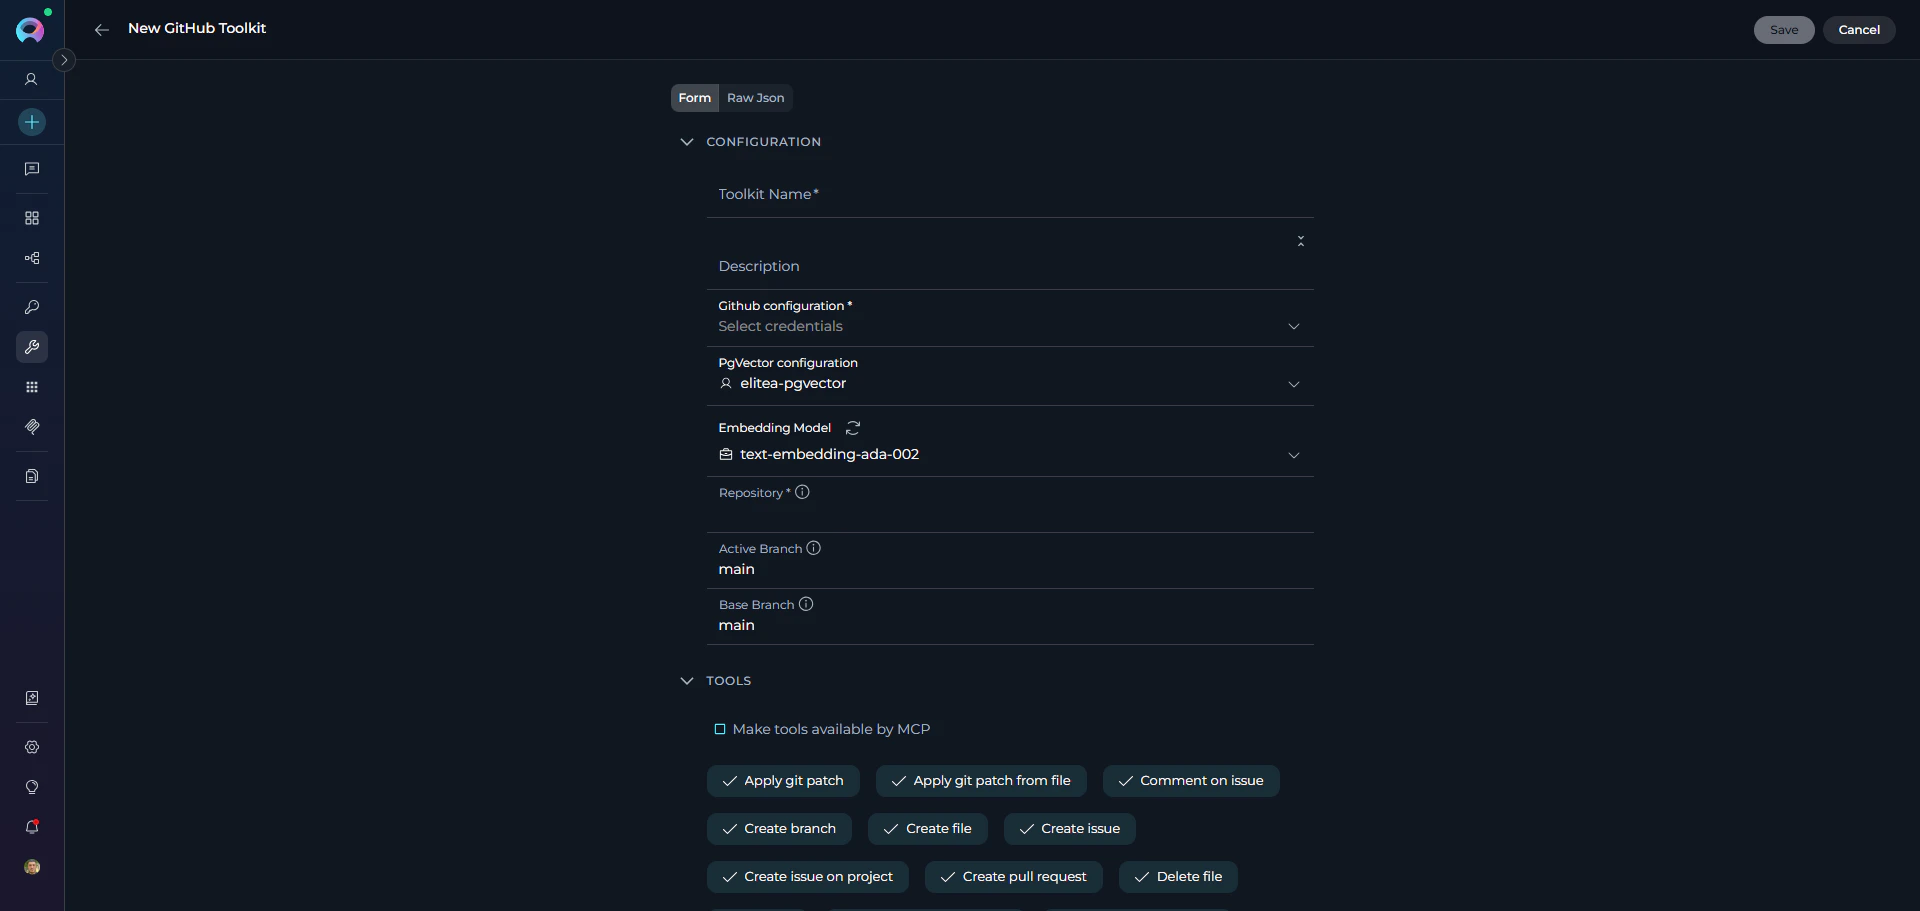
Advanced users can switch to Raw JSON mode to directly edit the toolkit configuration as JSON. This provides more flexibility for complex configurations and bulk data entry. Toggle between the form view and Raw JSON view using the interface switch.

Toolkit Categories & Descriptions
The platform supports a wide range of toolkits, organized by category. Below is the latest list of categories and available toolkits.Toolkit availability may evolve. Refer to the platform UI for the most current list.
Managing Toolkit Configuration
The toolkit detail page provides a comprehensive interface for configuring, testing, and monitoring your toolkits. Access it by clicking on any toolkit from the Toolkits dashboard. The page is organized into two main tabs, each serving a specific purpose:Configuration Tab: Managing and Testing Toolkit
The Configuration tab (⚙ icon) is the primary interface for configuring toolkit settings, managing tool selection, and testing toolkit functionality in real-time. It uses a two-column layout:- Left panel — the configuration form (name, description, credentials, parameters, tool selection)
- Right panel — the Test Settings panel for running tools interactively, with a View run history (🕐 clock icon) in the top bar (see Viewing Toolkit History)
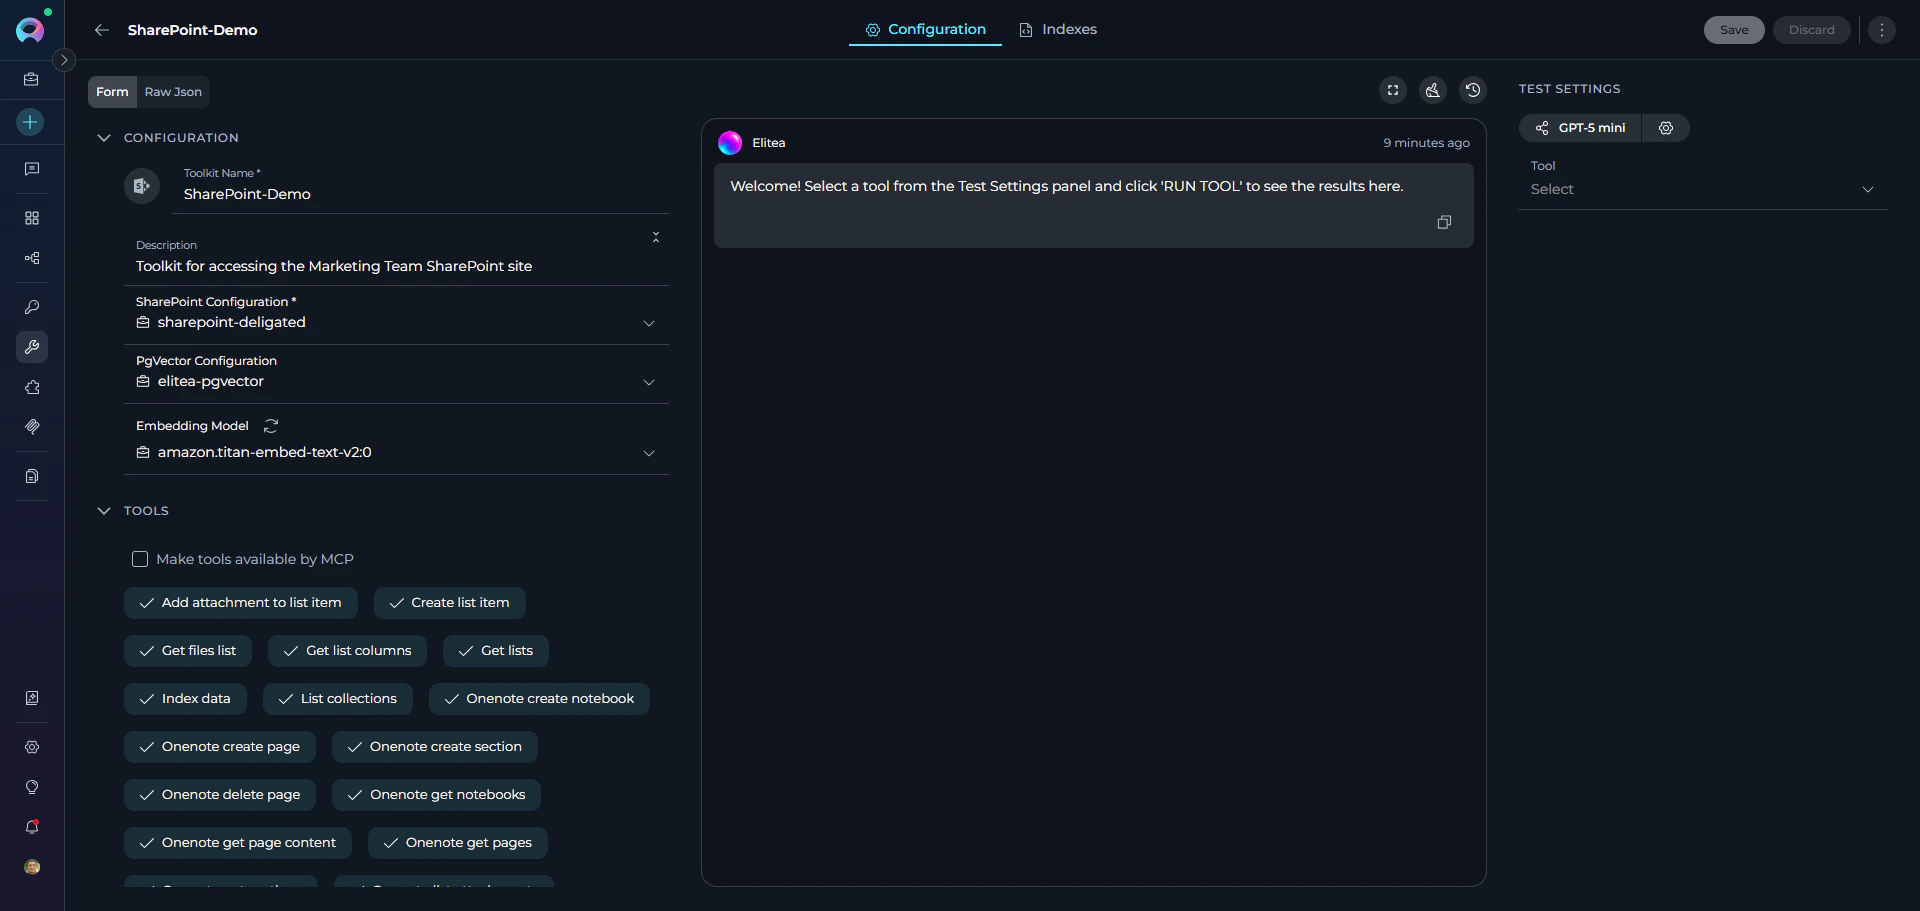
- Edit Toolkit Details: Update the name, description, credentials (API keys, tokens, service URLs), and any custom or advanced options directly in the configuration panel.
- Manage Tool Selection: Configure which specific tools are enabled for this toolkit. In the “Tools” section, check only the tools your agent will use. Enabling only necessary tools improves security (principle of least privilege) and optimizes performance.
- Update Advanced Configurations: Modify PgVector configuration settings or change embedding model selections to optimize performance or adapt to new requirements.
- Save Changes: Click Save to apply your updates. Changes are applied immediately and reflected in the dashboard.
- Remove Toolkit: Click the Remove (trash) icon to delete the toolkit. Confirm the removal in the dialog.
- Copy Link: Click the copy link icon to copy a direct link to the toolkit’s detailed page—useful for sharing with teammates who have access.
- Export and Fork: Available in the three-dot menu (⋮) in the toolbar. These options are currently disabled (greyed out) and will be enabled in a future release.
- Review available tools carefully and enable only those needed for your specific use case
- Test each enabled tool using the Test Settings panel to ensure proper functionality
-
Update tool selection as your requirements change or new tools become available
- Purpose: Enables toolkit tools to be exposed and accessible via MCP servers
- Location: Appears in the Tools configuration section when selecting toolkit tools
- When to Enable:
- You plan to use this toolkit’s tools through an MCP server
- You want to make these tools available to external MCP clients
- You’re building MCP-based integrations that need access to these tools
-
Select a Model: Choose the LLM model from the model dropdown (e.g.,
gpt-4o).
-
Adjust Model Settings (Optional): Click the Model Settings icon (⚙️) next to the model selector to fine-tune the response generation. The settings vary depending on the selected model:
For Reasoning Models (e.g., GPT-5.1):
For Standard Models (e.g., GPT-4o):All Models:
-
Select Tool: Use the Tool dropdown to choose which toolkit action you want to test.
- Search functionality: Type in the search box to filter available tools
- Tool options: Select from available tools
- Provide Required Parameters (if prompted): Fill in any inputs required by the selected tool.
-
Execute the tool: Click the RUN TOOL button and review the results in the output area.
(The RUN TOOL button appears after selecting a tool.)
Shared Toolkit Credentials
When a toolkit is configured in a team project and its credential is shared across team members, two warning mechanisms protect users from unexpected disruptions.Credential Setup Required Banner
If you add a shared toolkit to an agent and the toolkit uses shared credentials that require each user to supply their own private copy, a warning banner is displayed on the tool card: Credential setup required: This toolkit requires your own private [credential type] credentials. Create a credential with the matching ID “[credential ID]” in your Private workspace to use this toolkit.
private_credential_not_found error — meaning the shared toolkit references a credential ID that does not exist in your personal (private) workspace.
What to do:
- Click the Create a credential link in the banner. It opens your Private workspace in a new tab with the credential name and ID pre-filled.
- Complete the credential form (supply your own API key, token, or login details).
-
Save the credential. The banner will no longer appear once the matching private credential exists.
Some toolkits (e.g., GitHub, Jira) are configured with shared connection settings but require each team member to authenticate with their own account. The private credential in your Personal workspace holds your individual credentials while reusing the shared toolkit’s configuration.
Credential Configuration Change Warning
When you edit the credentials of a toolkit that lives in a team project, a confirmation modal appears before the change is saved:Credential Configuration Change
Changing the credential may make this toolkit non-operational for other team members who do not have a matching Private credential. Make this decision considering the potential impact on your team.
Indexes Tab: Managing Toolkit Indexes
Toolkits that support document processing and content indexing provide an Indexes tab for managing indexed data. For detailed instructions on using the Indexes tab, see Using Indexes Tab Interface. Accessing the Indexes Tab The Indexes tab is enabled in the toolkit detail page alongside the Configuration tab when:-
The toolkit schema includes indexing tools (such as
index_data,search_index,remove_index) - PgVector configuration is set
- Embedding Model is configured
-
index_data tool is selected in the toolkit’s tool selection
- Creating new indexes: Set up document indexing for the external service
- Search indexes: View, configure, and monitor active indexes
- Index configuration: Configure indexing parameters specific to each index
- Index operations: Execute indexing operations and track their progress
-
Removing indexes: Delete indexes that are no longer needed
Viewing Toolkit History
The Run History panel provides a complete audit trail of all past test executions performed in the toolkit’s Test Settings panel. How to access Run History:- Open any saved toolkit.
- In the right panel of the Configuration tab (Test Settings area), click the clock icon (🕐) in the top bar. The tooltip reads “View run history”.
- The toolkit page is replaced by the two-panel Run History display. Click the ✕ (Close) button to return to the Configuration tab.
-
Left panel — sortable list of all past test runs. Click any column header to sort:
Click a row to load the conversation replay in the right panel. Each row also has a three-dot menu (⋮) with: Share link, Delete.
-
Right panel — full conversation replay of the selected test run.
For detailed instructions on using the Toolkit History panel, see the Toolkit History Tab Guide.For general information on the History panel shared across agents, pipelines, and toolkits, see the Agents and Pipelines History Guide.
Using Toolkits in Your Workflows
Once a toolkit is configured, you can use it across different areas of the platform to enhance your workflows: In Agents- Navigate to the Agents menu.
- Select or create an agent.
- In the agent’s configuration, add the desired toolkit from the list of available toolkits.
- Configure any agent-specific toolkit options, if prompted.
- Save your agent.
- Navigate to the Pipelines menu.
- Select or create a pipeline.
- In the pipeline configuration, add the desired toolkit to enable automated workflow steps.
- Configure pipeline-specific toolkit parameters as needed.
- Save your pipeline.
- Open a Chat session.
- Access the toolkit selector within the chat interface.
- Select one or more toolkits to make their capabilities available during the conversation.
- Use natural language to interact with the toolkit’s features.
You can use multiple toolkits simultaneously in agents, pipelines, and chat sessions to create powerful, integrated workflows that span multiple services and platforms.
Best Practices
Secure Your Credentials
Secure Your Credentials
Always use secure tokens or API keys. Never share credentials in public areas.
Test Before Use
Test Before Use
Use the Test Settings panel to test toolkit functionality before assigning them to agents.
Keep Toolkits Updated
Keep Toolkits Updated
Update credentials and settings if your external service changes.
Minimal Permissions
Minimal Permissions
Grant only the permissions necessary for the agent’s tasks.
Troubleshooting
Failed Connection
Failed Connection
Double-check credentials, URLs, and network connectivity.
Toolkit Not Appearing
Toolkit Not Appearing
Refresh the toolkits list or verify your permissions.
Agent Cannot Use Toolkit
Agent Cannot Use Toolkit
Ensure the toolkit is configured and assigned to the agent.
Indexes Tab Not Available
Indexes Tab Not Available
If the Indexes tab is disabled in your toolkit:
- Verify Index Data tool is enabled - Check your toolkit configuration and ensure the Index Data tool is selected in the Tools section
- Check project-level configuration - Confirm that PgVector and Embedding Model are properly configured at the project level in AI Configuration
- Save and refresh - After making changes, save your toolkit configuration and refresh the page to see the Indexes tab become available
Support Contact
If you encounter issues not covered in this guide or need additional assistance with toolkit management, please refer to Contact Support for detailed information on how to reach the ELITEA Support Team.Explore these related guides to maximize your toolkit usage:
- Sensitive Action Authorization Guardrail — Learn how to protect sensitive toolkit actions by requiring human approval before they are executed.
- Glossary — Definitions of common terms used across the platform
- Credentials — Learn how to create and manage credentials used by toolkits
- AI Configuration — Set up embedding models and vector configurations
- Secrets Management — Secure credential storage best practices