

Introduction
The document covers integrating and using the qTest toolkit within ELITEA. It provides a step-by-step walkthrough — from setting up your qTest API token to configuring the toolkit in ELITEA and incorporating it into your Agents. With this workflow, you can automate test management, streamline testing workflows, and enhance test coverage, all within the ELITEA platform. Brief overview of qTest qTest, by Tricentis, is a cloud-based test management platform that centralizes software testing activities and enables comprehensive quality management. It serves as a central hub for teams to manage test cases, track test execution, and ensure comprehensive test coverage. qTest offers a wide array of functionalities, including:- Test case management: Create, organize, and manage test cases in a centralized repository
- Test execution tracking: Monitor test runs and track execution status in real-time
- Requirements traceability: Link test cases to requirements and defects for complete audit trails
- Reporting & analytics: Generate comprehensive reports on test coverage and quality metrics
- Agile integration: Support for iterative testing and CI/CD pipeline integration
Account Setup & Configuration in qTest
Account setup If you do not yet have a qTest account, follow these steps to create one:- Visit Tricentis website: Open your web browser and navigate to the official Tricentis qTest website: https://www.tricentis.com/.
- Sign up for qTest: Go to “Trials & demos” and select “Try qTest free” to start a free 14-day trial.
- Create an account: Follow the prompts to create your qTest account. Complete the registration form with your business details.
- Create workspace: During the signup process, you will be asked to create your qTest web address and account credentials.
- Verify email: Check your inbox for a verification email from qTest. Select the verification link in the email to activate your account.
- Access qTest: Once your email is verified, log in to qTest using your newly created credentials.
Generate an API token
For secure integration with ELITEA, use a qTest API token (Bearer Token) for authentication. This method is more secure than using your primary qTest account password directly and allows you to control access permissions. Follow these steps to generate an API token in qTest:- Log in to qTest: Go to your qTest URL (e.g.,
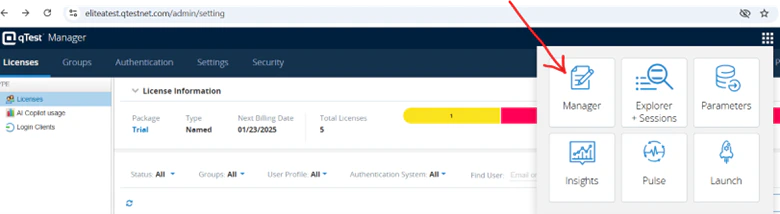
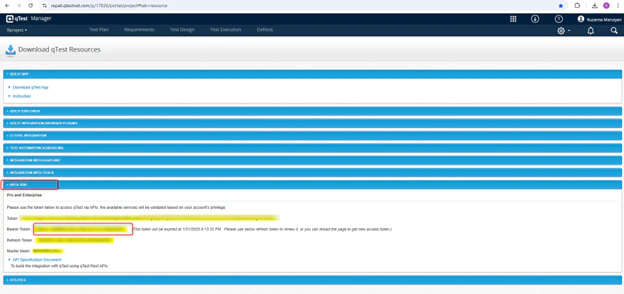
your-subdomain.qtestnet.com) and log in with your credentials. - Go to API settings: Go to “Manager” > “API & SDK” from the main navigation menu.
- Copy your API token: Find and copy your Bearer Token from the API settings page. This is your API token for authentication.
- Store your API token securely: Copy the generated API token immediately. Store it in a password manager or, preferably, ELITEA built-in Secrets feature for enhanced security. You will need this token to configure the qTest toolkit in ELITEA.

System Integration with ELITEA
To integrate qTest with ELITEA, follow a three-step process: Create Credentials > Create Toolkit > Use in Agents. This workflow ensures secure authentication and proper configuration.Step 1: Create qTest credentials
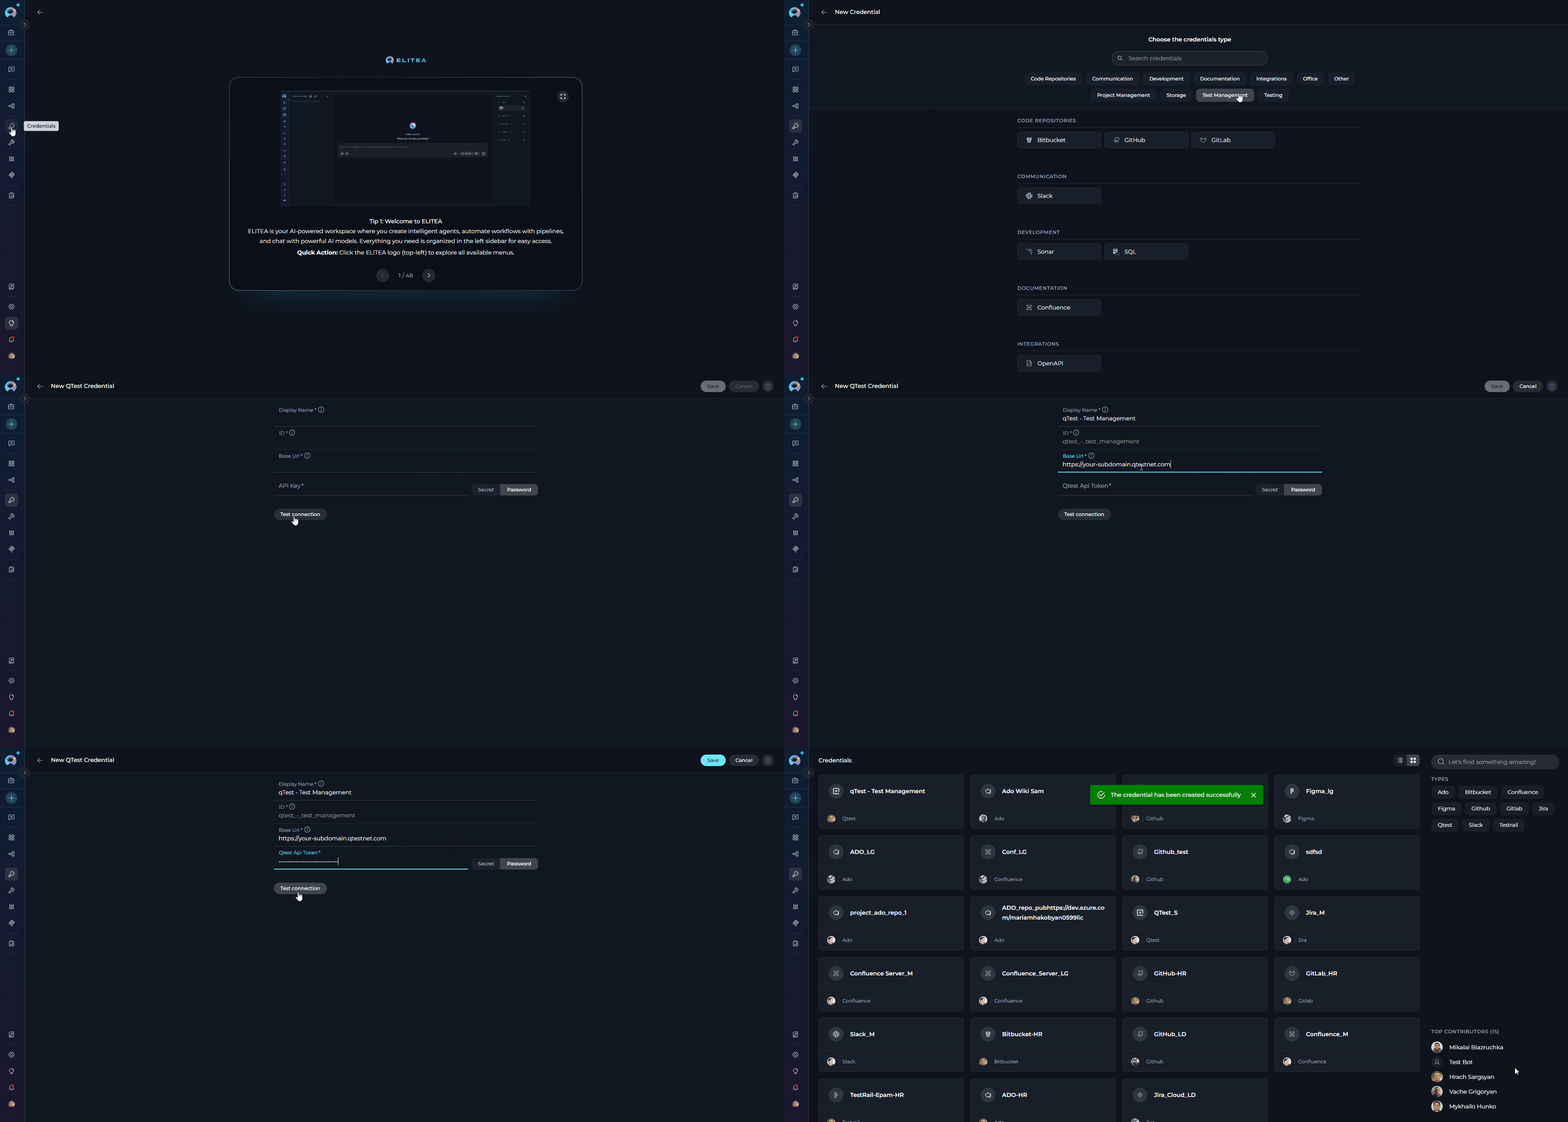
- Go to Credentials: Open the sidebar and select Credentials.
- Create new credential: Select
+ Create. - Select qTest: Choose qTest as the credential type.
- Complete the fields:
- Display name: Enter a descriptive name (e.g., “qTest - Test Management”)
- Base URL: Enter your qTest instance URL (e.g.,
https://your-subdomain.qtestnet.com) - qTest API token: Enter your Bearer token from qTest
- Test connection: Select Test Connection to verify that your credentials are valid and ELITEA can connect to qTest.
- Save credential: Select Save to create the credential. After saving, your qTest credential appears in the credentials dashboard and is ready to use in toolkit configurations. You can view, edit, or delete it from the Credentials menu at any time.
Step 2: Create qTest toolkit
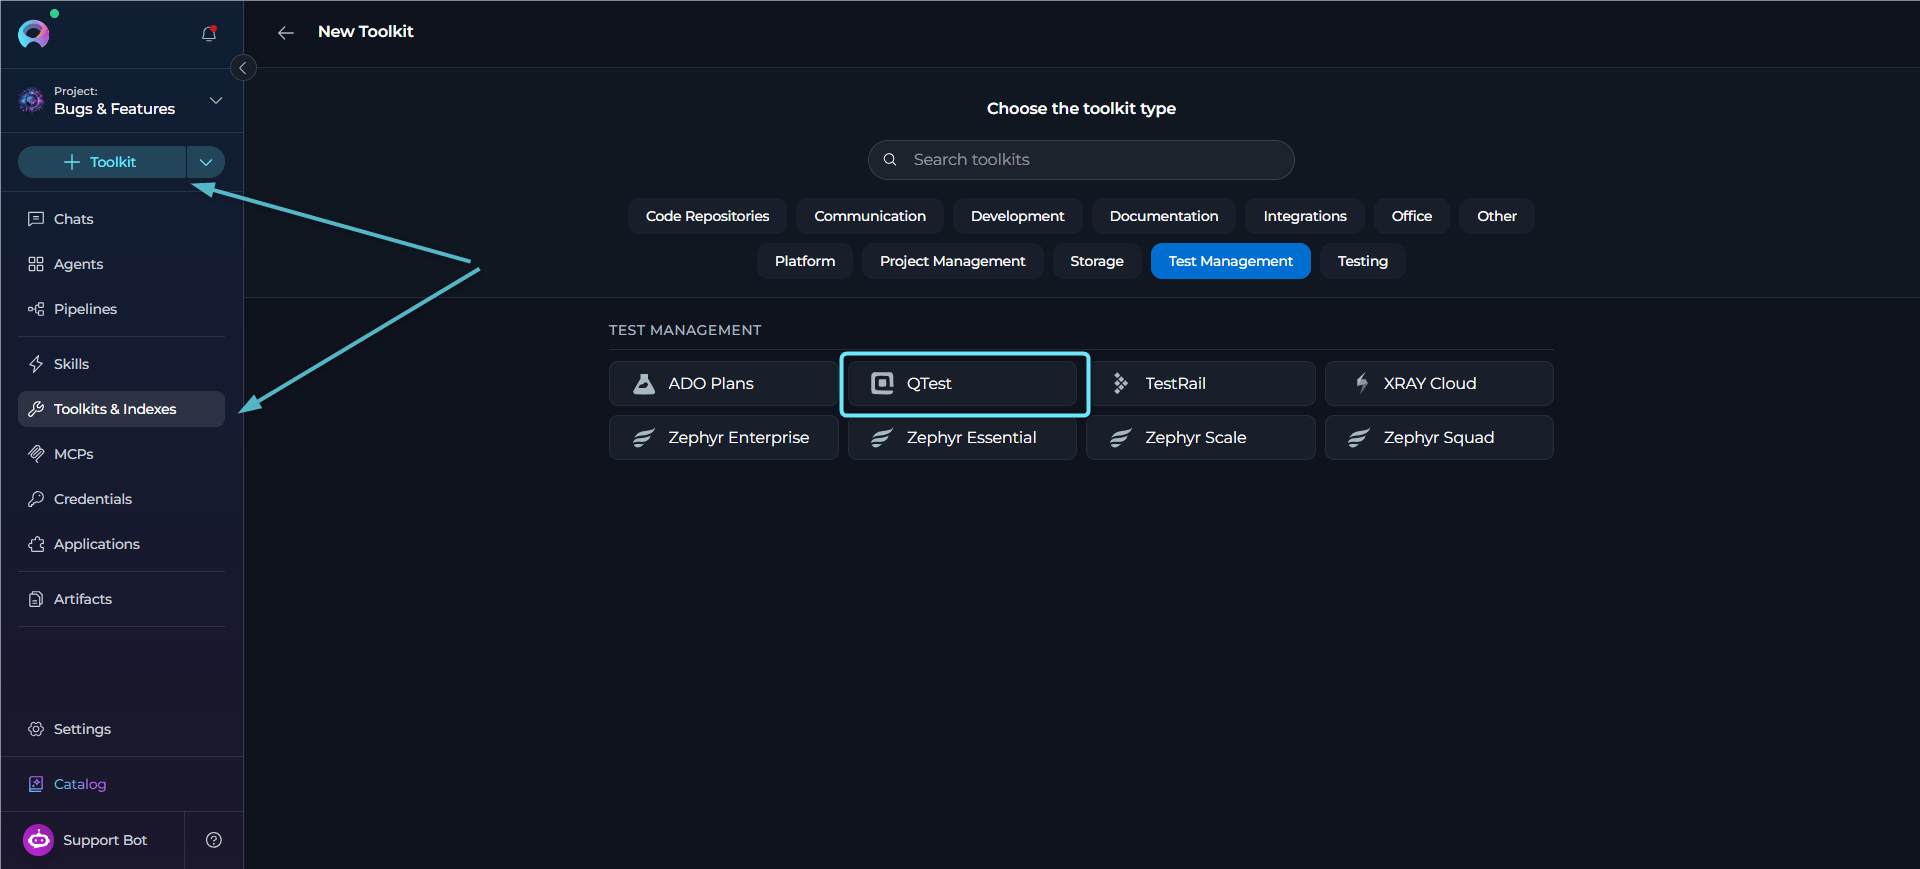
- Go to Toolkits: Open the sidebar and select Toolkits & Indexes.
-
Create new toolkit: Select
+ Toolkit. -
Select qTest: Choose qTest from the list of available toolkit types.
-
Complete the fields:
- Toolkit name: Enter a descriptive name for your toolkit (required). Example: “qTest - Project Testing”
- Description: Provide an optional description to explain the toolkit purpose. Example: “Toolkit for managing test cases and test execution in qTest for Project Alpha”
-
Configure credentials:
- In the Configuration section, select your previously created qTest credential from the Credentials dropdown.
-
Configure advanced options:
- PgVector configuration: Select a PgVector connection for vector database integration.
- Embedding model: Select an embedding model for text processing and semantic search capabilities.
-
Configure qTest settings:
- qTest project ID: Enter the numerical project ID of your qTest project.
- No of tests shown in DQL search: [Required field] Set the maximum number of test cases to retrieve in DQL queries (recommended: 100–200).
-
Turn on desired tools: In the “Tools” section, select the checkboxes next to the specific qTest tools you want to turn on. Turn on only the tools your agents will use to follow the principle of least privilege.
- Make tools available by MCP — (optional) Turn on this option to make the selected tools accessible through external MCP clients.
- Save toolkit: Select Save to create the toolkit.
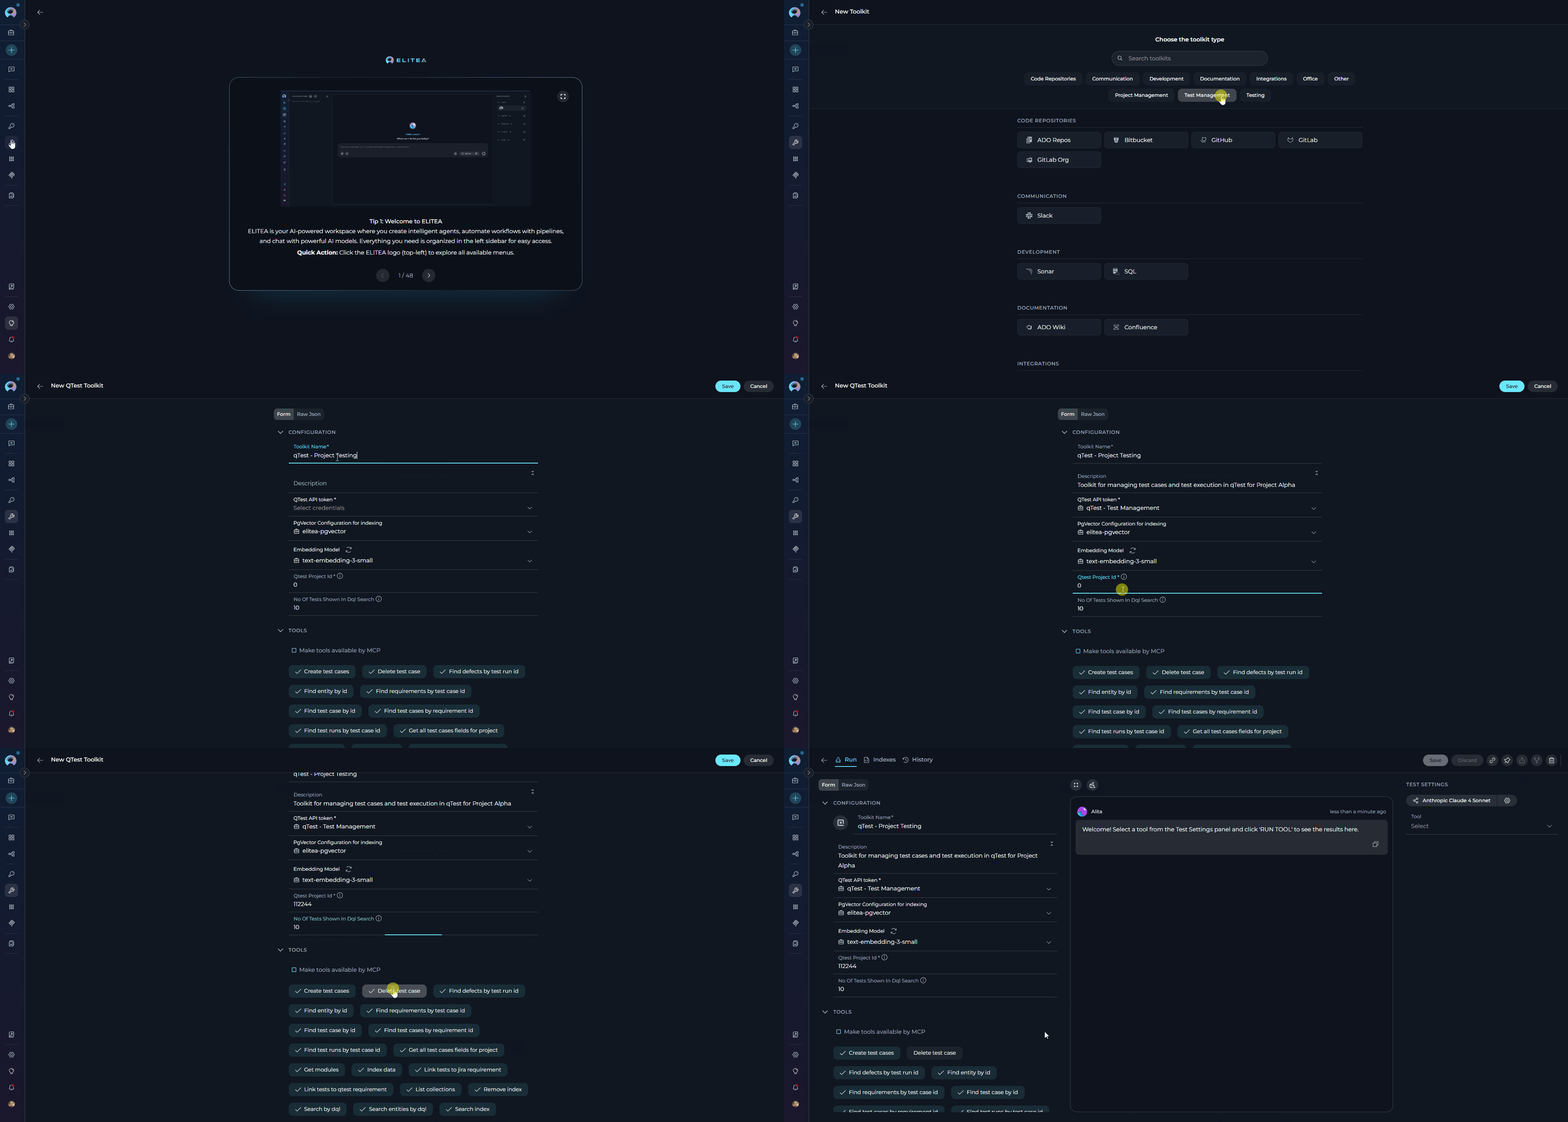
DQL search limit configuration: “No of tests shown in DQL search”
Purpose and usage:- Context management: Prevents LLM context limits from being exceeded when retrieving large datasets
- Performance optimization: Smaller result sets improve query response times and Agent processing speed
- Resource control: Manages the amount of data transferred and processed during DQL operations
- Image handling: Especially important when “Extract images” is turned on, as images significantly increase context size
Available tools
In the table you can see tools for interacting with qTest projects and test cases, organized by functional categories:append_test_stepsisfalse, so full test-step payloads are not fetched unless you request them explicitly.include_external_propertiesisfalse, so external-property payloads are also excluded unless needed.
Test toolkit tools
After configuring your qTest toolkit, you can test individual tools directly from the toolkit detail page using the Test settings panel. This allows you to verify that your credentials are working correctly and validate tool functionality before adding the toolkit to your workflows. General testing steps:- Select LLM model: Choose a Large Language Model from the model dropdown in the Test settings panel.
- Configure model settings: Adjust model parameters like creativity, max completion tokens, and other settings as needed.
- Select a tool: Choose the specific qTest tool you want to test from the available tools.
- Provide input: Enter any required parameters or test queries for the selected tool.
- Run the test: Run the tool and wait for the response.
- Review the response: Analyze the output to verify the tool is working correctly and returning expected results.
Step 3: Add qTest toolkit to your workflows
You can add the configured qTest toolkit to your agents, pipelines, or use it directly in chat.In Agents
- Go to Agents: Open the sidebar and select Agents.
- Create or edit agent: Create a new agent or select an existing agent to edit.
-
Add qTest toolkit:
- In the “TOOLS” section of the agent configuration, select the “+Toolkit” icon.
- Select your configured qTest toolkit from the dropdown list.
- The toolkit will be added to your agent with the previously configured tools turned on.
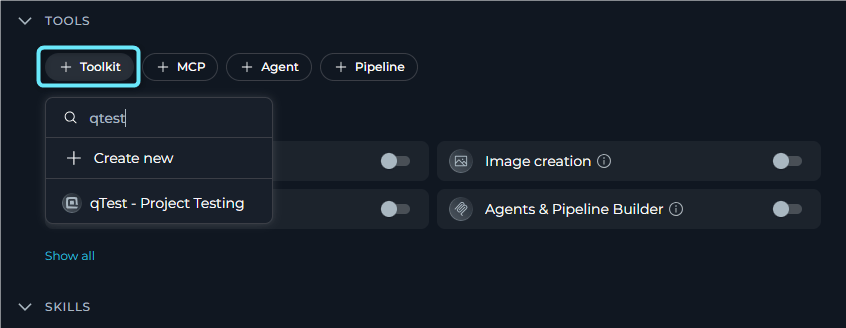
In Pipelines
- Go to Pipelines: Open the sidebar and select Pipelines.
- Create or edit pipeline: Create a new pipeline or select an existing pipeline to edit.
-
Add qTest toolkit:
- In the “TOOLS” section of the pipeline configuration, select the “+Toolkit” icon.
- Select your configured qTest toolkit from the dropdown list.
- The toolkit will be added to your pipeline with the previously configured tools turned on.
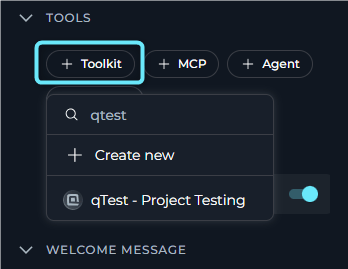
In Chat
- Navigate to Chat: Open the sidebar and select Chat.
- Start New Conversation: Click + Conversation or open an existing conversation.
-
Add qTest Toolkit to Conversation:
- Click the
+icon in the chat input toolbar (tooltip: Add files, agents, toolkits and more…) - Hover over Toolkits in the popup menu.
- Search for your qTest toolkit by name.
- Enable the toolkit to add it to your conversation.
- Click the
- Verify Toolkit Added: The qTest toolkit appears in the PARTICIPANTS panel on the right side under the Toolkits section.
-
Use Toolkit in Chat: You can now directly interact with your qTest projects and test cases by asking questions or requesting actions that will trigger the qTest toolkit tools.
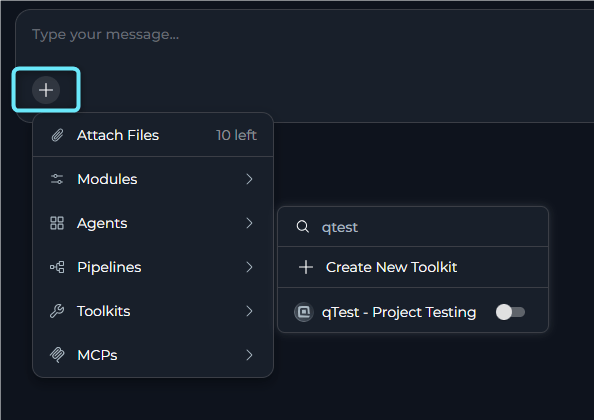
- “Search for all test cases in module ‘Partners pages’ with status ‘Ready for Testing’.”
- “Create a new test case for the login functionality with steps and expected results.”
- “Find test case with ID TC-12345 and show me its details.”
- “Link test cases TC-100, TC-101, and TC-102 to Jira requirement PROJ-456.”
Instructions & Prompts for Using the qTest Toolkit
To instruct your ELITEA Agent to use the qTest toolkit, provide clear and precise instructions in the Agent Instructions field. These instructions guide the Agent on when and how to use the available qTest tools to achieve your automation goals.Instruction creation for Agents
When crafting instructions for the qTest toolkit, clarity and precision are essential. Break down complex tasks into a sequence of simple, actionable steps. Explicitly define all parameters required for each tool and guide the Agent on how to obtain or determine the values for those parameters. Agents respond best to instructions that are:- Direct and action-oriented: Use strong action verbs and clear commands. For example, “Use the ‘search_by_dql’ tool…”, “Create a test case with…”, “Find test case by ID…”.
-
Parameter-centric: List each parameter required by the tool. For each parameter, specify:
- Its name (exactly as expected by the tool)
- The format or type of value expected
- How the Agent should obtain the value — from user input, from previous steps, from an external source, or as a predefined static value
- Contextually rich: Provide enough context so the Agent understands the objective and the specific scenario in which each qTest tool should be applied.
- Step-by-step in structure: Organize instructions into numbered or bulleted steps for complex workflows.
- Inclusive of conversation starters: Include example conversation starters that users can use to trigger each workflow.
- State the goal: Begin by clearly stating the objective for this step.
- Specify the tool: Indicate the specific qTest tool to use.
- Define parameters: List all parameters required by the selected tool.
- Describe expected outcome: Briefly describe the expected result after the tool runs.
- Add conversation starters: Include example conversation starters that users can use to trigger this workflow.
Chat usage examples by tool category
The following examples show how to interact with the qTest toolkit in ELITEA Chat, organized by functional categories. Each example shows the user request and the expected agent behavior.Search & Discovery — Search by DQL
Search & Discovery — Search by DQL
Test Case Management — Create Test Cases
Test Case Management — Create Test Cases
Requirements & Traceability — Link Tests to Jira Requirement
Requirements & Traceability — Link Tests to Jira Requirement
Test Run & Defect Management — Find Defects by Test Run ID
Test Run & Defect Management — Find Defects by Test Run ID
Advanced Search — Search Index
Advanced Search — Search Index
Best Practices & Use Cases for qTest Integration
Best practices for efficient integrationTest integration thoroughly
Test integration thoroughly
- Credentials are correctly configured.
- The API token is valid and not expired.
- All turned-on tools function as expected.
- Responses match your qTest instance data.
Security best practices
Security best practices
- Use API tokens: Always use API tokens instead of passwords for integration.
- Secure storage: Store credentials securely using ELITEA Credentials feature and Secrets Management.
- Least privilege: Turn on only the tools your Agent actually needs.
- Regular audits: Periodically review and rotate API tokens.
- Access control: Ensure proper permissions are set in qTest for the integration account.
Optimize performance
Optimize performance
- DQL search limits: Set appropriate No of tests shown in DQL search limits (100–200 for most cases, 20–50 with images).
- Image extraction: Turn off “Extract images” when visual analysis is not needed to reduce token usage.
- Lightweight defaults: Keep
append_test_stepsandinclude_external_propertiesturned off unless your workflow needs them. - Query specificity: Use specific DQL queries instead of broad searches to minimize data transfer.
- Incremental complexity: Start with simple use cases and gradually increase complexity.
- Monitor usage: Track token usage and adjust settings based on actual needs.
Provide clear agent instructions
Provide clear agent instructions
- Use the prompt examples in this document as templates.
- Adapt instructions to your specific workflows.
- Include conversation starters for user guidance.
- Define clear parameters and expected outcomes.
- Test instructions thoroughly before production deployment.
Use cases for qTest toolkit integration The qTest toolkit opens up a wide range of automation possibilities for test management, QA workflows, and reporting within ELITEA.
Automated test case retrieval for test execution guidance
Automated test case retrieval for test execution guidance
find_test_case_by_id, read_file (if test data is in external files)Example instruction:Dynamic test case creation from requirements or user stories
Dynamic test case creation from requirements or user stories
create_test_casesExample instruction:Automated test case updates based on test feedback or requirements changes
Automated test case updates based on test feedback or requirements changes
update_test_case, read_document (if updates are based on external documents)Example instruction:Manual test run status updates with execution notes
Manual test run status updates with execution notes
update_test_run_statusExample instruction:Attach execution evidence to test runs
Attach execution evidence to test runs
upload_attachment_to_test_runExample instruction:Reporting on test case coverage & status using DQL queries
Reporting on test case coverage & status using DQL queries
search_by_dqlExample instruction:Module-specific test case retrieval with image analysis
Module-specific test case retrieval with image analysis
get_modules, search_by_dql (with Extract images turned on)Example workflow:- “Use the ‘get_modules’ tool to retrieve all available modules and their full names.”
- “Use the ‘search_by_dql’ tool with Extract images turned on to search for test cases using: ‘Module = ‘MD-1 MD-6 Company page’ AND Status = ‘Ready for Testing”. Analyze any embedded images to provide insights on UI testing requirements.”
Troubleshooting
Connection errors
Connection errors
- Verify credentials: Ensure your qTest credentials are correctly configured and the API token is valid.
- Check base URL: Verify the qTest base URL in your credentials matches your instance (e.g.,
https://yourcompany.qtestnet.com). - Verify project ID: Confirm that you have entered the correct project ID for your qTest project.
- Network connectivity: Confirm network connectivity between ELITEA and your qTest instance.
Context & DQL search limit issues
Context & DQL search limit issues
- Issue: The No of tests shown in DQL search field is empty or set to 0.
- Solution: Set a valid number (recommended: 100–200 for most use cases).
- Issue: Large responses when “Extract images” is turned on overwhelm the AI context.
- Root cause: Images significantly increase token usage and context size.
- Solutions:
- Reduce the DQL search limit to 20–50 when images are turned on.
- Turn off “Extract images” if visual analysis is not required.
- Use highly specific DQL queries to target only necessary test cases.
- Focus on single modules or specific test case criteria.
- Monitor token usage and adjust limits accordingly.
- Image-specific considerations:
- Only pasted images in test steps are retrieved (not attachments).
- Multiple images per test case multiply the context impact.
- Custom image description prompts can help optimize token usage.
- Issue: Slow response times or timeouts with high search limits.
- Solution:
- Start with lower limits (50–100) and increase gradually.
- Use targeted DQL queries instead of broad searches.
- Consider pagination for large result sets.
DQL query syntax & module issues
DQL query syntax & module issues
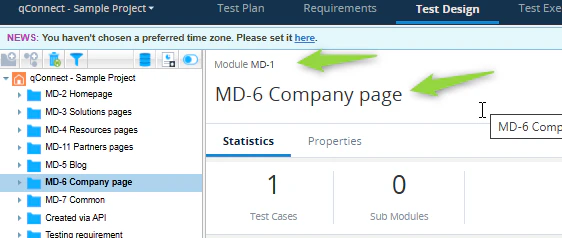
- Use full module names: Always use complete module paths (e.g.,
'MD-1 MD-6 Company page'not just'Company page'). - Get modules first: Use the Get modules tool to retrieve exact module names for your queries.
- Verify DQL syntax: Ensure proper DQL syntax following qTest documentation standards.
No data retrieved from queries
No data retrieved from queries
- Check search limit: Verify No of tests shown in DQL search is set to an appropriate value (greater than 0).
- Test simple query: Start with basic queries like
Project = 'YourProject'. - Verify project ID: Ensure the project ID in the toolkit matches the target project.
- Check permissions: Confirm the API token has read access to the target test cases.
Toolkit configuration issues
Toolkit configuration issues
- Complete required fields: Ensure all mandatory fields are filled in:
- qTest API token (credential selection)
- Project ID (numerical value)
- No of tests shown in DQL search (positive number)
- Credential validation: Test the credential independently before using it in the toolkit.
- Tool selection: Turn on at least one tool for the toolkit to be functional.
Support contact
If you encounter issues not covered here or need additional assistance with qTest integration, see Contact support for information on how to reach the ELITEA Support Team.FAQ
How do I create a qTest toolkit in ELITEA?
How do I create a qTest toolkit in ELITEA?
- First, create qTest credentials in the Credentials menu with your API token and base URL.
- Then, create the toolkit by selecting those credentials and configuring the project ID and DQL search limit.
What is the 'No of tests shown in DQL search' field and why is it required?
What is the 'No of tests shown in DQL search' field and why is it required?
Can I use my regular qTest username and password for the ELITEA integration?
Can I use my regular qTest username and password for the ELITEA integration?
Where do I find the project ID for my qTest project?
Where do I find the project ID for my qTest project?
https://yourcompany.qtestnet.com/p/12345).Why am I getting 'Permission denied' errors?
Why am I getting 'Permission denied' errors?
- API token validity: Ensure the token has not been revoked in qTest.
- qTest account permissions: Verify your account has proper permissions for the target project.
- Correct project ID: Ensure the project ID in toolkit configuration matches your target project.
- Proper credential selection: Confirm you have selected the correct credential in the toolkit.
My DQL queries return no results, but I know test cases exist. What is wrong?
My DQL queries return no results, but I know test cases exist. What is wrong?
Can I use the same qTest credential across multiple toolkits and agents?
Can I use the same qTest credential across multiple toolkits and agents?
What are some best practices for using the qTest toolkit effectively?
What are some best practices for using the qTest toolkit effectively?
- After setting up the qTest toolkit, test each tool you intend to use to ensure connectivity, correct authentication, and accurate execution.
- Regularly monitor the performance of Agents using qTest toolkits to identify any potential issues or areas for optimization.
- Use API tokens for integrations.
- Grant only the minimum necessary permissions (principle of least privilege).
- Store credentials securely using ELITEA Secrets Management feature.
- Craft clear and unambiguous instructions in your ELITEA Agents to guide them in using the qTest toolkit effectively.
- Treat resend as a fresh execution attempt, not as a guaranteed replay of a cached result.
- Verify current qTest state before resending write operations.
- Begin with simpler automation tasks and gradually progress to more complex workflows as you gain experience.
What are common use cases for qTest toolkit integration?
What are common use cases for qTest toolkit integration?
- Quickly retrieve detailed test case steps and expected results for test execution guidance.
- Automatically generate test cases from requirements or user stories to ensure comprehensive test coverage.
- Automatically update test cases based on changing requirements, test feedback, or workflow progress.
- Generate custom reports on test case coverage, execution status, and quality metrics using DQL queries.
- Link test cases to Jira requirements for complete traceability between testing and requirements.
- Analyze test cases with embedded images to understand visual requirements and expected UI behaviors.
- Create and edit agents from canvas — Learn how to create and edit agents directly from chat canvas for rapid prototyping and workflow automation.
- Create and edit toolkits from canvas — Discover how to create and configure qTest toolkits directly from the chat interface for streamlined workflow setup.
- Create and edit pipelines from canvas — Instructions for building and modifying pipelines from chat canvas for automated qTest workflows.
- How to test toolkit tools — Detailed instructions on testing toolkit tools before deploying to production workflows.
- Secrets management — Best practices for securely storing API tokens and sensitive credentials.
- Credentials documentation — Comprehensive documentation for creating and managing credentials in ELITEA.
- Toolkits documentation — Complete reference for toolkit configuration and management.
- Tricentis qTest website — Main product website for qTest information and documentation.
- qTest documentation — Official qTest documentation for features, functionalities, and API.
- qTest API documentation — Official API documentation for developers.
- Tricentis support — Community support, articles, FAQs, and troubleshooting guides.