

Introduction
This guide is your comprehensive resource for integrating and utilizing the Bitbucket toolkit within ELITEA. It provides detailed, step-by-step instructions, from setting up your Bitbucket API Token to configuring the toolkit in ELITEA and effectively using it within your Agents, Pipelines, and Chat conversations. By following this guide, you will unlock the power of automated code management, streamlined development workflows, and enhanced team collaboration, all directly within the ELITEA platform. Brief Overview of Bitbucket Bitbucket, by Atlassian, is a leading web-based platform for version control and code collaboration built around Git. It provides a comprehensive ecosystem for professional teams working on software development projects, offering features for:- Robust Version Control: Leveraging Git, Bitbucket meticulously tracks every change to your code, enabling seamless collaboration, easy rollback to previous states, and a complete history of project evolution.
- Streamlined Code Collaboration: Facilitate effective teamwork with features like pull requests for code review, in-line commenting, and branch-based development workflows, fostering a collaborative coding environment.
- Centralized Repository Management: Provides a secure, reliable platform for hosting and managing your Git repositories, ensuring code availability and integrity.
- Workflow Automation: Integrate with CI/CD pipelines (Bitbucket Pipelines) and other tools to automate building, testing, and deploying your software directly from your repositories.
- Issue Tracking and Project Management: Integrated tools help teams organize tasks, track bugs, and manage projects within the Bitbucket platform.
Toolkit’s Account Setup and Configuration
Account Setup If you don’t already have a Bitbucket account, follow these steps to create one:- Visit Bitbucket: Navigate to bitbucket.org
- Sign Up: Click the “Sign up for Free” button
- Enter Details: Provide your email address (use your company email for professional use), enter your name, and create a secure password
- Verify Email: Check your inbox for a verification email from Bitbucket and click the verification link to activate your account
- Log In: Once verified, log in to Bitbucket with your credentials
Generate an API Token
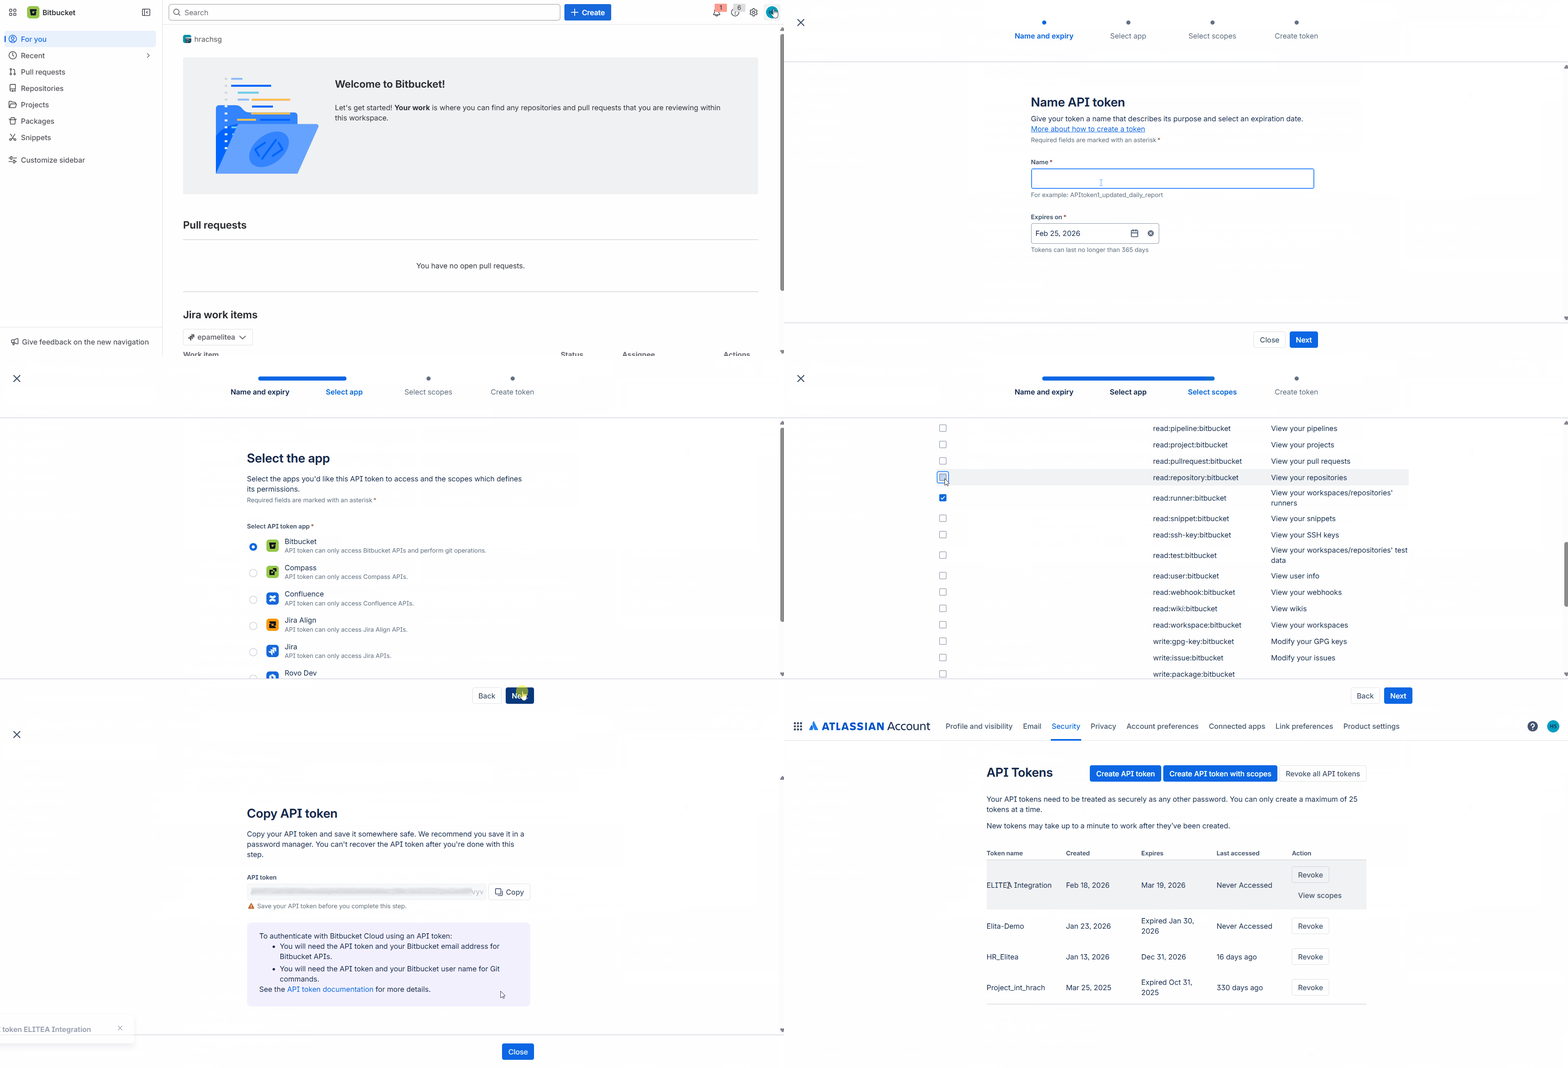
For secure integration with ELITEA, it is essential to use a Bitbucket API Token. This method is significantly more secure than using your primary Bitbucket account password directly and allows you to precisely control the permissions granted to ELITEA. Follow these steps to generate an API Token in Bitbucket:- Log in to Bitbucket: Access your Bitbucket account at bitbucket.org.
- Navigate to Atlassian Account Settings: Click on “Settings” in the top left corner, then select “Atlassian account settings” from the dropdown menu.
- Switch to Security Tab: Click on the “Security” tab in the left sidebar.
- Access API Token Management: Click on “Create and manage API tokens”.
- Create API Token with Scopes: Click the “Create API token with scopes” button.
-
Enter Token Name and Expiration:
- In the “Token name” field, enter a descriptive name like “ELITEA Integration” to easily identify its purpose
- Set the expiration date for the token (recommended for security) or choose “No expiration”
- Click “Next”
-
Select the App:
- From the list of Atlassian products, select “Bitbucket”
- Click “Next”
-
Select Bitbucket Scopes: Carefully select only the necessary scopes for ELITEA to interact with Bitbucket. Following the principle of least privilege is crucial for security.
!!! tip “Token Scopes”
Minimal Scopes for Common Use Cases:
- Account scopes:
- account:read — Read account information
- Project scopes:
- project:read — Read project information
- Repository scopes:
- repository:read — Read repository content
- repository:write — Write to repositories (only if your Agent needs to modify repositories)
- Pull Request scopes:
- pullrequest:read — Read pull requests
- pullrequest:write — Create and modify pull requests (only if needed)
- Issue scopes:
- issue:read — Read issues (only if needed)
- Wiki scopes:
- wiki:read — Read wiki content (only if needed)
- Account scopes:
- Review and Create Token: Review all the token details including name, expiration, app selection, and scopes. Click “Create token” to generate the API token.
-
Copy and Store Token: Copy the generated API Token immediately — this is your only chance to see it. Store it securely in a password manager or ELITEA’s Secrets feature.
System Integration with ELITEA
To integrate Bitbucket with ELITEA, you need to follow a three-step process: Create Credentials → Create Toolkit → Use in Agents. This workflow ensures secure authentication and proper configuration.Step 1: Create Bitbucket Credentials
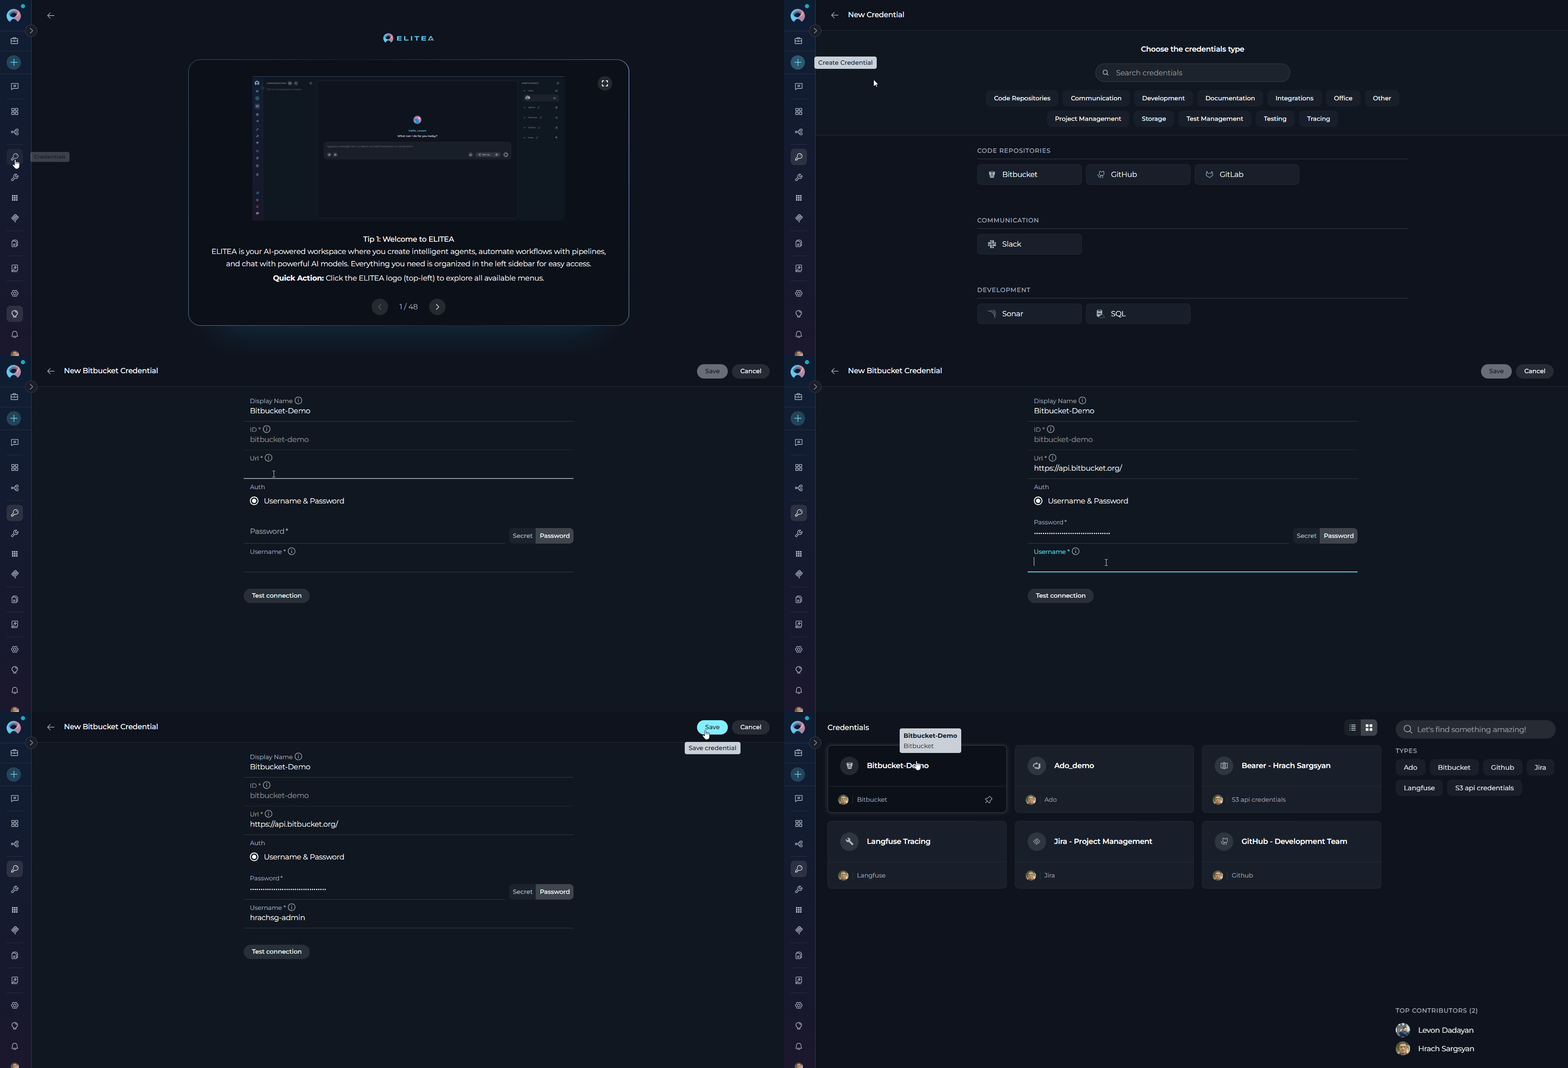
Before creating a toolkit, you must first create Bitbucket credentials in ELITEA:- Navigate to Credentials Menu: Open the sidebar and select Credentials.
-
Create New Credential: Click the
+ Createbutton. - Select Bitbucket: Choose Bitbucket as the credential type.
-
Configure Credential Details:
- Test Connection: Click Test Connection to verify your credentials are valid and ELITEA can connect to Bitbucket
-
Save Credential: Click Save to create the credential
Step 2: Create Bitbucket Toolkit
Once your credentials are configured, create the Bitbucket toolkit:- Navigate to Toolkits Menu: Open the sidebar and select Toolkits.
-
Create New Toolkit: Click the
+ Createbutton. - Select Bitbucket: Choose Bitbucket from the list of available toolkit types.
-
Configure Toolkit Settings:
-
Enable Desired Tools: In the “Tools” section, select the checkboxes next to the specific Bitbucket tools you want to enable. Enable only the tools your agents will actually use
- Make Tools Available by MCP - (optional checkbox) Enable this option to make the selected tools accessible through external MCP clients
- Save Toolkit: Click Save to create the toolkit
Available Tools:
The Bitbucket toolkit provides 23 tools for interacting with Bitbucket repositories, organized into 3 categories as shown in the UI:Testing Toolkit Tools
After configuring your Bitbucket toolkit, you can test individual tools directly from the Toolkit detailed page using the Test Settings panel. This allows you to verify that your credentials are working correctly and validate tool functionality before adding the toolkit to your workflows. General Testing Steps:- Select LLM Model: Choose a Large Language Model from the model dropdown in the Test Settings panel
- Configure Model Settings: Adjust model parameters like Creativity, Max Completion Tokens, and other settings as needed
- Select a Tool: Choose the specific Bitbucket tool you want to test from the available tools
- Provide Input: Enter any required parameters or test queries for the selected tool
- Run the Test: Execute the tool and wait for the response
- Review the Response: Analyze the output to verify the tool is working correctly and returning expected results
Step 3: Add Bitbucket Toolkit to Your Workflows
Now you can add the configured Bitbucket toolkit to your agents, pipelines, or use it directly in chat:In Agents:
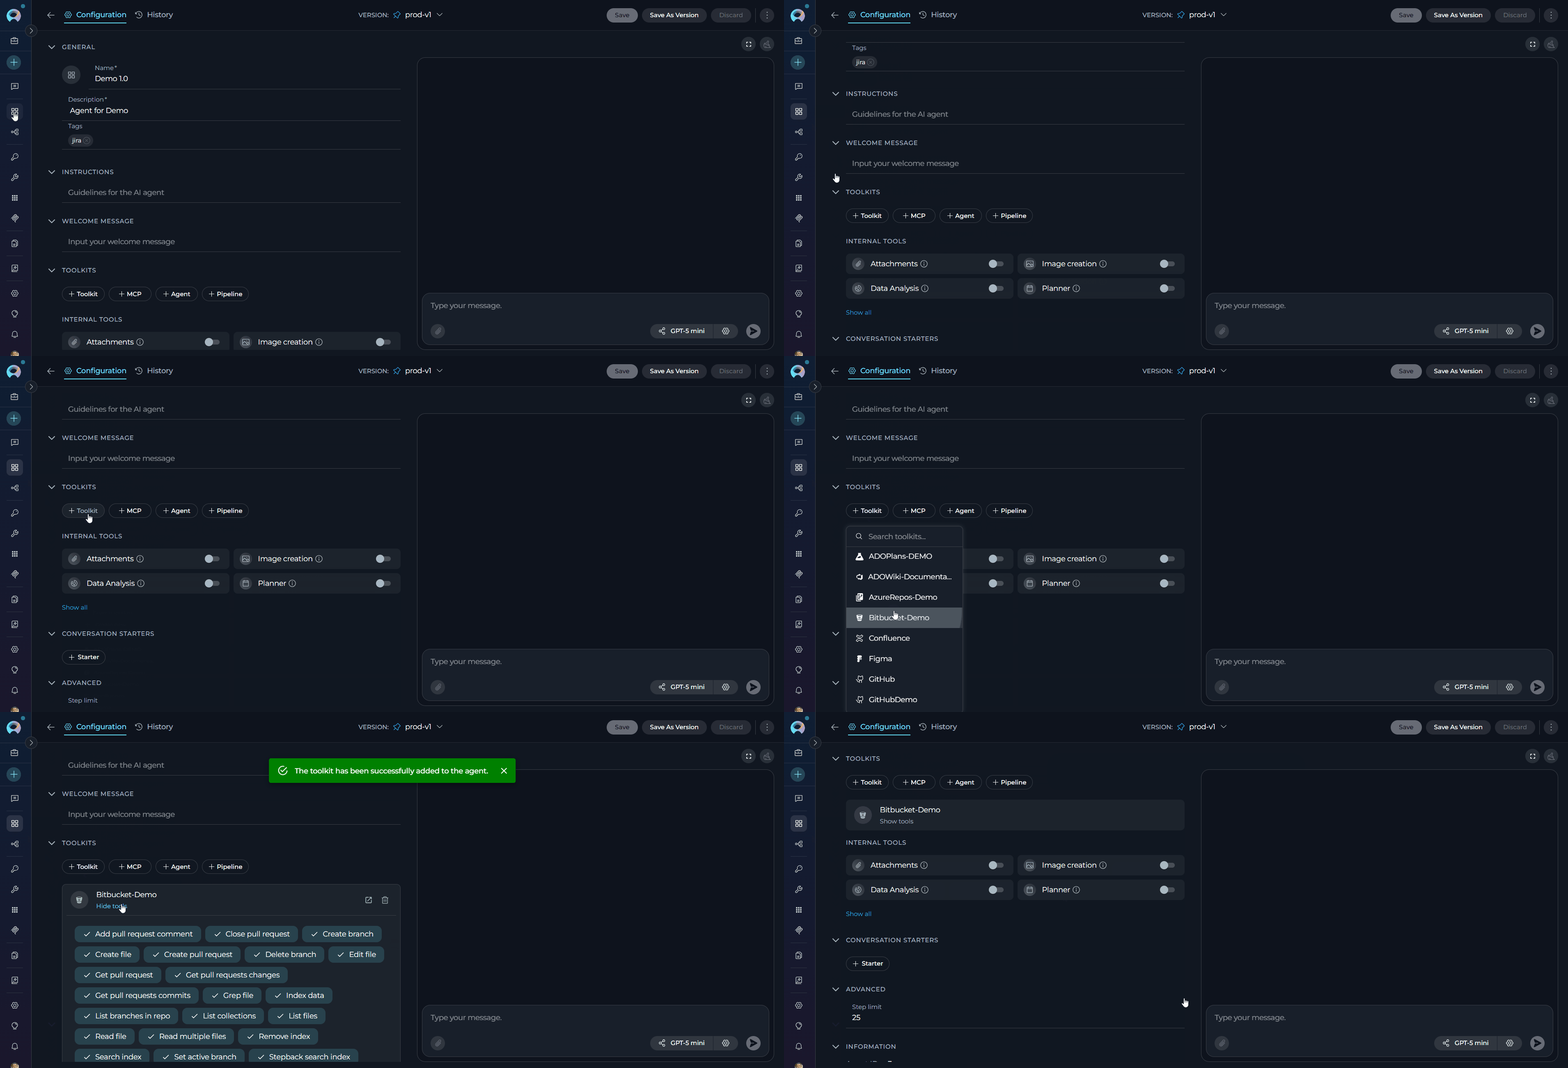
- Navigate to Agents: Open the sidebar and select Agents
- Create or Edit Agent: Either create a new agent or select an existing agent to edit
-
Add Bitbucket Toolkit:
- In the “TOOLKITS” section of the agent configuration, click the “+Toolkit” icon
- Select your desired Bitbucket toolkit from the dropdown menu
- The toolkit will be added to your agent with the previously configured tools enabled
In Pipelines:
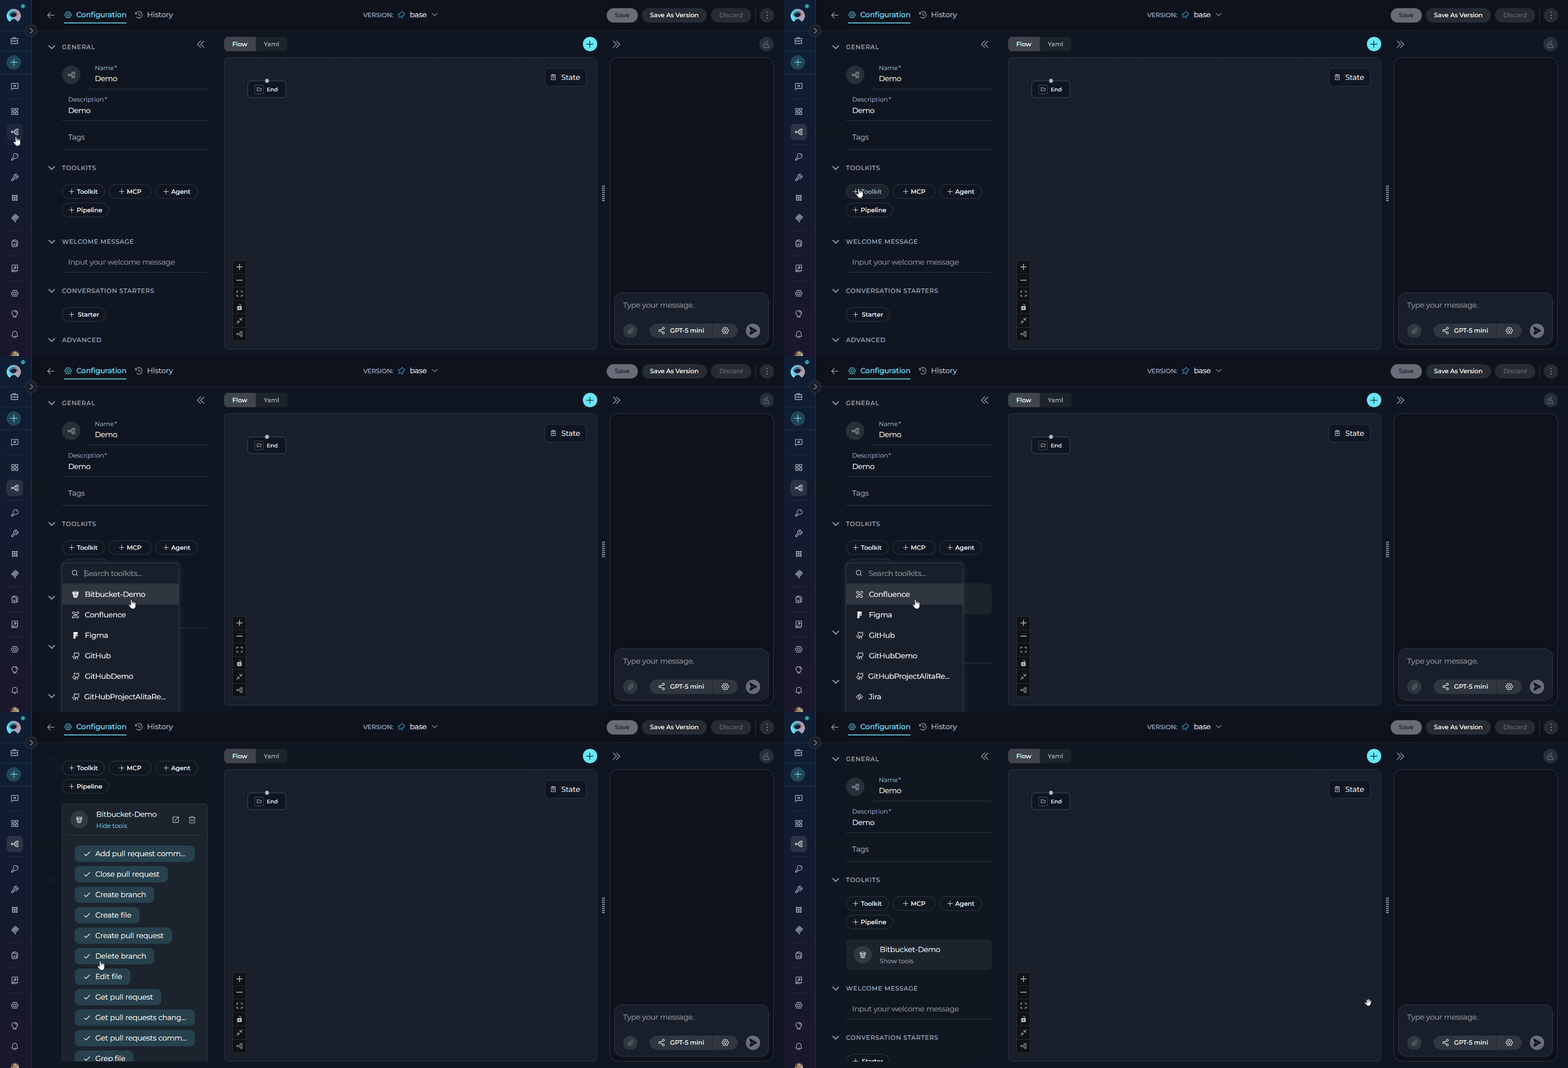
- Navigate to Pipelines: Open the sidebar and select Pipelines
- Create or Edit Pipeline: Either create a new pipeline or select an existing pipeline to edit
-
Add Bitbucket Toolkit:
- In the “TOOLKITS” section of the pipeline configuration, click the “+Toolkit” icon
- Select your desired Bitbucket toolkit from the dropdown menu
- The toolkit will be added to your pipeline with the previously configured tools enabled
In Chat:
- Navigate to Chat: Open the sidebar and select Chat
- Start New Conversation: Click +Create or open an existing conversation
-
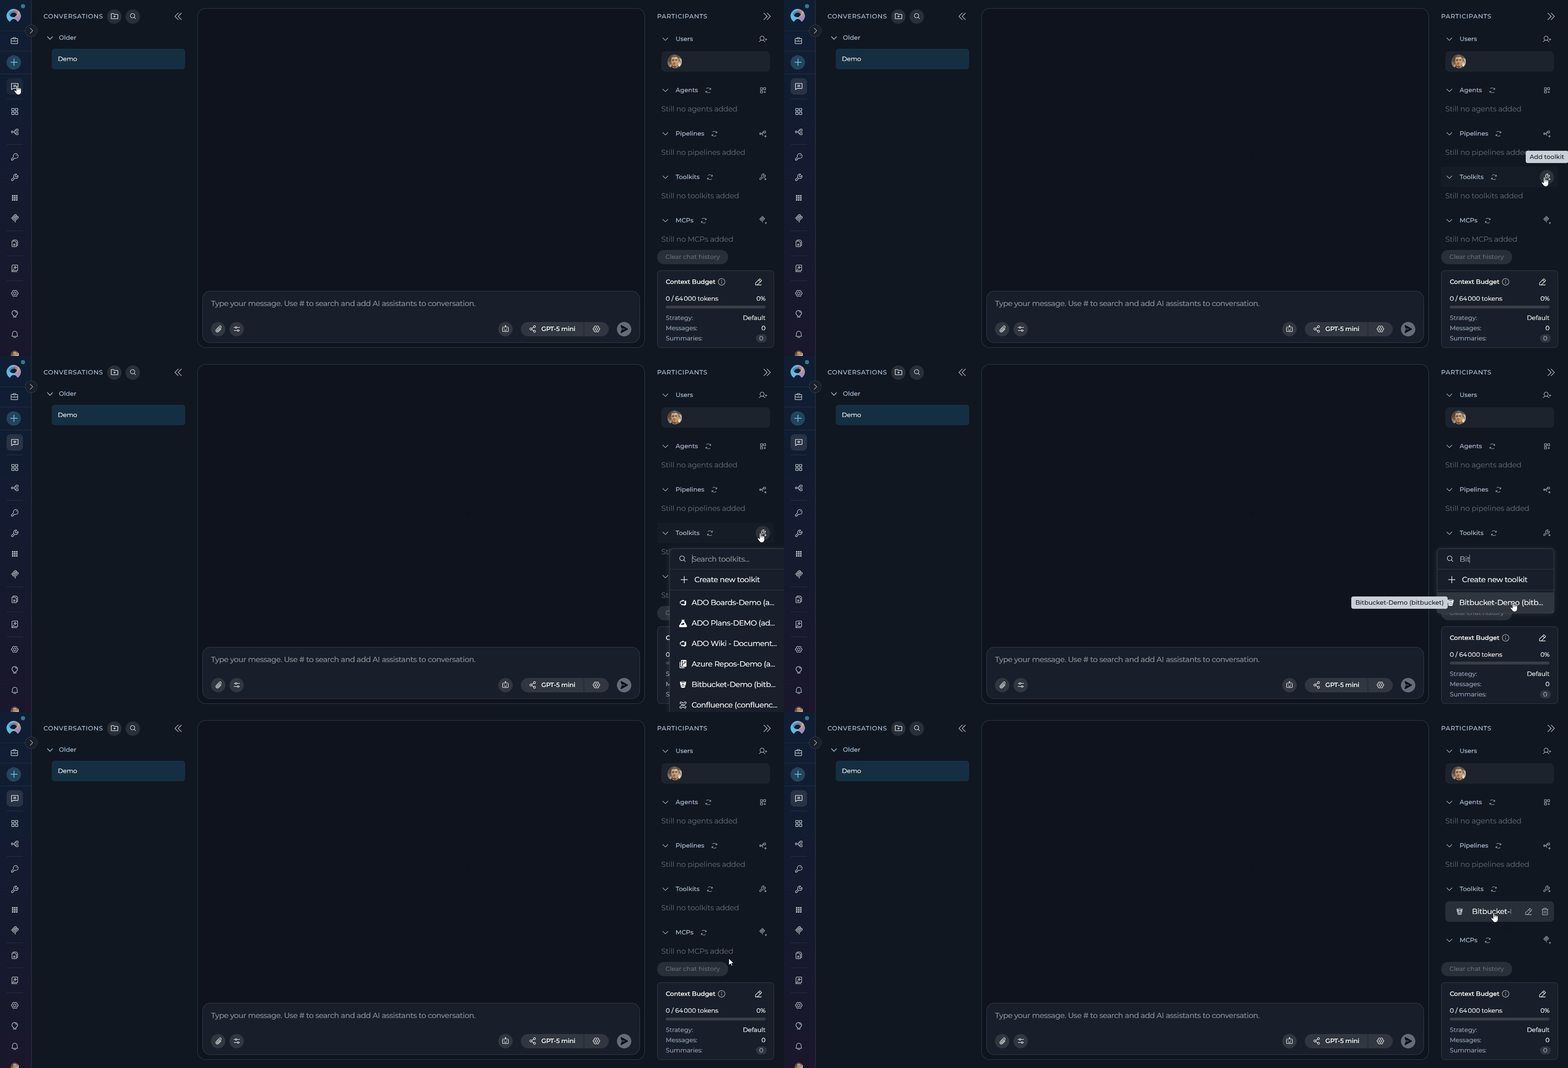
Add Toolkit to Conversation:
- In the chat Participants section, look for the Toolkits element
- Click to add a toolkit and select your desired Bitbucket toolkit from the available options
- The toolkit will be added to your conversation with all previously configured tools enabled
-
Use Toolkit in Chat: You can now directly interact with your Bitbucket repository by asking questions or requesting actions that will trigger the toolkit tools
- “Create a new feature branch called ‘user-authentication’”
- “Show me the contents of the README.md file”
- “List all open pull requests in the repository”
- “Create a new pull request from my feature branch to main”
Instructions and Prompts for Using the Bitbucket Toolkit
To effectively instruct your ELITEA Agent to use the Bitbucket toolkit, you need to provide clear and precise instructions within the Agent’s “Instructions” field. These instructions are crucial for guiding the Agent on when and how to utilize the available Bitbucket tools to achieve your desired automation goals.Instruction Creation for Agents
When crafting instructions for the Bitbucket toolkit, especially for OpenAI-based Agents, clarity and precision are paramount. Break down complex tasks into a sequence of simple, actionable steps. Explicitly define all parameters required for each tool and guide the Agent on how to obtain or determine the values for these parameters. OpenAI Agents respond best to instructions that are:- Direct and Action-Oriented: Employ strong action verbs and clear commands to initiate actions. For example, “Use the ‘read_file’ tool…”, “Create a branch using ‘create_branch’…”, “List all open pull requests…”.
-
Parameter-Centric: Clearly enumerate each parameter required by the tool. For each parameter, specify:
- Its name (exactly as expected by the tool)
- How the Agent should obtain the value — whether from user input, derived from previous steps in the conversation, retrieved from an external source, or a predefined static value
- Contextually Rich: Provide sufficient context so the Agent understands the overarching objective and the specific scenario in which each Bitbucket tool should be applied within the broader workflow. Explain the desired outcome or goal for each tool invocation.
- Step-by-Step Structure: Organize instructions into a numbered or bulleted list of steps for complex workflows. This helps the Agent follow a logical sequence of actions.
- Add Conversation Starters: Include example conversation starters that users can use to trigger this functionality. For example, “Conversation Starters: ‘Create a feature branch’, ‘Show me the README’, ‘List all pull requests’”
- State the Goal: Begin by clearly stating the objective you want to achieve with this step. For example, “Goal: To create a new feature branch in the repository.”
- Specify the Tool: Clearly indicate the specific Bitbucket tool to be used for this step. For example, “Tool: Use the ‘create_branch’ tool.”
-
Define Parameters: Provide a detailed list of all parameters required by the selected tool. For each parameter:
- Parameter Name:
<Parameter Name as defined in tool documentation> - Value or Source:
<Specify the value or how to obtain the value. Examples: "user input", "from previous step", "hardcoded value 'main'", "value of variable X">
- Parameter Name:
- Describe Expected Outcome (Optional but Recommended): Briefly describe the expected result or outcome after the tool is successfully executed. For example, “Outcome: The Agent will display the file content to the user.”
- Add Conversation Starters: Include example conversation starters that users can use to trigger this functionality.
Chat Usage Examples by Tool Category
The following examples demonstrate how to interact with the Bitbucket toolkit in ELITEA Chat, organized by functional categories. Each example shows the user request and the expected agent behavior.Branch Management - Create Branch
Branch Management - Create Branch
Branch Management - List Branches
Branch Management - List Branches
File Operations - Create File
File Operations - Create File
File Operations - Read File
File Operations - Read File
Pull Request Management - Create Pull Request
Pull Request Management - Create Pull Request
Pull Request Management - Add PR Comment
Pull Request Management - Add PR Comment
Troubleshooting
Connection Issues
Connection Issues
- “Cannot connect to Bitbucket at [URL]: connection refused”
- “Connection to Bitbucket at [URL] timed out”
- “SSL certificate verification failed”
- “Bitbucket API endpoint not found”
-
Verify URL Format:
- Cloud: Use
https://api.bitbucket.org/(default) - Server/Data Center: Use your server URL (e.g.,
https://bitbucket.company.com) - Ensure URL starts with
http://orhttps:// - Remove trailing slashes from URL
- Cloud: Use
-
Check Network Connectivity:
- Verify you can access the Bitbucket URL in a browser
- Check firewall settings and proxy configuration
- Ensure the server is not blocking API requests
-
SSL Certificate Issues:
- For self-hosted Bitbucket Server with self-signed certificates, verify SSL setup
- Contact your IT department if certificate validation fails
-
API Endpoint Validation:
- Cloud uses
/2.0/userendpoint for connection testing - Server uses
/rest/api/1.0/users/{username}endpoint - Verify the correct endpoint is accessible
- Cloud uses
Authentication Errors
Authentication Errors
- “Authentication failed: invalid username or password” (401)
- “Access forbidden: check user permissions” (403)
- “not permitted to access this resource”
- “Please, verify you token/password”
-
Verify Credentials:
- Username must match the account that created the API Token
- Ensure API Token is copied correctly without extra spaces
- Check that the API Token hasn’t expired
- Password field cannot be empty
-
API Token Scopes (Cloud):
- Minimum read-only:
account:read,project:read,repository:read - For write operations: add
repository:write - For pull requests: add
pullrequest:write - Verify scopes at: https://bitbucket.org/account/settings/api-tokens/
- Minimum read-only:
-
Permissions Check:
- Ensure the user has access to the workspace/project
- Verify repository access rights (read or write as needed)
- For Server, check if the user has project permissions
-
Token Regeneration:
- If token is compromised or old, generate a new one
- Update the toolkit configuration with the new token
- Delete old tokens for security
Repository Access Issues
Repository Access Issues
- “Unable to connect to the repository ‘[name]’ due to error”
- “Error branch
[name]does not exist, in repo with current branches: [list]” - “Branch ‘[name]’ does not exist in the repository”
-
Workspace/Project Configuration:
- Cloud: Use workspace slug (e.g.,
my-workspace) - Server: Use project key (e.g.,
PROJ) - Verify case sensitivity - names must match exactly
- Cloud: Use workspace slug (e.g.,
-
Repository Name:
- Use repository slug, not display name
- Check spelling and case sensitivity
- Example:
my-reponotMy Repo
-
Branch Name Validation:
- Branch names are case-sensitive
- Use
list_branches_in_repotool to see all available branches - For branches with slashes (e.g.,
feature/login), ensure correct encoding - Set correct branch using
set_active_branchtool
-
Access Rights:
- Verify the user has at least read access to the repository
- Check repository visibility settings (private vs public)
- Ensure workspace/project membership is active
Branch Operation Failures
Branch Operation Failures
- “Branch [name] already exists. set it as active”
- “Cannot delete branch ‘[name]’. Deletion of main or master branches is forbidden”
- “Branch ‘[name]’ cannot be deleted because it is currently the active branch”
- “Failed to validate branch ‘[name]’”
-
Branch Creation Issues:
- If branch already exists, it will be set as active automatically
- Ensure active branch is set correctly before creating from it
- Verify you have write permissions to create branches
-
Branch Deletion Protection:
- Cannot delete:
mainormasterbranches (safety feature) - Cannot delete: Currently active branch
- Switch to a different branch before deleting
- Use
set_active_branchto switch context first
- Cannot delete:
-
Branch Switching:
- Verify branch exists before switching to it
- Check branch name spelling and case sensitivity
- Review list of available branches if unsure
File Operation Failures
File Operation Failures
- “File was not created due to error: [details]”
- “Can’t extract file content (
[path]) due to error” - “File ‘[path]’ from branch ‘[branch]’ is empty or could not be retrieved”
- “Failed to retrieve text from file ‘[path]’ from branch ‘[branch]’”
- “File was not updated due to error: [details]”
-
File Path Format:
- Use relative paths from repository root
- Correct:
src/config.jsonorREADME.md - Incorrect:
/src/config.json(no leading slash) - Avoid special characters in file names
-
Active Branch:
- Ensure active branch is set correctly using
set_active_branch - Verify the branch exists using
list_branches_in_repo - File operations use the currently active branch by default
- Ensure active branch is set correctly using
-
Write Permissions:
- Check API Token has
repository:writescope - Verify user has write access to the repository
- Branch protection rules may prevent direct commits
- Check API Token has
-
Update File Format:
- Use OLD/NEW markers on dedicated lines:
- Markers must be on their own lines, not inline with content
- Multiple OLD/NEW pairs are supported for multiple edits
- Use OLD/NEW markers on dedicated lines:
-
Empty File Handling:
- Some tools may fail on empty files
- Verify file exists before reading
- Check file is not binary or too large
Pull Request Issues
Pull Request Issues
- “Make sure your pr_json matches to data json format”
- “Bad request” error when creating PR
- “Can’t get pull request
[id]due to error” - “Can’t add comment to pull request
[id]due to error”
-
PR Creation Format:
- Use correct JSON format for
create_pull_request - Verify source and target branches exist
- Ensure you have
pullrequest:writescope (Cloud)
- Use correct JSON format for
-
PR Access:
- Verify pull request ID is correct
- Check user has access to view the PR
- Ensure PR exists and hasn’t been deleted
-
Comment Format:
- Content can be string (raw text) or dict with ‘raw’, ‘markup’, ‘html’ keys
- For inline comments, provide line numbers and file path
- Verify PR is open and accepting comments
Indexing and Search Issues
Indexing and Search Issues
-
PgVector Configuration:
- Ensure PgVector Configuration is set in toolkit settings
- Verify PgVector database is accessible and running
- Check connection credentials for PgVector
-
Embedding Model:
- Embedding Model must be specified in toolkit configuration
- Common models:
amazon.titan-embed-text-v2:0,text-embedding-ada-002 - Verify model is available in your environment
-
Index Operations:
- Index must be created before searching (
index_datatool) - Use
list_collectionsto verify index exists - Remove and recreate index if data is stale
- Index must be created before searching (
-
Search Queries:
- Use natural language for semantic search
- Be specific in queries for better results
- Try stepback search for broader context
Support Contact
If you encounter issues not covered in this guide or need additional assistance with Bitbucket integration, please refer to Contact Support for detailed information on how to reach the ELITEA Support Team.FAQ
Can I use my regular Bitbucket password instead of an API Token?
Can I use my regular Bitbucket password instead of an API Token?
- More secure than passwords
- Granular permission control through scopes
- Can be revoked without changing password
- Activity tracking and audit capabilities
- No need to share actual account password
What are the minimum scopes needed for the API Token?
What are the minimum scopes needed for the API Token?
account:read— Read account informationproject:read— Read project/workspace datarepository:read— Read repository content
repository:write— Create/modify files and branchespullrequest:write— Create and manage pull requests
- Basic file reading:
account:read,repository:read - Code changes: Add
repository:write - PR workflows: Add
pullrequest:write - Full automation: All scopes above
What happened to App Passwords?
What happened to App Passwords?
- September 9, 2025: App Passwords deprecated, new tokens use API Token system
- June 9, 2026: All existing App Passwords will be disabled
- Go to https://bitbucket.org/account/settings/api-tokens/
- Create new API Token with appropriate scopes
- Update your toolkit configuration with the new token
- Delete old App Passwords for security
- Better security with scope-based permissions
- Improved audit and activity tracking
- Alignment with modern authentication standards
Can I use this toolkit with Bitbucket Server or Data Center?
Can I use this toolkit with Bitbucket Server or Data Center?
- URL:
https://api.bitbucket.org/(default) - Cloud checkbox: ✔️ Checked (or auto-detected)
- Project: Workspace slug (e.g.,
my-workspace) - Authentication: API Token with scopes
- API: REST API v2.0 endpoints
- URL: Your server URL (e.g.,
https://bitbucket.company.com) - Cloud checkbox: ✘ Unchecked
- Project: Project key (e.g.,
PROJ) - Authentication: Username and password/token
- API: REST API v1.0 endpoints
How do I know which branch is currently active?
How do I know which branch is currently active?
- Initial Setup: Branch specified in toolkit configuration (default:
main) - During Operations: Last branch set using
set_active_branchtool - After Branch Creation: Newly created branch automatically becomes active
- Always verify active branch before file operations using
set_active_branch - Use
list_branches_in_repoto see all available branches - The agent maintains branch context throughout the conversation
- File operations default to the active branch unless specified otherwise
Why can't my Agent create pull requests?
Why can't my Agent create pull requests?
- Bitbucket Cloud: Ensure API Token has
pullrequest:writescope - Bitbucket Server: Verify user has write access to target repository
- Verify source branch exists and has commits
- Ensure target branch exists (usually
mainordevelop) - Check both branches are in the same repository
- Source branch must have changes not in target branch
- Pull request requires JSON data with title, description, source, and destination
- Ensure JSON format matches Bitbucket API requirements
- Check for syntax errors in the JSON data
- Some repositories may have branch protection rules
- Pull requests might require approvals or checks
- Verify user is not restricted from creating PRs
Can I use this toolkit with multiple repositories?
Can I use this toolkit with multiple repositories?
-
Create Multiple Toolkit Configurations:
- Create separate toolkit for each repository
- Use descriptive names (e.g., “Bitbucket - Frontend”, “Bitbucket - Backend”)
- Each can use the same credentials but different repository settings
-
Agent Configuration:
- Add all needed toolkits to your agent
- Agent can access all repositories through their respective toolkits
- Specify toolkit name when needed for clarity
-
Best Practices:
- Use naming convention to identify repository purpose
- Share credentials across toolkits if accessing same workspace
- Consider separate embeddings for each repo when indexing
What's the difference between 'edit_file' and 'update_file' tools?
What's the difference between 'edit_file' and 'update_file' tools?
- Use OLD/NEW marker format for content replacement
- Support multiple edits in single operation
- Validate changes before applying
- Require markers on dedicated lines
- Markers must be on their own lines (not inline)
- Multiple OLD/NEW pairs supported
- Validates that old content exists before replacement
- Provides detailed error messages if markers are malformed
- Both tools are functionally equivalent for file updates
How do I handle branch names with special characters or slashes?
How do I handle branch names with special characters or slashes?
- Branch names like
feature/login-pageare URL-encoded internally - Use the full branch name as-is when calling tools
- No manual encoding required from your side
- Use forward slashes for hierarchical naming:
feature/,bugfix/,release/ - Avoid special characters:
@,#,$,&,* - Use hyphens instead of spaces:
feature-loginnotfeature login - Keep branch names descriptive but concise
Can I use this toolkit for repository indexing and semantic search?
Can I use this toolkit for repository indexing and semantic search?
- PgVector Configuration: Must be set up and accessible
- Embedding Model: Specified in toolkit configuration
- Index Creation: Use
index_datatool to create searchable index
- Index data: Load repository into vector database
- Search index: Find code using natural language queries
- Stepback search: Advanced contextual search with broader scope
- Stepback summary: Generate intelligent summaries of code
- List collections: View available indexed repositories
- Remove index: Clean up or refresh indexes
- Find similar code patterns across large repositories
- Discover implementations of specific features
- Generate documentation from code
- Analyze code structure and dependencies
- Search using natural language instead of exact keywords
What file operations are supported and are there any size limits?
What file operations are supported and are there any size limits?
- Read:
read_file,read_multiple_files,read_file_chunk - Write:
create_file,update_file,edit_file - Search:
grep_file(pattern search within files) - List:
list_files(with recursive/non-recursive options)
- Text Files: Full support for all text-based files
- Binary Files: Limited support, may cause issues
- Empty Files: Can be created but read operations may fail
- Large Files: No explicit size limit, but consider performance
- Use
read_file_chunkfor partial reads of large files - Use
read_multiple_filesfor efficiency when reading several files - Avoid operations on binary files (images, executables, etc.)
- For very large files, consider using grep instead of full reads
- No direct file deletion tool (use update with empty content if needed)
- No file move/rename operation (create new + delete old)
- File paths must be relative to repository root
- Create and Edit Agents from Canvas — Quick agent creation for Bitbucket automation
- Create and Edit Toolkits from Canvas — Streamline Bitbucket toolkit configuration
- Create and Edit Pipelines from Canvas — Build automated Bitbucket workflows
- Indexing Overview — Enable semantic search across Bitbucket repositories
- Index Repo Data — Instructions for indexing repository content (applicable to Bitbucket)
- Bitbucket Website — Access the main Bitbucket platform
- Bitbucket API Tokens Settings — Create and manage API tokens
- Bitbucket REST API Documentation — Official API reference
- Bitbucket Cloud Documentation — Comprehensive Bitbucket guides
- ELITEA Support — Contact support team for assistance