Introduction to Chat Functionality
A Conversation in ELITEA represents a dynamic dialogue involving multiple participants. These can include language models (LLMs), Agents, Pipelines, Toolkits, MCPs, and human Users like yourself. You interact using natural language, and the chat maintains context, allowing you to refer to previous messages within the same conversation. Conversations are isolated; context is not shared between different conversations. All your conversations are securely stored on the ELITEA server, making them accessible from any device where you log in. You can find all your conversations listed under the Chat menu in the sidebar. Key FeaturesPublic & Private Conversations
Control visibility and collaboration by sharing conversations or keeping them private.
Diverse Participants
Integrate Models, Agents, Pipelines, Toolkits, MCPs, and other Users (in public conversations).
Canvas Editor
Edit and refine AI-generated code, tables, diagrams, and DOCX files with built-in tools.
File Attachments
Upload and attach images and files for AI analysis and processing.
Internal Tools
Execute Python code, plan tasks, analyze data, create images, and more — no external integrations needed.
Rich Interactions
Engage with participants, copy responses, provide feedback, and regenerate outputs.
Conversation Management
Save, pin, share, delete, and organize conversations into folders.
Playback Mode
Simulate and review conversation flows without engaging live models — ideal for demos.
Getting Started
Creating a New Conversation
- In the main sidebar on the left, locate the Chat section.
- Click the + Conversation button at the top of the sidebar.
- The chat input field appears and is highlighted to focus your attention.
- You’ll see a welcome screen with the message “Hello, [Your Name]! What can I do for you today?”
- The message input box at the bottom shows the placeholder: “Type your message. Use # to search and add AI assistants to conversation.”
- Choose your approach:
- Add a participant first: Type
#to search and select an Agent, Pipeline, Toolkit, or MCP from the dropdown list that appears. Selected participants will appear as chips above the input box. - Select a model: Click the model selector dropdown to choose an LLM (e.g., GPT-4, Claude).
- Add a participant first: Type
- Type your message: Enter your initial message, question, or command (e.g., “Help me write a Python script”, “What are the best practices for API design?”, “Explain quantum computing”).
- Send: Click the Send icon (paper airplane icon) or press Enter.
- The new conversation is created and appears in the CONVERSATIONS sidebar on the left.
- The conversation name is automatically generated based on your message content. During name generation (1-2 seconds), you’ll see a loader icon with “Naming” text next to the conversation item. You can manually rename it at any time after generation completes.
Creating a New Folder
Organize your conversations by grouping them into folders.- In the Conversations sidebar, locate the folder icon button next to “Conversations” at the top.
- Click the folder icon (Create folder button).
- A new folder entry will appear. Enter a descriptive Name for your folder.
- Press Enter or click the checkmark to save.
Managing Conversations
Moving Conversations to Folders
To organize conversations into folders: Method 1: Drag and Drop- In the CONVERSATIONS sidebar, click and hold on the conversation you wish to move.
- Drag the conversation over the destination folder.
- Release to drop the conversation into the folder.
- In the CONVERSATIONS sidebar, right-click on the conversation you wish to move.
- Select Move to from the context menu.
- Choose the desired destination folder from the list, OR
- Select Create folder to create a new folder and move the conversation into it simultaneously.
- To move a conversation back to the main list, select Back to the list from the Move to menu.
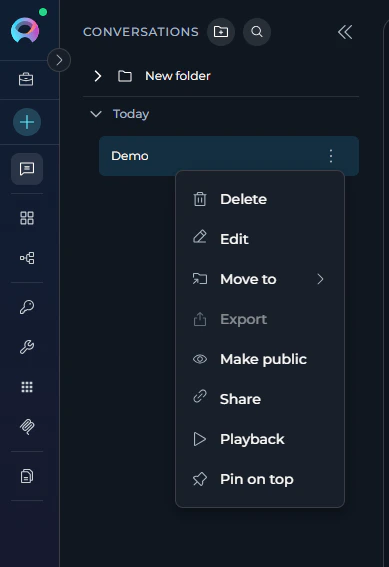
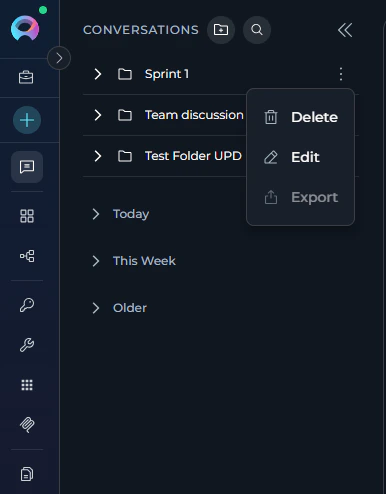
Conversation Actions (Sidebar)
You can manage conversations directly from the CONVERSATIONS sidebar by right-clicking on a conversation or clicking the options menu (often …) associated with it. The following actions are available:- Edit: Rename the conversation. Enter the new name and confirm.
- Pin / Unpin: Select Pin to keep the conversation at the top of the list for easy access. Select Unpin on a pinned conversation to remove it from the top.
- Move To: Move the conversation into a folder, as described above.
- Make Public: Convert a private conversation into a public one, visible to other project members.
Caution: This action is irreversible; you cannot make a public conversation private again. - Share: To share a conversation with team members, select Share from the conversation contextual menu. This action copies a direct link to the conversation to your clipboard. Team members can use this link to access and view the conversation. (
available for team project) - Delete: Permanently remove the conversation. You will be asked to confirm this action.
- Playback: Enter Playback mode for this conversation (See Playback Mode).
Sharing Conversations
The conversation sharing feature allows you to share conversations with team members by providing them with a direct link. This is particularly useful for collaboration, code reviews, troubleshooting, and knowledge sharing within your team. How Conversation Sharing Works When you share a conversation, ELITEA generates a unique URL that includes the conversation ID, name, and a special parameter that identifies it as a shared conversation. Team members who receive this link can access and view the complete conversation history in their browser. How to Share a Conversation- Navigate to the CONVERSATIONS sidebar in the Chat section.
- Locate the conversation you want to share.
- Hover over the conversation to reveal the contextual menu.
- Select Share from the menu options.
- The conversation link is automatically copied to your clipboard.
- You will see a notification: “The link has been copied to the clipboard.”
- Paste the link in your communication channel (email, Slack, Teams, etc.) to share it with team members.
- Collaboration: Share conversations to involve team members in ongoing discussions or problem-solving sessions
- Code Reviews: Share conversations containing code generation or refactoring for peer review
- Troubleshooting: Share error discussions with technical support or senior team members
- Knowledge Transfer: Share valuable conversations as learning resources for team members
- Documentation: Share conversations that demonstrate best practices or solutions to common problems
- Demos and Presentations: Share conversations to demonstrate ELITEA capabilities or AI-assisted workflows
- The link opens in their browser
- ELITEA automatically navigates to the specified conversation
- The conversation opens with the complete history visible
- The recipient can read the entire conversation thread
- Depending on their permissions, they may be able to interact with or continue the conversation
If a user doesn’t have access or permissions to the shared conversation (i.e., the conversation is not public and the user is not added as a participant), clicking the shared link will navigate them to the chat interface, but they will not be able to view the conversation content. This is the expected behavior to maintain conversation privacy and security.
Managing Folders
Folder Actions (Sidebar)
Folders can be managed directly from the CONVERSATIONS sidebar. Right-click on a folder or click its associated options menu (…) to access the following actions:- Edit Folder: Rename the folder. Enter the new name and click the checkmark (✔) or Save button.
- Delete Folder: Remove the folder.
Important: Deleting a folder does not delete the conversations inside it. Conversations within a deleted folder are automatically moved back to the main conversation list (root level). You will be asked to confirm deletion.
Understanding Conversation/Folder Visibility
ELITEA has two project types — Private and Team. Visibility and access rules for conversations and folders depend on which type you’re working in.- Private Project
- Team Project
Conversations and folders in a private project are personal to you only.
View collaboration scenario
View collaboration scenario
Scenario: The QA, PM, and BA team collaborate on a new file upload feature using a shared team project conversation.Steps:
-
BA adds requirements:
-
PM sets the timeline:
-
QA plans testing:
-
BA clarifies:
-
PM tracks progress:
- Use
@mentions to notify specific teammates in a conversation. - Group related conversations into folders for better navigation.
- Define roles, responsibilities, and deadlines directly in the chat.
- Regularly post progress updates and flag blockers in the conversation.
Working with Participants
Participants are the core components you interact with within a conversation.What are Participants?
Participants are the “tools” or “entities” you add to your chat:Models
Large Language Models (e.g., GPT-4, Claude) for generating text and answering questions.
Agents
Pre-configured automated workflows or specialized bots designed for specific tasks.
Pipelines
Multi-step automated processes that orchestrate multiple agents and tools.
Toolkits
Collections of tools and integrations (e.g., GitHub, Jira, Confluence) that extend chat capabilities.
MCPs
Model Context Protocol servers for external tool capabilities (e.g., Playwright, Figma).
Users
In public conversations, other project members who join or interact become participants.
Adding Participants to a Conversation
- # Symbol
- / Toolkit Tool Mention
- In the chat input toolbar, click the
+icon. - Hover over the relevant category (Agents, Pipelines, Toolkits, or MCPs).
- A flyout submenu appears listing available participants of that type.
- Select an existing item from the list, or click Create New at the bottom to create one inline.
- The participant is added and appears in the PARTICIPANTS panel on the right.
Creating New Participants from Chat
You can create new participants directly from the chat interface:- Click the
+icon in the input toolbar. - Hover over the relevant category (Agents, Pipelines, Toolkits, or MCPs).
- Click the Create New option at the bottom of the submenu.
- The corresponding Canvas editor opens inline.
- Agents: See How to Create and Edit Agents from Canvas.
- Pipelines: See How to Create and Edit Pipelines from Canvas.
- Toolkits: See How to Create and Edit Toolkits from Canvas.
- MCPs: See How to Create and Edit MCPs from Canvas.
Adding Users to a Conversation
Users (team members) can only be added to in team projects. They cannot be added to private conversations. To Add Users:- In the chat input toolbar, click the
+icon. - Select Invite Users from the popup menu.
- The Add users modal will appear with a search bar.
- Use the search bar to find teammates by name.
- Select one or more users from the list by clicking on them.
- Click Add to confirm. The selected users will appear in the Users section of the PARTICIPANTS panel.
- Added users will receive notifications about being added to the conversation.
- Users can also join a public conversation implicitly by interacting with it.
- Once a conversation is public, it cannot be converted back to private.

Using Participants in a Conversation
Once added, participants are ready to process your messages:- Check Participants: Ensure the desired participant is listed in the Participants section.
- Select Active Participant(s):
- Click: Click the participant’s name/icon in the Participants list to make it active for your next message.
- Mention Users (Team Projects only): You can mention other team members using
@followed by their name (e.g.,@John Doe). This notifies them and brings their attention to specific parts of the conversation. - Send Message/Command: Type your message or a simple command (like “Go”, “Execute”, “Run it”) and press Send. The active participant(s) will process your input.
Example Usage
Example Usage
-
To ask a general question using a specific model:
- Select a model from the model selector dropdown (e.g.,
GPT-4o). - Type:
"Explain the concept of recursion in programming."-> Send.
- Select a model from the model selector dropdown (e.g.,
-
To use a specific agent:
- Click the
+icon in the input toolbar and hover over Agents. - Select
Data Analysis Agentfrom the submenu, or type#Data Analysis Agentin the input box. - Type your request:
"Analyze the latest sales data."-> Send.
- Click the
-
To use a toolkit:
- Click the
+icon and hover over Toolkits. Select the desired toolkit (e.g.,Artifact Toolkit). - Type:
"Store this data in artifacts."-> Send.
- Click the
-
To mention a team member (Team Projects only):
- In your message, type
@followed by the team member’s name (e.g.,@John Doe). - Type:
"@John Doe, can you review this analysis?"-> Send.
- In your message, type
Selecting and Configuring Models
Selecting a Model:- Click the model selector dropdown at the bottom of the chat.
- Select a desired LLM model from the available options (e.g., GPT-4o, GPT-5.1, Claude).
- The selected model name is displayed on the button. Models that support image analysis or reasoning show small capability icons next to their name in the dropdown.
- Reasoning Models (e.g. GPT-5.1)
- Standard Models (e.g. GPT-4o)
| Badge | Meaning |
|---|---|
| The model accepts image inputs alongside text | |
| The model uses extended chain-of-thought reasoning |
Capability badges appear automatically at the bottom of the settings panel based on the selected model. If neither capability is supported, the Capabilities row is hidden.
Steps Limit (Conversations only)
Controls the maximum number of execution steps (tool calls) the AI can take before the loop is forcefully stopped. This prevents runaway agent executions that could consume excessive resources.
- Each time the AI invokes a tool or performs an internal reasoning step, the counter increments by one. When the limit is reached, the execution loop ends and the AI returns whatever results it has collected so far.
- The Steps Limit field is shown in the model settings panel only in Conversations (chat). It is not available on the Agents or Pipelines pages, where step limits are configured at the agent/pipeline level.
Configuring Participants
You can configure and edit participants (Agents, Pipelines, Toolkits, and MCPs) directly within the conversation using the Canvas editor. Accessing Participant Settings:- Option 1: Click the participant in the Participants list, then click the ⚙️ (settings) icon.
- Option 2: Hover over the participant element in the Participants list and click the Edit icon that appears.
- The appropriate Canvas editor will open based on the participant type.
- Agents
- Pipelines
- Toolkits
- MCPs
- Edit the agent’s prompt and instructions
- Modify variables used by the agent
- Configure model settings
- Select the agent version (default is “base”)
- Adjust toolkits and integrations
- Make your edits in the Canvas editor.
- Click the Save button to apply your modifications.
- The updated configuration will be used for subsequent messages in the conversation.
Displaying Configured Conversation Starters
When you add a participant (like an Agent, Pipeline, Toolkit, or MCP) that has a pre-configured “conversation starter” message or instruction set, this message will automatically appear in the chat. This helps guide you on how to interact with the participant effectively.Interacting with Conversation Outputs
Editing Your Last Message
If you want to refine your prompt instead of sending a brand-new follow-up, ELITEA lets you edit your last user message and regenerate the answer from that updated text.- Locate your most recent user message.
- Use the action icons shown under that message, then click the Edit (pencil) icon.
- The message switches into inline edit mode.
- Update the text as needed.
- Click Save and apply to submit the edited message and regenerate the answer, or click Cancel to discard your changes.
The edit action is shown as Edit the message and regenerate answer. The Save and apply button stays disabled until the message content changes and the edited text is not empty.
Like/Dislike and Commenting
- Below each generated response, you’ll see Thumbs Up (👍) and Thumbs Down (👎) icons.
- Click Thumbs Up to indicate satisfaction.
- Click Thumbs Down to indicate dissatisfaction.
- After clicking Thumbs Down, a Leave comment field appears. Click it, type your specific feedback or reason for disliking, and press Send (or Enter). This feedback is valuable for improving models and prompts.
Regenerating the Last Output
- If you’re not satisfied with the very last response generated by a participant, you can ask it to try again.
- Ensure a response has been generated.
- Click the Regenerate icon 🔄 usually located near the last message or the input box.
- The system will use the same input/prompt that generated the last response and attempt to create a new, potentially improved, output.
Using Canvas for Content Editing
Canvas is your all-in-one workspace for editing, refining, and collaborating on AI-generated content in ELITEA. Instead of copying results into other tools, you can work directly with code, tables, and diagrams—right where the conversation happens. What is Canvas? Canvas is a built-in editor that appears automatically when ELITEA generates code, tables, or Mermaid diagrams in a chat. It allows you to edit, refine, and export AI-generated content without leaving the conversation. Canvas Features:Code Editor
Edit code with syntax highlighting, find/replace, and code folding. Export as
.py, .js, .java, and more.Table Editor
Modify tables with spreadsheet-like functionality. Add/remove rows and columns, sort, filter, and export to XLSX or Markdown.
Diagram Editor
Edit Mermaid diagrams with live preview and syntax highlighting. Export as PNG, JPG, or SVG.
DOCX Editor
Edit
.docx files from Artifacts in a full WYSIWYG interface — formatting toolbar, ruler, zoom control, save directly to the Artifact bucket.The pencil icon (✏️) does not appear for DOCX files in chat. Open DOCX files via the View/Edit file icon in Artifacts or chat attachments instead.
- Ask ELITEA to generate code, a table, or a Mermaid diagram.
- When ELITEA generates the content, look for the pencil icon (✏️) in the top-right corner of the content block.
- Click the icon to open the Canvas editor in a modal window.
- Make your edits using the available tools:
- Copy: Copy content to clipboard
- Undo/Redo: Revert or reapply actions
- Save: Save your changes
- Export: Download in various formats
- Click Save to preserve your changes in the conversation or Export to download files.
Attaching Files and Images
Attach files and images directly to chat conversations for AI-powered analysis. This feature enables multimodal interactions where AI can process visual content, documents, and data files alongside text-based queries. Every file you attach is automatically uploaded to the defaultattachments bucket — no manual Artifact Toolkit configuration is required. Files are accessible from the Artifacts section.
- Images are sent directly to the LLM for real-time vision analysis.
- Non-image files (documents, code, data) are indexed into a vector database and retrieved via semantic search.
How to Attach Files:
- In the chat input toolbar, click the
+icon. - Click Attach Files.
- The native file browser opens — select one or more files.
- Selected files appear as chips above the input field. To remove a file, click the × on its chip.
- Type your message and press Send.
- Drag and drop — drag files directly onto the chat input area.
- Paste — paste files or images from your clipboard with Ctrl+V / Cmd+V.

Using Internal Tools
Internal tools provide built-in capabilities that enhance your conversations without requiring external integrations. These tools can be enabled directly from the chat interface or configured as part of an agent’s default setup. Available Internal Tools- Python Sandbox
- Planner
- Data Analysis
- Image Creation
- Smart Tools Selection
- Swarm Mode
- Elitea MCP Tools
Execute Python code securely in conversations using Pyodide (Python compiled to WebAssembly). Useful for calculations, data processing, testing algorithms, and generating visualizations.
Use Cases: Execute code snippets, perform calculations, test algorithms, process data.→ Python Sandbox Guide
- Navigate to your conversation.
- In the chat input toolbar, click the
+icon. - Hover over Internal Tools in the popup menu.
- A flyout panel opens on the right showing all available tools with toggle switches.
- Click the toggle next to the tool name to enable or disable it.
- A success notification will appear: “Internal tools configuration updated”.
- Click anywhere outside the popup to close it.

- Navigate to Agents in the main menu and select the agent.
- Click the Configuration tab.
- Expand the Internal Tools section.
- Toggle the desired tools ON.
- Click Save at the top of the configuration page.
- The enabled internal tools will be available in all new conversations using this agent.
- Python Sandbox: The assistant can execute Python code, install packages, perform calculations, and generate visualizations
- Planner: The assistant can break down complex tasks, create structured plans with priorities and due dates, and track task progress
- Data Analysis: The assistant can perform comprehensive data analysis on uploaded files using natural language commands
- Python Sandbox Guide
- Planner Internal Tool Guide
- Data Analysis Internal Tool Guide
- Smart Tools Selection Guide
- Swarm Mode Guide
- Elitea MCP Tools Guide
Sensitive Action Authorization
When an agent or pipeline attempts to call a sensitive tool (such as deleting a repository, running a shell command, or dropping a database table), the conversation automatically pauses and displays an authorization card before anything is executed. Authorization Dialog Elements:
Actions:
- Authorize — Approves the tool call. Execution resumes and the tool runs as planned.
- Block — Rejects the tool call. The tool is skipped entirely; the agent receives a cancellation message and continues or stops based on its logic.
Voice Capabilities
ELITEA Chat includes voice input and voice output capabilities that let you speak your messages and have AI responses read back to you.Voice Input
Dictate messages into the chat input field. Transcribed text is inserted at the cursor position in real time.
Text-to-Speech
Have AI responses read aloud. Pause and resume playback from a mini-player pill in the input area.
Speaking Mode
Hands-free voice conversation loop. ELITEA records, sends, speaks the response, and listens again — automatically.
Voice Input
Voice Input lets you dictate messages directly into the chat input field using a microphone. The transcribed text is inserted at the cursor position, so you can combine typed and spoken content in the same message. How to use Voice Input:- Click the microphone icon in the message input toolbar to start recording.
- Speak your message. A live transcript appears in the input field as you talk — interim results update in real time.
- Click the Stop (■) button to finish recording. The final transcript is committed and focus returns to the input field.
When a server-side ASR (automatic speech recognition) model is configured in Settings → AI Configuration → Speech Recognition (ASR), Voice Input uses that model via streaming. If no server ASR model is available, Voice Input falls back to the browser’s built-in Web Speech API. If neither is available, the microphone icon is hidden.
Text-to-Speech
Text-to-Speech reads AI responses aloud. A Read out button (megaphone icon) appears in the action bar below each AI message when the message contains speakable text. How to use Text-to-Speech:- Click the Read out (megaphone) button below an AI message to start playback.
- The text is read aloud and a playback pill appears in the input area with:
- A Stop (■) button to halt audio playback at any time.
- A Voice settings (⚙) gear icon — opens the Voice Settings dialog (disabled while playback is active).
- After stopping, a Play (▶) button replaces the Stop button to restart playback from the beginning.
- Click the ⚙ gear icon (only available when playback is stopped) to open the Voice settings dialog.

When a TTS model is configured in Settings → AI Configuration → Text to Speech (TTS), ELITEA uses that model for audio generation. If no TTS model is configured, playback uses the browser’s built-in SpeechSynthesis API as a fallback.
Click Apply to save, or Cancel to discard changes.
Speaking Mode
Speaking Mode is a continuous, hands-free voice conversation loop. Once activated, ELITEA automatically records your speech, sends your message after a pause, plays back the AI’s response, and then starts listening again — without any manual interaction between turns. How to activate Speaking Mode:- Leave the message input field empty.
- Click the voicewave icon (shown in place of the Send button when the input is empty) to enter Speaking Mode.
- A voicewave pill with an Exit (✕) button replaces the send button, indicating Speaking Mode is active.
- Speak your message. After 3 seconds of silence, your message is automatically sent.
- The AI response streams in and is read aloud via Text-to-Speech.
- Once the response finishes playing, recording starts again automatically for the next turn.
- Click the ✕ button in the voicewave pill to exit Speaking Mode at any time.
Speaking Mode requires a voice recognition source (server ASR model or browser Web Speech API) for input and uses Text-to-Speech for output. If you start manual voice input while Speaking Mode is active, Speaking Mode is automatically deactivated.
Playback Mode
Playback mode allows you to step through an existing conversation turn by turn, exactly as it happened, without actually sending requests to the Models, Toolkits, etc.
Purpose
Demonstrate workflows, review complex interactions, or debug without incurring processing costs or waiting for live responses.
Activation
Access via the conversation’s context menu in the sidebar — right-click a conversation and select Playback.
Controls
Move forward to the next message, go back to the previous message, or stop the playback simulation using the on-screen controls or keyboard arrow keys.
A Product Manager is preparing a demo for stakeholders to showcase how the team collaborated on a new feature. They use Playback Mode to simulate the conversation and highlight key decisions and actions. Steps to Use Playback Mode: Access the Conversation:
The Product Manager navigates to the conversation in the CONVERSATIONS sidebar where the team discussed the feature. Activate Playback Mode:
The Product Manager right-clicks on the conversation and selects Playback from the context menu. Simulate the Conversation:
- The playback starts with the BA’s initial message outlining the feature requirements.
Example: - The PM uses the Next control to move to the next message, where they set the timeline for development and testing.
Example: - The QA’s message about testing strategies is reviewed next.
Example:
- The Product Manager pauses playback to explain the rationale behind certain decisions, such as the timeline or testing strategy.
- They resume playback to show the BA’s clarification about drag-and-drop uploads.
Example:
- The Product Manager stops playback after showcasing the final message tracking progress.
Example:
- Polished Presentations: Playback Mode ensures a smooth and professional demo without interruptions or delays.
- Clarity: Stakeholders can see the exact flow of discussions and decisions.
- Engagement: The step-by-step simulation keeps the audience engaged and focused on key points.