

Introduction
This document is your definitive resource for integrating and effectively utilizing the Aha! toolkit within ELITEA. It provides a detailed, step-by-step walkthrough, from generating an Aha! API key to configuring the toolkit in ELITEA and seamlessly incorporating it into your Agents, Pipelines, and Chat sessions. By following these steps, you will unlock the power of automated roadmap management, requirements tracking, idea triage, and cross-team collaboration — all directly within the ELITEA platform. This integration empowers you to leverage AI-driven automation to optimize your Aha!-driven product workflows, enhance team productivity, and improve product visibility across your organization. Brief Overview of Aha! Aha! is a leading product development suite used by product managers, engineers, and business stakeholders to build strategy, capture ideas, plan releases, and deliver features. The Aha! toolkit in ELITEA connects to two Aha! transports simultaneously — REST v1 for CRUD operations across the full record catalog, and GraphQL v2 for notes/pages and markdown-native reads — so Agents get the best of both APIs from a single toolkit. Aha! offers:Roadmapping and Strategy
Ideas Management
Requirements and Notes
DEVELOP-123, ADT-123-1, and ABC-N-213.Custom Fields and Workflows
Rich Integration Surface
Toolkit’s Account Setup and Configuration in Aha!
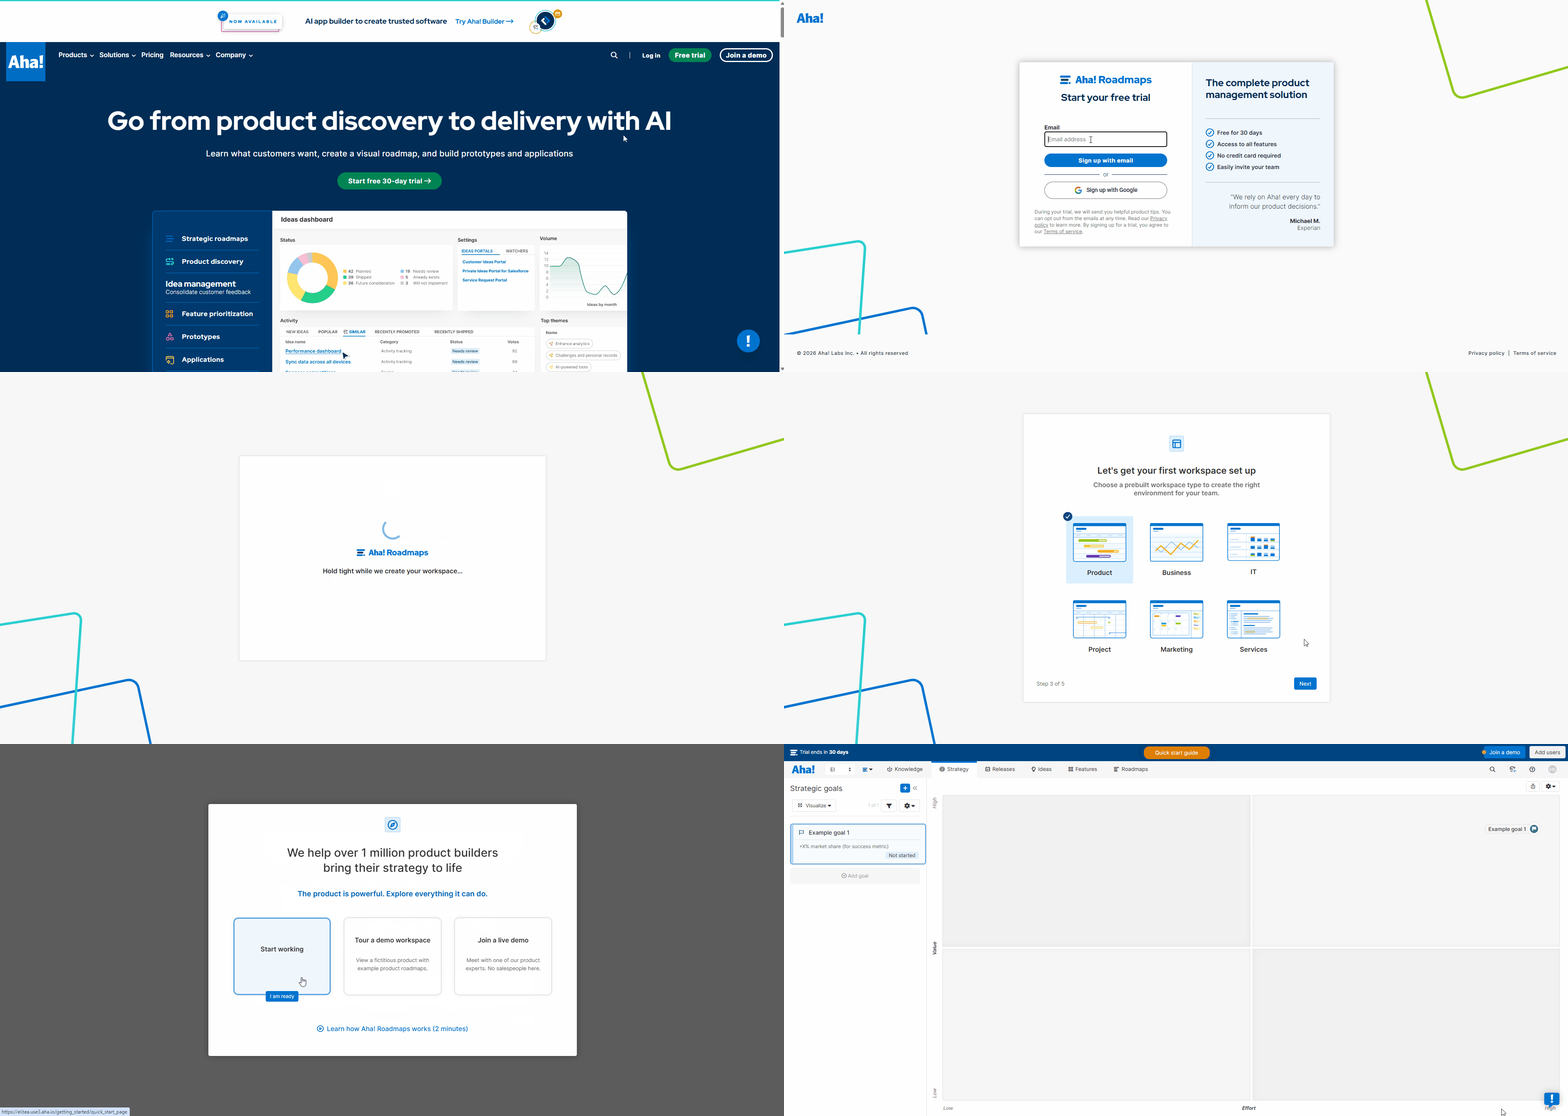
Account Setup If you do not yet have an Aha! account, please follow these steps to create one:- Visit Aha! Website: Open your web browser and navigate to the official Aha! website: https://www.aha.io.
- Sign Up for Aha!: Click on the “Try it free” or “Start free trial” button to begin the sign-up process.
-
Create Your Aha! Account: Follow the prompts to create an Aha! account using your email address. For professional use, use your company email so your Aha! workspace URL matches your organization (e.g.
https://yourcompany.aha.io). -
Choose a Subdomain: During signup, you will be asked to choose a subdomain that becomes the base URL of your Aha! instance (e.g.
yourcompany.aha.io). Keep this URL handy — you will need it later when configuring the ELITEA credential. - Set Up Your First Workspace: Aha! will guide you through creating your first workspace (product line and product). Add a name and choose a template that matches your team’s methodology.
-
Explore Aha! Features: Once your workspace is ready, familiarize yourself with the core record types you will manage via the toolkit — products, releases, features, requirements, epics, initiatives, ideas, and notes/pages.
Generate an API Key
For secure integration with ELITEA, it is essential to use an Aha! API key for authentication. Aha! calls the token a “personal API key”; it is issued per-user and inherits that user’s permissions across all workspaces they can access. Follow these steps to generate an API key in Aha!:-
Log in to Aha!: Navigate to your Aha! instance (e.g.
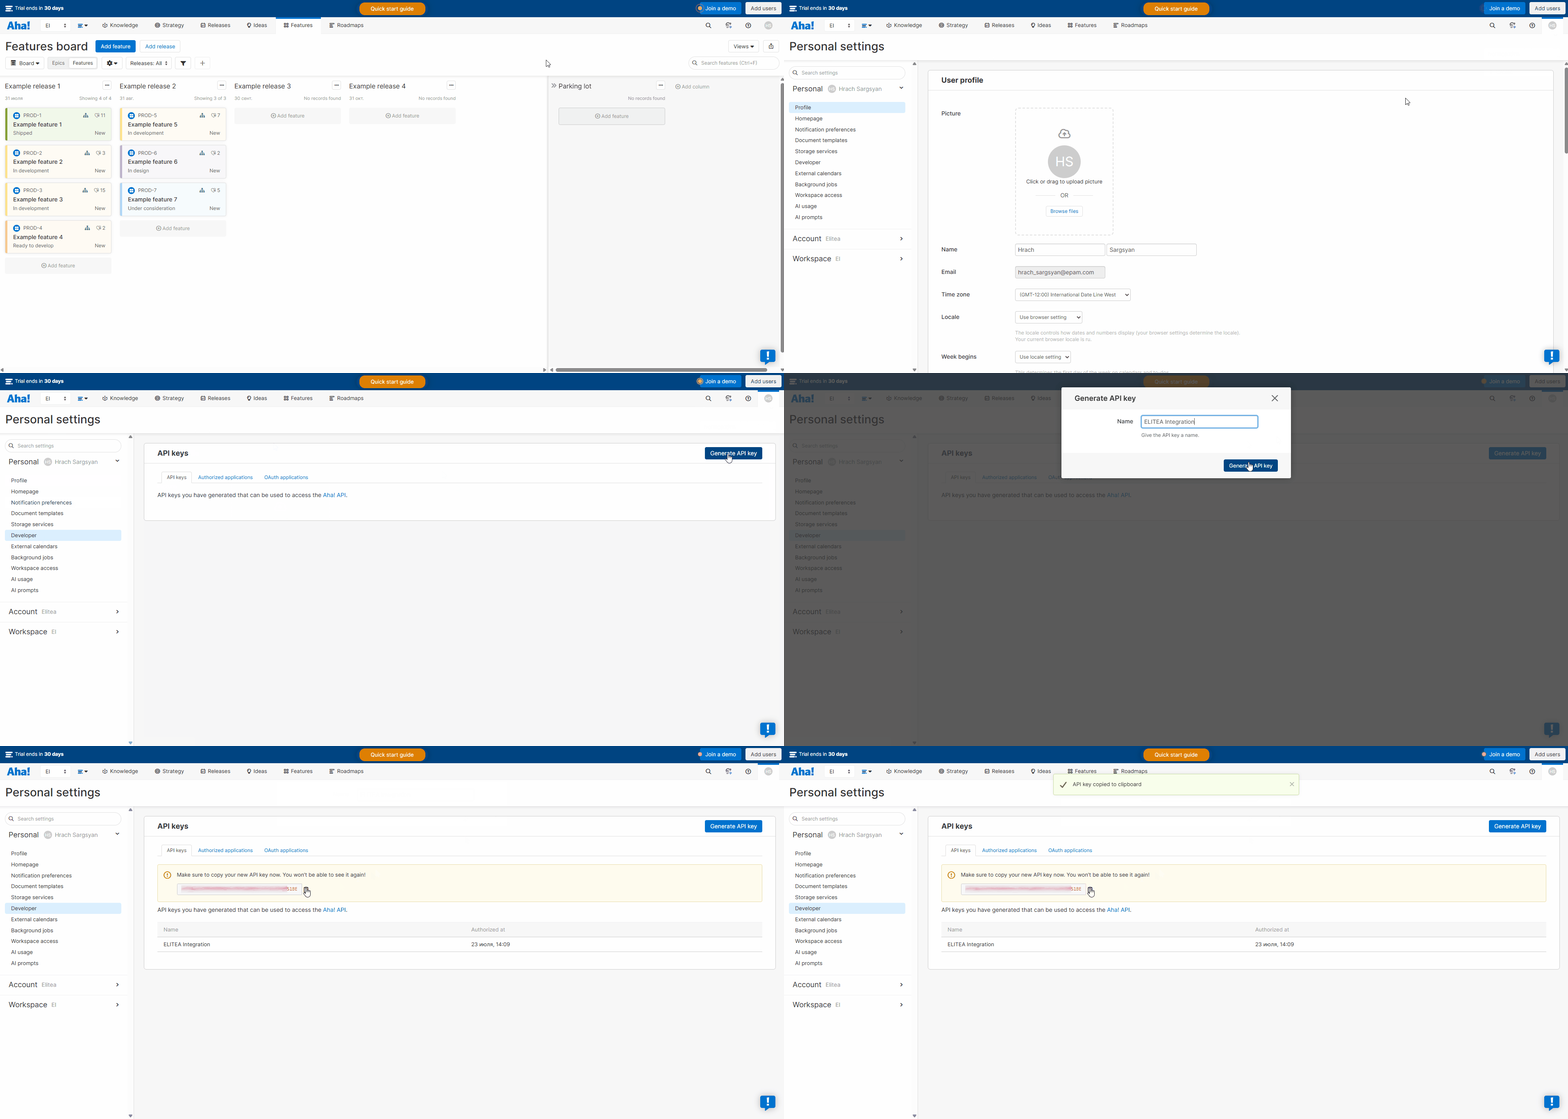
https://yourcompany.aha.io) and log in with your credentials. - Open Personal Settings: Click your avatar in the top-right corner of the Aha! interface and select “Settings → Personal” from the dropdown menu. You will land on the Personal settings page.
- Navigate to Developer / API Keys: In the left-hand sidebar, expand “Developer” (or scroll to the “API keys” panel). Aha! surfaces a table of any keys you have already generated with their Name and Authorized at timestamp
- Generate a New API Key: Click the “Generate API key” button.
-
Name Your Key: In the “Generate API key” dialog, enter a descriptive Name for the key, such as
ELITEA IntegrationorELITEA Agent Access. This label helps you identify the purpose of the key later and revoke it independently. - Confirm & Copy Your API Key: Click “Generate API key”. Aha! displays the newly generated token exactly once. Immediately copy the API key and store it securely — you will not be able to view the full value again after closing this dialog. If you lose the key you must revoke it and generate a new one.
-
Store the Key Securely: Store the API key in a password manager or, preferably, ELITEA’s built-in Secrets feature. You will paste this value into the ELITEA Aha! credential in the next step.
System Integration with ELITEA
To integrate Aha! with ELITEA, you need to follow a three-step process: Create Credentials → Create Toolkit → Use in Agents. This workflow ensures secure authentication and proper configuration.Step 1: Create Aha! Credentials
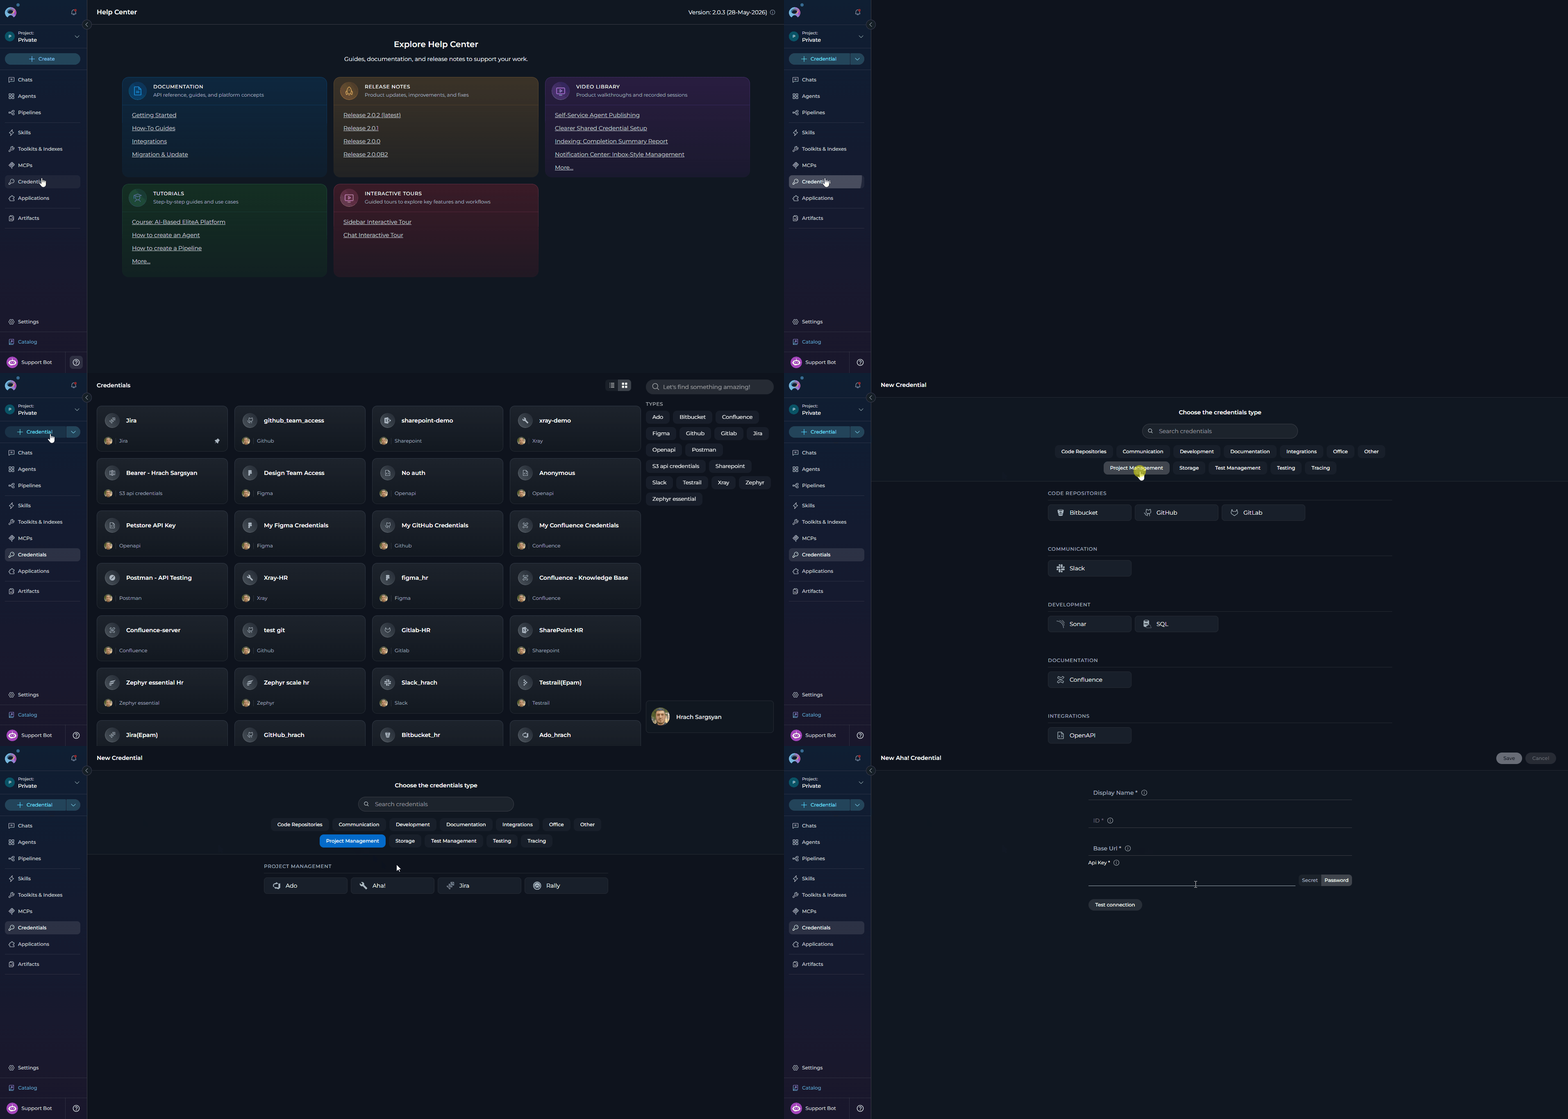
Before creating a toolkit, you must first create Aha! credentials in ELITEA:- Navigate to Credentials Menu: Open the sidebar and select Credentials.
-
Create New Credential: Click the
+ Createbutton. -
Select Aha!: Choose Aha! as the credential type.
-
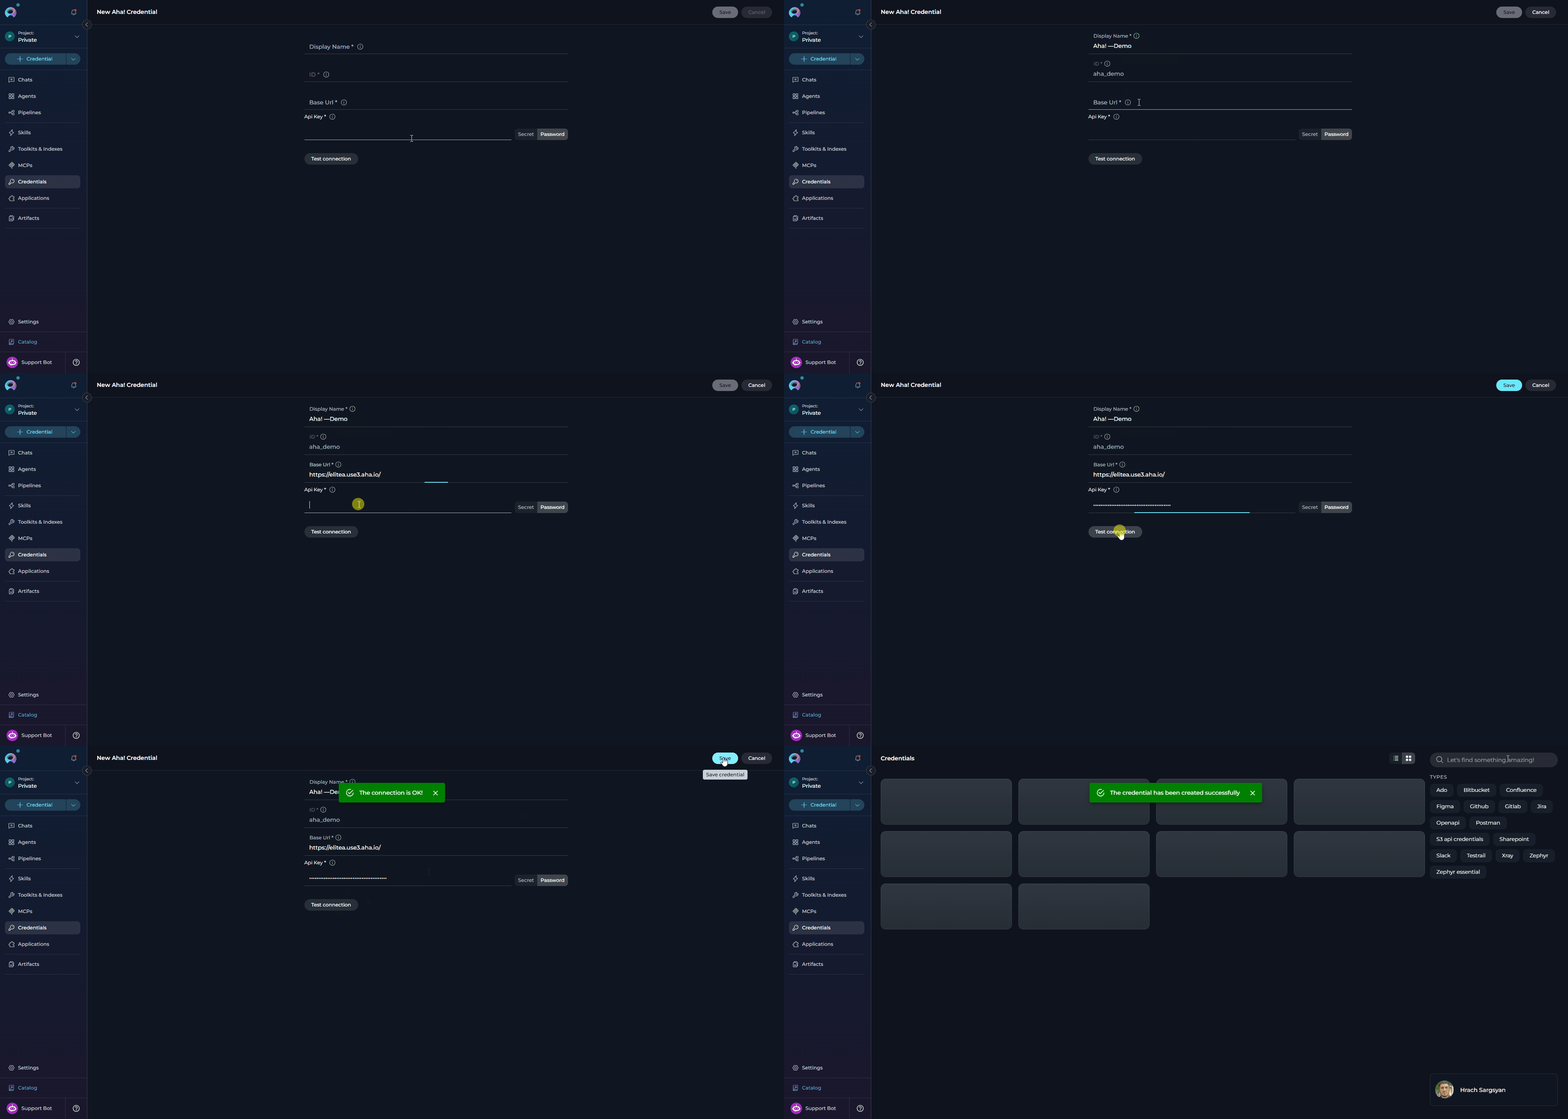
Configure Credential Details:
-
Test Connection: Click Test Connection to verify that your credential is valid. Behind the scenes, ELITEA calls
GET /api/v1/meon your Aha! instance and surfaces a human-readable error if the base URL is malformed, the token is missing/invalid, or the account lacks permission. -
Save Credential: Click Save to create the credential. It will be added to the credentials dashboard and available to use in toolkit configurations.
Step 2: Create Aha! Toolkit
Once your credentials are configured, create the Aha! toolkit:-
Start the toolkit creation flow using either of these options:
- Open the sidebar and select Toolkits & Indexes.
- Or, from any menu, open the dropdown next to the
+ Createbutton.
- Select Create Toolkit: From the dropdown menu, choose Create Toolkit.
-
Select Aha!: In the toolkit type selection flow, choose Aha! from the list of available toolkit types.
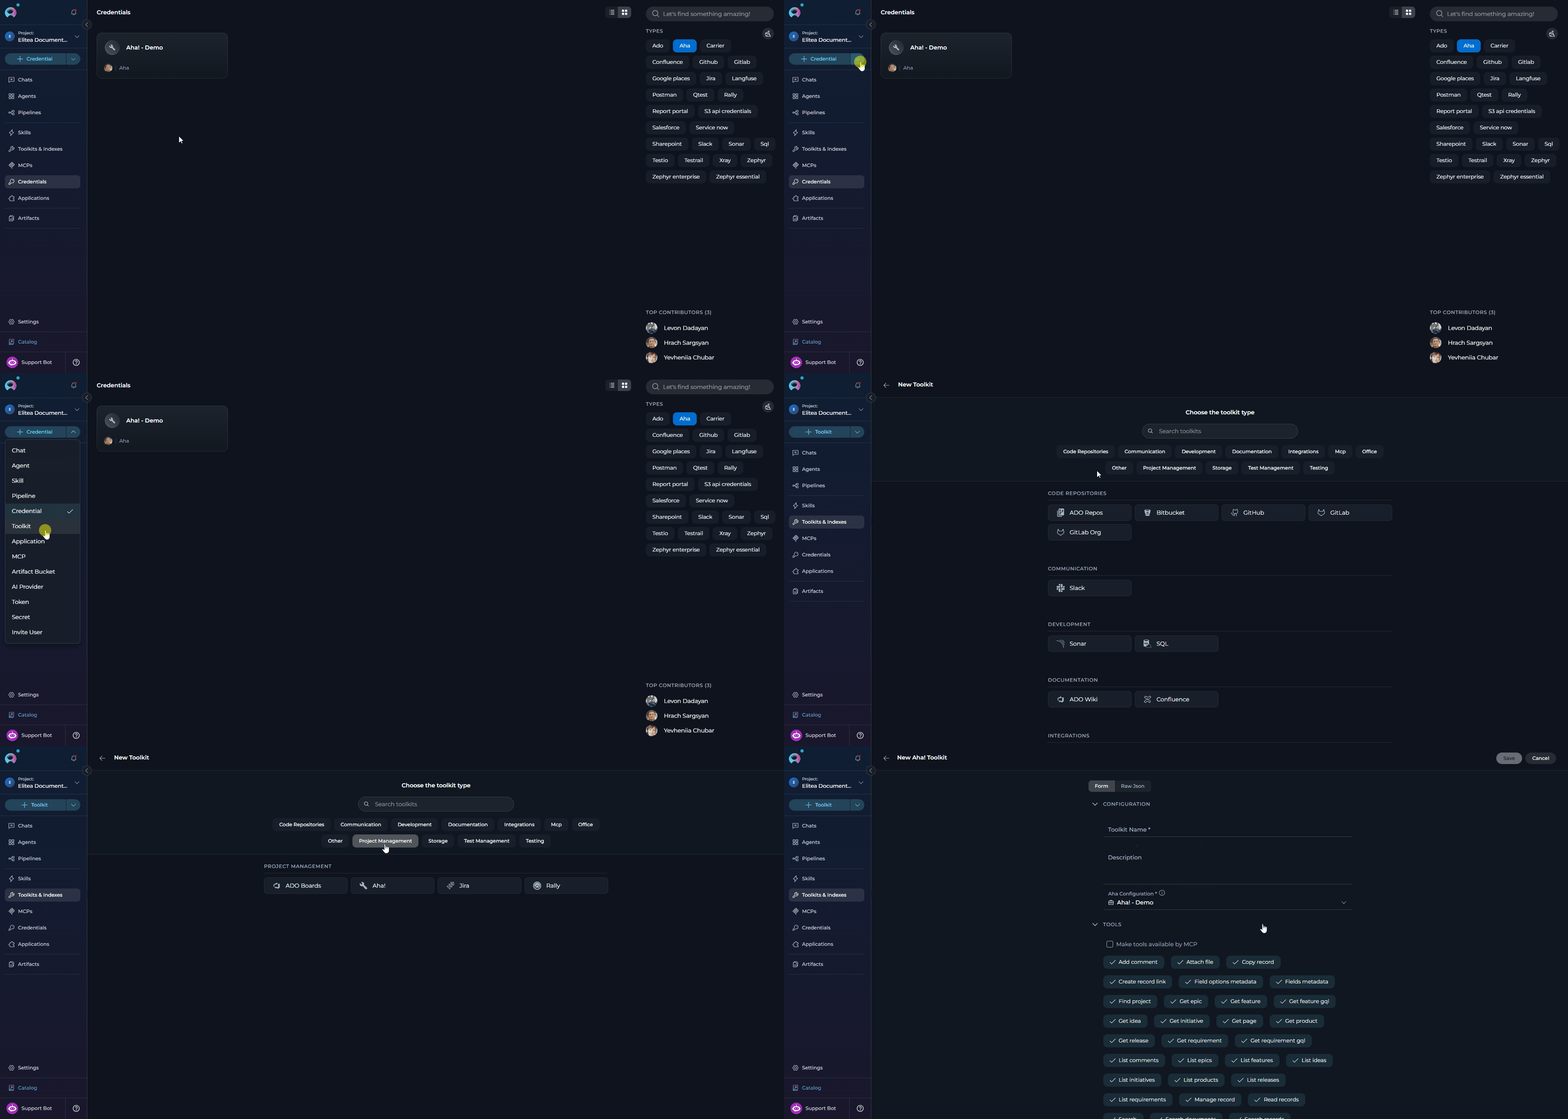
-
Configure Toolkit Details:
-
Enable Desired Tools: In the “Tools” section, tick the checkboxes next to the specific Aha! tools you want to enable.
- Make Tools Available by MCP - (optional) Enable to expose selected tools to external MCP clients.
-
Save Toolkit: Click Save to create the toolkit.
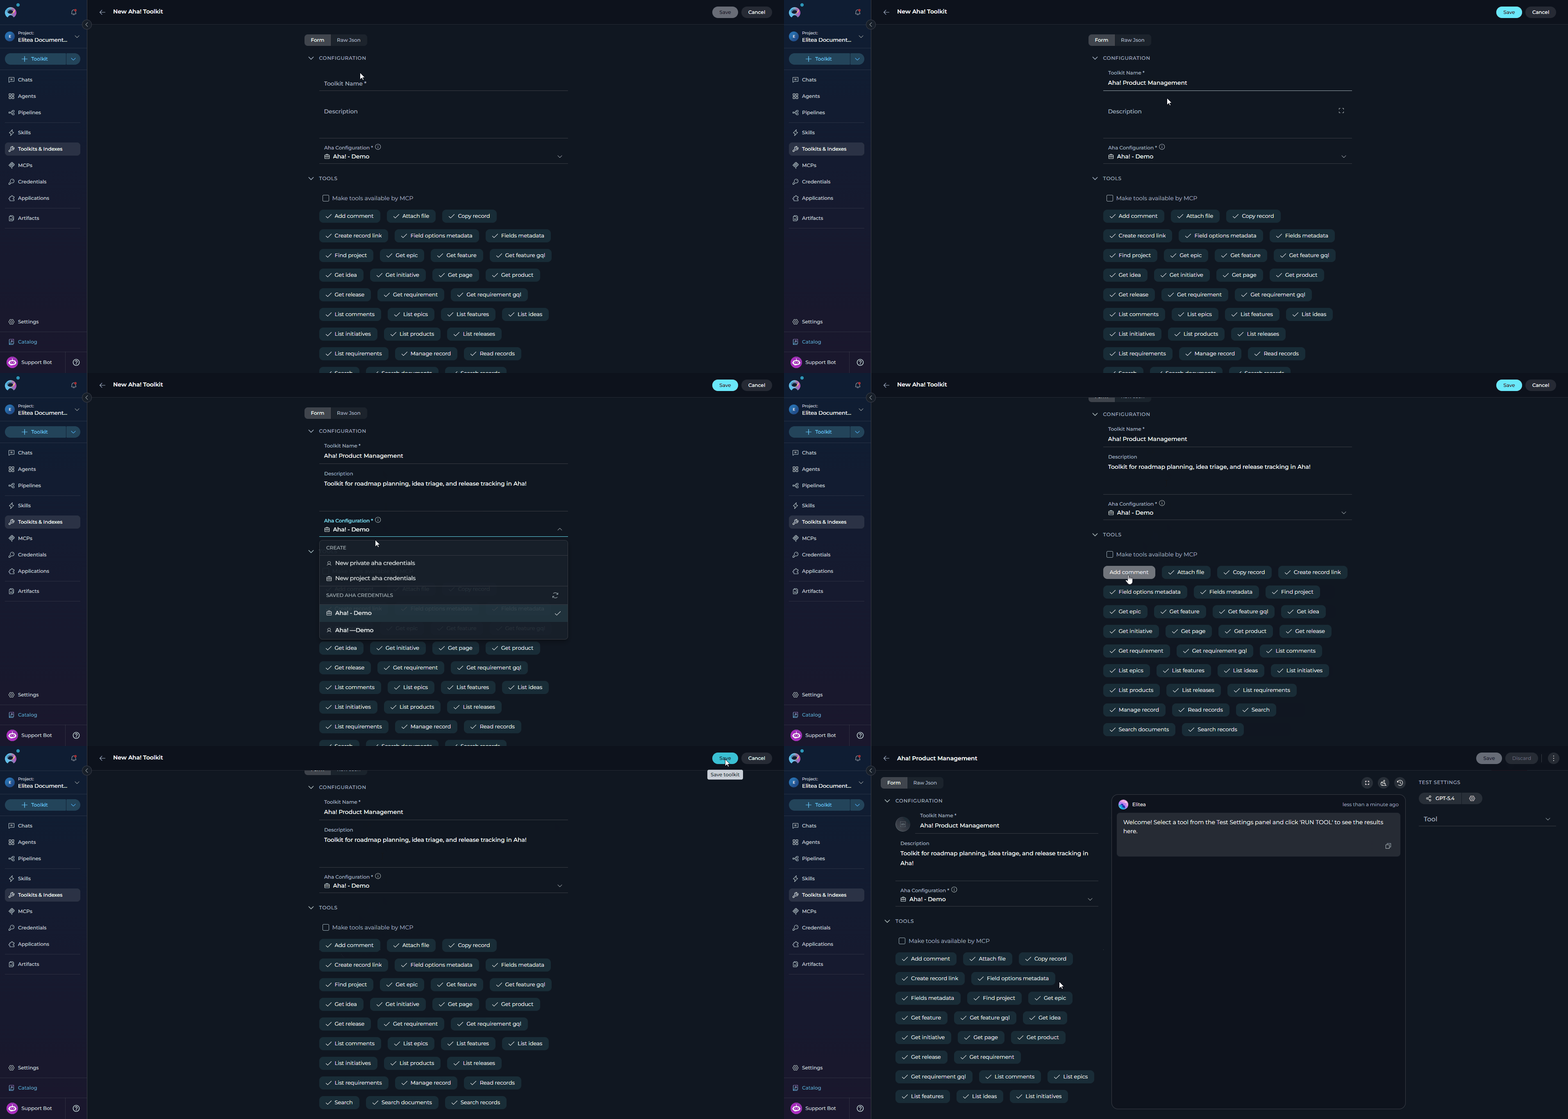
Available Tools
The Aha! toolkit provides the following tools for interacting with Aha! records, organized by functional category. Tool names match exactly what appears in the ELITEA toolkit configuration and in Agent tool calls.Testing Toolkit Tools
After configuring your Aha! toolkit, you can test individual tools directly from the Toolkit detailed page using the Test Settings panel. This allows you to verify that your credentials are working correctly and validate tool behavior before adding the toolkit to your workflows. General Testing Steps:- Select LLM Model: Choose a Large Language Model from the model dropdown in the Test Settings panel.
- Configure Model Settings: Adjust model parameters like Creativity, Max Completion Tokens, and other settings as needed.
- Select a Tool: Choose the specific Aha! tool you want to test (e.g.
find_project,read_records,search_records). - Provide Input: Enter the required parameters — for example,
record_type=featureandreference_or_id=DEVELOP-123forread_records. - Run the Test: Execute the tool and wait for the response.
- Review the Response: Analyze the output to verify the tool is working correctly and returning expected results.
Step 3: Add Aha! Toolkit to Your Workflows
Now you can add the configured Aha! toolkit to your agents, pipelines, or use it directly in chat:In Agents:
- Navigate to Agents: Open the sidebar and select Agents.
- Create or Edit Agent: Either create a new agent or select an existing agent to edit.
-
Add Aha! Toolkit:
- In the “TOOLS” section of the agent configuration, click the “+Toolkit” icon
- Select your configured Aha! toolkit from the dropdown list
- The toolkit will be added to your agent with the previously configured tools enabled
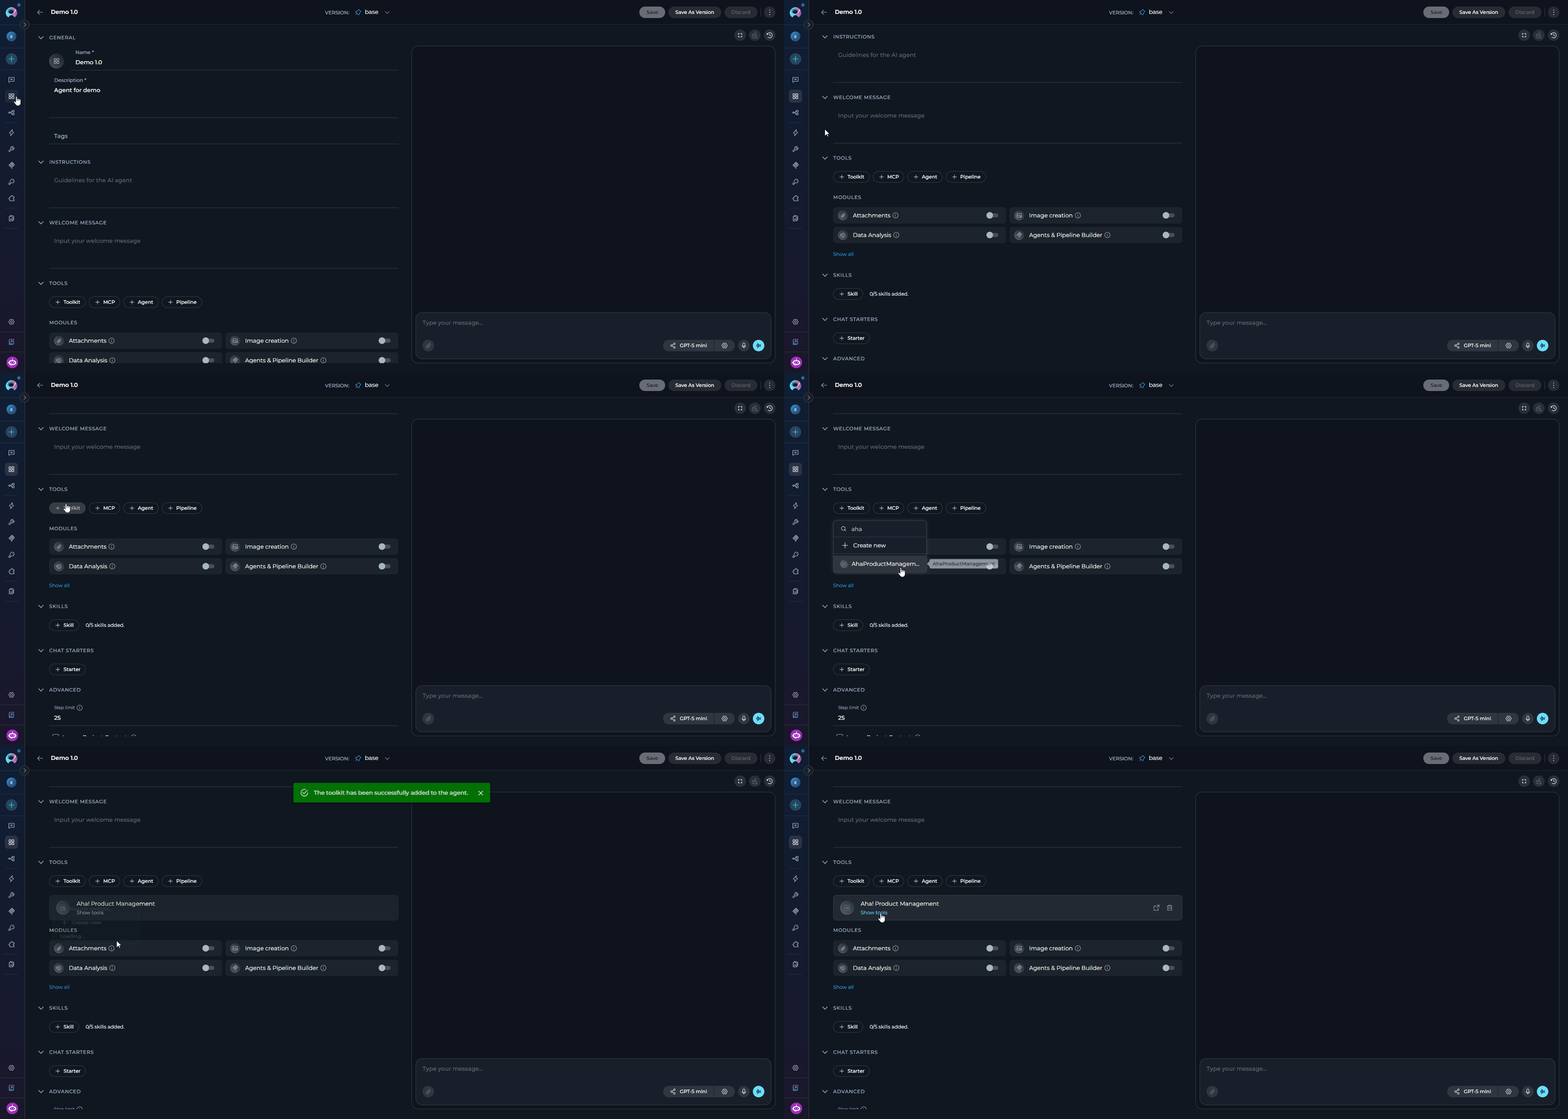
In Pipelines:
- Navigate to Pipelines: Open the sidebar and select Pipelines.
- Create or Edit Pipeline: Either create a new pipeline or select an existing pipeline to edit.
-
Add Aha! Toolkit:
- In the “TOOLS” section of the pipeline configuration, click the “+Toolkit” icon
- Select your configured Aha! toolkit from the dropdown list
- The toolkit will be added to your pipeline with the previously configured tools enabled
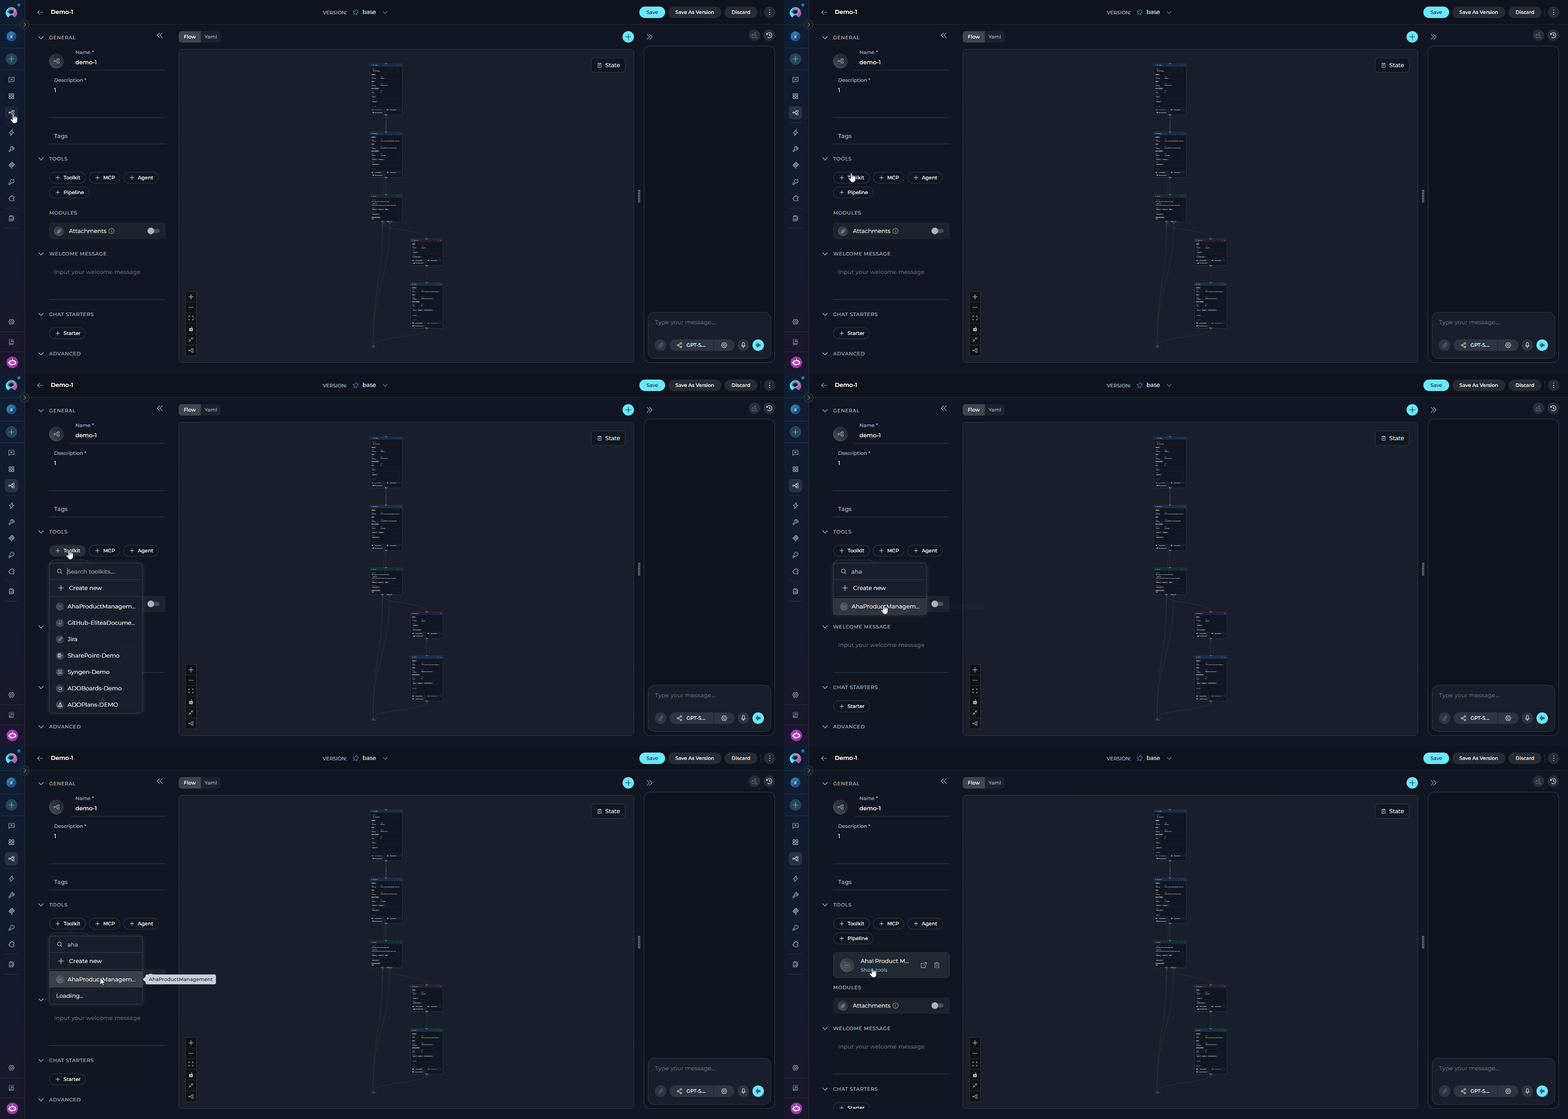
In Chat:
- Navigate to Chat: Open the sidebar and select Chat.
- Start New Conversation: Click +Create or open an existing conversation.
-
Add Toolkit to Conversation:
- In the chat input toolbar, click the
+icon - In the popup menu, hover over Toolkits
- Search for and enable your configured Aha! toolkit from the list
- Or type
#in the message input and choose the toolkit from the dropdown - The toolkit is added to the current conversation with the tools enabled in its configuration
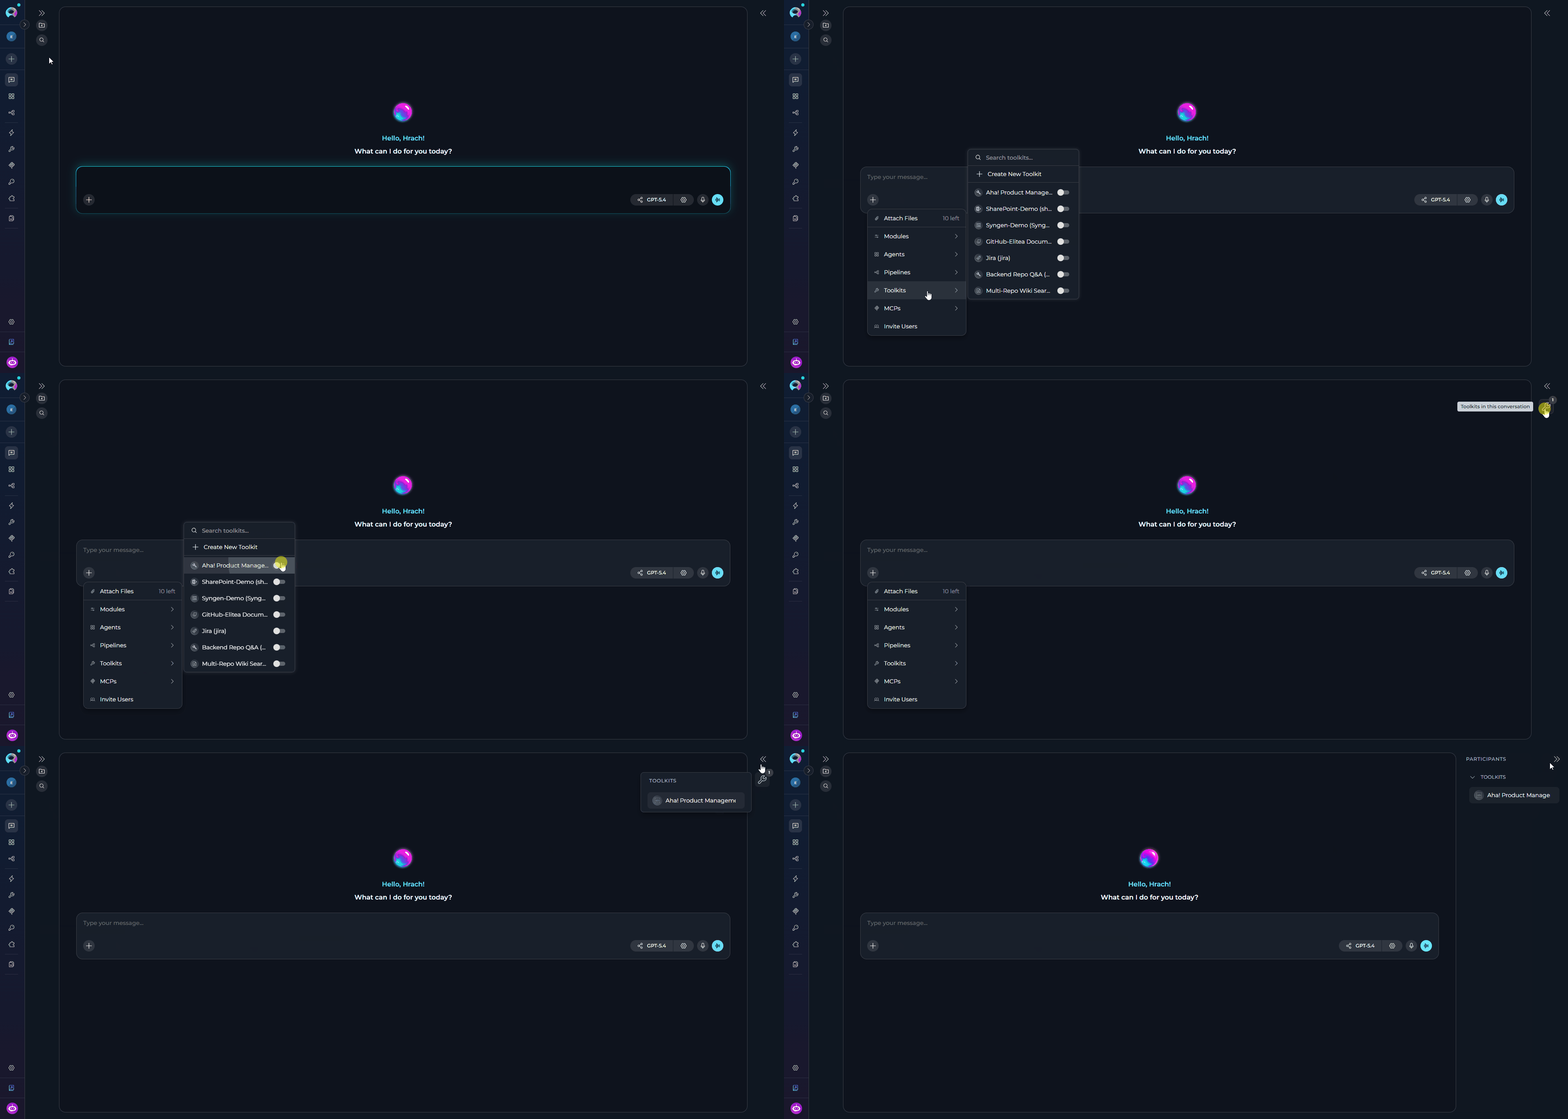
- In the chat input toolbar, click the
- Use Toolkit in Chat: You can now directly interact with your Aha! records by asking questions or requesting actions that will trigger the Aha! toolkit tools.
Example Chat Usage
- “Find the product whose name contains ‘Fredwin’ and list its active releases.”
- “Read feature DEVELOP-123 and summarize the acceptance criteria.”
- “Create a new requirement under feature DEVELOP-123 titled ‘Retry on 429 responses’ with a short description.”
- “Post a comment on idea DEMO-I-45 saying it has been promoted to a feature.”
- “Search notes for ‘onboarding checklist’ and give me the URL of the top hit.”
Instructions and Prompts for Using the Aha! Toolkit
To effectively instruct your ELITEA Agent to use the Aha! toolkit, you need to provide clear and precise instructions within the Agent’s “Instructions” field. These instructions are crucial for guiding the Agent on when and how to utilize the available Aha! tools to achieve your desired automation goals.Instruction Creation for Agents
When crafting instructions for the Aha! toolkit, especially for OpenAI-based Agents, clarity and precision are paramount. Break down complex tasks into a sequence of simple, actionable steps. Explicitly define all parameters required for each tool and guide the Agent on how to obtain or determine the values for these parameters. OpenAI Agents respond best to instructions that are:Direct and Action-Oriented
search_records tool with record_type='feature'…”, “Read feature DEVELOP-123 with read_records…”, “Create a requirement under feature DEVELOP-123 with manage_record…”.Parameter-Centric
Contextually Rich
Step-by-Step Structure
find_project → search_records → read_records → manage_record.Add Conversation Starters
Parameter Checklist
- Use the exact parameter name expected by the tool, such as
record_type,reference_or_id, orproperties. - State the expected value format, such as a reference-number string, ISO-8601 timestamp, or JSON object.
- Explain where the Agent should get the value: user input, a previous step, an external source, or a fixed value.
- State the Goal: e.g. “Goal: Find the product reference for the roadmap the user asked about.”
- Specify the Tool: e.g. “Tool: Use the
find_projecttool.” - Define Parameters: For each parameter, name and value/source.
- Describe Expected Outcome (Optional but Recommended): e.g. “Outcome: The Agent will return the product’s
reference_numandid, which subsequent tools reuse viaproduct_id.” - Add Conversation Starters.
Chat Usage Examples by Tool Category
The following examples demonstrate how to interact with the Aha! toolkit in ELITEA Chat, organized by functional categories. Each example shows the user request and the expected agent behavior.Discovery - Find Project
Discovery - Find Project
Read - Feature (markdown body)
Read - Feature (markdown body)
Search Records - Features by product
Search Records - Features by product
Write - Create a Requirement
Write - Create a Requirement
Communication - Add Comment
Communication - Add Comment
Relationship Management - Link Records
Relationship Management - Link Records
Documents - Search Notes / Pages
Documents - Search Notes / Pages
Troubleshooting
Credential Not Appearing in Toolkit Configuration
Credential Not Appearing in Toolkit Configuration
- Check Credential Scope: Ensure you’re working in the same workspace/project where the credential was created. Private credentials are only visible in your Private workspace, while project credentials are visible within the specific team project.
- Verify Credential Creation: Go to the Credentials menu and confirm that your Aha! credential was successfully saved.
- Credential Type Match: Ensure you selected Aha! as the credential type when creating the credential.
Connection Errors
Connection Errors
Aha! base_url is requiredAha! base_url must start with http:// or https://Aha! api_key is requiredCannot connect to Aha! at <base_url>: connection refusedConnection to Aha! at <base_url> timed outSSL certificate verification failed: …
- Verify Base URL: Ensure the Base URL in the credential is set to the root of your Aha! instance — e.g.
https://yourcompany.aha.io. Do not include/api,/api/v1, or a trailing slash — the toolkit appends the correct suffix (/api/v1for REST,/api/v2/graphqlfor GraphQL) automatically. - Verify Protocol: The base URL must start with
http://orhttps://. Production Aha! instances always use HTTPS. - Check API Key: Confirm the API key you pasted is valid and has not been revoked in Personal settings → Developer → API keys. Regenerate the key if necessary.
- Network Connectivity: Confirm that both your ELITEA environment and
*.aha.ioare reachable. Corporate proxies or firewalls that intercept outbound HTTPS traffic must trust Aha!‘s certificate.
Tool-Specific Parameter Errors
Tool-Specific Parameter Errors
'<value>' is not a valid Aha! feature reference (expected pattern: ^[A-Z][A-Z0-9]*-\d+$)'<value>' is not a valid Aha! requirement reference (expected pattern: ^[A-Z][A-Z0-9]*-\d+-\d+$)'<value>' is not a valid Aha! page reference (expected pattern: ^[A-Z][A-Z0-9]*-N-\d+$)Unsupported Aha resource type '<value>'manage_record does not support record_type '<value>'manage_record: action must be 'create', 'update', or 'delete'manage_record create <type>: parent_id is required (<parent> ref)create_record_link: Aha REST only supports links originating from featurescopy_record: Aha REST only supports duplicating releasesUnsupported output_format '<value>'. Use 'json', 'csv', or 'markdown'.
- Reference Format: Aha! reference numbers are strict:
- Feature:
<PREFIX>-<N>(e.g.DEVELOP-123) - Requirement:
<PREFIX>-<N>-<M>(e.g.ADT-123-1) - Page:
<PREFIX>-N-<N>(e.g.ABC-N-213) Numeric IDs are accepted by REST endpoints; the GraphQL tools (get_feature_gql,get_requirement_gql,get_page) require the reference-number form.
- Feature:
- Supported Types for
manage_record:feature,requirement,idea,release,initiative,epic,page. Anything else is rejected. - Parent Scope for
manage_recordcreate: always required — feature → release, requirement → feature, idea/release/initiative/page → product, epic → release. Pass the parent reference viaparent_id. create_record_link: Aha! REST currently only exposes record-link creation from features (from_record_type='feature'). To link between other record types, create the link from the feature side.copy_record: Aha! REST only supports duplicating releases. To “copy” another record type, read the source withread_recordsand re-create it viamanage_record(action='create', ...)with the fields you want to carry over.- Custom Fields: When updating custom fields via
manage_record, use thecustom_fieldssub-object inproperties. Callfields_metadatato discover the field IDs andfield_options_metadatato resolve option names/IDs for single-select fields before attempting the write.
Rate Limiting (HTTP 429)
Rate Limiting (HTTP 429)
- Bulk list or search operations occasionally fail with
Aha! REST GET <path> failed (429): ... - Failures cluster during peak automation runs
ToolException rather than retrying automatically, so agents see the failure explicitly.Troubleshooting Steps:- Batch smaller: Reduce
max_recordsandper_pageon list/search tools when you don’t need the full page. - Project fewer fields: Pass a
fieldsallowlist to reduce payload size and, indirectly, the request cost. - Space out writes: For pipelines that create many records back-to-back, add a printer/HITL node or a short delay between record-manage calls.
- Dedicated service account: Very high-volume automations should use a dedicated Aha! service account so the rate-limit budget is not shared with human users.
Non-JSON or Empty Response Body
Non-JSON or Empty Response Body
Aha! REST <METHOD> <path> returned non-JSON body
- Verify Base URL: A non-JSON body most often means the URL resolved to an HTML page (e.g. a login screen). Confirm your Base URL is the tenant root (
https://yourcompany.aha.io) and does not accidentally point at a marketing page or an SSO redirector. - Check the endpoint: If you added a custom path suffix in the base URL, remove it — the toolkit appends
/api/v1and/api/v2/graphqlautomatically. - Inspect the response: Enable debug logging in your Agent to see the raw 500-character body excerpt included in the exception, which usually names the offending page.
GraphQL Errors
GraphQL Errors
get_feature_gql, get_requirement_gql, get_page, search_documents) fail with a GraphQL error.Error you may see:Aha! GraphQL errors: [{ 'message': '…', 'path': […] }]Aha! GraphQL failed (<status>): <body excerpt>
- Verify the reference number: GraphQL requires the reference-number form (e.g.
DEVELOP-123) — a numeric ID will be rejected. - Verify record scope: GraphQL queries respect the same per-workspace permissions as REST — confirm the account can see the target workspace.
- Aha! schema drift: The toolkit ships GraphQL queries pinned to Aha!‘s current schema. If Aha! deprecates a field, upgrade
elitea-sdkto pick up the schema fix.
Attachment Upload Failures
Attachment Upload Failures
attach_file fails to upload a file.Errors you may see:attach_file: filepath is requiredattach_file: cannot read '<path>': <os error>attach_file: artifact:// URIs require the SDK runtime artifact helper — provide a local filepath instead.Aha! attachment upload failed (<status>): <body excerpt>
- Verify the filepath: Local paths must be readable by the ELITEA runtime. Use absolute paths from an agent-mounted directory.
- Artifact URIs:
artifact://<bucket>/<name>requires the SDK runtime artifact helper to be available. When running outside the SDK runtime (e.g. bare REST calls), provide a local filepath instead. - Filename: If the file is served with an unusual extension, pass an explicit
filenameargument so Aha! stores the attachment with the intended name. - Resource type: Attachments live under a parent resource.
resource_typemust be one offeature,requirement,idea,release,epic,initiative,goal,to_do,product,page.
Support Contact
If you encounter issues not covered here or need additional assistance with Aha! integration, please refer to Contact Support for detailed information on how to reach the ELITEA Support Team.FAQ
Can I use my regular Aha! password for the ELITEA integration?
Can I use my regular Aha! password for the ELITEA integration?
What permissions are absolutely necessary for the Aha! API key to work with ELITEA?
What permissions are absolutely necessary for the Aha! API key to work with ELITEA?
- Read-only agents (using
find_project,search_records,read_records,list_*,get_*): the user must have Reviewer or higher access to every workspace it needs to query. - Write agents (using
manage_record,add_comment,attach_file,create_record_link,copy_record): the user must have Contributor or higher access to every workspace where records will be created, updated, or deleted. - Ideas triage agents: the user must be an Aha! Ideas or Roadmaps user with permission to edit ideas in the target workspace.
What is the correct format for the Aha! Base URL?
What is the correct format for the Aha! Base URL?
- Cloud (all Aha! instances):
https://<subdomain>.aha.io— e.g.https://yourcompany.aha.io
/api, /api/v1, /api/v2/graphql, or a trailing slash — the toolkit appends the correct suffix for REST and GraphQL calls automatically. The base URL must start with http:// or https://.Which record types are supported end-to-end?
Which record types are supported end-to-end?
manage_record:feature(parent scope: release)requirement(parent scope: feature)idea(parent scope: product)release(parent scope: product)initiative(parent scope: product)epic(parent scope: release)page— Aha!‘s note resource (parent scope: product)
read_records / list tools: product, and via GraphQL: page, feature (markdown body), requirement (markdown body). Duplication (copy_record) is currently limited to release because that is what Aha!‘s REST API supports.What's the difference between get_feature and get_feature_gql?
What's the difference between get_feature and get_feature_gql?
get_featureuses Aha!‘s REST v1 endpoint. It returns the full record but the description body is HTML.get_feature_gqluses Aha!‘s GraphQL v2 endpoint. It returns a leaner projection (id,referenceNum,name,workflowStatus.name,description.markdownBody) with the description body already in markdown — much easier for an LLM to summarize or paraphrase.
get_requirement / get_requirement_gql. Pages are only available via GraphQL (get_page).Can I use the same Aha! credential across multiple toolkits and agents?
Can I use the same Aha! credential across multiple toolkits and agents?
How does the toolkit reduce token usage on large payloads?
How does the toolkit reduce token usage on large payloads?
output_format— passcsvormarkdownto render list responses as tables instead of nested JSON. Great for LLMs that reason better over tabular data.fields— pass an allowlist of top-level fields (e.g.["id", "reference_num", "name", "workflow_status"]) to strip everything else out of the response before it reaches the model.
per_page and max_records when you only need the first handful of records. The toolkit’s pagination helper stops fetching as soon as max_records is satisfied.How do I discover the correct Aha! product/workspace to query?
How do I discover the correct Aha! product/workspace to query?
find_project tool (a thin wrapper over Aha!‘s /products endpoint) or list_products to enumerate the workspaces the API key can see. Both tools return each product’s reference_num and id — either can be passed as product_id to the type-specific list tools (list_features, list_releases, list_epics, list_ideas) or to search_records.What are common use cases for the Aha! toolkit?
What are common use cases for the Aha! toolkit?
- Answer “what’s shipping this quarter” by combining
list_releases(filtered by date/product) withlist_featuresscoped by release.
- Search the ideas backlog with
search_records(record_type='idea', q=…), read the top matches withread_records, and promote high-value ideas by creating features viamanage_record(action='create', record_type='feature', parent_id=<release>).
- Enumerate shipped features with
list_features(release_id=…), fetch their markdown descriptions viaget_feature_gql, and post the compiled notes back withadd_commenton the release.
- Bridge Aha! to Jira / GitHub / Confluence toolkits — e.g. create a Jira ticket from a new Aha! requirement, or post a Confluence page link back to Aha! via
add_commentandcreate_record_link.
- After an automated test or design review, attach the artifact to the underlying feature or requirement via
attach_fileso the record retains the full audit trail.
Related Documentation
- Create and Edit Agents from Canvas - Learn how to quickly create and edit agents directly from chat canvas for rapid prototyping and workflow automation.
- Create and Edit Toolkits from Canvas - Discover how to create and configure Aha! toolkits directly from chat interface for streamlined workflow setup.
- Create and Edit Pipelines from Canvas - Guide to building and modifying pipelines from chat canvas for automated Aha! workflows.
- Secrets Management - Best practices for securely storing API tokens and sensitive credentials.
- AI Configuration - Essential settings and configurations for optimizing AI performance with integrations.
- Aha! API Overview - Official Aha! API landing page — REST v1 and GraphQL v2 reference.
- Aha! REST API v1 - REST endpoint reference for all Aha! record types.
- Aha! GraphQL API v2 - GraphQL schema explorer and reference.
- Aha! Personal API Keys - Manage your Aha! API keys.
- Aha! Support - Aha! support portal, articles, and community resources.