

Overview
Confluence indexing turns your Confluence content into a searchable knowledge base inside ELITEA. You can index pages, spaces, labels, attachments, and comments, then use that data for semantic search, AI chat with citations, and broader knowledge discovery across your documentation. Typical use cases include:Knowledge Search
Find procedures, policies, and technical guidance across Confluence spaces.
Faster Onboarding
Help new team members learn from existing documentation more quickly.
Support Enablement
Resolve tickets faster with indexed knowledge articles and FAQs.
Summaries & Answers
Generate concise answers and summaries from existing Confluence content.
Content Audits
Identify gaps, overlap, and outdated information in your documentation.
Knowledge Reuse
Reuse existing Confluence content in chats, workflows, and team research.
Prerequisites
Before indexing Confluence data, ensure you have:- Confluence Credential: A Confluence API token or authentication credentials configured in ELITEA
- Vector Storage: PgVector selected in Settings → AI Providers
- Embedding Model: Selected in AI Configuration (defaults available) → AI Providers
- Confluence Toolkit: Configured with your Confluence instance details, credentials, and Index Data tool enabled
Your Confluence credential must have
- Read access to the spaces and pages you want to index
- Access to attachments and comments if you plan to include them
- Access to restricted content only if you want restricted pages indexed
Supported authentication methods
- Basic Authentication: Username and API Key
- Bearer Token: Confluence API token
Setting Up the Confluence Toolkit
- Generate a Confluence API Token in your Atlassian account under Security → API Tokens
- Create a Confluence Credential in ELITEA: Go to Credentials → + Credential → Confluence, enter the required details, and save
- Create a Confluence Toolkit: Go to Toolkits → + Toolkit → Confluence
- Configure the Toolkit: Set the base URL, space, hosting option, and assign the Confluence credential you created
- Enable Required Tools: Select
Index Data,List Collections,Search Index,Stepback Search Index,Stepback Summary Index, andRemove Index - Save the Toolkit
For complete credential and toolkit setup details, see:
Index Confluence Data
Access the Interface
- Go to Toolkits & Indexes in the main navigation.
- Choose your configured Confluence toolkit from the list.
- In the toolkit configuration view, expand the INDEXES section.
-
Use the left-side index list to create a new index or open an existing one.

Create a New Index
- In the INDEXES section, select + Index.
- Open the dedicated New index page with Index configuration parameters.
- Enter the required and optional values for the Confluence indexing parameters.

Start and Monitor Indexing
- Fill in all required fields until the Index button becomes active.
- Select Index to start the indexing process.
- Track progress on the dedicated index page after the run starts.
- Watch real-time status updates on the index page.
Index Statuses
- 🔄 In Progress: Indexing is currently running.
- ✅ Completed: All items indexed successfully.
- ⚠️ Partially Indexed: Indexing finished but some files were skipped (unsupported extension, empty content, or errors). The index is fully usable for search and scheduling. Review the skipped-file breakdown in the chat panel.
- ❌ Failed: Indexing encountered an error.
Verify Index Creation
Once indexing completes:- The index status should appear as Completed or Partially Indexed.
-
The dedicated index page shows the General section with the index name, created date, and the initial Files indexed and Files skipped counts.

-
The INDEXES section shows an index card with the collection name, created date, indexed or total file count, and skipped file count when applicable.

Reindexing
Use Reindex on the dedicated index page when you want to refresh the indexed Confluence content.- The Index configuration section loads the saved settings for the current index.
- You can update the configuration before starting the reindex run, except for
index_name, which remains read-only. - After a successful reindex, the General section shows the latest reindex details, including the last reindex date and updated file counts.
Confluence Reindex Behavior
- If attachments are deleted from a Confluence page, they are not removed from the index during reindexing, even when Clean Index is selected. If new attachments are added to the page, they are added to the index. This behavior is caused by Atlassian-side limitations.
- If a page is deleted from Confluence, it is not removed from the index during reindexing unless Clean Index is selected.

Scheduling
Use the Schedule section on the index page to automate reindexing.- Select + Schedule to create a schedule and define when the index should run.
- Existing schedules can be edited, deleted, enabled, or disabled from the same section.
- Scheduling is available only for indexes in Completed or Partially Indexed status.
- Scheduled indexing runs also generate notifications, so you can track successful, partial, or failed updates.

Use Search Tools
Once your Confluence data is indexed, you can search and interact with it directly through the interface. The following search tools are available:Prerequisites for Search
- Indexes in Completed or Partially Indexed status support search.
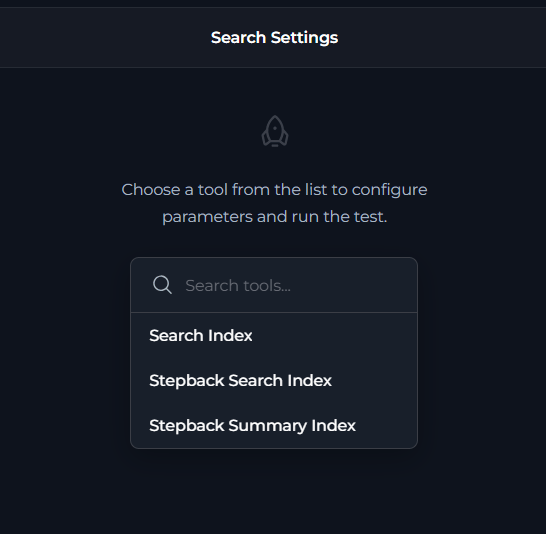
- At least one search tool must be enabled in the toolkit configuration: Search Index, Stepback Search Index, or Stepback Summary Index.
Select a Search Tool
- Open the index page.
- In the left panel, select Select tool.
- Choose a search tool from the dropdown list.
-
The page switches to the selected tool settings.
Run a Search
- Enter your query.
- Adjust optional parameters such as filters or model settings.
- Select Search.
- Review the results in the integrated chat panel.
Use Indexed Data in Conversations
Your Confluence toolkit can be used in two main contexts:- In Conversations: Add the toolkit as a participant to ask questions and search your indexed Confluence data
- In Agents: Include the toolkit when creating AI agents to give them access to your Confluence knowledge base
- Start a New Conversation or Create an Agent
- Add Toolkit as Participant: Select your Confluence toolkit from the available toolkits
- Ask Natural Language Questions: The toolkit will automatically search your indexed data and provide relevant answers with citations
Real-Life Example Workflow
Let’s walk through a complete example of indexing and using a company knowledge base: Step 1: Add toolkit to a conversation and start asking questions- Navigate to Chat → + Chat
- select the
+icon in the input toolbar. - Hover over the Toolkits category and enable your Confluence toolkit

-
User Request in Chat:
“Index our knowledge base with collection suffix ‘kb’. Include comments and labels but exclude attachments. Keep markdown formatting and clean any existing index first.”
-
User Request:
“List my collections”

- User Request: “What is our company’s vacation policy?”
-
Confluence Toolkit: “Based on your indexed knowledge base, here’s your company’s vacation policy:
- Annual Leave Entitlement: All full-time employees are entitled to 25 days of annual leave per year
- Accrual System: Vacation days accrue monthly at a rate of 2.08 days per month
- Carryover Policy: Up to 5 unused vacation days can be carried over to the next year…
- User Request: “How do I set up a new development environment?”
-
Confluence Toolkit: “Here’s the step-by-step process for setting up a new development environment:
Prerequisites:
- Install Docker Desktop
- Obtain access credentials from the DevOps team
- Clone the main repository from GitHub
- Run the environment setup script:
./scripts/setup-dev.sh - Configure your local environment variables…
Troubleshooting
Indexing Interface Not Visible or Tab Disabled
Indexing Interface Not Visible or Tab Disabled
- Verify PgVector and Embedding Model are configured in Settings → AI Configuration.
- Ensure the Index Data tool is enabled in your Confluence toolkit configuration.
- Check that your toolkit supports indexing.
- Refresh the browser page and try again.
Space Not Found or Authentication Failed
Space Not Found or Authentication Failed
- Verify that your Confluence credential uses the correct API token.
- Ensure the space key is exact and case-sensitive, for example
KBinstead ofkb. - Check that the credential has access to the target space.
Index Creation Failed or Indexing Stuck in Progress
Index Creation Failed or Indexing Stuck in Progress
- Check that your space and filter settings are not too restrictive.
- Verify that the space contains pages matching your criteria.
- Review the progress indicators for specific error details.
API Rate Limit Exceeded
API Rate Limit Exceeded
- Reduce Max Pages or narrow the scope with labels or CQL.
- Wait and retry the indexing run.
- Consider indexing large spaces in smaller batches.
No Documents Indexed
No Documents Indexed
- Check that your label or CQL filters are not too restrictive.
- Verify that the space contains pages matching your criteria.
- Try indexing without filters first, then narrow the scope.
No Search Results Returned
No Search Results Returned
- Verify that the index status is Completed.
- Check that your query matches the type of indexed content.
- Try broader search terms or a different search tool.
- Verify that the indexed content contains the information you expect.
Vector Database Connection Failed or PgVector Errors
Vector Database Connection Failed or PgVector Errors
- Ensure PgVector is configured correctly in Settings → AI Configuration.
- Verify that the vector database is running and accessible.
- Check connection credentials and database permissions.
- Restart the vector database service if needed.
Embedding Model Not Found or Embedding Errors
Embedding Model Not Found or Embedding Errors
- Verify that an embedding model is selected in AI Configuration.
- Check that the model is available and initialized.
- Try switching to a different embedding model.
- Ensure the environment has enough resources to load the model.
Large Confluence Spaces
Large Confluence Spaces
- Use label filters such as
label="documentation"orlabel="public". - Use CQL to narrow the scope, for example
space="KB" AND created>="2024-01-01". - Consider indexing by page hierarchy or in smaller batches.
- Monitor progress indicators and document counts during the run.
Search Result Quality
Search Result Quality
If search returns few or no results:
- Verify that the index status is Completed.
- Lower the cut-off score from
0.5to0.35or0.3. - Increase
search_topfrom10to20or30. - Rephrase the query with different keywords.
- Include both pages and attachments for broader coverage.
- Use natural language queries instead of exact keyword matches.
- Use follow-up questions in the integrated chat interface.
- Create separate indexes for different content types or scopes.
Guides & References
- Indexing Overview - General indexing concepts and features
- How to Use Credentials - Credential management and Confluence setup
- Toolkits Menu - Toolkit configuration and management
- Confluence Toolkit Integration Guide - Complete Confluence toolkit reference
- AI Providers - Vector storage and embedding model setup
- Chat Menu - Creating conversations and adding toolkit participants