

Overview
Build with AI is an agent creation shortcut that converts a natural-language description into a complete agent draft. Instead of filling in every field manually, describe what the agent should do and ELITEA generates a starting configuration: name, description, instructions, welcome message, conversation starters, and suggestions for toolkits and child agents already available in your project. The draft is fully editable before the agent is created — nothing is saved until you click Create Agent.Natural-Language Input
Describe the agent’s goal, tasks, and tone in plain text. No structured syntax or templates required.
Full Draft Preview
Review and edit every generated field — name, description, instructions, welcome message, and conversation starters — before the agent is created.
Suggested Resources
ELITEA analyses the available toolkits and agents in your project and suggests relevant ones to attach. You decide which to include.
Non-Destructive
No agent is created until you click Create Agent. Go back to edit your prompt at any time before confirming.
Prerequisites
- Permission: Requires agent edit/update permissions in the project. The Build with AI button is not shown to users without this permission.
- Default Model: The project must have at least one LLM model configured. The generated agent uses the project’s default model.
- Existing Resources (optional): Toolkits and agents already in the project are surfaced as suggestions. None are required to use the feature.
How It Works
Build with AI is a three-step modal flow:
After you click Create Agent, the platform:
- Creates the agent with the reviewed fields and the project’s default LLM model
- Associates the selected toolkits and child agents
- Navigates you directly to the new agent’s Configuration tab
The AI generates values for: Name, Description, Instructions, Welcome Message, Conversation Starters, and lists of Suggested Toolkits and Suggested Agents from your project. All values are editable before creation.
Use Build with AI
Step 1 — Open the Build with AI Dialog
- Go to Agents in the main menu.
- Click + Create to open the new agent form.
- In the General accordion section, locate the Build with AI button in the section header (sparkle icon ✨).
-
Click Build with AI to open the dialog.

Step 2 — Describe Your Agent
The dialog opens on the description input step. A large multiline text field is shown with the placeholder:Describe your agent’s goal, key tasks, and preferred tone or behavior.
-
Enter your description in the text field. Include:
- What the agent is for
- What tasks it should handle
- Any specific tone, constraints, or behavior you want
-
Click Generate or press Enter (without Shift) to submit.
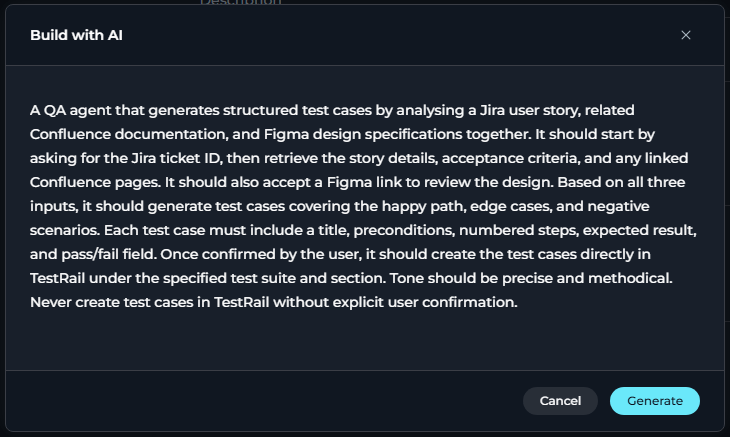
Pressing Shift+Enter inserts a line break in your description. Only plain Enter triggers generation.
Step 3 — Review & Edit the Draft
Once generation completes, the dialog shows the Review step with all generated fields pre-filled and fully editable. Editable fields:
Suggested resources:
If the AI detected relevant toolkits or agents in your project, they are shown in checkbox lists at the bottom of the review form:
- Suggested Toolkits — shows toolkit name and type. Select the ones to attach.
- Suggested Agents — shows agent name and description. Select the ones to attach as child agents.
- Back to prompt — returns to the description input step with your original text preserved, without losing the draft. Use this to refine your description and regenerate.
-
Create Agent — creates the agent with the current field values and selected resources.

Step 4 — Agent Created
After clicking Create Agent:- The agent is created in the project.
- Selected toolkits are associated with the agent’s first version.
- Selected agents are associated as child agents.
- The dialog closes and the browser goes directly to the new agent’s Configuration tab.
Edit an Agent with AI
Use AI after an agent already exists. Edit with AI helps you propose targeted updates to a saved agent, review the generated changes step by step, and then either apply them to the current version or save them as a new version. Unlike Build with AI, which creates a brand-new agent draft, Edit with AI starts from the current saved agent configuration and generates a proposed update.Prompt-Based Editing
Describe the changes you want in plain language, such as refining instructions, updating the welcome message, or suggesting missing resources.
Step-by-Step Review
Review the generated update through a guided wizard that can include General, Instructions, User Interaction, Tools & Skills, and Summary steps.
Selective Apply
Choose which generated field changes to keep before saving. You do not have to accept every suggested update.
Version-Safe
Save the AI-generated changes directly to the current version or create a new version from the reviewed draft.
Step 1 — Open the Edit with AI Dialog
- Open an existing saved agent.
- In the General accordion section, locate the Edit with AI button in the section header.
-
Click Edit with AI to open the dialog.
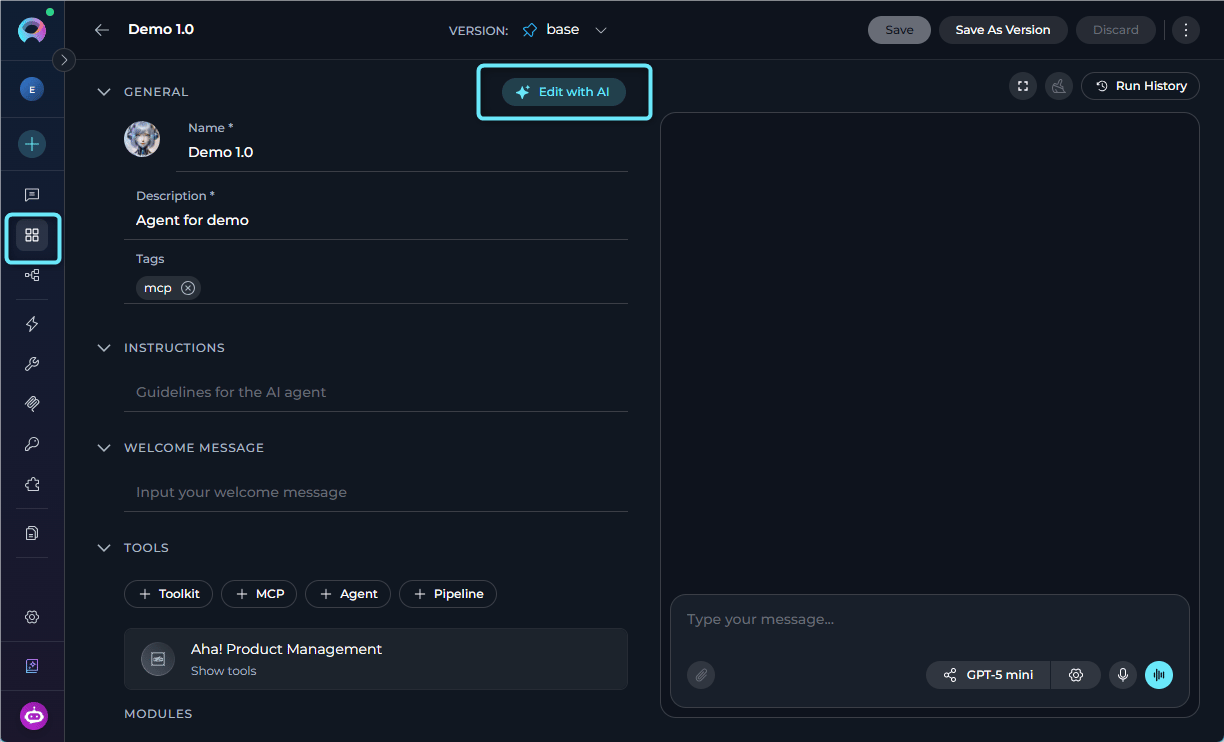
Step 2 — Describe the Changes You Want
The dialog opens on the prompt step with a multiline text field. The placeholder explains that AI can help update the agent’s description, instructions, tools, skills, and other configuration details.-
Describe the changes you want to make. For example:
-
Click Generate Draft or press Enter (without Shift).

Pressing Shift+Enter inserts a line break in the prompt. Only plain Enter triggers draft generation.
Step 3 — Review the Generated Update
Once generation completes, ELITEA opens a wizard-style review flow. The exact steps depend on what the AI changed, but the wizard can include:
- Move between steps using Previous and Next
- Use Refine Prompt to return to the prompt step and regenerate
- Selectively keep or skip individual field changes
- Review suggested resource changes before they are applied
The AI edit flow can propose changes to Name, Description, Instructions, Welcome Message, Conversation Starters, and attached resources such as toolkits, MCPs, agents, pipelines, and Skills.
Step 4 — Save the Changes
At the end of the wizard, choose one of the following actions:- Save — applies the selected AI-generated changes to the current version
-
Save as Version — opens a version-name dialog and creates a new version from the reviewed draft

Step 5 — Continue Editing in Configuration
After saving, the dialog closes and the agent remains available in the standard configuration view, where you can continue adjusting models, resources, modules, variables, and other settings manually if needed.Build an Agent with AI from Chat
Use Build with AI without leaving an active conversation, via the Canvas interface in Chat.-
In the chat input toolbar, click the
+icon. - Hover over Agents to expand the submenu.
- Click Create New Agent at the bottom of the submenu.
- The Agent Canvas slides in with the full creation form.
- In the General section header, click the Build with AI button (sparkle icon ✨).
- Enter a description of your agent’s goal, tasks, and behavior, then click Generate.
- Review and edit the generated draft — name, instructions, welcome message, conversation starters, and suggested resources.
- Click Save to create the agent.
Example Descriptions
The following examples show the range of descriptions you can provide:Code Review Agent
Code Review Agent
A code review agent that reviews Python pull requests for correctness, style, and security issues. It should be thorough but concise, and return its feedback as a structured list with severity labels (critical, warning, suggestion).The AI will generate instructions focused on Python code analysis, a welcome message inviting users to paste their code, and conversation starters like “Review this Python function for security issues.”
Jira Ticket Management Agent
Jira Ticket Management Agent
An agent that helps engineers create, update, and search Jira tickets. It should ask clarifying questions before creating tickets to ensure all required fields are filled. Tone should be professional and efficient.The AI will generate instructions for Jira task management and likely suggest any Jira toolkits available in your project.
Sprint Planning Coordinator
Sprint Planning Coordinator
A meta-agent that coordinates sprint planning by gathering sprint goals from the user, delegating analysis to specialist agents, and producing a consolidated sprint plan. It should be structured and ask one question at a time.The AI will generate coordinator-style instructions and may suggest other agents in the project as child agents.
Troubleshooting
Generation fails with an error
Generation fails with an error
If the AI backend fails to generate a draft, an error message appears in the dialog and you remain on the input step. Common causes:
- The description is empty or too short
- A backend service is temporarily unavailable
Suggested toolkits or agents are not shown
Suggested toolkits or agents are not shown
Suggestions are based on resources already in your project. If no toolkits or agents exist in the project, no suggestions appear. Create the relevant toolkits or agents first, then try generating a draft again.
The generated name or instructions are not suitable
The generated name or instructions are not suitable
All fields are fully editable in the Review step. Overwrite the generated name, rewrite the instructions, and adjust any other field before clicking Create Agent. Alternatively, click Back to prompt, refine your description, and regenerate.
I want to start over with a different description
I want to start over with a different description
Click Back to prompt on the Review step. Your original description is preserved in the input field and you can edit it before generating again.
Guides & References
- Agents Overview — Creating and configuring agents manually
- Agent Publishing — Publish your generated agent so others can use it
- Entity Versioning — Create and manage versions of your agent after generation
- Toolkits Overview — Create and configure toolkits to attach to your agent
- Agents from Canvas — Another way to create and edit agents directly from a conversation