

Overview
A Skill is a focused, reusable instruction set that gives an agent a named capability — written once in Markdown and shared across as many agents as you need. Instead of duplicating instructions or hardwiring behavior into every agent separately, you define the logic in a Skill, attach it where needed, and invoke it on demand during any conversation.Reusable
Write once, attach to many agents. Updates to a Skill apply everywhere it is used.
On-Demand
Invoke any attached Skill mid-conversation by typing
~skill-name in the chat composer.Versioned
Maintain multiple named versions alongside the always-present
base, so you can iterate without breaking existing agents.Access Skills
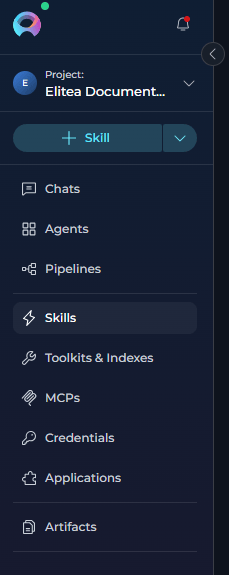
To open the Skills area:- Select the correct project from the project switcher at the top of the left sidebar.
-
Select Skills in the main navigation sidebar.
The Skills page opens, showing the Skills tab — a scrollable list (or card grid) of all Skills in the current project.
Organize Skills into Folders
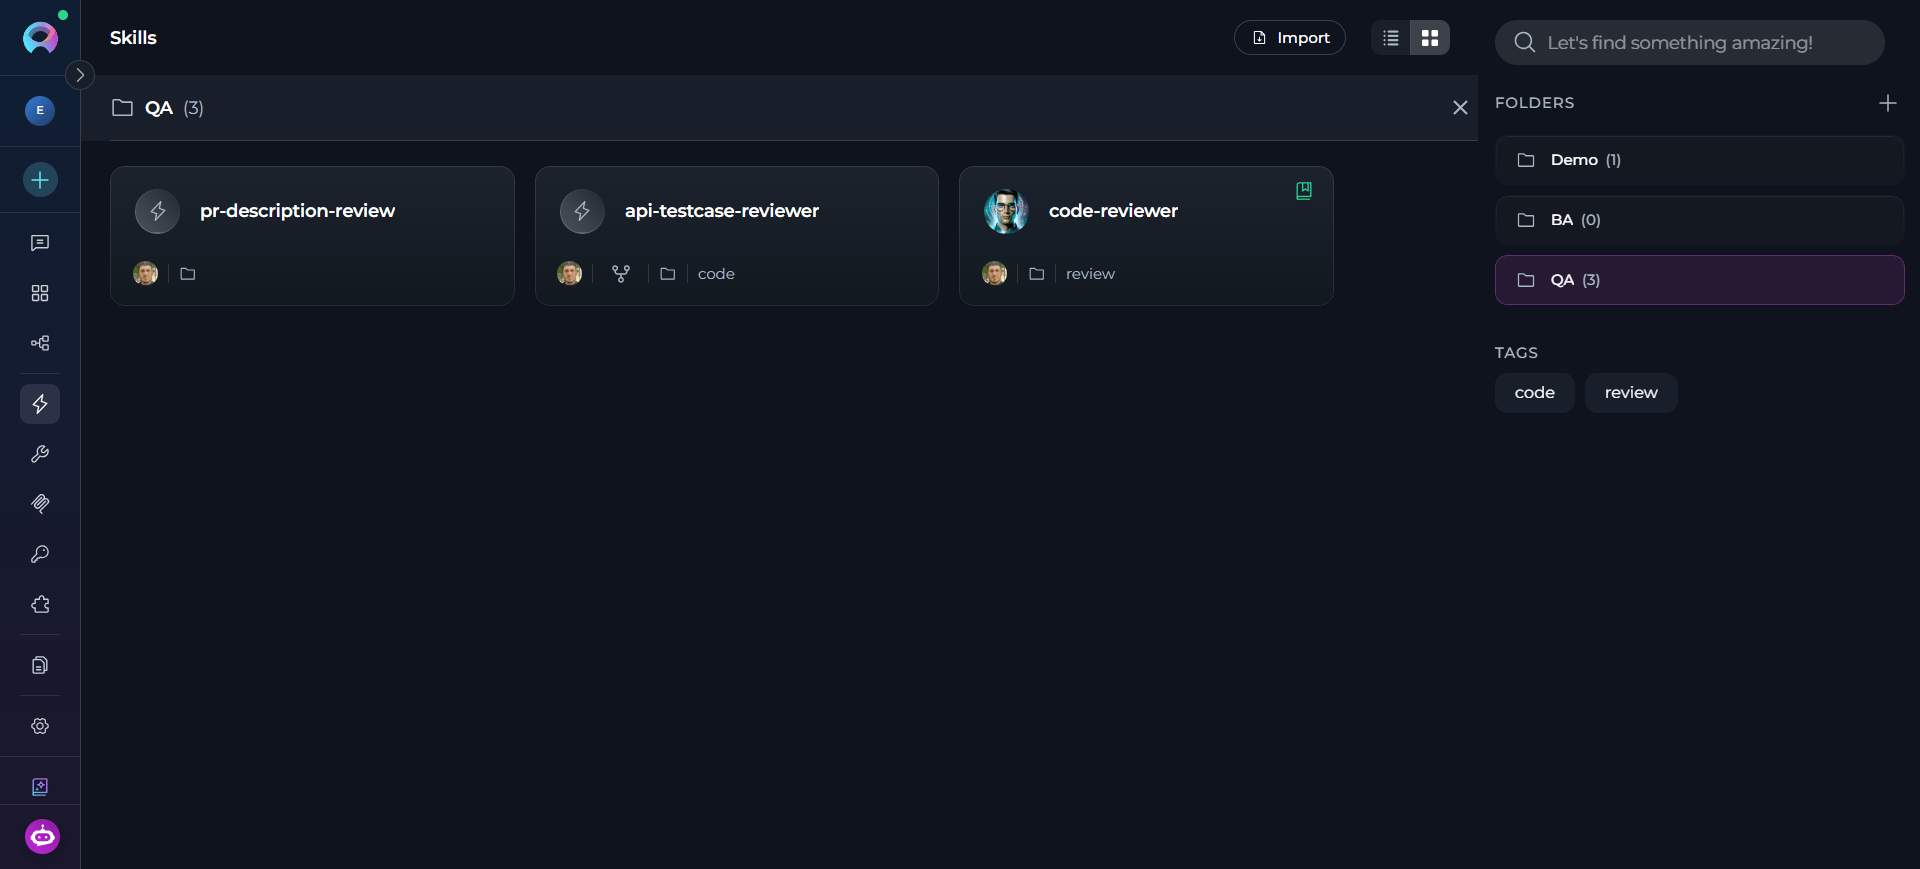
Folders help you organize Skills into logical groups for better navigation and management. You can create folders, move Skills between folders, and control folder access within team projects.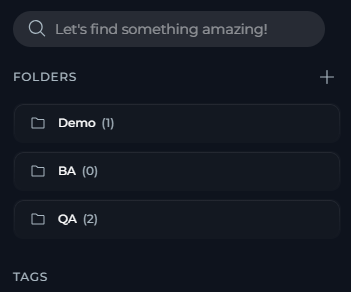
- In the Skills dashboard right panel, locate the Folders section.
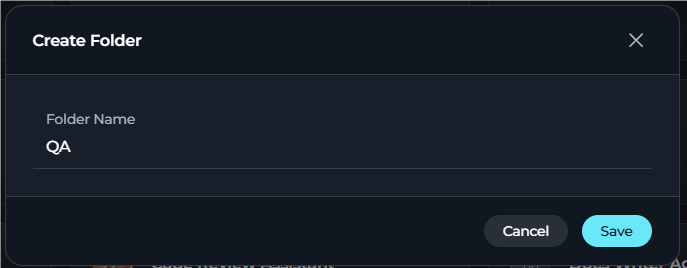
- Select + Create Folder.
- Enter a folder name (up to 128 characters).
-
Select Save.
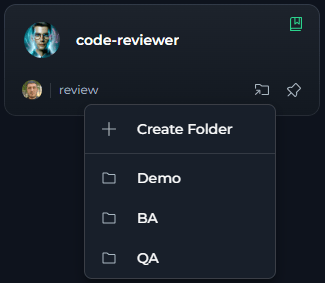
- Hover over a Skill card: A “Move to folder” icon (folder with arrow) appears on the card.
- Click the folder icon: Opens a menu with folder options.
-
Select a folder from the list: The menu displays:
- + Create Folder option at the top
- A scrollable list of existing folders
- Pinned folders are marked with a pin icon
- The current folder (if any) is highlighted and marked with a checkmark
-
The Skill is moved to the selected folder.
Remove a Skill from a Folder:
- Open the Skill card’s three-dot menu (⋮).
- Select Remove from Folder.
- The Skill returns to the main Skills list and the folder icon is removed from its card.
Folders are available in team and personal projects. In team projects, folder access can be restricted to specific users. The Public project does not support folders.
Folder Permission Management
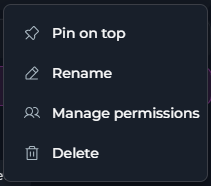
In team projects, you can control which users can view and modify specific folders by setting permission exceptions. By default, users retain the permissions granted by their project roles. Permission exceptions can only restrict access. Access Folder Permissions:- In the Skills dashboard right panel, locate the folder in the Folders list.
- Select the folder’s three-dot menu (⋮).
- Select Manage Access.
- The Manage Permissions dialog opens.
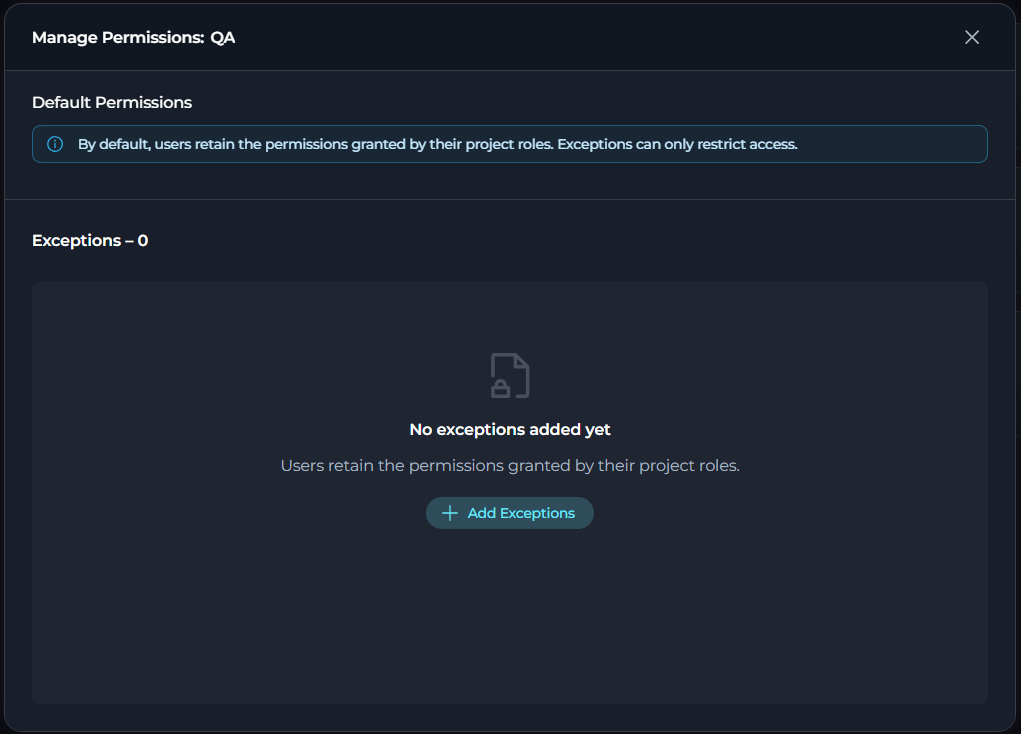
- In the Manage Permissions dialog, select + Add Exception.
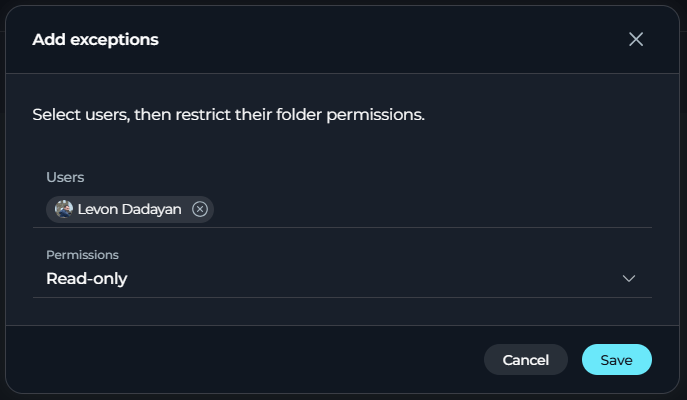
- Search for and select one or more users from the project.
- Choose a permission level: Read-only or No access.
-
Select Add. The selected users are added to the permissions table.
Edit Permission Exceptions:
- To modify an existing exception, locate the user in the permissions table and select the Edit (pencil) icon in the Actions column. Change the permission level to your desired setting and select Save.
- To remove an exception and return the user to default permissions, change the permission level to Read/write (default). When saved, the user is removed from the exceptions table and inherits permissions based on their project role.
Permission exceptions apply only to the folder itself. Users with no access to a folder cannot see it in their folders list or view its contents.
Create a Skill
You can create a Skill from the Skills page, directly from the agent editor, or from chat using the Skill Builder module.From the Skills Page
- Select the
+(Create) button in the top section of the left sidebar, or go to the Skills page and select Create in the empty state if no Skills exist yet.
-
Alternatively, use the global
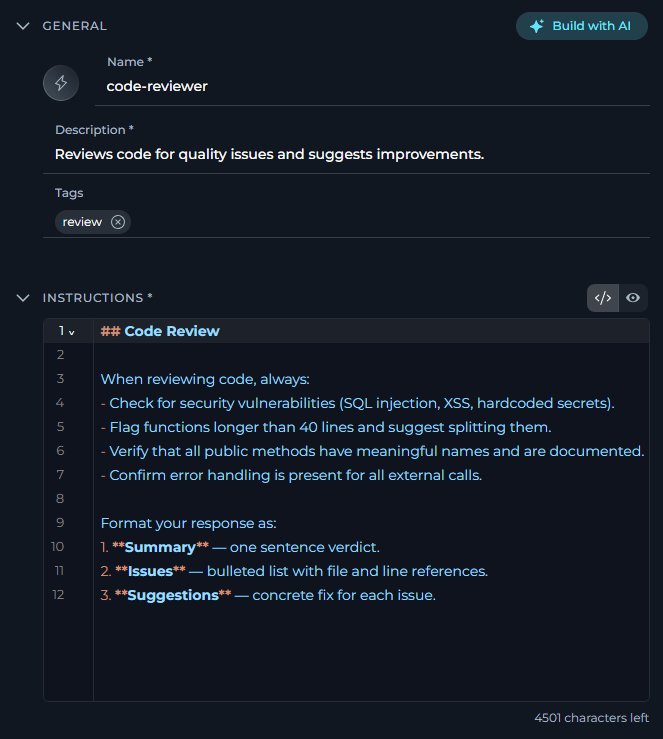
+Create button in the sidebar and select Skill from the dropdown. The New Skill form opens with two accordion sections: General and Instructions.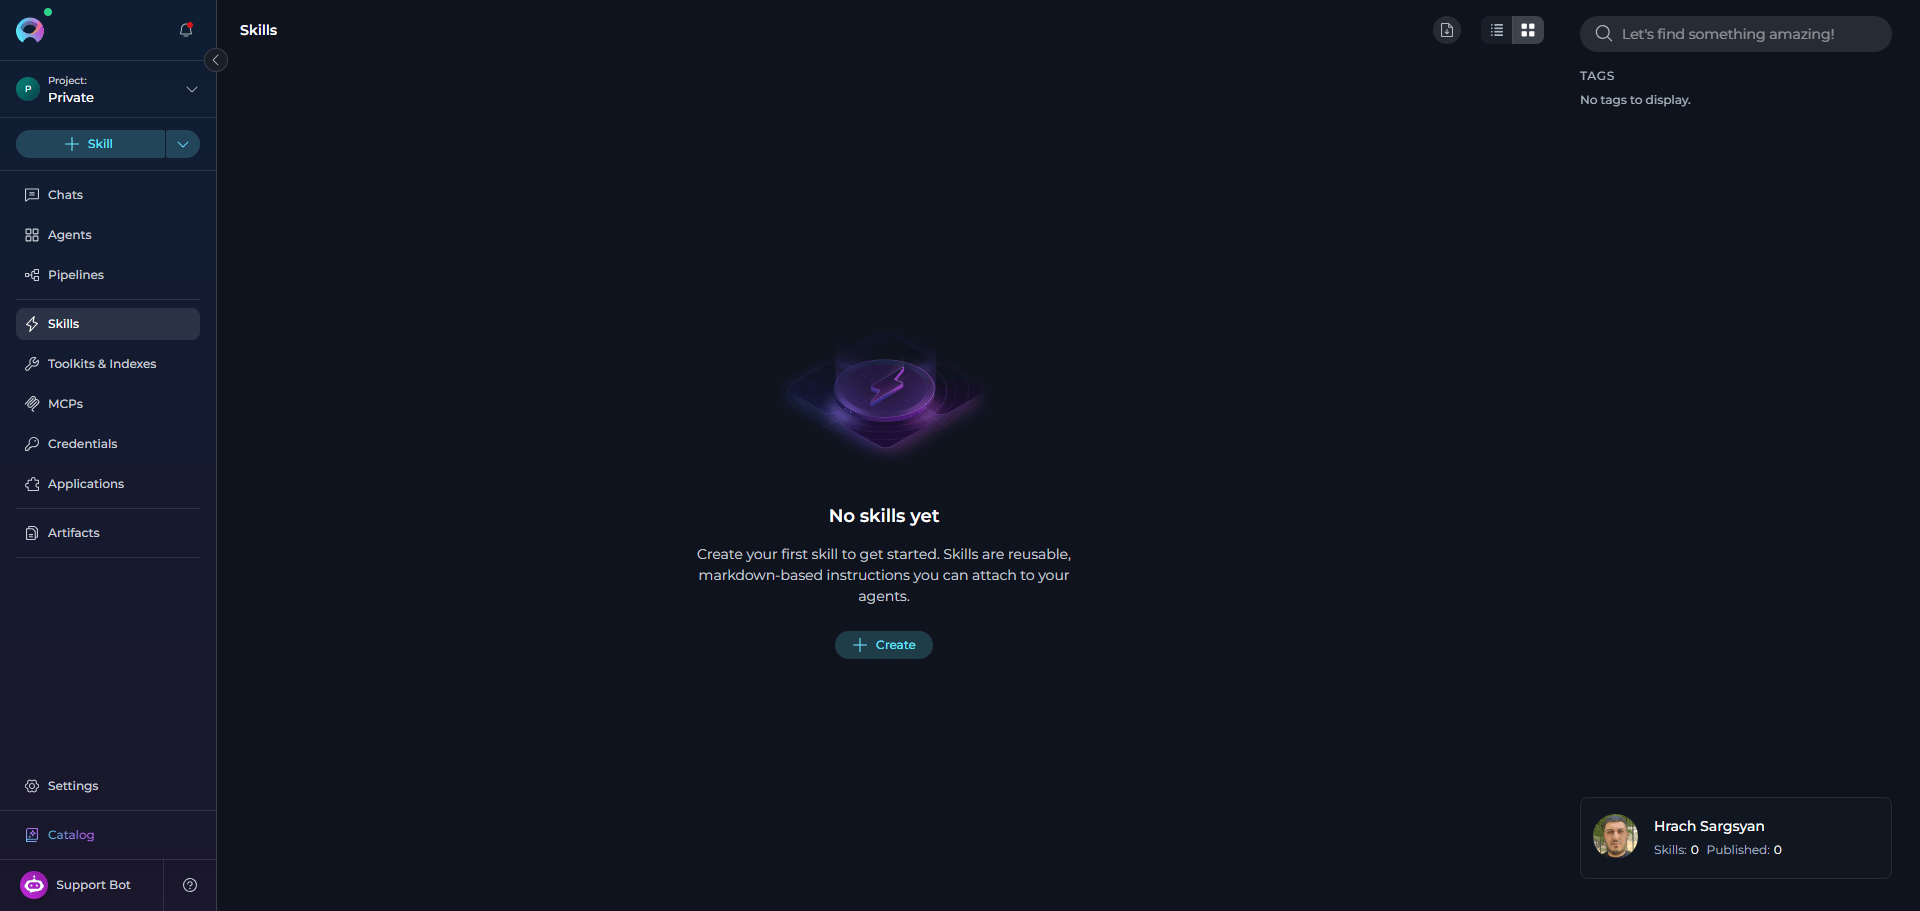
-
In the General section, complete the following fields. Then, in the Instructions section, enter your skill instructions in the Markdown or CodeMirror editor.
Name rulesName must use lowercase letters, digits, and hyphens only. It must not start or end with a hyphen. The maximum length is 64 characters. It must not contain
claude or anthropic.- Use the toggle button group in the section header to switch between Edit mode and Preview mode.
-
A character counter at the bottom of the editor shows the remaining characters. The maximum is 5000 characters.
- Select Save in the tab bar at the top of the page.
Upload a Skill Icon
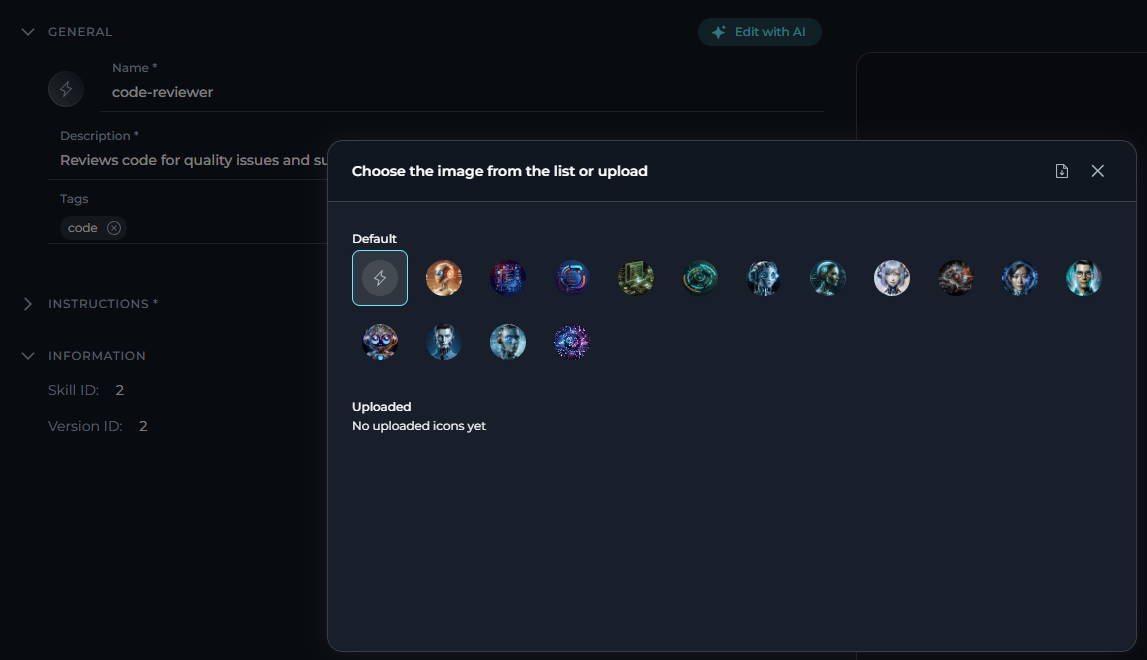
In the General section, the Skill icon is editable when your role includes the upload icon permission.- Open the Skill editor.
- In General, select the Skill icon.
- Upload a new icon or select an existing icon from the icon gallery.
- Select Save.
Generate a Skill with AI
Instead of filling in the form manually, select Generate with AI in the General section header to open the Generate skill dialog.-
Describe what you want the Skill to do in the input field.
Example prompt:
- ELITEA drafts a Name, Description, and Instructions for you.
- Review and edit the draft in the dialog.
- Select Approve to apply it to the form, then select Save.
Edit a Skill with AI
You can also refine an existing Skill with Edit with AI.- Open an existing Skill.
- Select Edit with AI.
- Describe the changes you want.
- Select Generate Draft.
- Review the generated draft step by step.
- Select Save or Save as Version.
Test a Skill
After you save a Skill, the right panel of the Skill editor contains a test chat panel. This stateless, ephemeral chat lets you interact with the Skill directly without creating a saved conversation. Use it to verify instructions before you attach the Skill to any agent.Test conversationsTest conversations are ephemeral. They are not saved and disappear when you leave the page or clear the chat.
Select the LLM Model & Settings
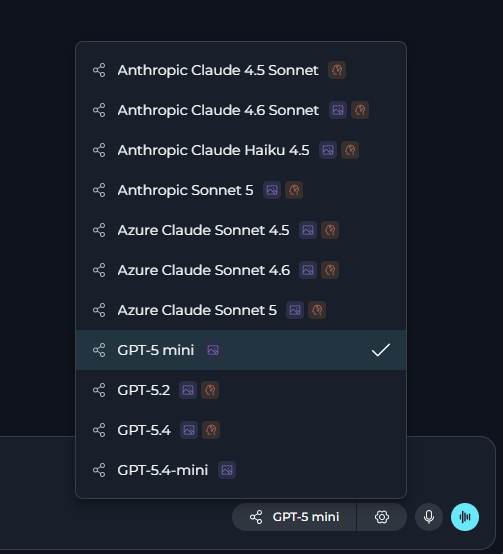
Before sending a message, you can choose which AI model processes the Skill and optionally fine-tune its parameters.- Select the model chip in the chat input bar to open the model selector dropdown.
-
Choose the model from the list, for example
gpt-4oorgpt-5.1. -
Select the Model Settings icon next to the model chip to adjust generation parameters.
- Reasoning Models (e.g. GPT-5.1)
- Standard Models (e.g. GPT-4o)
| Level | Behavior |
|---|---|
| Low | Fast, surface-level reasoning with concise answers and minimal steps |
| Medium | Balanced reasoning with clear explanations and moderate multi-step thinking (default) |
| High | Deep, thorough reasoning with detailed step-by-step analysis (may be slower) |
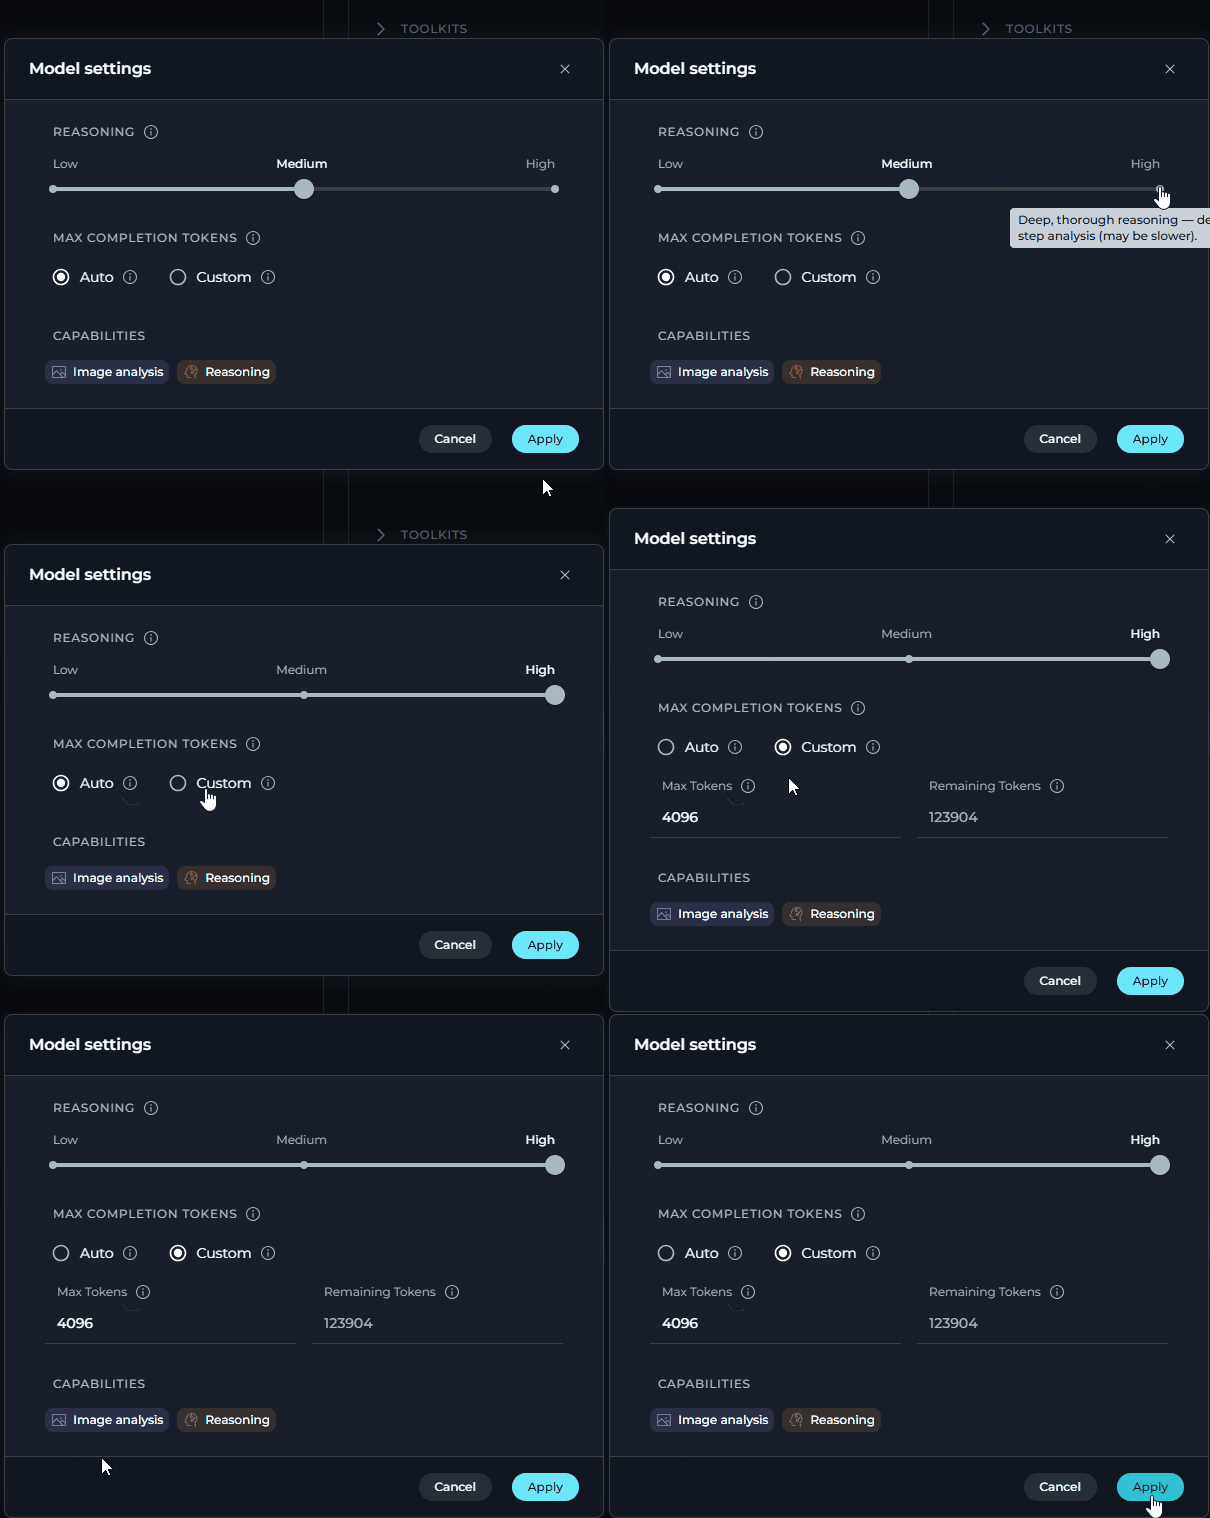 |
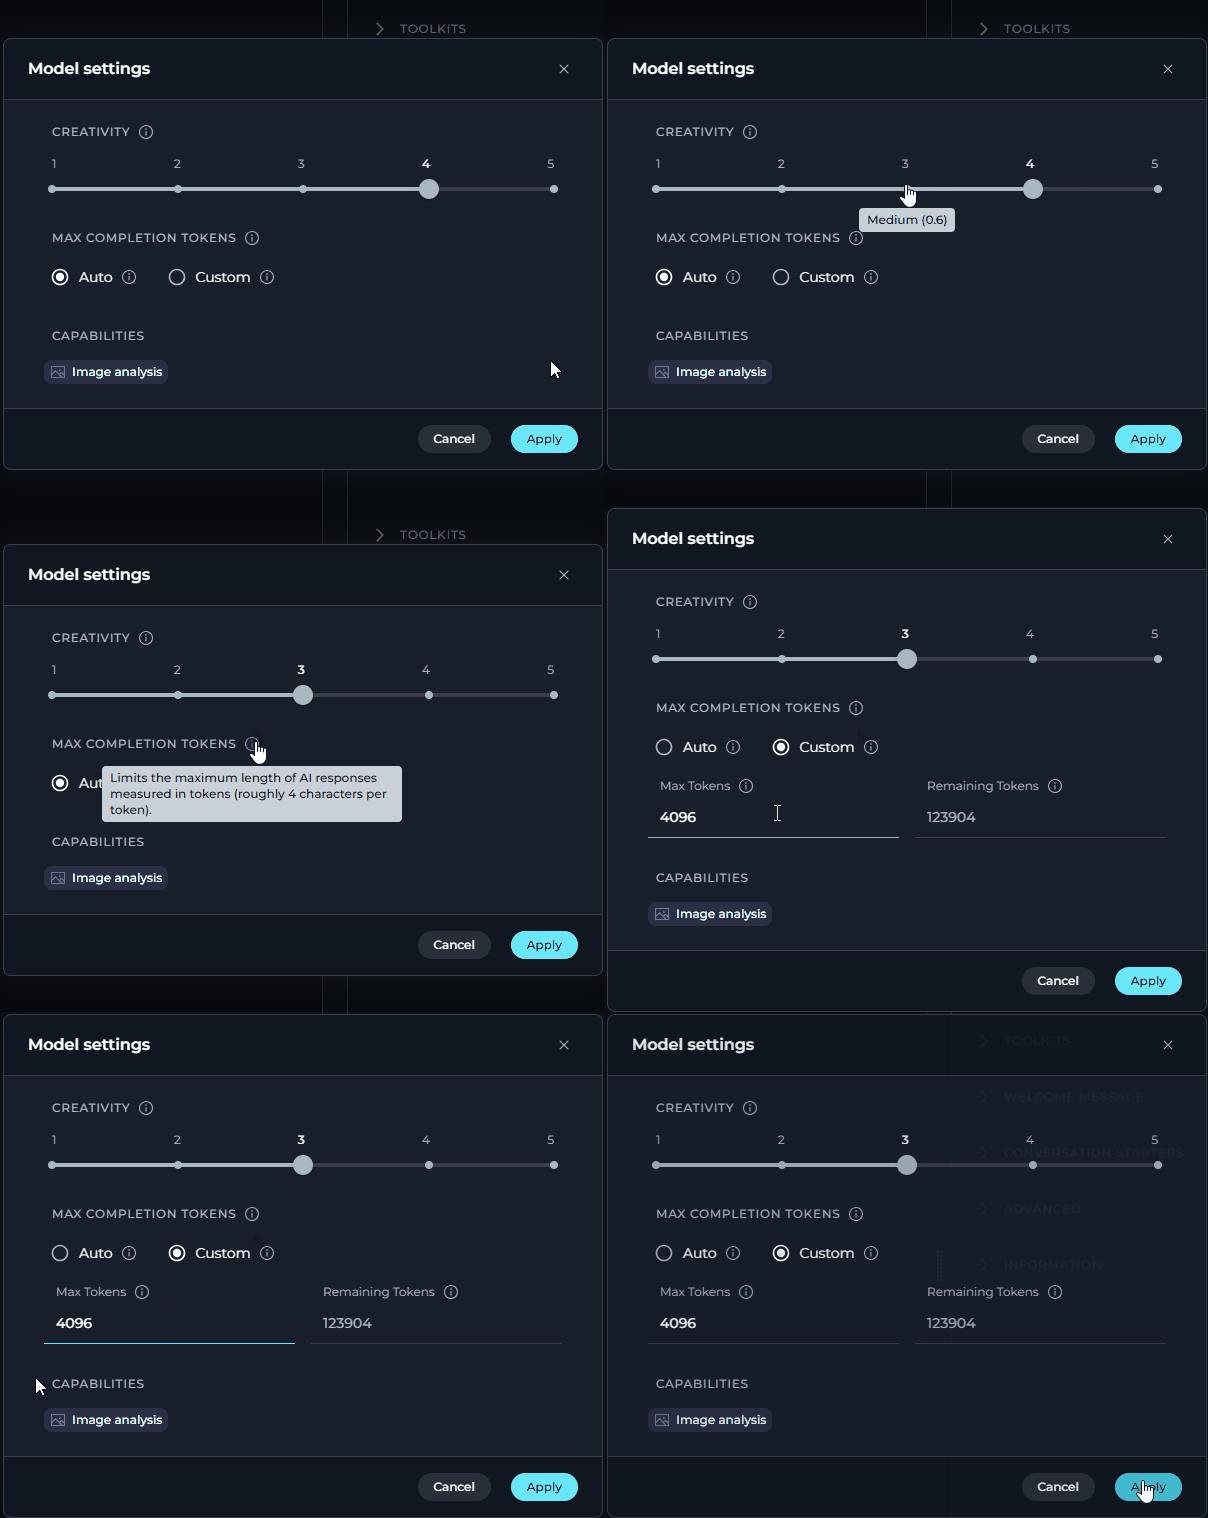
Use Voice Capabilities
The Skill test chat panel supports the same voice features as the agent chat interface.Voice Input
Dictate prompts into the chat input field. Transcribed text is inserted at the cursor in real time.
Text-to-Speech
Have Skill responses read aloud. Pause and resume playback from a mini-player pill in the input area.
Speaking Mode
Hands-free voice loop. ELITEA records, sends, speaks the response, and listens again — automatically.
Voice inputVoice Input uses a server-side automatic speech recognition (ASR) model if it is configured in Settings > AI Configuration. Otherwise, it falls back to the browser Web Speech API. If neither is available, the microphone icon is hidden.
Text-to-speechWhen a text-to-speech (TTS) model is configured in Settings > AI Configuration, ELITEA uses it for audio generation. Otherwise, playback falls back to the browser SpeechSynthesis API.

Create & Manage Versions
Skills support versioning, allowing you to maintain multiple iterations of a Skill without breaking existing agents that depend on it. Every Skill has abase version, and you can create additional named versions to test changes, iterate on improvements, or maintain different variants for different use cases.
Key Version Concepts:
- base version: The always-present initial version of every Skill. Cannot be deleted.
- Default version: The version agents use when a Skill is attached without specifying a particular version. Can be changed to any version except those currently attached to agents.
- Named versions: Additional versions you create (e.g., “v2”, “updated-for-api-v3”). Each must have a unique name within the Skill.
- Version selector: Dropdown in the Skill editor tab bar that shows all versions, their creators, and creation dates.
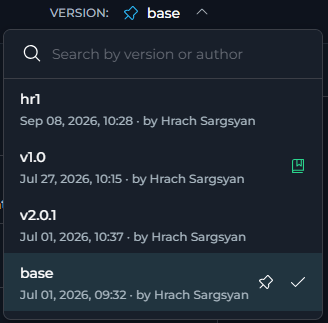
For detailed information about version management patterns, best practices, naming conventions, and the complete Compare Versions workflow, see Entity Versioning. The reference documentation describes agent versioning, but skill versioning works the same way.
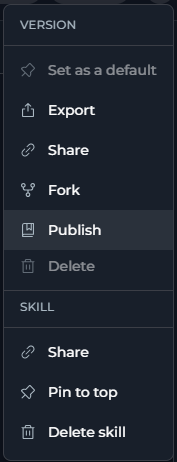
Export a Skill
- Open the Skill and go to the version you want to export.
- Select the ⋮ overflow menu in the tab bar.
- Under the VERSION section, select Export.
-
A
.mdfile for the current version is downloaded to your machine.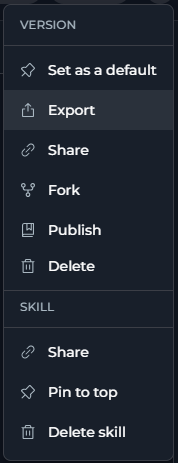
Import a Skill
- On the Skills page, select the Import icon button in the top toolbar.
-
A file picker opens. Select the
.mdexport file from your machine. -
The Import parameters dialog appears, showing:
- PROJECT — a project selector (defaults to the currently selected project). Change it to import the Skill into a different project.
- MAIN ENTITY — a preview card showing the Skill name, type, description, and instructions from the file.
- Select Import to create the Skill, or select Cancel to abort.
Imported versionImported Skills are always created with the
base version, regardless of the version stored in the export file.Fork a Skill
You can fork a Skill version from the Skill editor or from ELITEA Catalog.- Open the Skill version you want to reuse.
- Open the ⋮ overflow menu.
- Select Fork.
- Complete the import flow.
Publish a Skill
Skills can be published to ELITEA Catalog and later unpublished.- Open the Skill version you want to publish.
- Open the ⋮ overflow menu.
- Select Publish.
- Complete the publish flow.
Use Skills from ELITEA Catalog
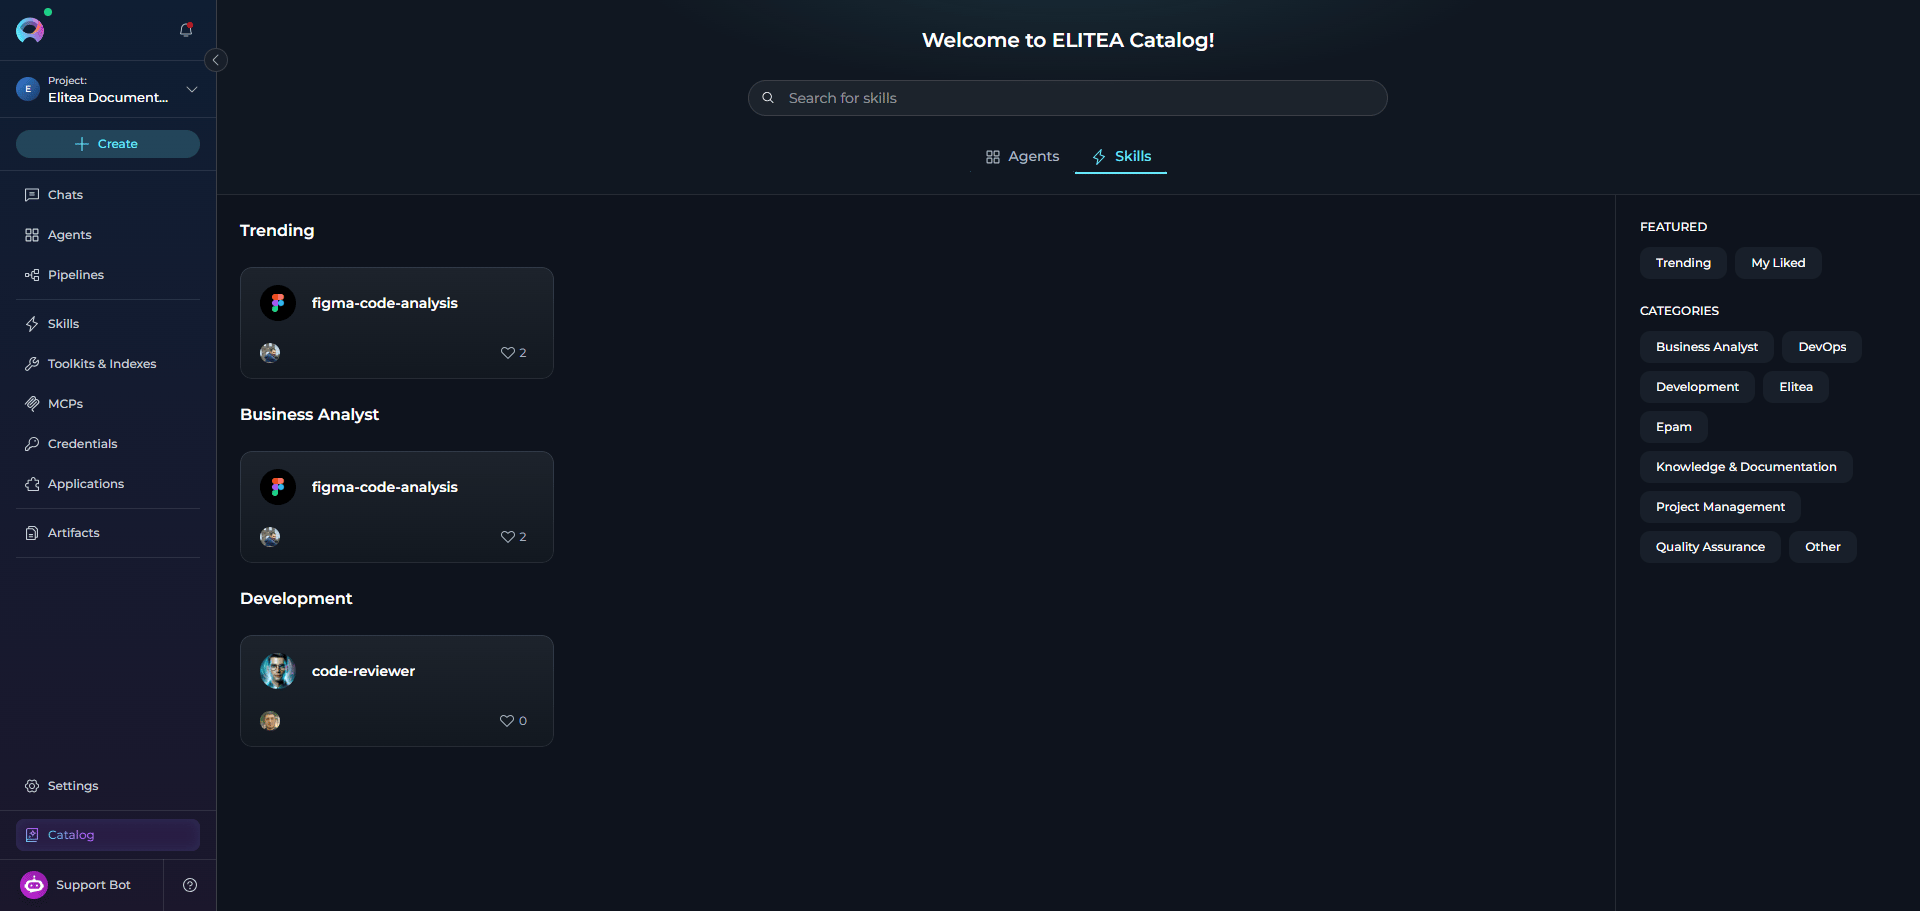
Published Skills are available in ELITEA Catalog. From the catalog, you can:- Browse published Skills by category
- Open Skill details
- Export a published Skill
- Fork a published Skill into your project
- Attach a public Skill to one or more agents in the current project
Attach a Skill to an Agent
Skills are attached at the agent version level, not to the agent as a whole. You must save the agent before Skills can be attached.Skill limitA maximum of 5 Skills can be attached to a single agent version. The counter in the Skills section shows how many are currently attached (e.g.,
2/5 skills added).- In Agents, open the agent you want to configure.
- In the agent configuration form, scroll to the Skills accordion section (below the Instructions and Toolkits sections).
-
Select the
+ Skillbutton to open the skill picker dropdown.- The button is disabled and shows a tooltip if the agent has not been saved yet (
Save the agent first, then add skills) or if the 5-Skill limit has been reached (Maximum number of skills reached).
- The button is disabled and shows a tooltip if the agent has not been saved yet (
- Search for the Skill by name in the Search skills… field, or browse the list.
-
Click a Skill to attach it. It attaches immediately using the Skill’s
baseversion.- Skills already attached to the agent version are excluded from the list to prevent duplicates.
- Select
+ Skillin the Skills accordion. - Select Create new at the bottom of the picker dropdown.
- You are taken to the Skill creation form.
The attached skill version no longer exists. Select a valid version or remove this skill.If no Skills are attached to the agent, the mention list in chat shows:
No skills attached to this agent
Change the Attached Version
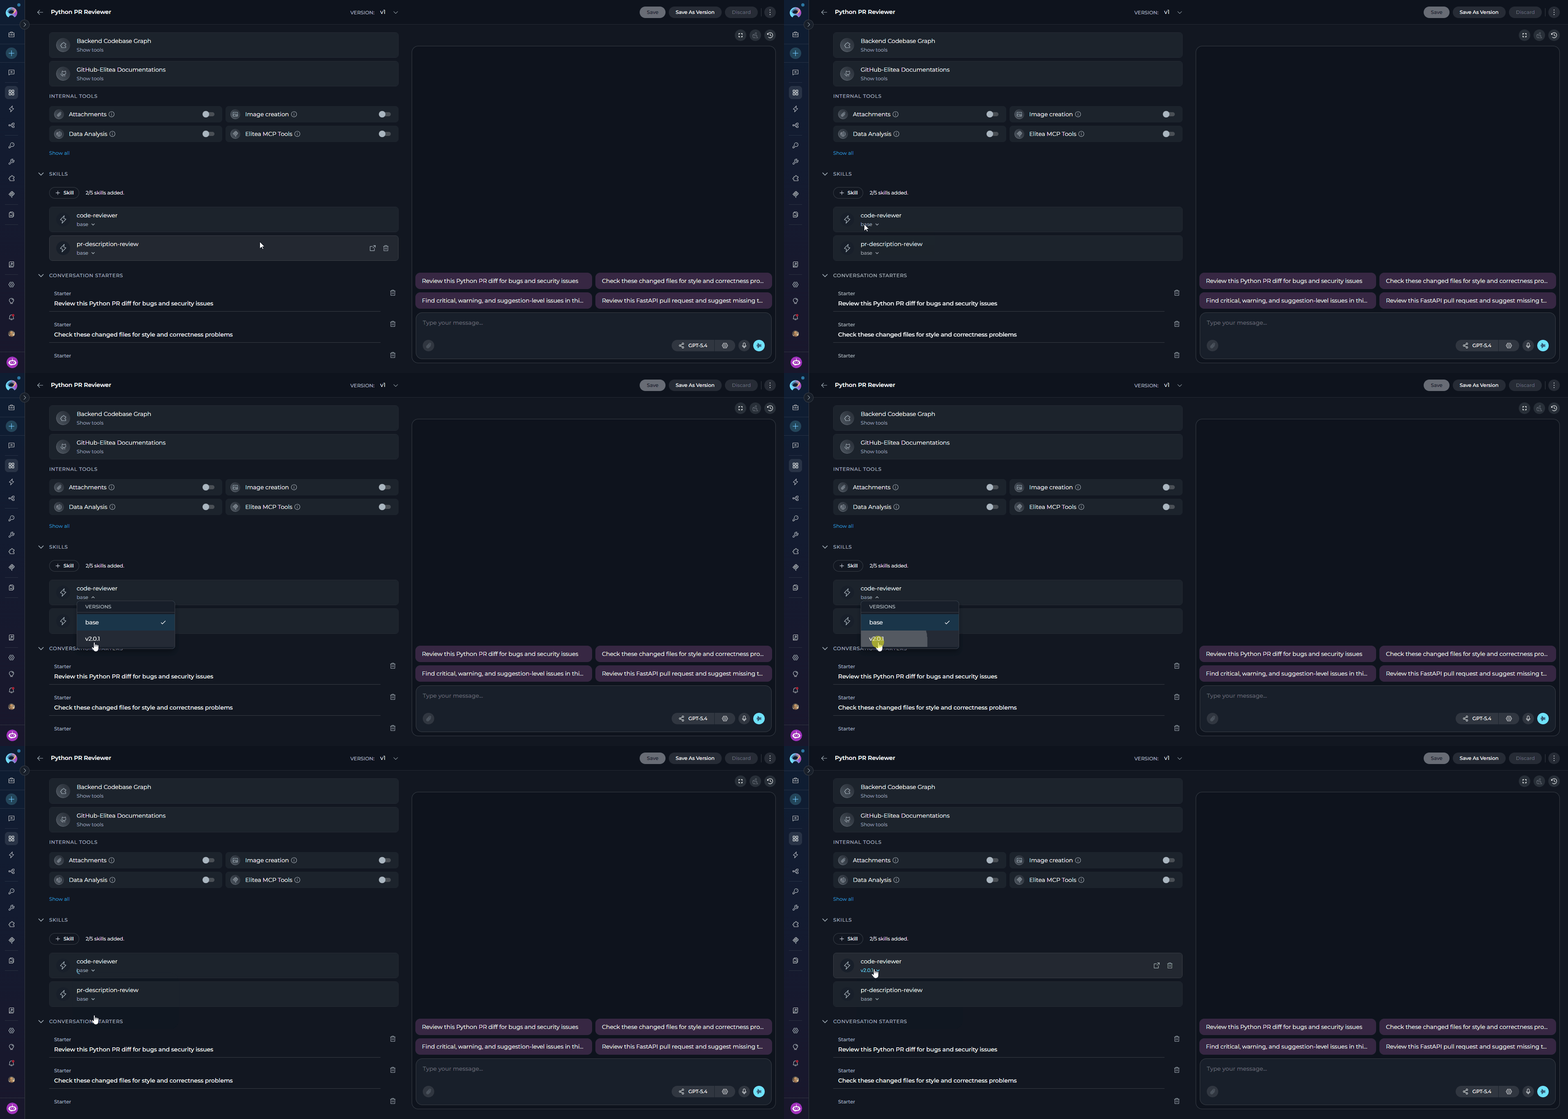
Each attached Skill card shows the currently active version name below the Skill’s name. To change which version the agent uses:-
On the Skill card inside the agent Skills section, select the version name, for example
base. - A Versions dropdown appears, listing all available versions.
- Select the version you want. The attachment is updated automatically. The old version is detached and the new version is attached.
-
The selected version is highlighted with a check mark.
Use Skills in Chat
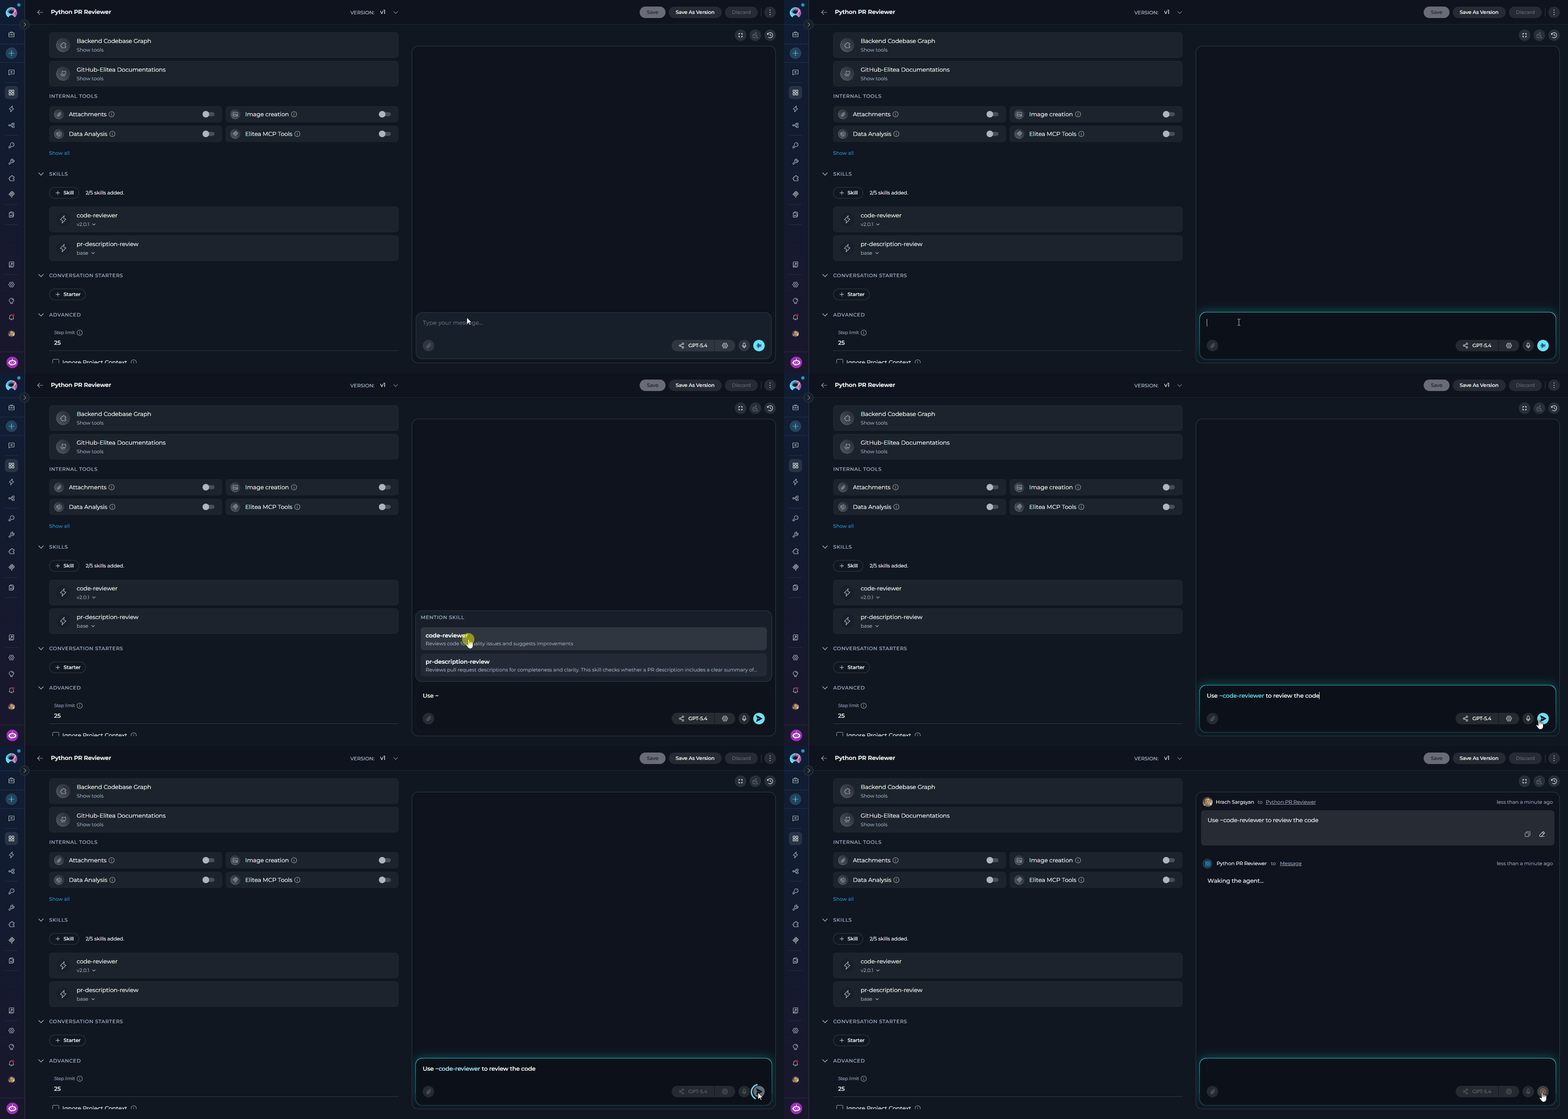
When an agent has one or more Skills attached, users can invoke a Skill explicitly during a chat conversation by typing~ (tilde) followed by the Skill name in the chat composer.
-
In a chat conversation with an agent that has Skills attached, type
~in the message input. -
A Mention skill dropdown appears above the input, listing all Skills attached to that agent.
- If no Skills are attached, the dropdown shows: “No skills attached to this agent”.
- Type additional characters to filter the list, or use the arrow keys to highlight a Skill.
- Press Enter or select the Skill name to insert it as a mention token in your message.
-
Send the message. The agent receives and executes that Skill’s instructions for this turn.
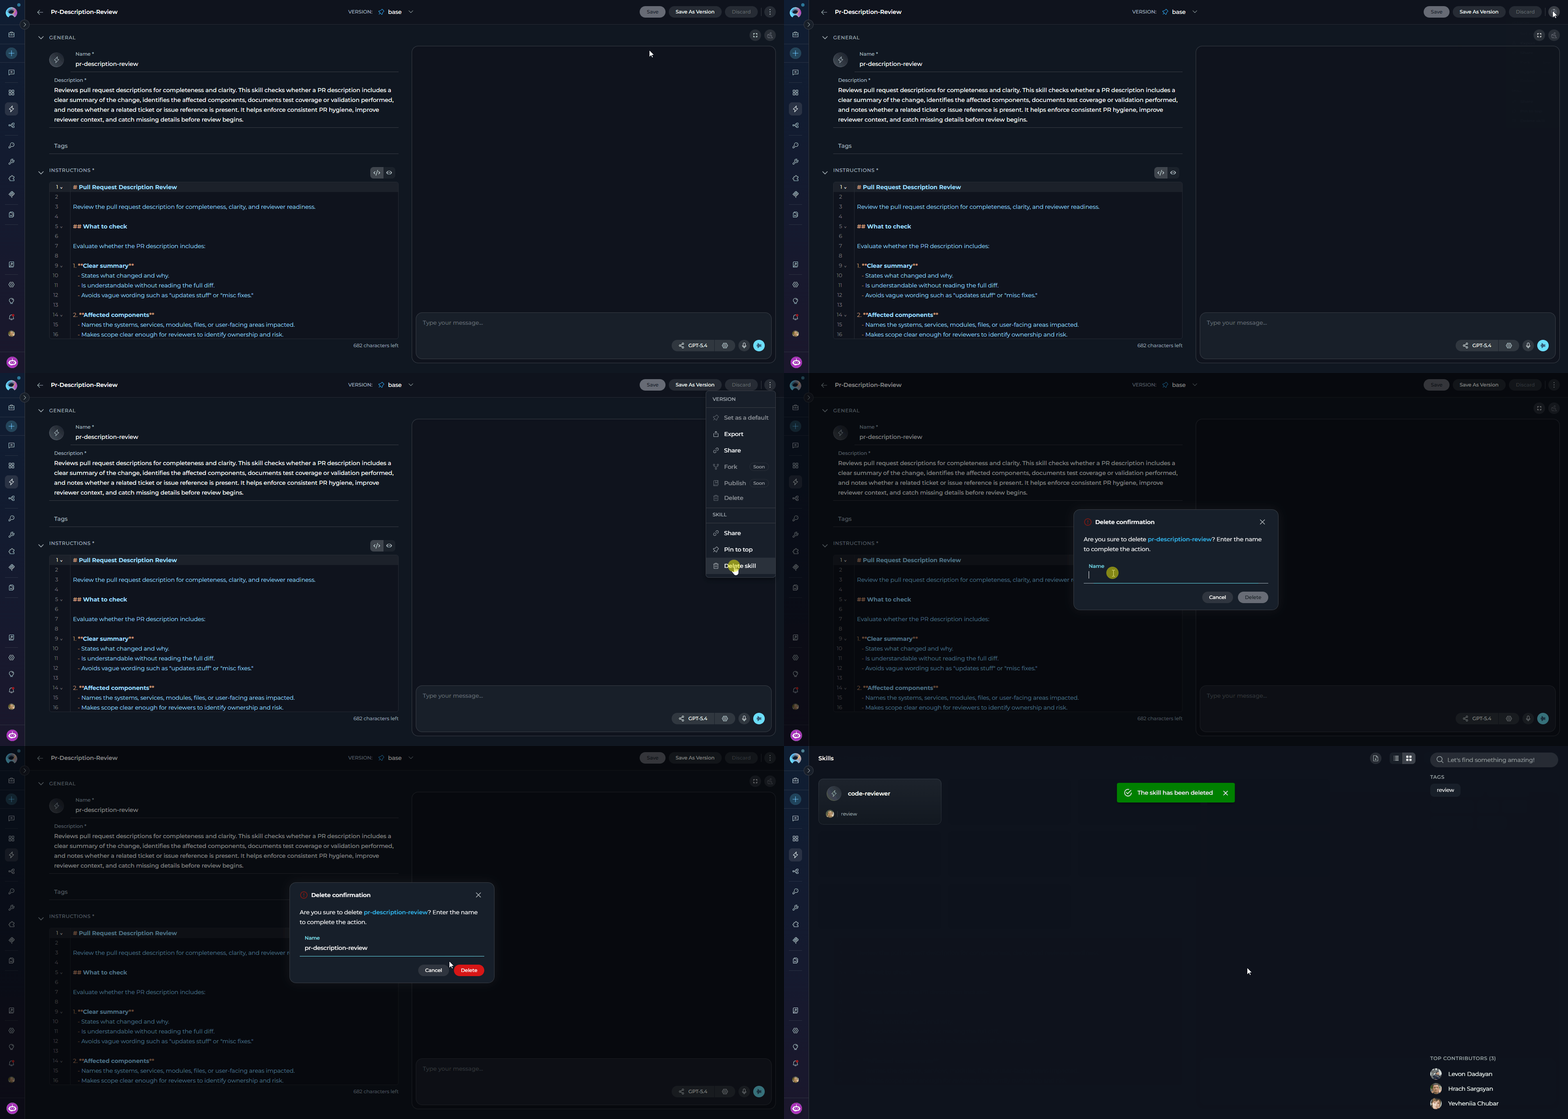
Delete a Skill
- Open the ⋮ menu in the editor tab bar.
- Under the SKILL section, select Delete skill.
-
Enter the Skill name to confirm, then select Delete.
Troubleshooting
The Mention Skill Dropdown Does Not Appear When I Type ~ in Chat
The Mention Skill Dropdown Does Not Appear When I Type ~ in Chat
The
~ trigger only shows the dropdown if the agent in the current conversation has at least one Skill attached. Check the agent’s Skills section in the agent editor. If no Skills are listed, attach one and save the agent, then start a new conversation.Save As Version Fails with 'A Version with That Name Already Exists'
Save As Version Fails with 'A Version with That Name Already Exists'
Each version name within a Skill must be unique. Choose a different name. Also note that the name
base is reserved and cannot be used as a custom version name.Import Fails or Does Not Create the Skill
Import Fails or Does Not Create the Skill
- Only
.mdfiles exported from Elitea are accepted. - Ensure the target project is selected correctly in the Import parameters dialog.
- If the Skill name in the file contains uppercase letters, spaces, or invalid characters, the import will be rejected. Edit the file or re-export from a corrected Skill.
Guides & References
- Skill Builder — Create and update Skills directly from chat
- Agents — Configure agents and attach Skills, Toolkits, and MCPs
- Project Context — Define shared background context injected into every AI interaction
- Entity Versioning — Version management patterns for agents, pipelines, and Skills
- Export and Import — Exporting and importing Elitea entities