

Overview
Agent Evaluation lets you measure how well an agent performs against a repeatable set of test cases, using criteria you define yourself. Instead of judging agent quality by spot-checking a few chat replies, you build a repeatable process. You create a Dataset of representative inputs, define Dimensions that describe what “good” looks like (tone, accuracy, following instructions, structure, etc.) and combine them into a Suite. Running the suite scores the agent against the dataset and produces consistent, comparable results. This turns agent quality from a subjective impression into something you can track over time:- Catch regressions—re-run the same suite after changing agent instructions or tools, and immediately see whether scores improved or dropped.
- Combine automated and human judgment—score responses with an Artificial Intelligence (AI) judge model, a custom validation script, a human reviewer or any mix of the three.
- Compare instruction changes objectively—run the same dataset against different agent versions to see which configuration performs best before you adopt it.
- Build a record of quality—the platform keeps every run in a searchable history, so you can cite concrete evidence of how an agent behaves, rather than relying on anecdotes.
Dimensions
Named criteria used to score responses—via an AI judge, a human reviewer or a custom validation script.
Datasets and cases
Reusable collections of test inputs (and optionally expected outputs) that a suite runs the agent against.
Suites
A configured pairing of one agent version, one dataset and one or more dimensions—the unit you actually run.
Results and history
Per-case, per-dimension scores for every run, plus a full history you can revisit, export or clear.
Agent Evaluation is currently in Beta. The interface and available options may continue to evolve.
Prerequisites
- You need an existing agent to evaluate. See Agents if you have not created one yet.
- Your project role determines what you can do in Agent Evaluation:
Access Agent Evaluation
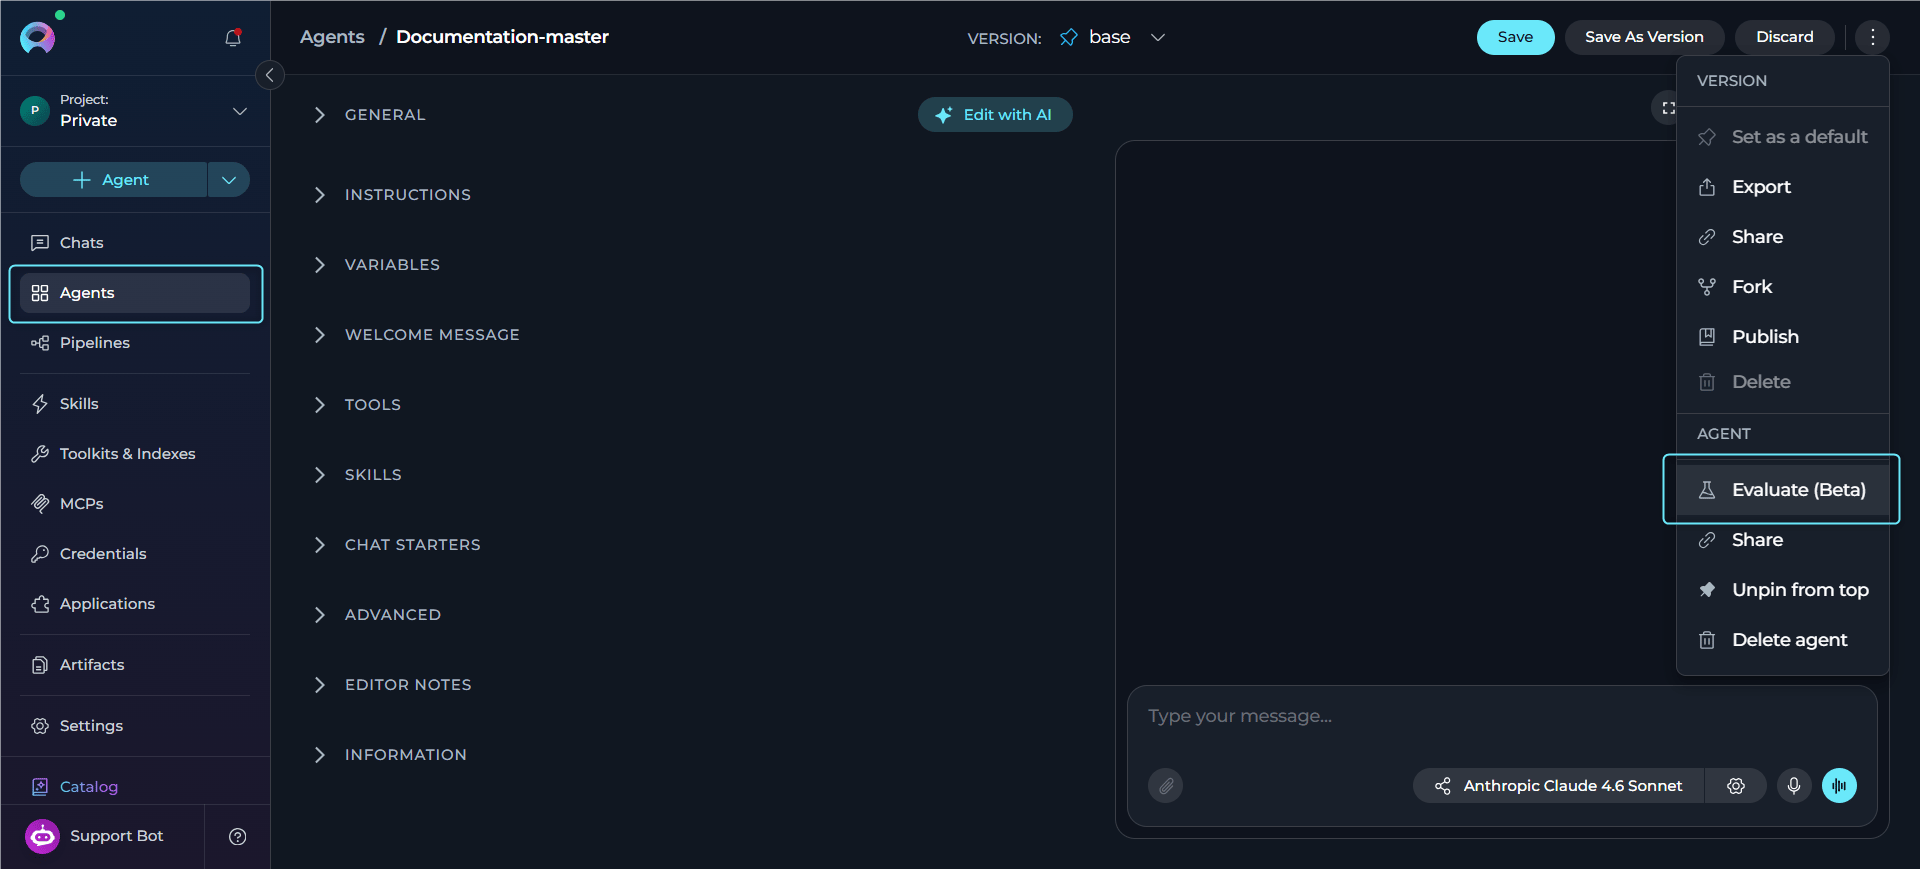
- Open the agent you want to evaluate.
- Click the three-dot menu (⋮) on the agent.
- Select Evaluate (Beta).
Suites
A Suite is what you actually run: it pairs one agent version, one Dataset and one or more Dimensions (via per-suite bindings), plus a Judge Model used for any AI-scored dimensions.A dimension binding carries suite-specific settings—such as weight, target, engine and evidence scope—without changing the shared dimension definition itself. Removing a dimension from a suite only removes the binding. The dimension itself stays in the library for reuse.
-
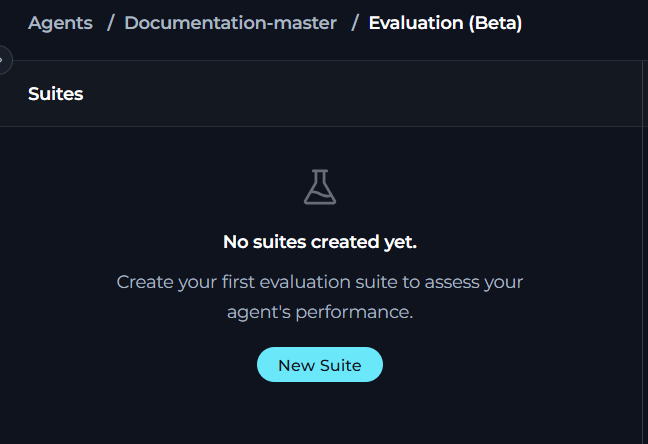
In the Evaluation workspace, click New Suite (or via the + button once other suites already exist).
-
Under General, fill in the following fields:
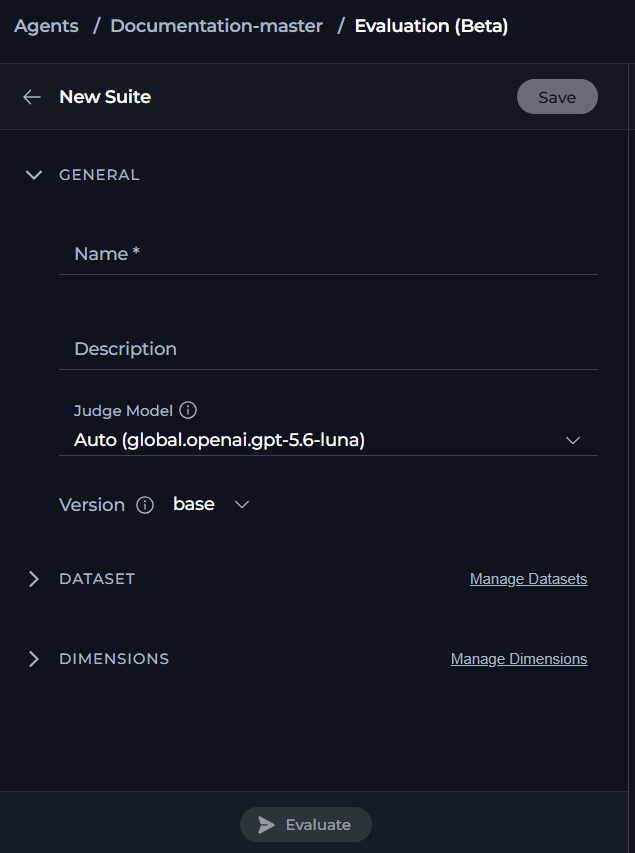
- Click Save to create the suite.
Datasets
A Dataset is a named collection of test Cases that you run the agent against during an evaluation. Datasets belong to an owning agent but can be marked Available across the project so other agents’ suites can reuse them.Only the owner of the dataset can edit its cases. A suite borrowing a shared dataset can exclude or include individual cases for its own runs without affecting the original dataset or any other suite using it—at least one case must remain active.
Create a Dataset
- In the Evaluation workspace, open Manage Datasets.
- Click + to create a dataset.
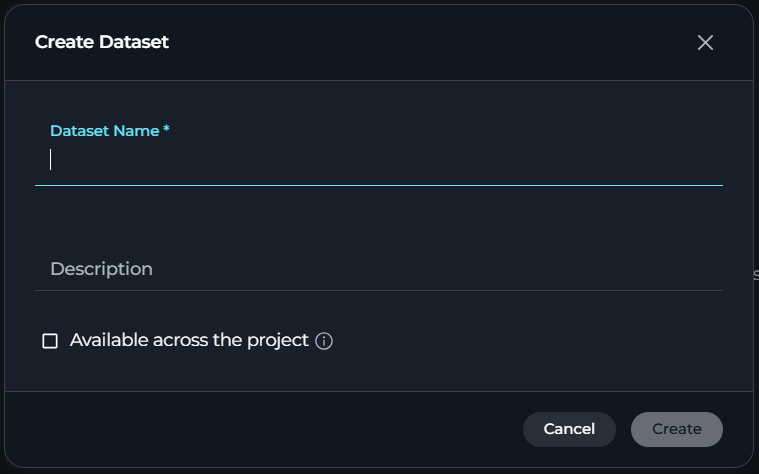
- Enter a Dataset Name (required) and an optional Description.
- If you want other agents’ suites to use this dataset, check Available across the project.
- Click Save.
View the Dataset Page
Selecting a dataset from Manage Datasets opens its case list.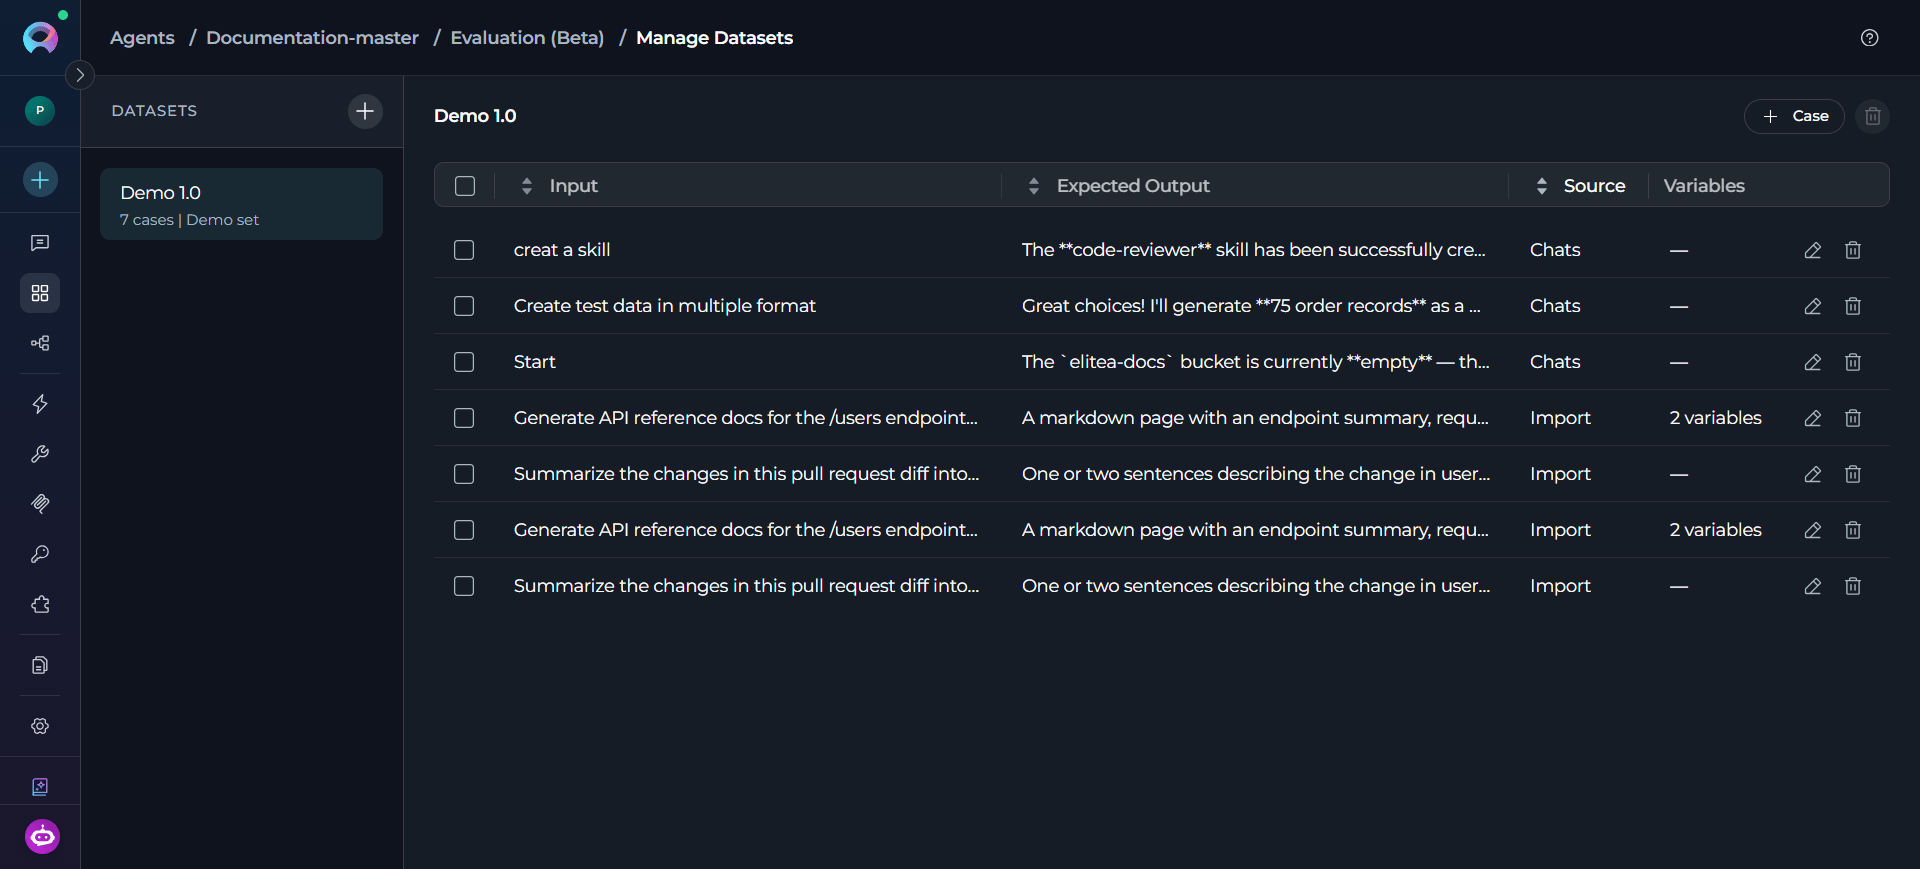
- Dataset list (left)—every dataset created for the agent, showing its case count and description. Click a dataset to view its cases. Click + to create another.
- Case table (right)—one row per case, with sortable Input, Expected Output, Source and Variables columns. Source shows how you created the case (for example, Chats or Import), and Variables shows how many key-value pairs the case defines, or — when it has none.
- + Case—opens the add-case menu.
- Delete icon (top right, next to + Case)—deletes the dataset itself.
- Row actions—hover a row to reveal its edit (pencil) and delete (trash) icons, for editing or removing that individual case.
Test Cases
A Case is a single test within a dataset: an input (and, optionally, an expected output and variables) that the agent responds to during a run. Each case represents one concrete scenario for evaluating the agent. The dataset stays meaningful only when its cases reflect the situations the agent needs to handle well. Every dimension bound to the suite scores each case independently, and a run breaks down results per case. Adding, editing or excluding a case changes what the suite evaluates and directly affects its overall score the next time it runs.Add a Test Case
With the dataset selected, click + Case to open the add-case menu. Then choose one of the three methods below.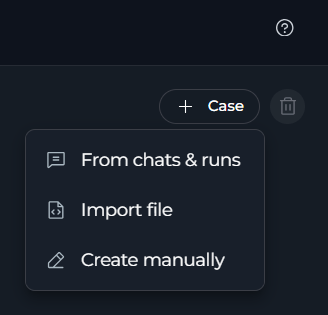
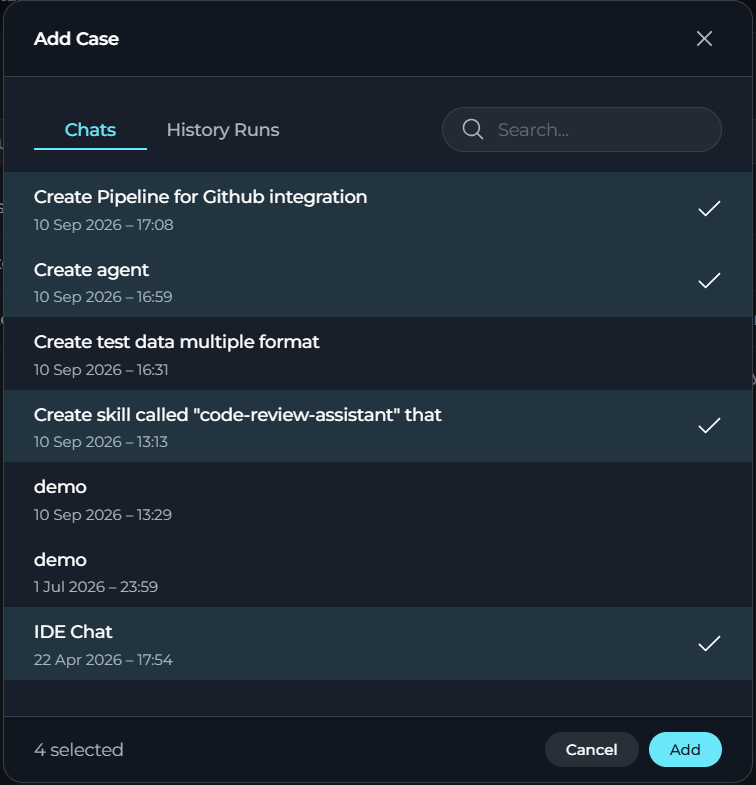
- From the add-case menu, select From chats and runs.
- Switch between the Chats and History Runs tabs to find the conversation or run you want to reuse.
- Select the entry to turn it into a repeatable test case in the dataset.
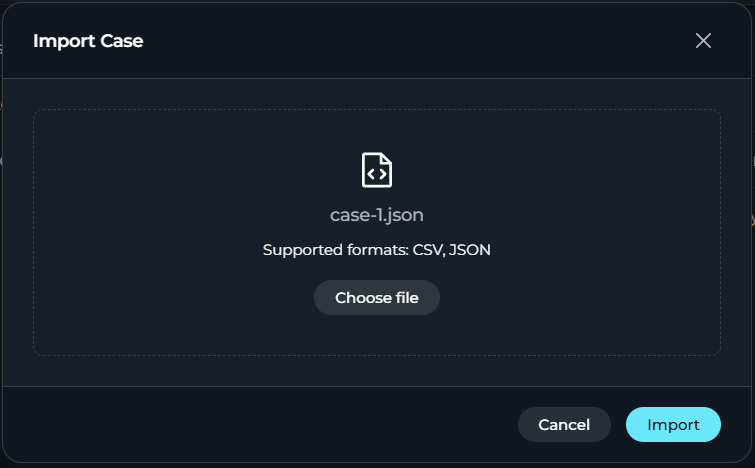
- From the add-case menu, select Import file.
-
Choose a
.csvor.jsonfile containing your cases. -
Upload the file. A result banner shows how many cases were imported and how many were rejected.
The platform checks a
.json file for valid JSON syntax before upload. It rejects a malformed file outright and imports no cases from it. Once uploaded, the platform validates each case individually: it adds valid cases to the dataset and skips invalid ones, listing each skipped case in the result banner with the reason for rejection. This way, the rest of the file still imports even when one row is invalid.- From the add-case menu, select Create manually.
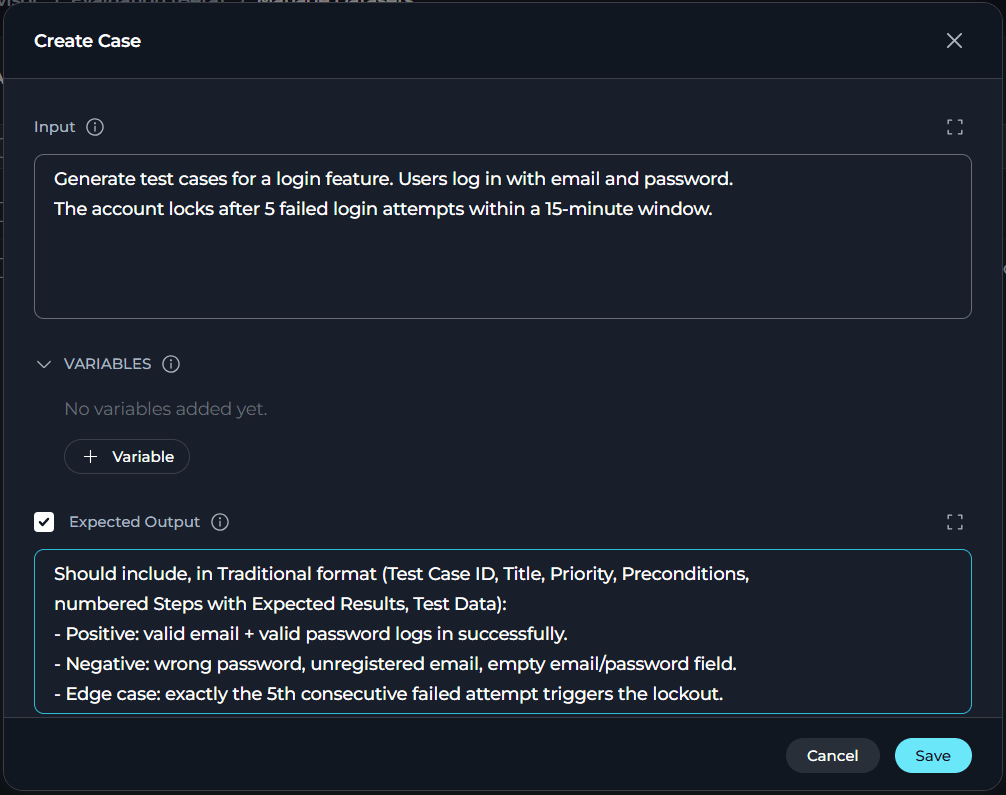
- Enter the Input (required)—the text sent to the agent.
- Optionally add Variables as key-value pairs.
- Optionally check the Expected Output option and enter the expected response.
-
Click Save to add the case to the dataset.
Dimensions
A Dimension defines one thing you want to measure—for example, “Response is polite and professional” or “Output is valid JSON.” Dimensions turn what would otherwise be a subjective impression of quality into a named, repeatable criterion that scores the same way on every case, every time the suite runs. One of three engines scores each dimension. You choose the engine when you create the dimension, and it stays fixed afterward:
A dimension lives in a shared library, and you add it to one or more suites through a binding. Editing its evaluation instructions, target or scale affects every suite that includes it the next time that suite runs, not just the suite you were viewing when you made the change.
Dimensions can be scoped at three levels:
- Agent—private to the agent you are evaluating.
- Project—shared and reusable across every agent in the project.
- Platform—shared platform-wide; read-only to regular users.
Create a Dimension
- In the Evaluation workspace, open Manage Dimensions.
- Switch between the Agent, Project and Platform tabs to choose the scope for the new dimension (Platform is read-only for dimension creation).
- Click + to create a new dimension.
-
Fill in the following fields and click Save.
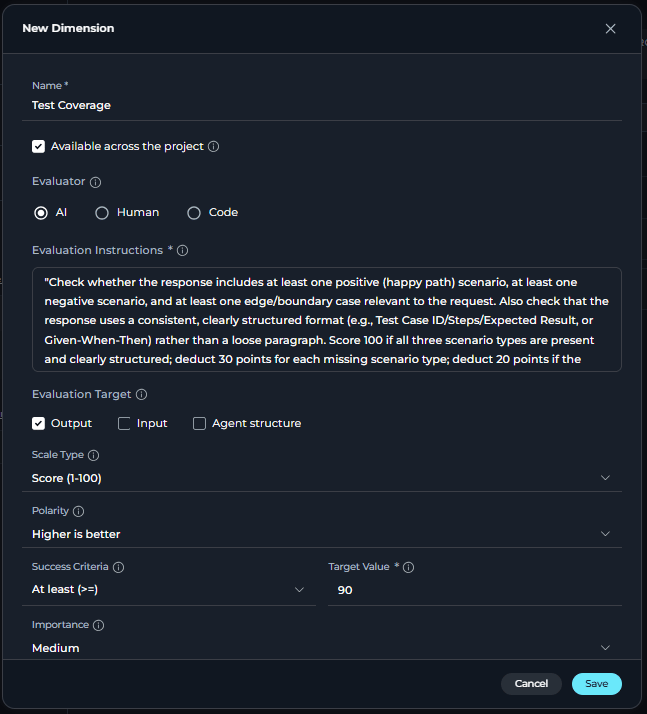
Example of Evaluation InstructionsFor a dimension measuring tone, Evaluation Instructions might read: “Score the response from 1-100 based on how polite and professional it sounds. A courteous response that avoids slang, sarcasm or curt phrasing should score above 80. A response that is rude, dismissive or uses inappropriate language should score below 40.” Specific, concrete instructions keep scoring by the AI judge more consistent across cases.
A dimension can only have one evaluator. If you want both an AI score and a human score for the same criterion, create two separate dimensions (or two bindings of dimensions with the same instructions)—one set to AI, one set to Human.
Code Validation SafetyAn automatic safety check runs before you can save a validation script. The check rejects scripts that use dangerous imports, unsafe built-in functions or dunder (
__) attribute access. Only Admins can create or edit Code dimensions. Editors can view them.Build a Dimension with AI
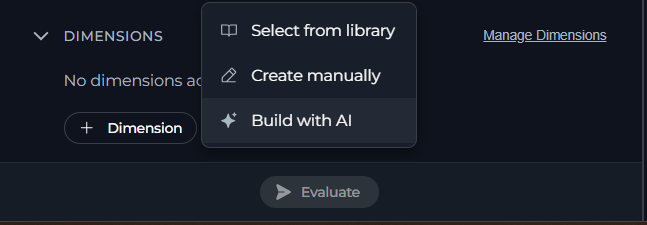
If you would rather describe what you want in plain language than complete every field yourself, you can generate a dimension draft:- From the dimension creation menu, choose Build with AI.
- Describe the quality you want to measure—for example, a description of a polite and professional tone, or a requirement that output be valid JSON.
- Click Generate Draft.
- Review the generated candidate dimensions and click one to select it.
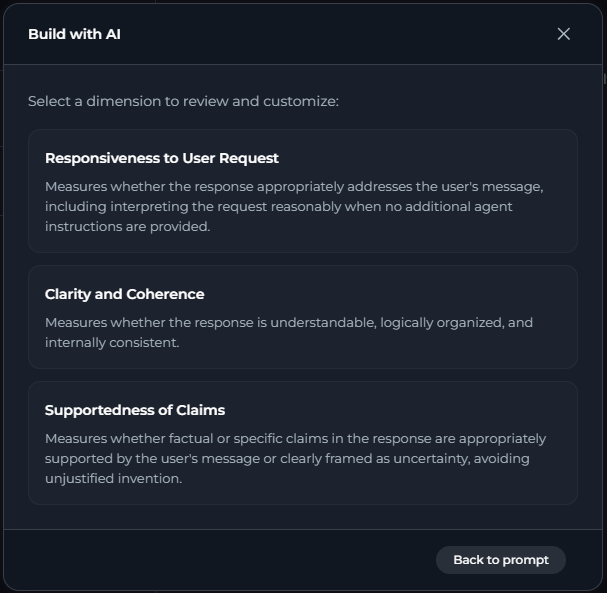
- The full dimension form opens pre-filled with the generated content. Adjust any field as needed, then click Create Dimension.
Run an Evaluation
Use a completed suite to measure agent performance and review its results.Run the Suite
- Open the suite you want to run.
- Confirm that a dataset is attached under the Dataset section of the suite.
- Confirm that at least one dimension is added under the Dimensions section of the suite.
- Click Evaluate.
- A progress indicator shows how many cases have completed (for example, “3 of 10 cases”) while the run is in progress. You can cancel a run in progress.
- When the run finishes, the Results panel updates automatically with the new scores.
When multiple dimensions share the same evaluation target, the platform automatically batches them into a single AI judge call per test case, rather than one call per dimension. The platform also splits or truncates oversized evidence or oversized batches automatically, behind the scenes. This works without configuration, and the run always completes successfully.
Review Results
The Results panel shows the outcome of the most recent run for the selected suite: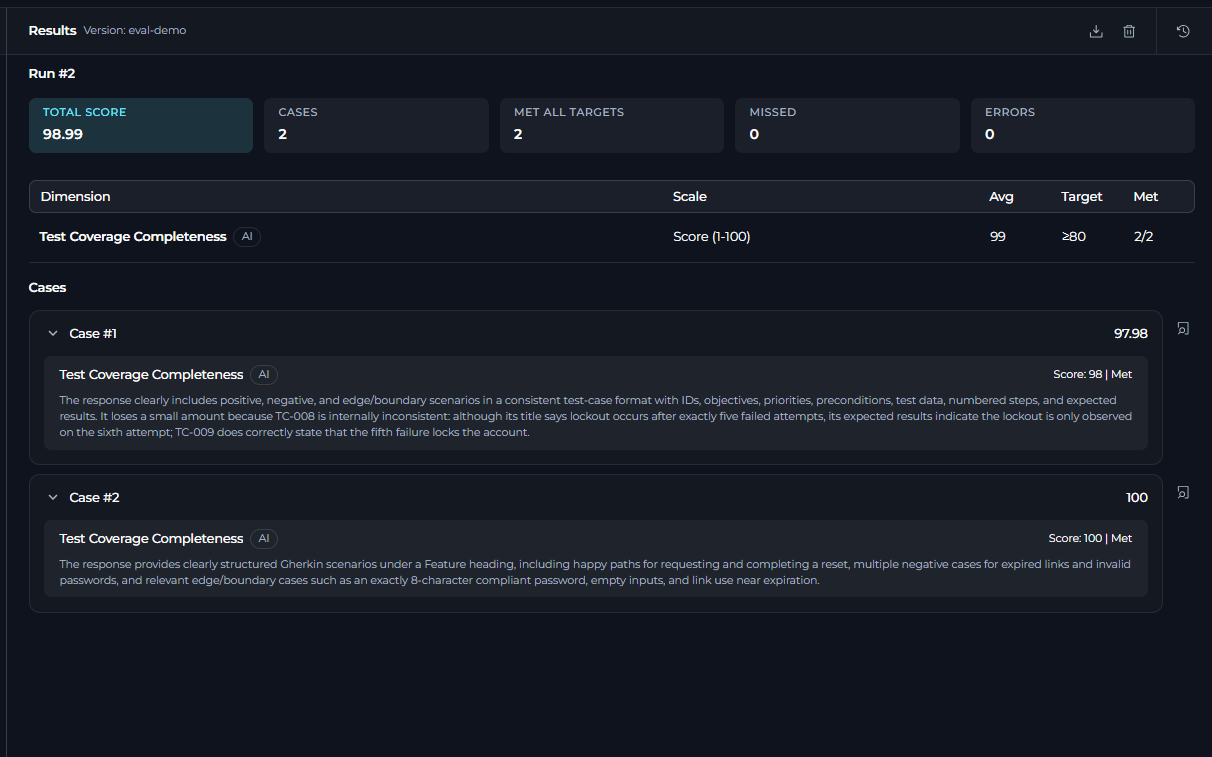
- Dimension table—for each dimension: its Scale, Average score, Target and whether the target was Met.
- Case list—every case in the dataset, expandable to show its per-dimension results. Each dimension card shows its state (score and whether the target was met, an error, or—for Human-scored dimensions—pending) along with the rationale from the judge, your own comments or an “Awaiting human evaluation” note.

- Export to Excel—download the full results as a spreadsheet.
- Clear the results—remove the results for the current run (with a confirmation prompt).
- Results History—open the full run history for this agent in a separate panel.
Score a Human Dimension
Human-scored dimensions let a run continue without waiting. The cases appear as pending until someone enters a score.- In the case results, find a dimension card for a Human-evaluated dimension and open it.
- Review the response shown, using any Evaluation Guidance written on the dimension.
- Enter a score using the control shown for the scale of that dimension (a Pass or Fail choice or a numeric score or rating).
- Optionally add a Comment (up to 2000 characters).
- Click Save.
Review Run History
- From the Results panel, click the Results History icon (or navigate to it directly from the Evaluation workspace).
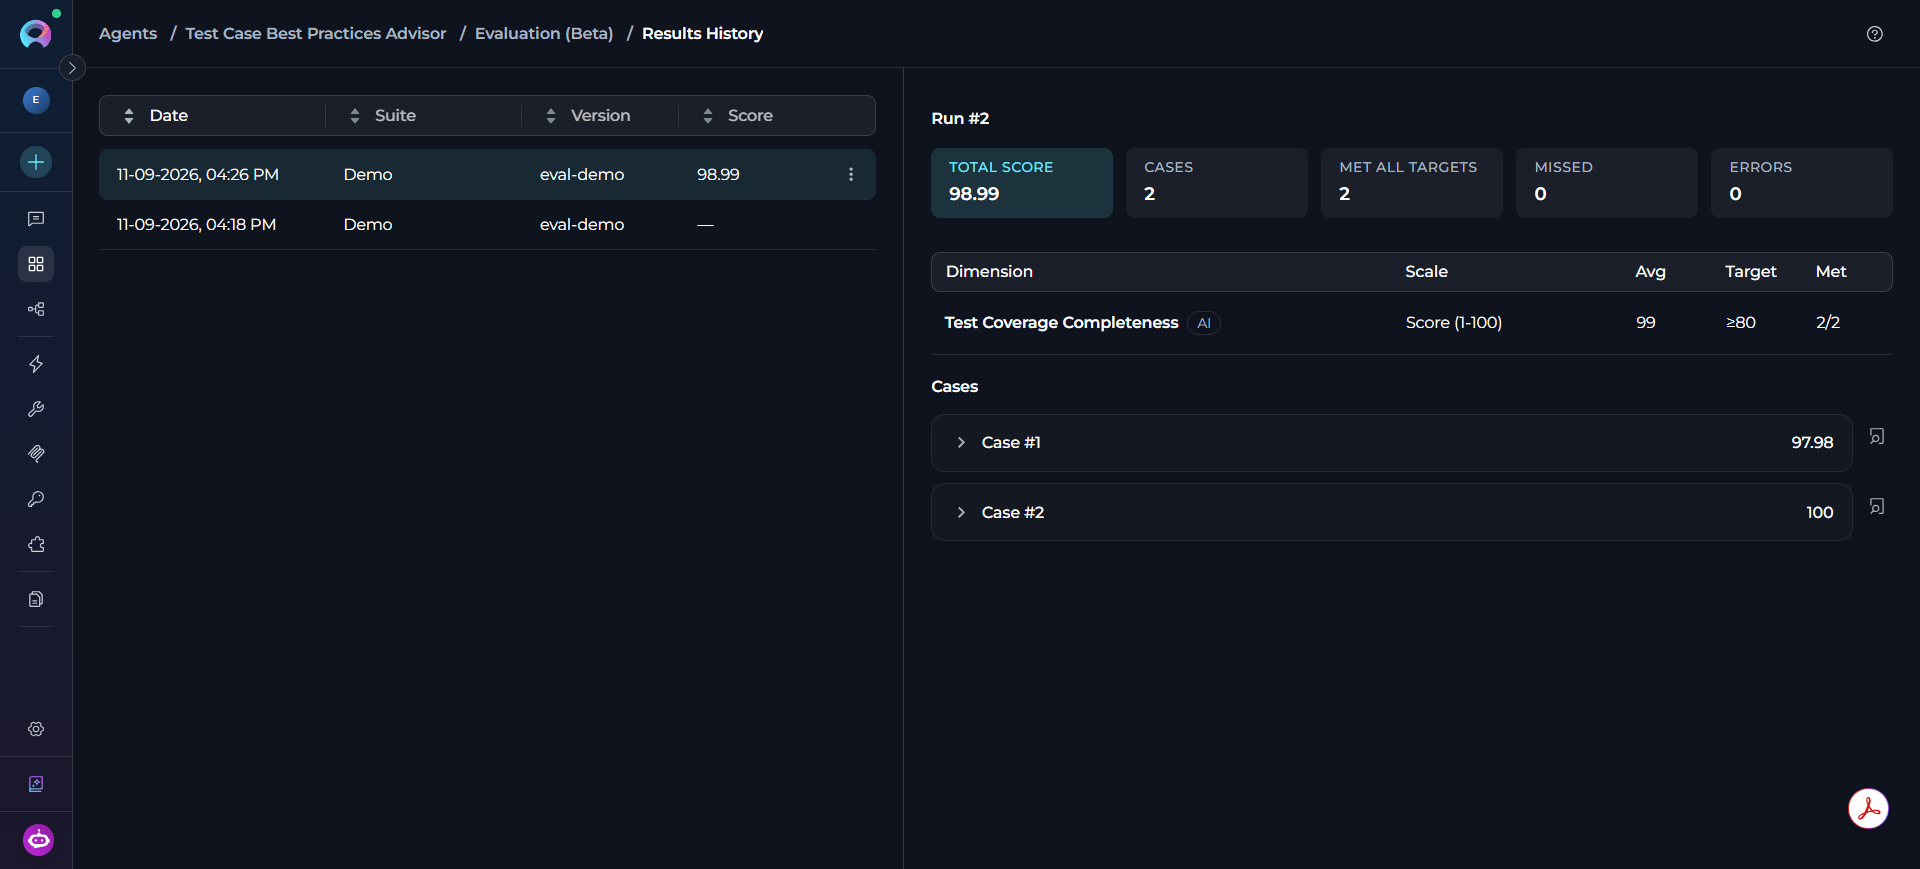
- The run history table lists every run for the agent, showing its Date, Suite, agent Version and Score. A badge highlights the score change compared to the previous scored run for the same suite.
- Select a run to view its full results in the panel beside the table.
- Use the row actions menu to Share, Export to Excel or Delete a run (deleting requires the appropriate permission).
Deleting a dimension from the library removes it everywhere it is used going forward, but finished runs keep a frozen snapshot of the dimensions as they were scored at the time. Historical results stay exactly as they were.
Troubleshoot Evaluation Issues
Resolve a Dimension Error for a Case
Resolve a Dimension Error for a Case
This means the scoring engine could not produce a valid result for that specific case—for example, the AI judge returned a response that did not match the expected format. The error remains isolated to this dimension and case. Other dimensions and cases in the same run are unaffected. Review the evaluation instructions or evidence scope for the dimension and run the suite again if needed.
Resolve a Pending Human Dimension
Resolve a Pending Human Dimension
Human-scored dimensions require someone to manually enter a score after the run completes—only a person can score them. Open the case and save a score to clear the pending state.
Create or Edit a Code Dimension
Create or Edit a Code Dimension
Only Admins can create or edit Code-based dimensions. Editors have view-only access. Also check that your validation script passes the automatic safety check—the check rejects dangerous imports, unsafe built-ins and dunder attribute access.
Resolve Rejected Imported Cases
Resolve Rejected Imported Cases
The platform rejects a
.json file entirely when it is not valid JSON, and imports no cases from it. Otherwise, it validates each case on its own. Check the reasons listed next to the rejected count in the import result banner, fix those rows in your source file and re-import. Cases that already passed validation stay in the dataset unchanged.Run a Suite
Run a Suite
Before you can evaluate a suite, it needs a Dataset attached and at least one Dimension added. Open the suite and check both the Dataset and Dimensions sections. For instructions, see the Run the Suite section.
Best Practices
Start Small and Expand the Dataset
Start Small and Expand the Dataset
Begin with a handful of cases that cover the scenarios you care about most, confirm your dimensions score them sensibly, then add more cases—including known failure cases—once the setup is stable.
Write Specific, Concrete Evaluation Instructions
Write Specific, Concrete Evaluation Instructions
Vague instructions produce inconsistent AI scores. Naming exact qualities, thresholds, or examples such as those in the evaluation instructions example gives the judge model less room for inconsistent scoring between runs.
Reuse Project and Platform Dimensions
Reuse Project and Platform Dimensions
Reuse a shared dimension instead of recreating similar criteria for every agent, so scores stay comparable across agents that share the same standards.
Turn Real Failures into Cases
Turn Real Failures into Cases
Use the From Chats and Runs method in the Add a Test Case section to capture an actual bad response as a permanent case, so the platform automatically catches the same mistake if it appears again.
Match the Engine to the Criterion
Match the Engine to the Criterion
Use Code dimensions for objective, deterministic checks (format, required fields), AI dimensions for judged qualities (tone, relevance) and Human dimensions only for what genuinely needs human judgment. Human scoring lets a run continue without waiting, but a person must complete it.
Use Case: Catch a Regression After an Instruction Change
Use Case: Catch a Regression After an Instruction Change
- Run a suite once to establish a baseline score.
- Edit the instructions or tools of the agent.
- Re-run the same suite—same dataset, same dimensions—and compare the new score against the previous one in the Run History section.
Use Case: Compare Two Agent Versions
Use Case: Compare Two Agent Versions
- Create two suites that share the same Dataset and Dimensions but are each locked to a different agent Version.
- Run both suites.
- Compare their scores in the Run History section to decide which version performs better before deploying it.
Use Case: Build a Regression Set from Real Failures
Use Case: Build a Regression Set from Real Failures
- When a chat or a run produces a bad response, open the From Chats and Runs method in the Add a Test Case section and add it to a dataset as a case.
- If you have one, enter the correct Expected Output so future runs have something concrete to compare against.
- Keep the case in the dataset used by your suites, so they automatically catch the same failure if it recurs.
- Agent Evaluation FAQ answers common questions about dimensions, datasets, suites and scoring behavior.
- Agents provides a complete guide to creating and configuring agents.