

Introduction
This guide is your comprehensive resource for integrating and utilizing the Azure DevOps (ADO) Wiki, Boards, and Plans toolkits within ELITEA. It provides detailed, step-by-step instructions, from setting up your Azure DevOps Personal Access Token to configuring these toolkits in ELITEA and effectively using them within your Agents, Pipelines, and Chat conversations. By following this guide, you will unlock the power of automated knowledge management, streamlined project planning, and enhanced workflow automation, all directly within the ELITEA platform. Brief Overview of Azure DevOps Services Azure DevOps provides integrated services for project management, knowledge sharing, and quality assurance. This guide covers integration with three core services:- Azure Wiki (ADO Wiki): Collaborative wiki service for creating and managing project documentation, knowledge bases, release notes, and meeting minutes. Provides version-controlled repository for team documentation.
- Azure Boards (ADO Boards): Work tracking and project management service for planning, organizing, and tracking tasks, user stories, bugs, features, and epics. Includes agile planning tools, customizable dashboards, and workflow automation.
- Azure Test Plans (ADO Test Plans): Comprehensive test management solution for planning, executing, and tracking software testing. Enables test plan creation, test suite organization, test case authoring, and test execution tracking.
Toolkit’s Account Setup and Configuration
Account Setup
Create an Azure DevOps account and organization to access Wiki, Boards, and Test Plans services.- Visit Azure DevOps: Navigate to https://azure.devops.com/
- Start Free or Sign In: Click “Start free” to create a new organization, or “Sign in to Azure DevOps” for existing accounts
- Create Organization: Follow prompts to set up your organization (provide name, select hosting region, optionally link to Azure account)
- Verify Email: Confirm your email address if prompted by clicking the verification link
- Enable Basic Subscription: Verify Basic subscription is enabled (typically enabled by default for new organizations). This grants access to Boards, Repos, Pipelines, Test Plans, and Artifacts
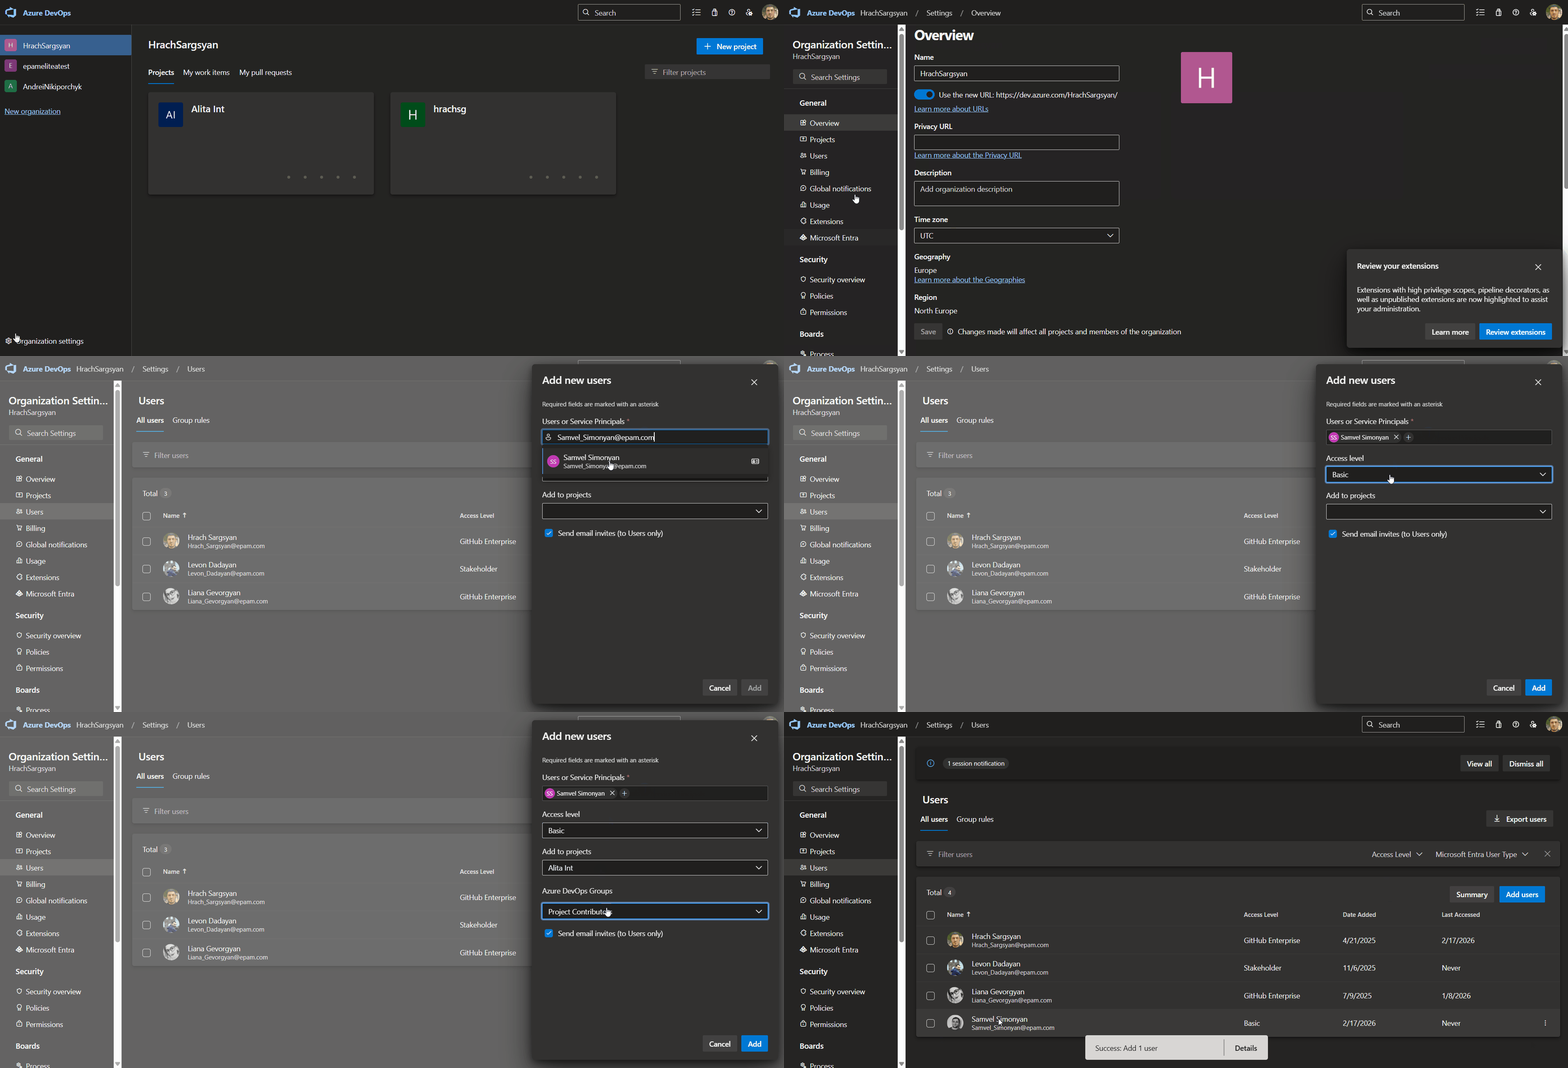
- Add Users (Optional): To grant access to team members:
- Navigate to
https://dev.azure.com/{YourOrganizationName}/_settings/users - Click “Add users”
- Enter user’s email address or Microsoft account
- Select “Basic” access level
- Choose relevant project(s)
- Click “Add”
- Navigate to
- Configure Project Permissions (Optional): To ensure users have project access:
- Open “Project settings” (bottom left)
- Select “Groups” under Security
- Add users to “Project Valid Users” or relevant group
- Verify Access: Confirm “Boards”, “Wiki”, and “Test Plans” appear in the left sidebar
Generate a Personal Access Token (PAT)
For secure integration with ELITEA, it is essential to use an Azure DevOps Personal Access Token (PAT). This method is significantly more secure than using your primary Azure DevOps account password directly and allows you to precisely control the permissions granted to ELITEA. Follow these steps to generate a Personal Access Token (PAT) in Azure DevOps:-
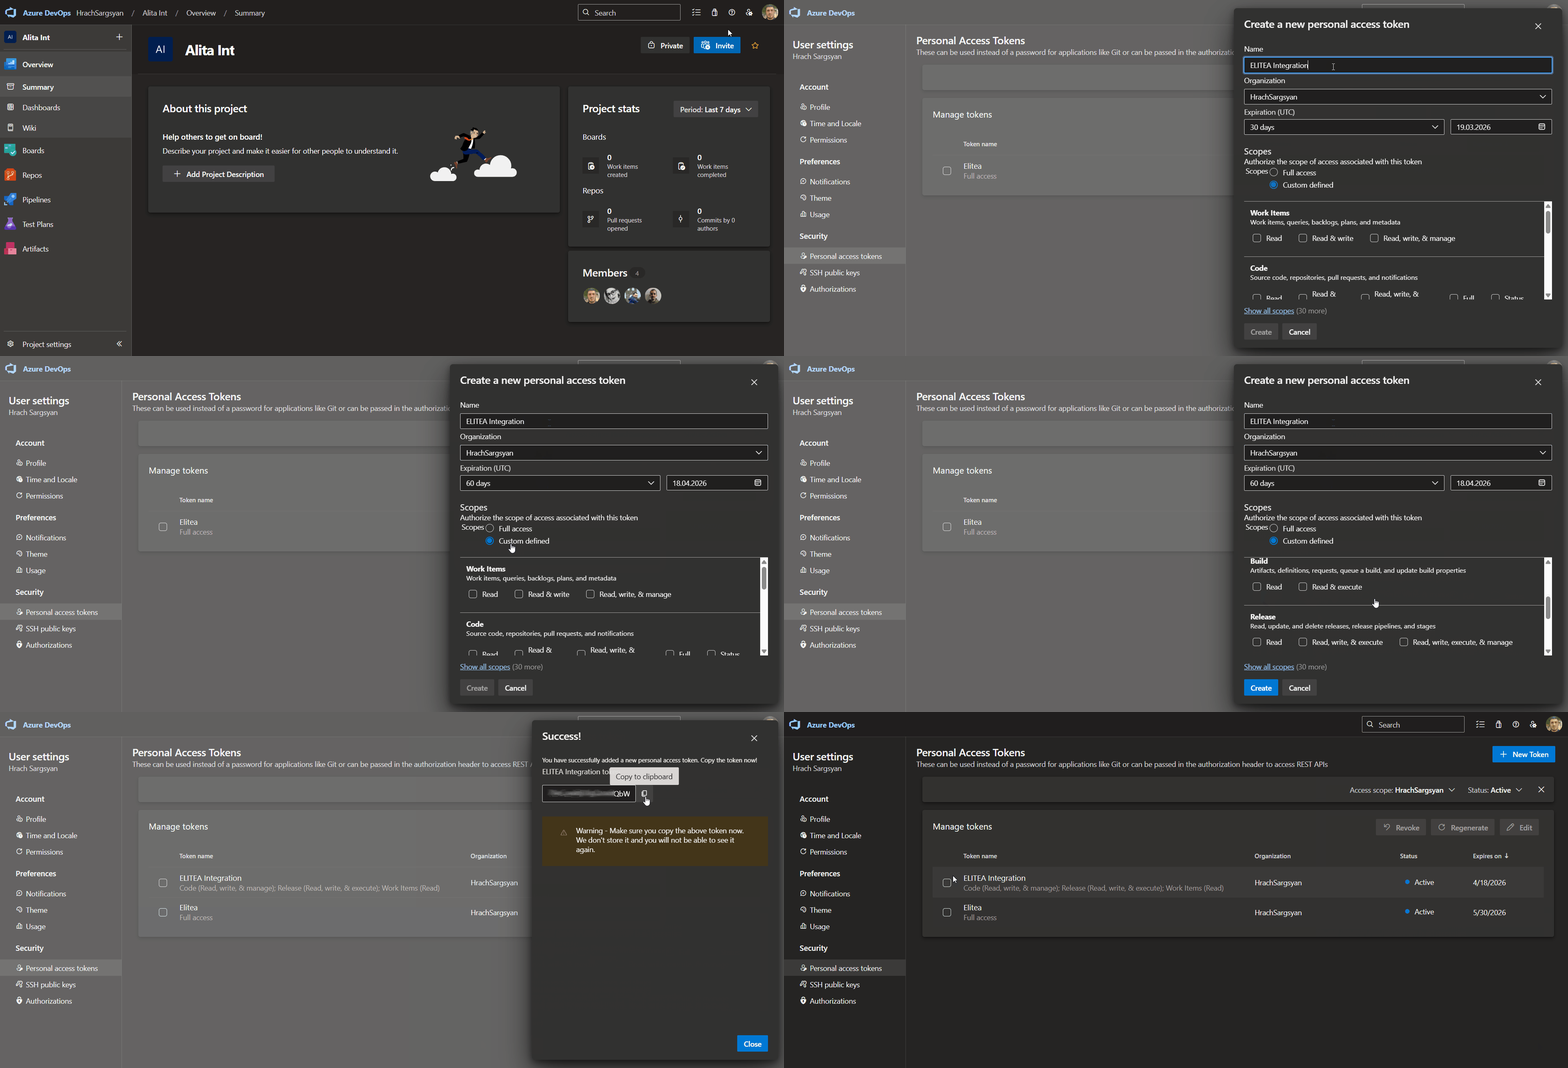
Log in to Azure DevOps: Access your Azure DevOps organization by navigating to
https://dev.azure.com/and logging in with your credentials. - Access User Settings: Click on the User settings icon in the top right corner, next to your profile picture. From the dropdown menu, select “Personal access tokens”.
- Generate New Token: Click the ”+ New Token” button to create a new PAT.
-
Configure Token Details: In the “Create a new personal access token” panel, configure the following:
- Name: Enter a descriptive label (e.g., “ELITEA Integration” or “ELITEA ADO Access”)
- Organization: Select “All accessible organizations” or choose specific organizations
- Expiration: Set an expiration date for enhanced security
- Scopes: Grant only the minimum necessary permissions
- Custom Defined - Select to manually choose granular scopes
- Work items:
- Read (To read work item details)
- Write (To create or update work items - only if needed)
- Wiki:
- Read & write (For full wiki access)
- Read (If agent only needs to read wiki content)
- Test Management:
- Read (To read test plans and cases)
- Read & write (To create or update test plans - only if needed)
- Additional Scopes for Specific Functionality (Grant only if needed):
- Build (For Azure Pipelines builds interaction)
- Release (For Azure Pipelines releases interaction)
- Create Token: Click the “Create” button to generate your PAT.
-
Copy and Store Token: Copy the generated token immediately - this is your only chance to see it. Store it securely in a password manager or ELITEA’s Secrets feature.
System Integration with ELITEA
To integrate Azure DevOps with ELITEA, you need to follow a three-step process: Create Credentials → Create Toolkit → Use in Agents. This workflow ensures secure authentication and proper configuration for Wiki, Boards, and Test Plans toolkits.Step 1: Create Azure DevOps Credentials
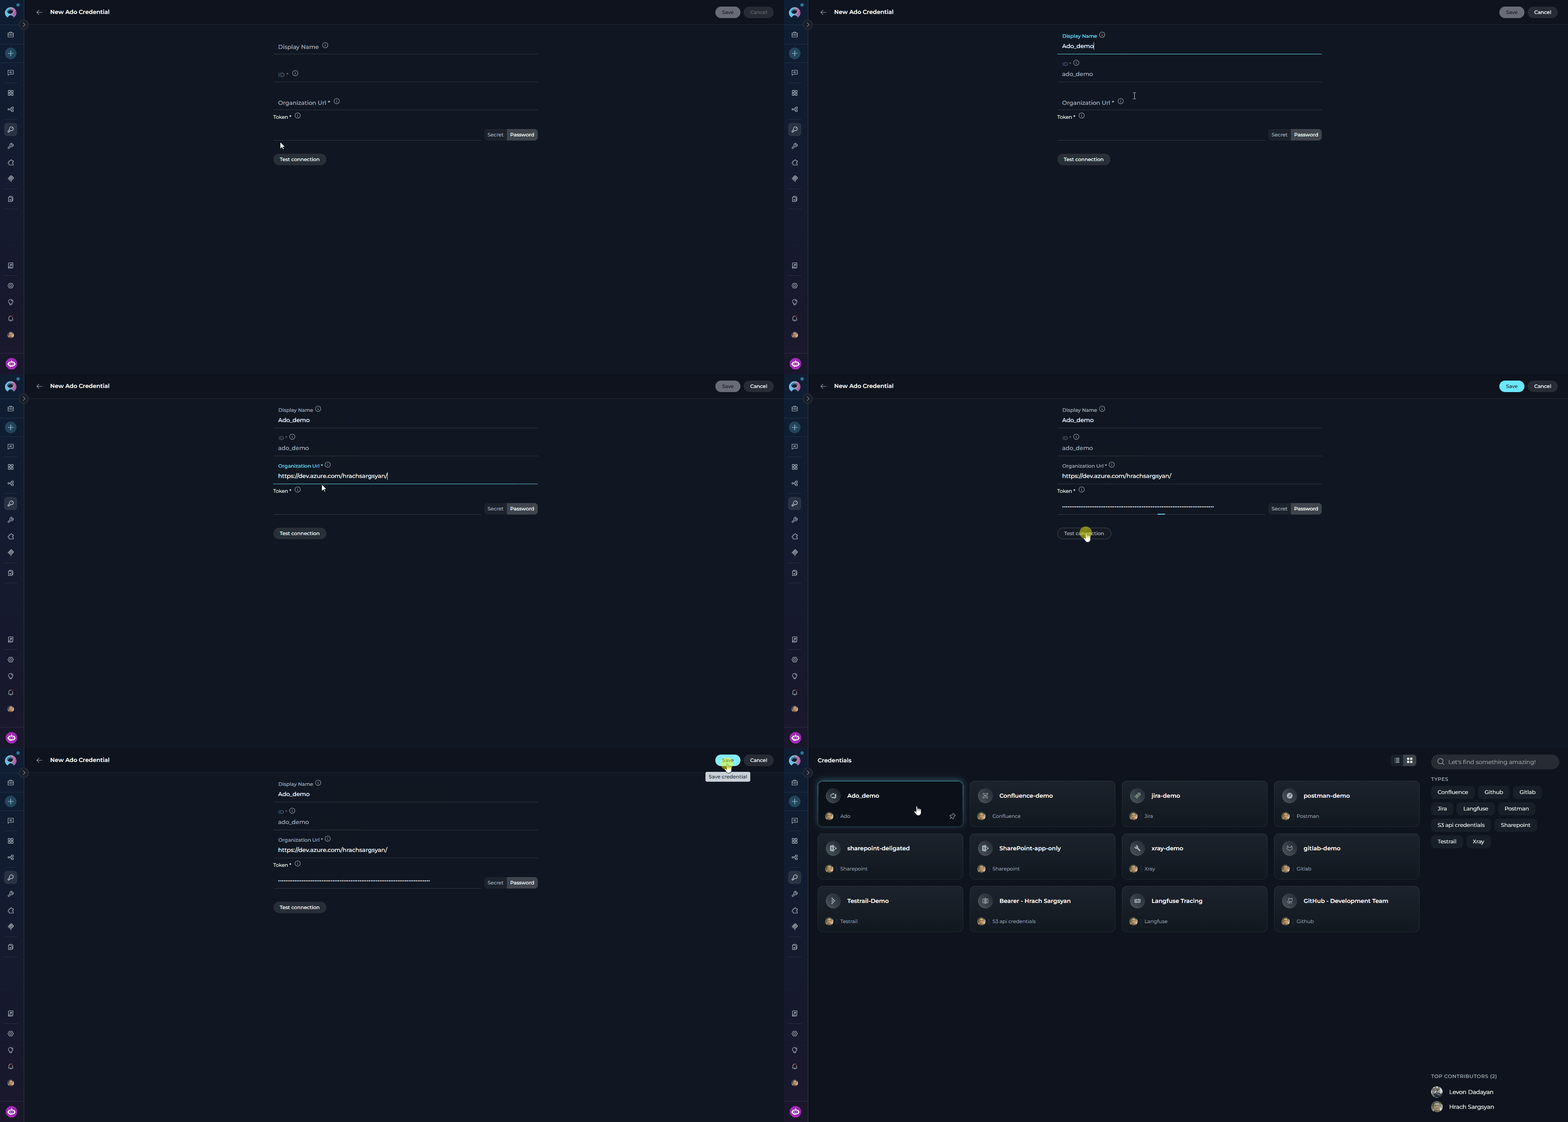
Before creating any toolkit, you must first create Azure DevOps credentials in ELITEA:- Navigate to Credentials Menu: Open the sidebar and select Credentials.
-
Create New Credential: Click the
+ Createbutton. - Select Azure DevOps: Choose Ado as the credential type.
-
Configure Credential Details:
- Test Connection: Click Test Connection to verify your credentials are valid and ELITEA can connect to Azure DevOps
-
Save Credential: Click Save to create the credential. It will be available in the Credentials dashboard for use in toolkit configurations.
Step 2: Create Azure DevOps Toolkits
Once your credentials are configured, you can create one or more Azure DevOps toolkits depending on your needs. ELITEA provides three separate toolkits for different Azure DevOps services:Azure DevOps Wiki Toolkit
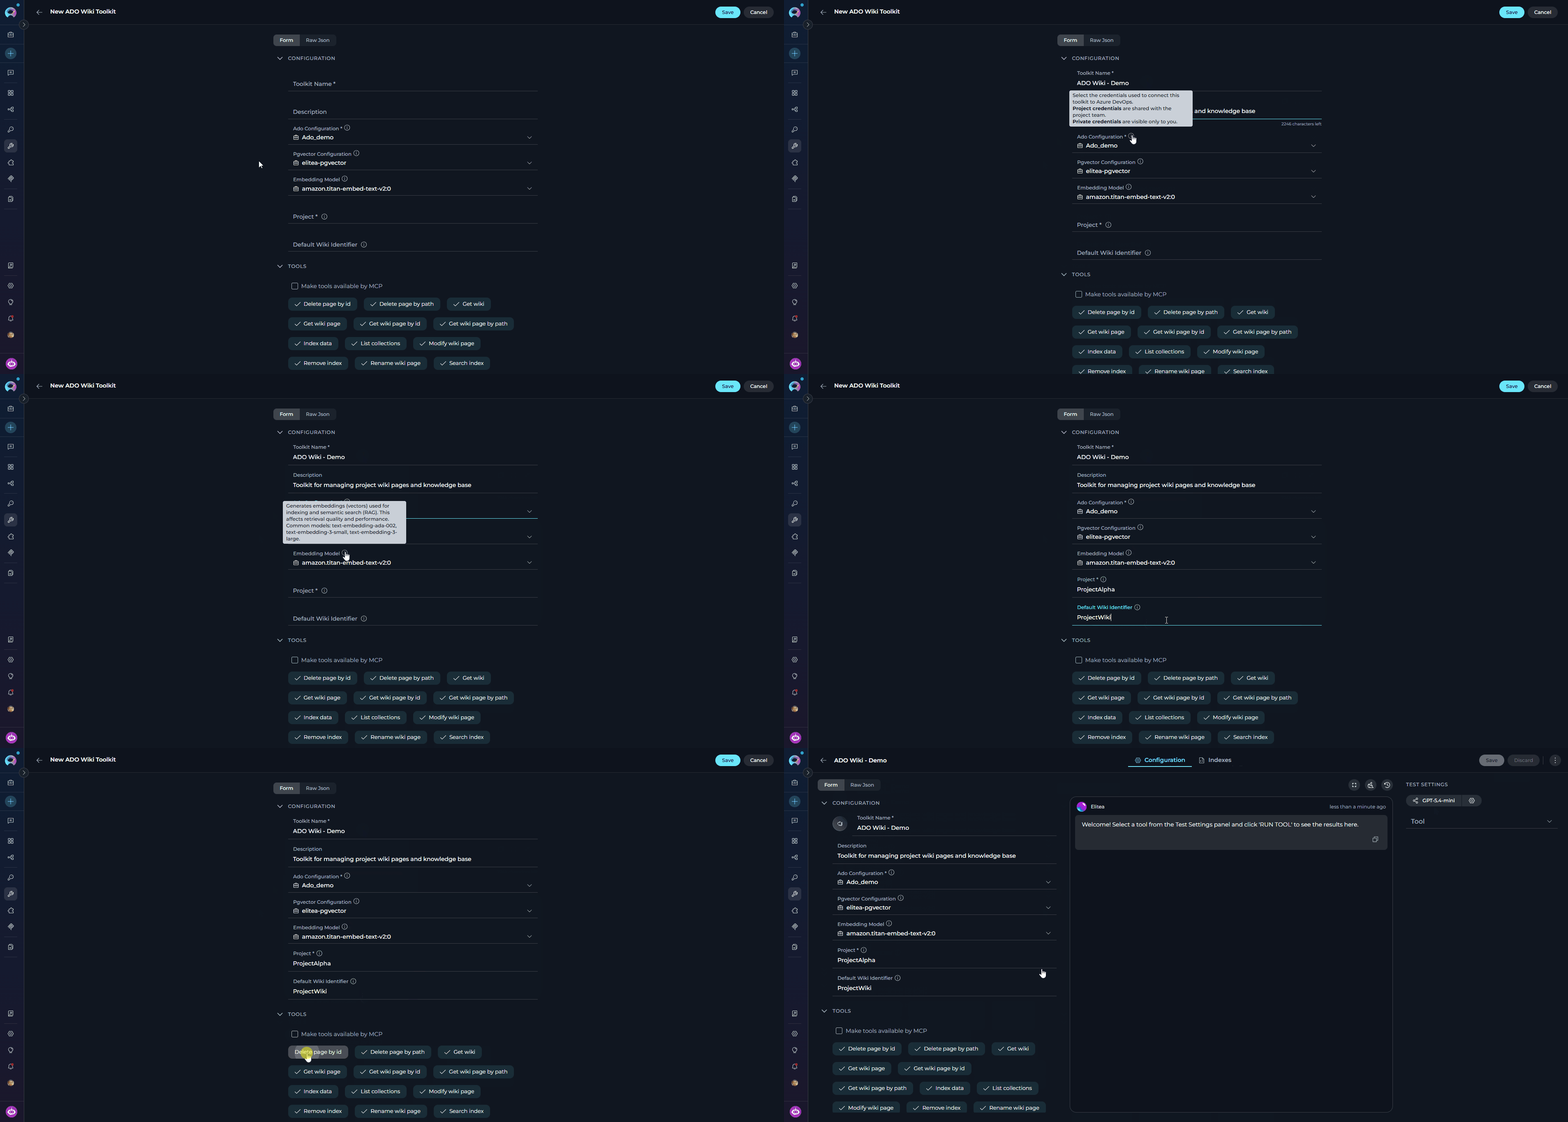
- Navigate to Toolkits Menu: Open the sidebar and select Toolkits.
-
Create New Toolkit: Click the
+ Createbutton. - Select Azure Wiki: Choose Azure Wiki (ADO Wiki) from the list of available toolkit types.
-
Configure Toolkit Settings:
-
Enable Desired Tools: In the “Tools” section, select the checkboxes next to the specific Wiki tools you want to enable. Enable only the tools your agents will actually use to follow the principle of least privilege
- Make Tools Available by MCP - (optional checkbox) Enable this option to make the selected tools accessible through external MCP clients
- Save Toolkit: Click Save to create the toolkit.
Available Wiki Tools:
The ADO Wiki toolkit provides the following tools for interacting with Azure DevOps Wiki, organized by functional categories:Azure DevOps Boards Toolkit
- Navigate to Toolkits Menu: Open the sidebar and select Toolkits.
-
Create New Toolkit: Click the
+ Createbutton. - Select Azure Boards: Choose Azure Boards (ADO Board) from the list of available toolkit types.
-
Configure Toolkit Settings:
-
Enable Desired Tools: In the “Tools” section, select the checkboxes next to the specific Boards tools you want to enable. Enable only the tools your agents will actually use
- Make Tools Available by MCP - (optional checkbox) Enable this option to make the selected tools accessible through external MCP clients
- Save Toolkit: Click Save to create the toolkit.

Available Boards Tools:
The ADO Boards toolkit provides the following tools for interacting with Azure DevOps Boards (Work Items), organized by functional categories:Azure DevOps Test Plans Toolkit
- Navigate to Toolkits Menu: Open the sidebar and select Toolkits.
-
Create New Toolkit: Click the
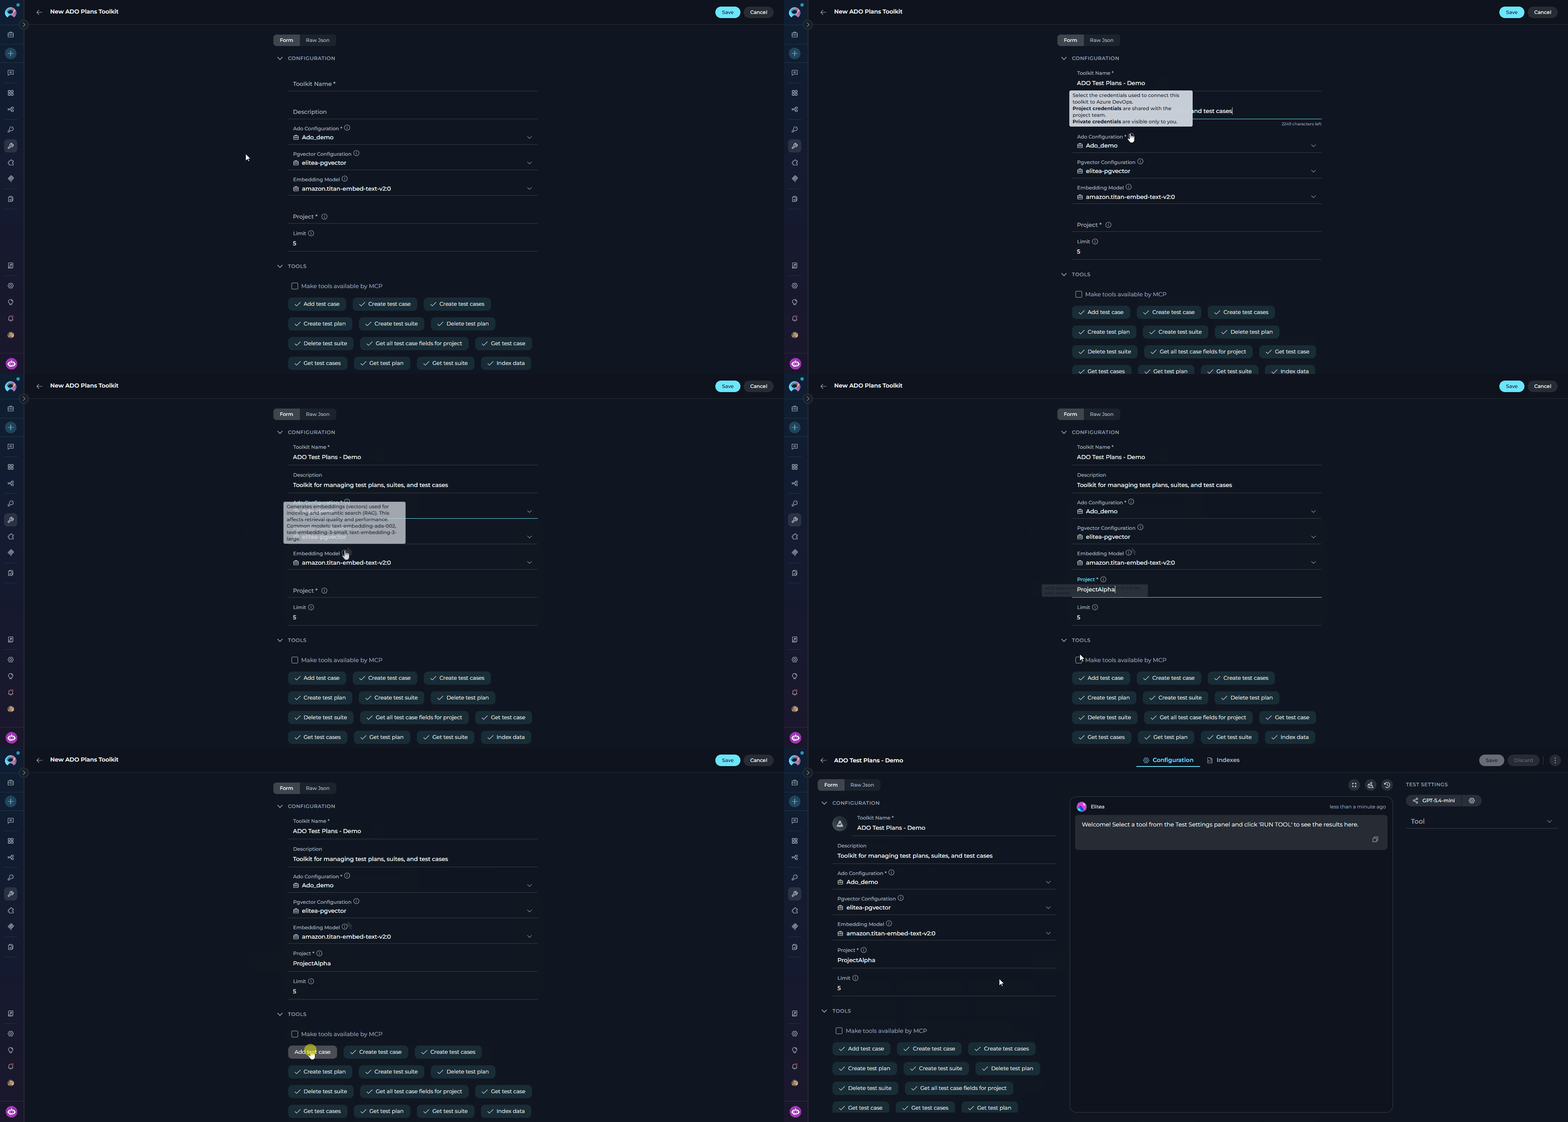
+ Createbutton. - Select Azure Test Plans: Choose Azure Test Plans (ADO Test Plan) from the list of available toolkit types.
-
Configure Toolkit Settings:
-
Enable Desired Tools: In the “Tools” section, select the checkboxes next to the specific Test Plans tools you want to enable. Enable only the tools your agents will actually use
- Make Tools Available by MCP - (optional checkbox) Enable this option to make the selected tools accessible through external MCP clients
- Save Toolkit: Click Save to create the toolkit.
Available Test Plans Tools:
The ADO Test Plans toolkit provides the following tools for interacting with Azure DevOps Test Plans, organized by functional categories:Testing Toolkit Tools
After configuring your Azure DevOps toolkits, you can test individual tools directly from the Toolkit detailed page using the Test Settings panel. This allows you to verify that your credentials are working correctly and validate tool functionality before adding the toolkit to your workflows. General Testing Steps:- Select LLM Model: Choose a Large Language Model from the model dropdown in the Test Settings panel
- Configure Model Settings: Adjust model parameters like Creativity, Max Completion Tokens, and other settings as needed
- Select a Tool: Choose the specific Azure DevOps tool you want to test from the available tools
- Provide Input: Enter any required parameters or test queries for the selected tool
- Run the Test: Execute the tool and wait for the response
- Review the Response: Analyze the output to verify the tool is working correctly and returning expected results
Step 3: Add Azure DevOps Toolkits to Your Workflows
Now you can add the configured Azure DevOps toolkits to your agents, pipelines, or use them directly in chat:In Agents:
- Navigate to Agents: Open the sidebar and select Agents.
- Create or Edit Agent: Either create a new agent or select an existing agent to edit.
- Add Azure DevOps Toolkit:
- In the “TOOLKITS” section of the agent configuration, click the “+Toolkit” icon
- Select your desired Azure DevOps toolkit (Wiki, Boards, or Test Plans) from the dropdown menu
- The toolkit will be added to your agent with the previously configured tools enabled
 Your agent can now interact with Azure DevOps using the configured toolkit and enabled tools.
In Pipelines:
- Navigate to Pipelines: Open the sidebar and select Pipelines.
- Create or Edit Pipeline: Either create a new pipeline or select an existing pipeline to edit.
- Add Azure DevOps Toolkit:
- In the “TOOLKITS” section of the pipeline configuration, click the “+Toolkit” icon
- Select your desired Azure DevOps toolkit from the dropdown menu
- The toolkit will be added to your pipeline with the previously configured tools enabled

In Chat:
- Navigate to Chat: Open the sidebar and select Chat.
- Start New Conversation: Click +Create or open an existing conversation.
- Add Toolkit to Conversation:
- In the chat Participants section, look for the Toolkits element
- Click to add a toolkit and select your desired Azure DevOps toolkit from the available options
- The toolkit will be added to your conversation with all previously configured tools enabled
- Use Toolkit in Chat: You can now directly interact with Azure DevOps by asking questions or requesting actions that will trigger the toolkit tools.

- “Show me the latest release notes from the project wiki.”
- “Create a new bug for the login issue I just found.”
- “List all high-priority tasks assigned to me.”
- “Create a new test plan for the upcoming release.”
Instructions and Prompts for Using the Azure DevOps Toolkits
When crafting instructions for the Azure DevOps toolkits, especially for OpenAI-based Agents, clarity and precision are paramount. Break down complex tasks into a sequence of simple, actionable steps. Explicitly define all parameters required for each tool and guide the Agent on how to obtain or determine the values for these parameters. OpenAI Agents respond best to instructions that are:- Direct and Action-Oriented: Employ strong action verbs and clear commands to initiate actions. For example, “Use the ‘get_wiki_page_by_path’ tool…”, “Create a work item using ‘create_work_item’…”, “List all open pull requests…”.
-
Parameter-Centric: Clearly enumerate each parameter required by the tool. For each parameter, specify:
- Its name (exactly as expected by the tool)
- How the Agent should obtain the value – whether from user input, derived from previous steps in the conversation, retrieved from an external source, or a predefined static value
- Contextually Rich: Provide sufficient context so the Agent understands the overarching objective and the specific scenario in which each Azure DevOps tool should be applied within the broader workflow. Explain the desired outcome or goal for each tool invocation.
- Step-by-Step Structure: Organize instructions into a numbered or bulleted list of steps for complex workflows. This helps the Agent follow a logical sequence of actions.
- Add Conversation Starters: Include example conversation starters that users can use to trigger this functionality. For example, “Conversation Starters: ‘Show me the release notes’, ‘Create a bug report’, ‘List all test plans’”
- State the Goal: Begin by clearly stating the objective you want to achieve with this step. For example, “Goal: To retrieve the content of a specific wiki page in Azure DevOps.”
- Specify the Tool: Clearly indicate the specific Azure DevOps tool to be used for this step. For example, “Tool: Use the ‘get_wiki_page_by_path’ tool.”
-
Define Parameters: Provide a detailed list of all parameters required by the selected tool. For each parameter:
- Parameter Name:
<Parameter Name as defined in tool documentation> - Value or Source:
<Specify the value or how to obtain the value. Examples: "user input", "from previous step", "hardcoded value 'main'", "value of variable X">
- Parameter Name:
- Describe Expected Outcome (Optional but Recommended): Briefly describe the expected result or outcome after the tool is successfully executed. For example, “Outcome: The Agent will display the wiki page content to the user.”
- Add Conversation Starters: Include example conversation starters that users can use to trigger this functionality. For example, “Conversation Starters: ‘Show me the release notes’, ‘What are the latest updates?’, ‘Display the project wiki’”
Chat Usage Examples by Tool Category
The following examples demonstrate how to interact with the Azure DevOps toolkits in ELITEA Chat, organized by functional categories. Each example shows the user request and the expected agent behavior.Wiki Tools - Get Wiki Page by Path
Wiki Tools - Get Wiki Page by Path
Wiki Tools - Modify Wiki Page
Wiki Tools - Modify Wiki Page
Boards Tools - Search Work Items
Boards Tools - Search Work Items
Boards Tools - Create Work Item
Boards Tools - Create Work Item
Boards Tools - Update Work Item
Boards Tools - Update Work Item
Test Plans Tools - Create Test Plan
Test Plans Tools - Create Test Plan
Test Plans Tools - Get Test Cases
Test Plans Tools - Get Test Cases
Best Practices and Use Cases
Test Integration Thoroughly
Test Integration Thoroughly
Monitor Agent Performance and Usage
Monitor Agent Performance and Usage
Follow Security Best Practices
Follow Security Best Practices
- Use Personal Access Tokens: Always use Azure DevOps Personal Access Tokens instead of your main account password for integrations.
- Grant Least Privilege: Grant only the minimum necessary scopes/permissions to the Personal Access Token to limit potential security risks.
- Securely Store Credentials: Utilize ELITEA’s Secrets Management feature to securely store and manage your Azure DevOps Personal Access Tokens instead of hardcoding them directly in Agent configurations.
Provide Clear Instructions and Prompts
Provide Clear Instructions and Prompts
Start with Simple Use Cases
Start with Simple Use Cases
Automated Retrieval of Release Notes for Support
Automated Retrieval of Release Notes for Support
- Scenario: During a support interaction, an Agent can automatically retrieve the latest release notes from the project wiki to provide users with up-to-date information on new features and bug fixes.
- Tools Used:
get_wiki_page_by_path - Example Instruction: “Use the ‘get_wiki_page_by_path’ tool to read the content of the wiki page at path ‘/Release Notes/Latest Release’ and display it to the user.”
- Benefit: Enhances support interactions by providing agents with immediate access to current release information, improving support efficiency and user satisfaction.
Dynamic Content Creation for Project Dashboards
Dynamic Content Creation for Project Dashboards
- Scenario: Agents can dynamically generate content for project dashboards within ELITEA by retrieving data from various sources and formatting it into wiki pages for display.
- Tools Used:
modify_wiki_page - Example Instruction: “Use the ‘modify_wiki_page’ tool to update the wiki page ‘Project Dashboard’ with the latest build status and test results summarized from other ELITEA workflows.”
- Benefit: Enables dynamic and automated dashboard updates, ensuring project dashboards within ELITEA always display the most current information, improving project visibility and awareness.
Automated Wiki Cleanup for Content Management
Automated Wiki Cleanup for Content Management
- Scenario: Implement a workflow to automatically delete outdated meeting minutes or temporary documentation pages from the project wiki after a certain period to maintain wiki cleanliness.
- Tools Used:
delete_wiki_page_by_path - Example Instruction: “Use the ‘delete_wiki_page_by_path’ tool to delete wiki pages in the ‘/Meeting Minutes/Archive’ path that are older than 90 days.”
- Benefit: Automates wiki maintenance tasks, ensuring the project wiki remains organized, relevant, and easy to navigate by automatically removing outdated content.
Intelligent Work Item Search for Task Prioritization
Intelligent Work Item Search for Task Prioritization
- Scenario: Developers can use ELITEA Agents to quickly search for work items assigned to them, filtered by priority or status, to efficiently prioritize their tasks for the day.
- Tools Used:
search_work_item - Example Instruction: “Use the ‘search_work_item’ tool to find all ‘Task’ work items assigned to me that are currently in ‘Active’ state and sorted by ‘Priority’.”
- Benefit: Improves developer efficiency by providing a fast and intelligent way to find and prioritize their work items directly within ELITEA, streamlining daily task management.
Contextual Work Item Details for Team Discussions
Contextual Work Item Details for Team Discussions
- Scenario: During team meetings or project discussions within ELITEA, Agents can provide immediate access to detailed information about specific work items to provide context and facilitate informed decision-making.
- Tools Used:
get_work_item - Example Instruction: “Use the ‘get_work_item’ tool to get details for work item with ID [work_item_id] and display the ‘Title’, ‘Description’, and ‘Status’ to the team.”
- Benefit: Enhances team collaboration by providing immediate access to relevant work item details within ELITEA, improving context and facilitating more focused and productive discussions.
Automated Bug Logging from ELITEA Workflows
Automated Bug Logging from ELITEA Workflows
- Scenario: When automated tests within ELITEA workflows detect a bug, automatically create a new Bug work item in Azure Boards, pre-populated with error details and relevant context from the test execution.
- Tools Used:
create_work_item - Example Instruction: “Use the ‘create_work_item’ tool to create a new ‘Bug’ work item with the title ‘Automated Test Failure Detected’ and description containing the error logs and test details from the failed workflow step.”
- Benefit: Streamlines bug reporting and issue tracking by automating bug logging directly from ELITEA workflows, ensuring timely and consistent bug reporting and accelerating the bug triage process.
Automated Work Item Updates Based on Workflow Progress
Automated Work Item Updates Based on Workflow Progress
- Scenario: As tasks progress through ELITEA workflows, automatically update the status of linked work items in Azure Boards to reflect the current progress and keep project status up-to-date.
- Tools Used:
update_work_item - Example Instruction: “Use the ‘update_work_item’ tool to update work item with ID [work_item_id]. Set the ‘Status’ field to ‘In Progress’ when the workflow reaches the ‘Development’ stage.”
- Benefit: Automates work item status management, ensuring work item statuses are always synchronized with the actual project progress. Reduces manual status updates and improves project tracking accuracy and real-time visibility.
Automated Test Plan Creation for Release Cycles
Automated Test Plan Creation for Release Cycles
- Scenario: At the start of each release cycle, automatically create a new test plan in Azure Test Plans, pre-populated with a predefined set of test suites and test cases, to streamline test planning for new releases.
- Tools Used:
create_test_plan,create_test_suite,add_test_case - Example Instruction: “Use the ‘create_test_plan’ tool to create a new test plan named ‘Regression Tests - Release [release_version]’. Then, use ‘create_test_suite’ and ‘add_test_case’ to populate the test plan with standard regression test suites and test cases.”
- Benefit: Automates test planning and setup for each release cycle, saving significant time and effort in test planning and ensuring consistent test coverage for every release.
Dynamic Test Suite Creation Based on Feature Scope
Dynamic Test Suite Creation Based on Feature Scope
- Scenario: When a new feature is developed, automatically create a dedicated test suite within the project’s test plan in Azure Test Plans to organize test cases specific to that feature.
- Tools Used:
create_test_suite - Example Instruction: “Use the ‘create_test_suite’ tool to create a new test suite named ‘Feature [feature_name] Tests’ within the test plan ‘Regression Test Plan’.”
- Benefit: Enables dynamic and organized test case management by automatically creating test suites tailored to specific features, improving test organization and focus.
Automated Test Case Updates from Requirements Changes
Automated Test Case Updates from Requirements Changes
- Scenario: When requirements for a specific feature change, automatically update the corresponding test cases in Azure Test Plans to ensure test cases remain aligned with the latest requirements.
- Tools Used:
get_test_case - Example Instruction: “Use the ‘get_test_case’ tool to retrieve the test case with ID [test_case_id].
- Benefit: Automates test case maintenance, ensuring test cases are always up-to-date with the latest requirements, reducing manual effort in test case updates and improving test accuracy.
Reporting on Test Plan Status and Progress
Reporting on Test Plan Status and Progress
- Scenario: Project managers can use ELITEA Agents to generate reports summarizing the status and progress of test execution within specific test plans, providing real-time visibility into testing efforts.
- Tools Used:
get_test_plan,get_test_suite,get_test_case - Example Instruction: “Use the ‘get_test_plan’ tool to get details for test plan ‘Regression Test Plan’. Summarize the overall test execution status and progress for each test suite within the plan and present a report to the project manager.”
- Benefit: Provides project managers with automated and up-to-date reports on test plan status and progress directly within ELITEA, improving project visibility and enabling data-driven decision-making regarding release readiness.
Troubleshooting
Connection Issues
Connection Issues
- Verify Azure DevOps URL: Ensure the organization URL is correct (e.g.,
https://dev.azure.com/YourOrganizationName) - Check Personal Access Token: Verify that your PAT is accurate and not expired
- Regenerate Token: If needed, create a new Personal Access Token in Azure DevOps and update your ELITEA credential
- Test Network Connectivity: Verify network connectivity between ELITEA and Azure DevOps
- Check Firewall Settings: Ensure your firewall or proxy isn’t blocking access to Azure DevOps
Incorrect Organization or Project Names
Incorrect Organization or Project Names
- Verify Organization Name: Ensure the organization name matches your Azure DevOps URL exactly
- Check Project Name: Confirm the project name is correct (project names are case-sensitive)
- Confirm Project Exists: Verify that the project exists in the specified organization
- Check URL Format: Ensure your Base API URL follows the format:
https://dev.azure.com/YourOrganizationName
Wiki/Work Item/Test Plan Access Issues
Wiki/Work Item/Test Plan Access Issues
- Verify Resource Exists: Confirm the resource (wiki page, work item, test plan) exists in the specified project
- Check Token Scopes: Ensure your Personal Access Token has appropriate scopes for the service you’re accessing
- Verify Service Enabled: Check that the service (Wiki, Boards, Test Plans) is enabled for the project
- Confirm Resource IDs: Verify you’re using correct resource IDs or paths in your requests
- Check Resource Permissions: Ensure your account has permission to access the specific resource
Indexing and Search Tool Errors
Indexing and Search Tool Errors
- Verify PgVector Configuration: Ensure PgVector is properly configured in your toolkit settings
- Check Embedding Model: Verify an embedding model is selected in the toolkit configuration
- Validate Index Creation: Confirm the index was created successfully before attempting to search
- Review Collection Names: Ensure you’re using the correct collection names when searching
- Check Data Availability: Verify there is data available to index from your Azure DevOps resources
Support Contact
If you encounter issues not covered in this guide or need additional assistance with Azure DevOps integration, please refer to Contact Support for detailed information on how to reach the ELITEA Support Team. Email: SupportAlita@epam.com## FAQ
Can I use my regular Azure DevOps password instead of a Personal Access Token?
Can I use my regular Azure DevOps password instead of a Personal Access Token?
What scopes/permissions should I grant to the Personal Access Token?
What scopes/permissions should I grant to the Personal Access Token?
vso.work_full- For Azure Boards (read and write access to work items)vso.wiki_full- For Azure Wiki (read and write access to wiki pages)vso.test_full- For Azure Test Plans (read and write access to test plans, suites, and cases)
What is the correct format for the Azure DevOps Organization URL?
What is the correct format for the Azure DevOps Organization URL?
https://dev.azure.com/YourOrganizationName. Replace YourOrganizationName with your actual Azure DevOps organization name. Do not include the project name in the Base API URL.Can I use the same credential for Wiki, Boards, and Test Plans toolkits?
Can I use the same credential for Wiki, Boards, and Test Plans toolkits?
How do I find my Azure DevOps organization and project names?
How do I find my Azure DevOps organization and project names?
https://dev.azure.com/YourOrgName). Project names are listed in the Azure DevOps interface when you log in. You can also find them under your organization’s Projects page.Why am I getting 'Permission Denied' errors even with a valid token?
Why am I getting 'Permission Denied' errors even with a valid token?
vso.work_writefor creating/updating work itemsvso.wiki_writefor modifying wiki pagesvso.test_writefor managing test plans
Do I need PgVector configuration for all toolkit tools?
Do I need PgVector configuration for all toolkit tools?
- Index data
- Search index
- Stepback search index
- Stepback summary index
- Remove index
- List collections
Can I use multiple Azure DevOps toolkits in the same agent?
Can I use multiple Azure DevOps toolkits in the same agent?
How do I update my Personal Access Token if it expires?
How do I update my Personal Access Token if it expires?
- Generate a new Personal Access Token in Azure DevOps (see the Token Generation section)
- Navigate to Credentials in ELITEA
- Edit your existing Azure DevOps credential
- Update the ADO Token field with the new token (or update the secret if you’re using Secrets Management)
- Save the credential
What's the difference between 'get_wiki_page_by_path' and 'get_wiki_page_by_id'?
What's the difference between 'get_wiki_page_by_path' and 'get_wiki_page_by_id'?
- get_wiki_page_by_path: Uses the hierarchical path of the wiki page (e.g.,
/Project Documentation/Getting Started). This is more user-friendly and intuitive. - get_wiki_page_by_id: Uses the unique numeric ID of the wiki page. This is more precise but requires knowing the page ID in advance.
- Create and Edit Agents from Canvas - Learn how to quickly create and edit agents directly from chat canvas for rapid prototyping and workflow automation.
- Create and Edit Toolkits from Canvas - Discover how to create and configure Azure DevOps toolkits directly from chat interface for streamlined workflow setup.
- Create and Edit Pipelines from Canvas - Guide to building and modifying pipelines from chat canvas for automated Azure DevOps workflows.
- Indexing Overview - Comprehensive guide to understanding ELITEA’s indexing capabilities and how to leverage them for enhanced search and discovery.
- Index ADO Wiki Data - Detailed instructions for indexing Azure DevOps Wiki data to enable advanced search, analysis, and AI-powered insights across your documentation.
- Azure Repos (ADO Repos) Toolkit Integration Guide - Learn how to integrate Azure Repos for comprehensive Azure DevOps version control capabilities.
- Azure DevOps Documentation - Official Microsoft documentation for Azure DevOps services and features.
- Azure Boards Documentation - Complete guide to work item tracking, backlogs, sprints, and Kanban boards.
- Azure Wiki Documentation - Learn about creating and managing project wikis for documentation and collaboration.
- Azure Test Plans Documentation - Comprehensive guide to test planning, execution, and tracking in Azure DevOps.
- Azure DevOps REST API Reference - Technical API documentation for Azure DevOps services integration.
- Personal Access Tokens Guide - Best practices for creating and managing PATs for secure authentication.