Overview
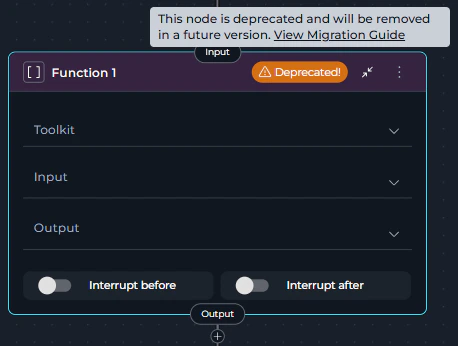
What changed:- Function Node is now deprecated and displays a warning icon with “Deprecated!” text in the node header
- Creating new Function nodes is no longer possible through the Add Node menu
- Existing Function nodes continue to function but should be migrated
- Toolkit Node, MCP Node, and Agent Node are the recommended replacements
- Hovering over the warning icon shows a tooltip with migration guidance
How to Identify Deprecated Function Nodes
Deprecated Function nodes are visually marked in the pipeline editor:- Warning Icon: A yellow/orange warning triangle icon appears in the node header
- “Deprecated!” Text: Text next to the icon clearly indicates the deprecation status
- Tooltip: Hovering over the warning area shows: “This node is deprecated and will be removed in a future version. View Migration Guide” with a link to this guide
There is no automatic migration from Function Nodes to Toolkit/MCP/Agent Nodes. You must manually replace Function Nodes in your existing pipelines following the steps in this guide.
- Review pipelines containing Function nodes
- Choose the appropriate replacement: Toolkit, MCP, or Agent node
- Follow migration steps to update your workflow
- Test the migrated pipeline thoroughly
Why This Change Was Made The Function Node has been deprecated in favor of more specialized and capable node types:
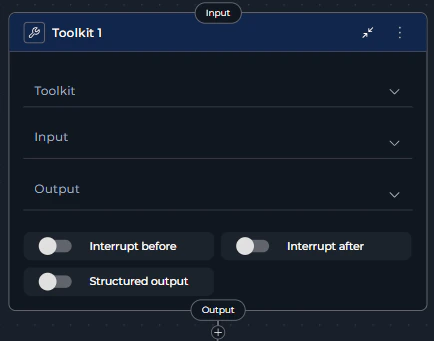
- Toolkit Node: Provides enhanced functionality for executing toolkit tools with structured output support and better configuration options
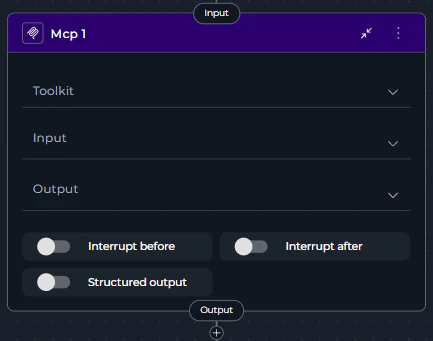
- MCP Node: Dedicated node for Model Context Protocol servers with specialized MCP tool handling
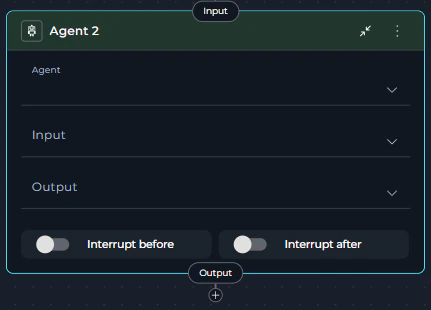
- Agent Node: Enables execution of AI agents with task-based instructions and enhanced capabilities
Migration Options
You have three supported replacements, each suited for different use cases:Toolkit Node
Choose Toolkit when:- Your Function node uses tools from ELITEA toolkits
- You need structured output support
- You want enhanced configuration options for toolkit execution
- You’re working with external service integrations
- Full functionality coverage of deprecated Function Node for toolkits
- Structured output configuration support
- Enhanced input/output mapping capabilities
- Better toolkit tool management
MCP Node
Choose MCP when:- Your Function node uses MCP server tools
- You’re working with Model Context Protocol integrations
- You need MCP-specific tool filtering and configuration
- You want dedicated MCP server support
- Dedicated MCP server support
- MCP-specific tool filtering
- Enhanced MCP tool discovery
- Structured output for MCP operations
Agent Node
Choose Agent when:- Your Function node’s behavior can be delegated to an AI agent
- You need intelligent task execution with natural language instructions
- You want to leverage pre-configured agents with specialized capabilities
- Your workflow requires LLM-based decision making
- Natural language task instructions
- Access to pre-configured agents
- Enhanced AI capabilities
- Flexible input mapping with task and chat_history support
Migration Steps: Function → Toolkit
Follow these steps to migrate a Function node that uses toolkit tools to a Toolkit node: Step 1: Review the Existing Function Node- Navigate to Pipelines in the main menu
- Open the pipeline containing the Function node
- Click the Configuration tab
- Select the Flow tab to view the pipeline flow diagram
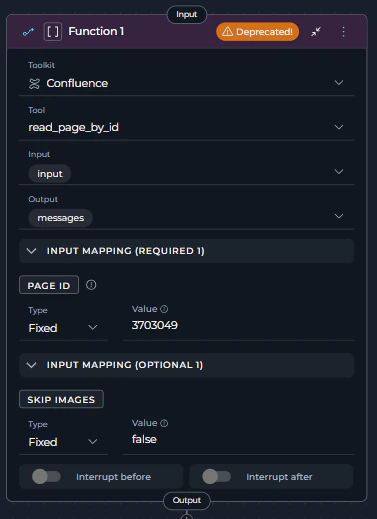
- Locate the Function node - it will display with a warning icon and “Deprecated!” text in the node header
- Click on the Function node to open its configuration panel
- Review its current configuration:
- Toolkit: Note which toolkit is selected (e.g., “confluence_toolkit”)
- Tool: Note which specific tool is selected (e.g., “read_page_by_id”)
- Input: Review input state variables
- Output: Review output state variables
- Input Mapping: Document all parameter mappings
- Interrupt Settings: Note any interrupt configurations
- In the same Flow tab, click the Add Node button (+ icon)
- Select Toolkit from the node menu under Execution Nodes
- The new Toolkit node will appear on the canvas
- Position it near the deprecated Function node for easy comparison
- Click on the Toolkit node to open its configuration panel
- Set the Toolkit field:
- Select the same toolkit that was selected in the Function node
- Example: Select “confluence_toolkit” from the dropdown
- Set the Tool field:
- After selecting the toolkit, the Tool dropdown will appear
- Select the same tool that was used in the Function node
- Example: Select “read_page_by_id”
- Configure Input:
- Select the same input state variables that were used in the Function node
- Example: If Function node had
page_id,input, select those same variables
- Configure Output:
- Select the same output state variables that were used in the Function node
- Example: If Function node output to
page_content,messages, configure the same
- Set up Input Mapping:
- Recreate all parameter mappings from the Function node
- The Input Mapping section displays parameters required by the selected tool
- For each parameter, configure the same type and value as in the Function node:
- Variable: Direct state reference (e.g.,
page_id) - F-String: Formatted string with variables (e.g.,
Page ID: {confluence_page_id}) - Fixed: Static value (e.g.,
123456789)
- Variable: Direct state reference (e.g.,
- Configure Structured Output (if needed):
- Toolkit nodes support structured output configuration (Function nodes did not)
- Enable if you want to enforce a specific output schema
- Configure Interrupt Settings:
- Copy interrupt before/after settings from the Function node
- Example: Enable “Interrupt after” if it was enabled in the Function node
- Disconnect the incoming connection to the Function node:
- Click on the edge connecting to the Function node
- Press
Deleteor click the remove icon
- Connect the Toolkit node:
- Drag a connection from the previous node to the Toolkit node’s input handle
- Example: Connect from “Data Input Node” to the new Toolkit node
- Connect the Toolkit outputs:
- Drag a connection from the Toolkit node’s output handle to the next node in the workflow
- Example: Connect to “Results Processor Node”
- Verify all connections match the original Function node’s flow
- Click on the Function node to select it
- Click the Delete icon (trash can) or press
Deletekey - Confirm the deletion
- The Function node is now removed from the pipeline
- Click Save to save the pipeline configuration
- Navigate to the Execution tab
- Run the pipeline with test inputs
- Verify that:
- The Toolkit node executes the same tool as before
- Input/output handling works correctly
- All parameter mappings function as expected
- All workflow connections function properly
Migration Steps: Function → MCP
Follow these steps to migrate a Function node that uses MCP server tools to an MCP node: Step 1: Review the Existing Function Node- Navigate to Pipelines in the main menu
- Open the pipeline containing the Function node
- Click the Configuration tab
- Select the Flow tab to view the pipeline flow diagram
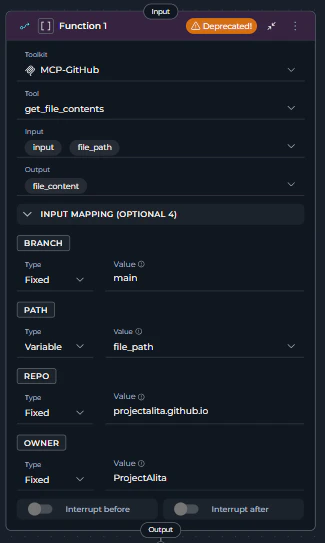
- Locate the Function node using an MCP server tool - it will display with a warning icon and “Deprecated!” text in the node header
- Click on the Function node to open its configuration panel
- Review its current configuration:
- Toolkit: Note which MCP server is selected (e.g., “GitHub MCP”)
- Tool: Note which specific MCP tool is selected (e.g., “get_file_contents”)
- Input: Review input state variables
- Output: Review output state variables
- Input Mapping: Document all parameter mappings
- Interrupt Settings: Note any interrupt configurations
- In the same Flow tab, click the Add Node button (+ icon)
- Select MCP from the node menu under Execution Nodes
- The new MCP node will appear on the canvas
- Position it near the deprecated Function node for easy comparison
- Click on the MCP node to open its configuration panel
- Set the Toolkit field:
- Select the same MCP server that was selected in the Function node
- MCP servers appear in the toolkit dropdown with “(MCP)” suffix
- Example: Select “GitHub MCP” from the dropdown
- Set the Tool field:
- After selecting the MCP server, the Tool dropdown will appear
- Select the same MCP tool that was used in the Function node
- Example: Select “get_file_contents” from available MCP tools
- Configure Input:
- Select the same input state variables that were used in the Function node
- Example: If Function node had
owner,repo,path, select those same variables
- Configure Output:
- Select the same output state variables that were used in the Function node
- Example: If Function node output to
file_content,messages, configure the same
- Set up Input Mapping:
- Recreate all MCP tool parameter mappings from the Function node
- The Input Mapping section displays MCP tool parameters
- For each parameter, configure the same type and value as in the Function node:
- Variable: Direct state reference (e.g.,
owner,repo,path) - F-String: Formatted string with variables (e.g.,
{repo_owner}/{repo_name}) - Fixed: Static value (e.g.,
ProjectAlitafor owner,projectalita.github.iofor repo)
- Variable: Direct state reference (e.g.,
- Configure Structured Output (if needed):
- MCP nodes support structured output configuration (Function nodes did not)
- Enable if you want to enforce a specific output schema for MCP responses
- Configure Interrupt Settings:
- Copy interrupt before/after settings from the Function node
- Example: Enable “Interrupt after” if it was enabled in the Function node
- Disconnect the incoming connection to the Function node:
- Click on the edge connecting to the Function node
- Press
Delete
- Connect the MCP node:
- Drag a connection from the previous node to the MCP node’s input handle
- Example: Connect from “Repository Input Node” to the new MCP node
- Connect the MCP outputs:
- Drag a connection from the MCP node’s output handle to the next node in the workflow
- Example: Connect to “Content Processor Node”
- Verify all connections match the original Function node’s flow
- Click on the Function node to select it
- Click the Delete icon (trash can) or press
Deletekey - Confirm the deletion
- The Function node is now removed from the pipeline
- Click Save to save the pipeline configuration
- Navigate to the Execution tab
- Run the pipeline with test inputs
- Verify that:
- The MCP node executes the same MCP tool as before
- Input/output handling works correctly
- All MCP parameter mappings function as expected
- MCP server connection is maintained
- All workflow connections function properly
Migration Steps: Function → Agent
Follow these steps to migrate a Function node to an Agent node when the function’s logic can be better expressed as an AI agent task: Step 1: Analyze Function Logic for Agent Suitability- Navigate to Pipelines in the main menu
- Open the pipeline containing the Function node
- Click the Configuration tab
- Select the Flow tab to view the pipeline flow diagram
- Analyze the Function node to determine if it’s suitable for agent migration:
- Good candidates: Functions that perform complex reasoning, content generation, analysis, or decision-making
- Poor candidates: Simple deterministic tool calls, API operations, or direct data transformations
- Example good candidate: A Function node that processes user stories and generates summaries
- Example poor candidate: A Function node that simply calls
confluence_toolkit.read_page_by_idwith static parameters
- In the same Flow tab, click the Add Node button (+ icon)
- Select Agent from the node menu under Interaction Nodes
- The new Agent node will appear on the canvas
- Position it near the deprecated Function node for easy comparison
- Click on the Agent node to open its configuration panel
- Set the Agent field:
- Select an appropriate agent from the dropdown that can perform the Function node’s task
- Agents must be added to the pipeline first (Configuration > Toolkits > Add Agent)
- Example: Select “Content Analysis Agent” to replace a content processing Function node
- Configure Input:
- Select the input states that the agent needs
- Example: If the Function node used
user_data,context, select those state variables
- Configure Output:
- Select the output states where agent results should be stored
- Example: If the Function node output to
processed_result, configure the same
- Set up Input Mapping:
- Configure the agent task and parameters to replicate Function behavior
- Common Agent Parameters:
- task: The main instruction/prompt for the agent
- chat_history: Conversation history (messages array)
- Custom Variables: Agent-specific parameters
- Example Task Mapping:
- Example Chat History Mapping:
- Configure Interrupt Settings:
- Copy interrupt before/after settings from the Function node
- Example: Enable “Interrupt after” if it was enabled in the Function node
- Disconnect the incoming connection to the Function node:
- Click on the edge connecting to the Function node
- Press
Delete
- Connect the Agent node:
- Drag a connection from the previous node to the Agent node’s input handle
- Example: Connect from “Data Input Node” to the new Agent node
- Connect the Agent outputs:
- Drag a connection from the Agent node’s output handle to the next node in the workflow
- Example: Connect to “Results Processor Node”
- Verify all connections match the original Function node’s flow
- Click on the Function node to select it
- Click the Delete icon (trash can) or press
Deletekey - Confirm the deletion
- The Function node is now removed from the pipeline
- Click Save to save the pipeline configuration
- Navigate to the Execution tab
- Run the pipeline with test inputs
- Verify that:
- The Agent node produces equivalent results to the Function node
- Input/output handling works correctly
- Task instructions properly guide the agent
- All workflow connections function properly
- Compare outputs: Ensure agent results match expected Function node behavior
- Adjust task instructions: If results differ, refine the agent task prompt
Best Practices
Choosing the Right Replacement Node
Choosing the Right Replacement Node
Use Toolkit Node when:
- Function node executes standard ELITEA toolkit tools
- You need deterministic, repeatable tool execution
- Working with external service integrations (Jira, GitHub, Confluence)
- Parameter mapping is straightforward and well-defined
- You want structured output support
- Function node executes Model Context Protocol server tools
- Working with MCP server integrations
- You need MCP-specific tool filtering
- Your workflow requires MCP server connections
- You want dedicated MCP support
- Function node’s logic involves reasoning or analysis
- Task can be expressed as natural language instructions
- You need LLM-based decision making
- Working with content generation or complex processing
- You want to leverage pre-configured AI agents
General Migration Tips
General Migration Tips
- Migrate One at a Time: Update and test one Function node before moving to the next
- Keep Both Temporarily: Test the new node before removing the deprecated Function node
- Document Changes: Note any differences in behavior for your team
- Review Connections: Ensure all incoming and outgoing connections are preserved
- Use YAML View: Check the YAML tab to verify configuration correctness
- Test Thoroughly: Always test migrated pipelines with various inputs to ensure correct behavior
- Version Control Migration: After migrating, save as a new version, test all flows, then update the main (latest) version
Configuration Best Practices
Configuration Best Practices
For Toolkit/MCP Nodes:
- Map All Required Parameters: Ensure all required parameters from the Function node are mapped
- Preserve Parameter Types: Use the same type (Variable, F-String, Fixed) as in the Function node
- Enable Structured Output: Take advantage of structured output support when needed
- Verify Tool Selection: Double-check that the correct toolkit and tool are selected
- Write Clear Task Instructions: Provide detailed, unambiguous task descriptions
- Include Context: Pass relevant context through chat_history or task parameters
- Test Task Prompts: Verify agent task instructions produce expected results
- Map Custom Variables: Configure any agent-specific custom variables appropriately
Troubleshooting
Toolkit/MCP Node Issues
Toolkit/MCP Node Issues
Problem: Toolkit/MCP node doesn’t execute the expected toolSolutions:Problem: Input Mapping parameters are missing or incorrectSolutions:Problem: Structured output configuration causes errorsSolutions:
- Verify the selected toolkit/MCP server matches the one from the Function node
- Check that the tool selection is correct
- Ensure input/output state configurations are correct
- Verify all required parameters are mapped in Input Mapping
- Review YAML configuration for syntax errors
- Review the Function node’s original input mapping configuration
- Verify all required parameters are mapped
- Check that parameter types (Variable, F-String, Fixed) are appropriate
- Ensure state variables referenced in mappings exist
- Test with simplified mappings first, then add complexity
- Verify structured output schema is valid
- Check that output state variables can accommodate the structured format
- Test without structured output first, then add it incrementally
- Review schema format and requirements
Agent Node Issues
Agent Node Issues
Problem: Agent node doesn’t produce expected resultsSolutions:Problem: Agent task field is empty or not configuredSolutions:
- Review and refine the task instructions
- Ensure task description is clear and detailed
- Verify the selected agent has appropriate capabilities
- Check that input parameters (task, chat_history) are correctly mapped
- Test agent separately to verify its behavior
- Ensure the task parameter is configured in Input Mapping
- Provide a clear, descriptive task instruction
- Use F-String format to include dynamic context:
task: "Process {input.data_type} data" - Verify task instructions guide the agent to replicate Function node behavior
Connection Issues
Connection Issues
Problem: Connections are lost after migrationSolutions:
- Manually reconnect nodes after adding the replacement node
- Verify each handle connects to the correct target
- Check that incoming connection to the new node is established
- Save pipeline after verifying all connections
- Use YAML view to confirm connections are properly configured
State Variable Issues
State Variable Issues
Problem: State variables not accessible in new nodeSolutions:
- Verify input state variables are defined in pipeline state
- Check that state variable names match exactly
- Ensure state variables are populated before the node executes
- Review state configuration in YAML view
Comparison Table
Related Documentation
- Toolkit Node - Detailed Toolkit node documentation
- MCP Node - Model Context Protocol node documentation
- Agent Node - Agent node documentation
- Pipeline States - Understanding state variables used in pipelines
- Node Connectors - How to connect nodes in pipelines
- YAML Configuration - Complete YAML syntax reference
- Flow Editor - Visual pipeline editing interface