

Overview
This guide will help you migrate your existing pipelines from the deprecated Loop node to manual loop patterns using Router, State Modifier, and Code nodes.Why Was the Loop Node Deprecated?
The Loop node has been deprecated to simplify the pipeline architecture and provide more explicit control over iteration logic:- More explicit control: Manual loop patterns make iteration logic visible and debuggable
- Better flexibility: You can customize loop behavior, exit conditions, and error handling
- Clearer data flow: Pipeline visualization shows exact execution paths
- Reduced complexity: Eliminates hidden batching and execution logic
Understanding Loop Node Functionality
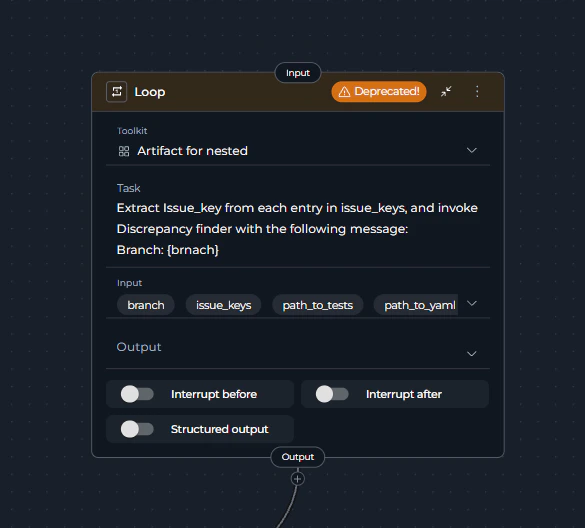
The Loop node automatically:- Accepted a prompt that generated a list of data batches
- Executed a function (toolkit) or Agent for each item in the list
- Aggregated results automatically
- Handled iteration control internally
Migration Strategy: Manual Loop Pattern
Replace Loop nodes with an explicit loop pattern using these components:Core Pattern Components
- Code Node, LLM Node or any other group of nodes: Initialize the list/batch of items to process
- State Modifier Node: Extract current item and increment index
- Router Node: Check exit condition and control loop flow
- Execution Node: Process the current item (Toolkit, LLM, Agent, or Code)
- State Modifier Node (optional): Aggregate results
Manual Loop Flow
Manual loop patterns provide better observability, debugging capabilities, and control. While they require more nodes, they make your pipeline logic transparent and maintainable.
Migration Examples
Example 1: Simple Loop Pattern (Reading and Processing List Items)
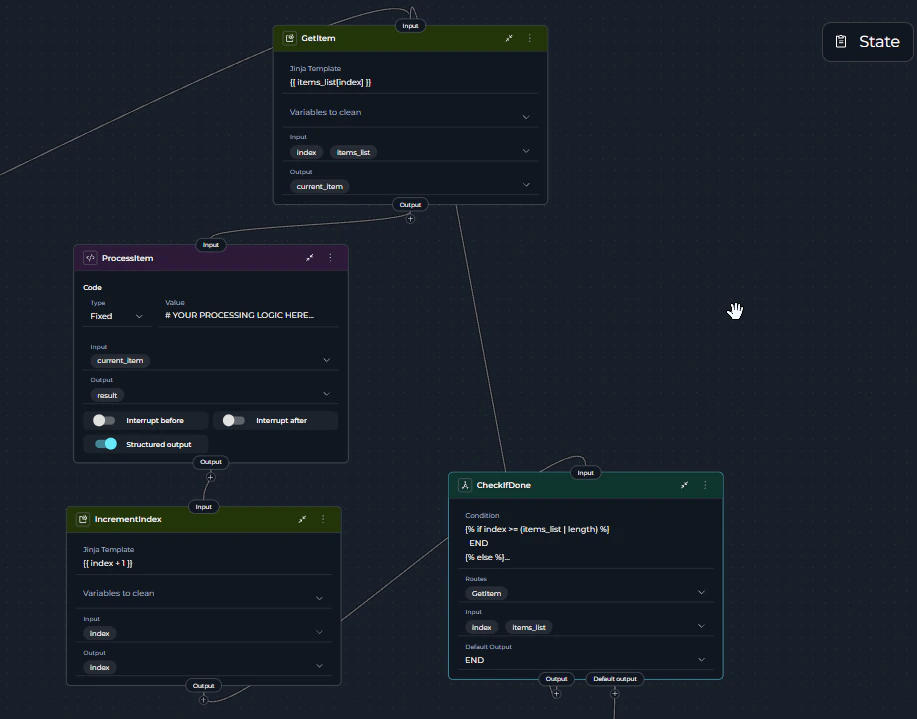
This simplified example shows the basic loop structure. Each node is shown as a placeholder to help you understand the pattern. Use Case: Process a list of items one by one Pattern: Initialize → Get Item → Process Item → Increment → Check → [Loop Back or END]Simplified Pipeline YAML
Flow Explanation
- InitializeList (Code Node): Creates a list with 3 items and sets index to 0
- GetItem (State Modifier): Extracts the current item using the index (
items_list[0], thenitems_list[1], etc.) - ProcessItem (Code Node): [Replace this with your processing logic] - could be toolkit, LLM, or any operation
- IncrementIndex (State Modifier): Adds 1 to index (0 → 1 → 2 → 3)
- CheckIfDone (Router): Checks if
index >= 3(list length)- If NO: Goes back to GetItem (loop continues)
- If YES: Goes to END (loop exits)
Example 2: Writing Data to External Resource (Creating Multiple Confluence Pages)
This example shows how to create multiple items in an external system (Confluence pages). Use Case: Create several documentation pages in Confluence from a list of topics Pattern: Initialize Topics → Get Topic → Create Page → Increment → Check → [Loop Back or END]Pipeline YAML
Flow Explanation
- InitializeTopics: Creates list of 3 topics to create pages for
- GetTopic: Gets current topic from list using index
- CreatePage: [Replace with Confluence Toolkit] - Creates the page
- IncrementIndex: Moves to next topic
- CheckIfDone: Checks if all topics processed → loops back or ends
Flow Explanation
- InitializeTopics (Code Node): Creates list of topics with Confluence metadata
- GenerateContent (LLM): Generates documentation content for current topic
- ExtractContent (State Modifier): Extracts content from LLM response
- CreateConfluencePage (Toolkit): Creates page in Confluence
- TrackResult (Code Node): Records creation result with page ID
- IncrementIndex (State Modifier): Moves to next topic
- CheckExit (Router): Checks if all topics processed → continues or exits
- GetNextTopic (State Modifier): Gets next topic from list (loop back to step 2)
- GenerateReport (State Modifier): Creates summary of all created pages
Configuring Step Limit for Loops
What is Step Limit?
Every agent and pipeline has a step limit that controls the maximum number of execution steps allowed. The default value is 25 steps.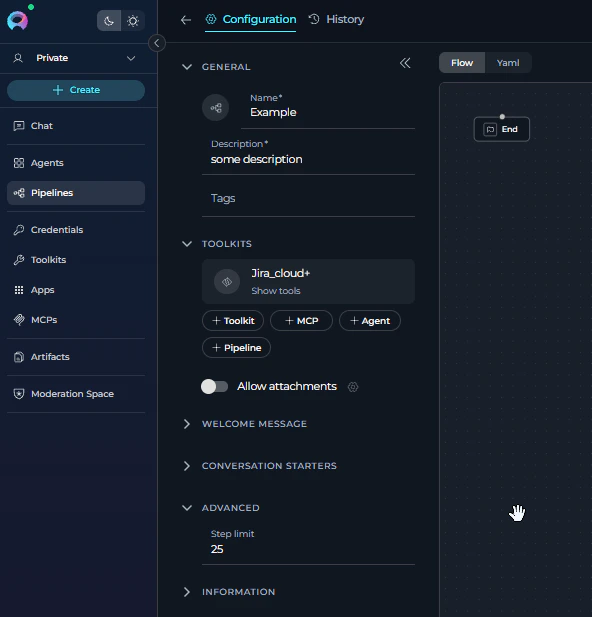
Why Step Limit Exists
Step limits prevent endless loops that can:- Waste tokens: Endless loops consume API tokens continuously
- Increase costs: More tokens = higher costs
- Cause data issues: May create duplicate records in Confluence, JIRA, or other systems
- Lose data: Failed loops may partially complete, leaving inconsistent state
How to Set Step Limit
For Agents:- Open your Agent configuration
- Scroll to Advanced section
- Set Step limit to your expected number of iterations + buffer
- Open your Pipeline in Flow Editor
- Go to Advanced Settings
- Set Step limit to your expected loop iterations + overhead
Calculating Step Limit
Formula:- Items to process: 3
- Steps per iteration: 4 (GetItem → Process → Increment → Check)
- Overhead: 1 (Initialize)
- Safety buffer: 5
- Total: 3 × 4 + 1 + 5 = 18
- Items to process: 10
- Steps per iteration: 6 (GetItem → Process → Aggregate → Increment → Check → ExtractData)
- Overhead: 2 (Initialize + Finalize)
- Safety buffer: 10
- Total: 10 × 6 + 2 + 10 = 72
Step Limit Error
If your pipeline exceeds the step limit, you’ll see: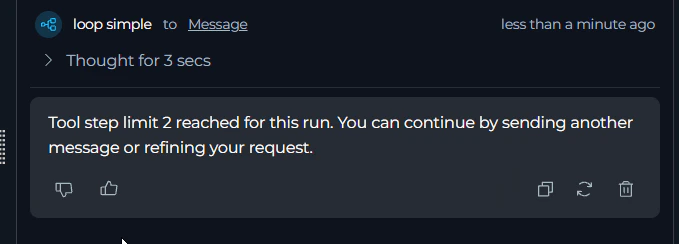
- Check if loop logic is correct (Router condition, increment, etc.)
- Verify you’re not in an endless loop
- If loop is correct, increase step limit appropriately
- Re-run the pipeline
When to Use LLM Instead of Loops
For small iterations (5-10 items or less), consider using an LLM node or Agent instead of manual loops: Use LLM/Agent when:- Processing fewer than 10 items
- Items can be processed in a single prompt
- You need intelligent interpretation of results
- Data fits within token limits
- ✔️ Simpler pipeline (no loop logic needed)
- ✔️ Fewer steps (stays within default 25 limit)
- ✔️ LLM can process batch intelligently
- ✘ Limited by token context window
- ✘ All items must fit in one prompt
Step-by-Step Migration Guide
Step 1: Identify Your Loop Requirements
Answer these questions about your existing Loop node:- What list of items needs processing?
- What should happen to each item?
- Do you need to save results?
Step 2: Build the Loop Pattern
Use the simple pattern from Example 1:- Initialize: Create your list
- Get Item: Extract current item
- Process: Do something with the item
- Increment: Move to next item
- Check: Are we done? If no, loop back
Step 3: Test Your Loop
- Start with just 2-3 items
- Run the pipeline
- Check that all items were processed
- Verify results are correct
Common Loop Patterns
Pattern 1: Process Each Item
Simply process items without saving results. Example: Send notifications, update recordsPattern 2: Collect Results
Process items and save all results. Example: Generate reports, validate dataTroubleshooting
Error: Step Limit Reached
Problem: Pipeline stops with “Step limit reached (25 steps)” error Solution:- Check if endless loop: Review Router condition and increment logic
- Calculate required steps: Count items × steps per iteration
- Increase step limit: Go to Advanced settings and increase the value
- Add safety buffer: Set limit 20-30% higher than calculated
- Test with small data: Verify loop works with 2-3 items first
Loop Never Stops
Problem: Pipeline keeps running forever Solution:- Check that index increases each time (Step 4: Increment)
- Verify Router condition:
{% if index >= (items_list | length) %} - Add safety limit:
{% if index >= 100 %}
Error: List Index Out of Range
Problem: Can’t access item at index Solution:- Start index at
0, not1 - Make sure list has items before accessing
- Check Router exits before invalid index
Only Last Result Shows
Problem: Previous results disappear Solution:- Initialize result variable as empty:
value: ''orvalue: [] - Use correct template:
{{ existing + new }}(not just{{ new }})
Frequently Asked Questions
Why was the Loop node removed?
Loop nodes hid too much complexity. Manual loops make it clear what’s happening at each step, making pipelines easier to understand and fix.Can I still use my old pipelines?
Yes. Existing Loop nodes will keep working. But we recommend updating to the new pattern for better control and future compatibility.What is the step limit and why does it matter?
Every pipeline has a step limit (default: 25) to prevent endless loops. When creating loops:- You must increase the step limit to match your iterations
- Calculate: (items × steps per item) + overhead + buffer
- Set it close to real values - don’t use 1000 “just in case”
- Mistakes in loop logic can cause endless loops that waste tokens and may corrupt external data
Should I use a loop or an LLM for small datasets?
For 5-10 items or less, consider using an LLM node or Agent instead:- Simpler pipeline (no loop needed)
- Stays within default 25 step limit
- LLM can process batch in one call
- Example: “Process these 5 items and return results” as a single LLM prompt
Which node creates the list?
- Code Node: When reading files, calling APIs, or transforming data
- LLM Node: When AI needs to generate the list
Can I stop the loop early?
Yes. Add a condition to your Router:How do I handle errors?
Wrap processing in try/catch using Code node:Where can I learn more?
- Router Node: Router Documentation
- State Modifier: State Modifier Documentation
- Code Node: Code Node Documentation
- All Nodes: Nodes Overview