

Overview
Key Capabilities:- Image Analysis: Upload images for visual analysis, OCR, content extraction, and AI-powered interpretation
- Document Processing: Attach documents for content indexing, semantic search, and information retrieval
- Data Files: Upload CSV, JSON, and other data formats for analysis and processing
- Multiple Upload Methods: Click to browse, drag-and-drop, or paste from clipboard
- Centralized Storage: All attachments stored in Artifact buckets with configurable retention policies
How Attachments Work
The attachment functionality is integrated with the Artifact Toolkit.- Storage: Every file you attach is automatically uploaded and stored in an Artifact bucket. The backend always uses the default
attachmentsbucket — no manual Artifact Toolkit configuration is required. - Access: This allows the AI agent to access the file for analysis and also provides a centralized location for you to manage these files via the Artifacts section of the platform.
- Retention: Files are subject to the retention policy of the bucket they are stored in. By default, new buckets have a retention period of 30 days, after which files are automatically deleted. Retention period can be changed manually.
Prerequisites
Before using attachments, ensure you have:- Permission Level: Editor or Admin role within the project (required for Agent configuration)
- Active Conversation: An existing conversation or agent
Enabling Attachments
Attachments must be explicitly enabled before use.Enable Attachments for Agents
Configure attachment capabilities at the Agent level to enable file uploads in all conversations using that agent.- Navigate to Agents from the main menu
- Select the agent to configure
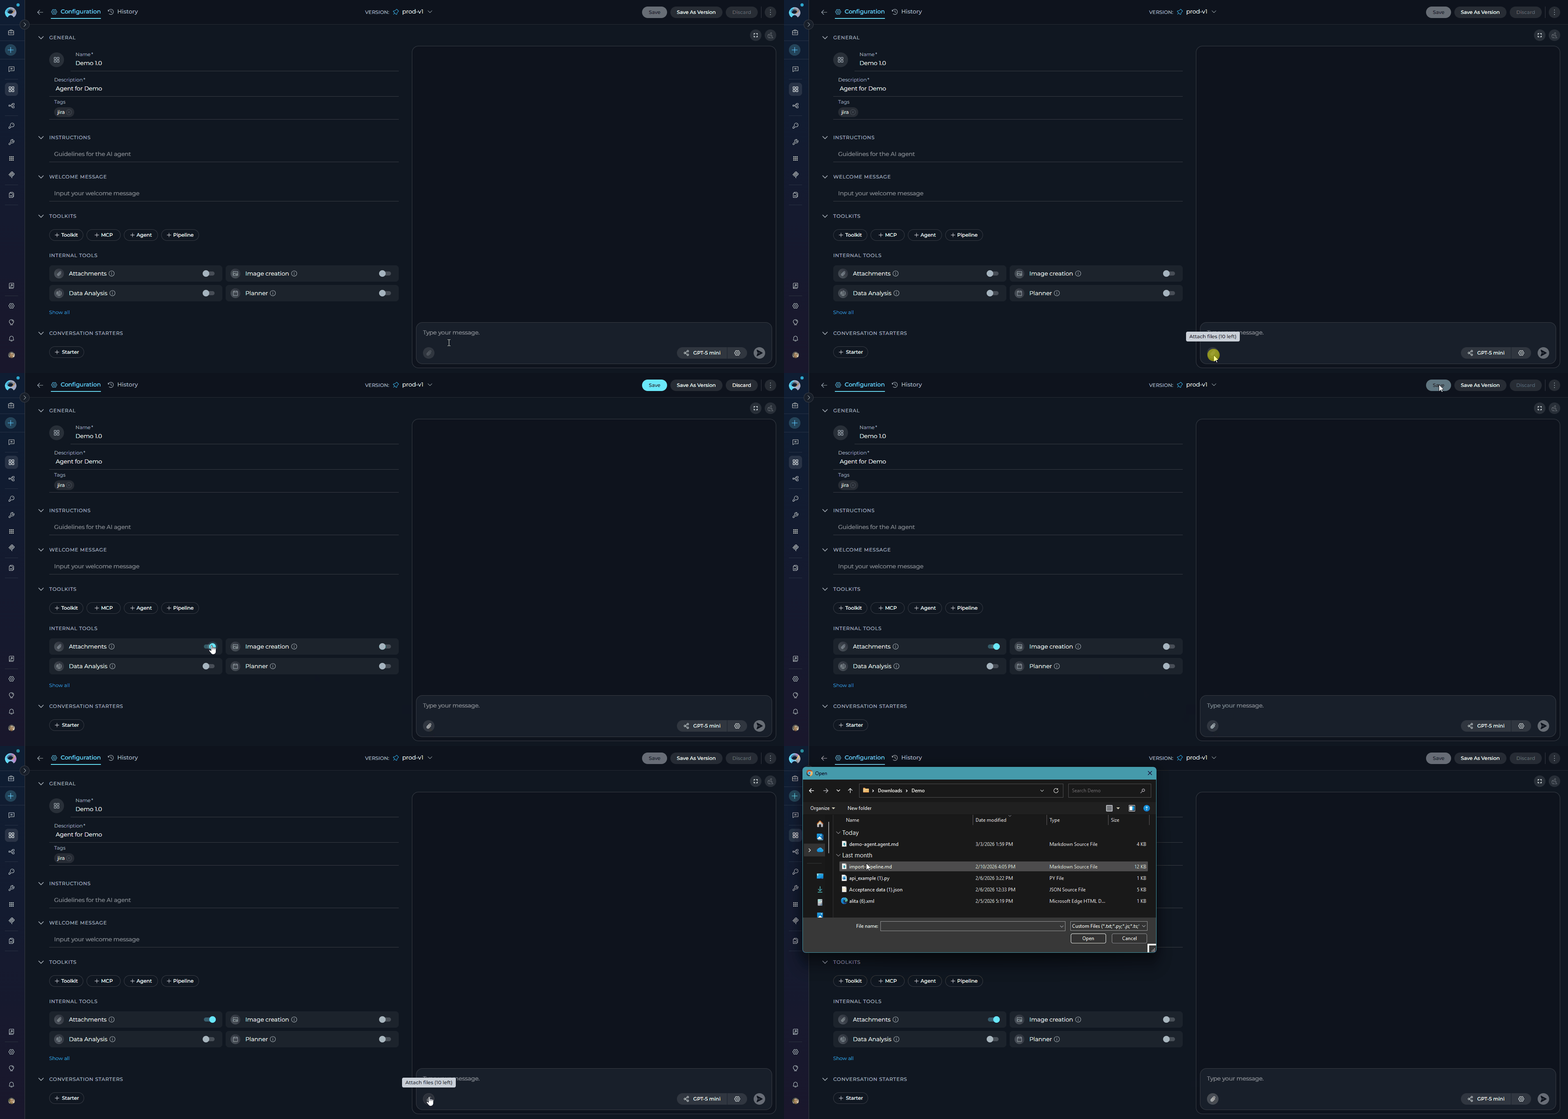
- On the Configuration tab, locate the Allow attachments toggle in Modules (disabled by default)
- Click the toggle to enable attachments
- Save the agent
Attachments module is added to the agent. The backend automatically provisions storage using the default attachments bucket — no additional toolkit configuration is required. When using this agent in a conversation, Attach Files becomes available in the + menu of the message input area.
Attach Files in a Conversation
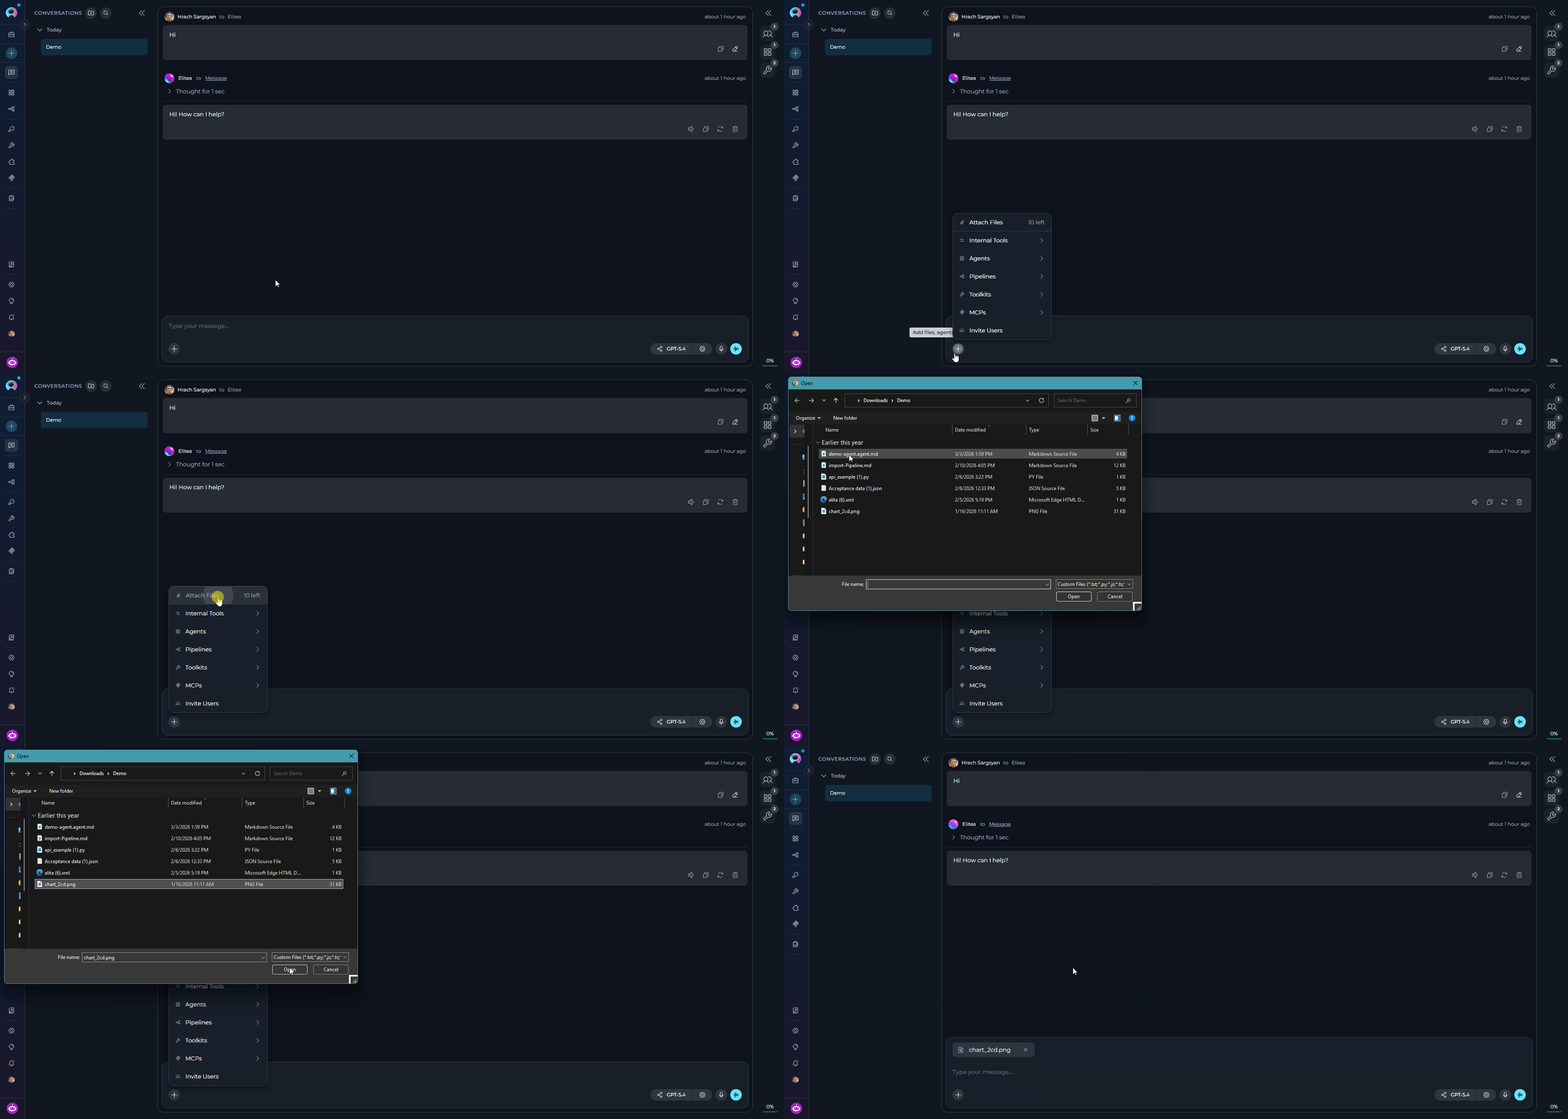
Upload files directly within an active chat session without configuring the agent.- Open a new or existing conversation
- Click the
+button in the message input toolbar - Click Attach Files at the top of the menu
- The file browser opens — select and confirm your files
- Drag and Drop
- Paste from Clipboard
- Select files from your file explorer
- Drag files directly into the message input area
- Release to attach files
image_20251106_143022_1.50KB.png). No error is shown and both files are preserved.Using Agents with Attachments in Conversations
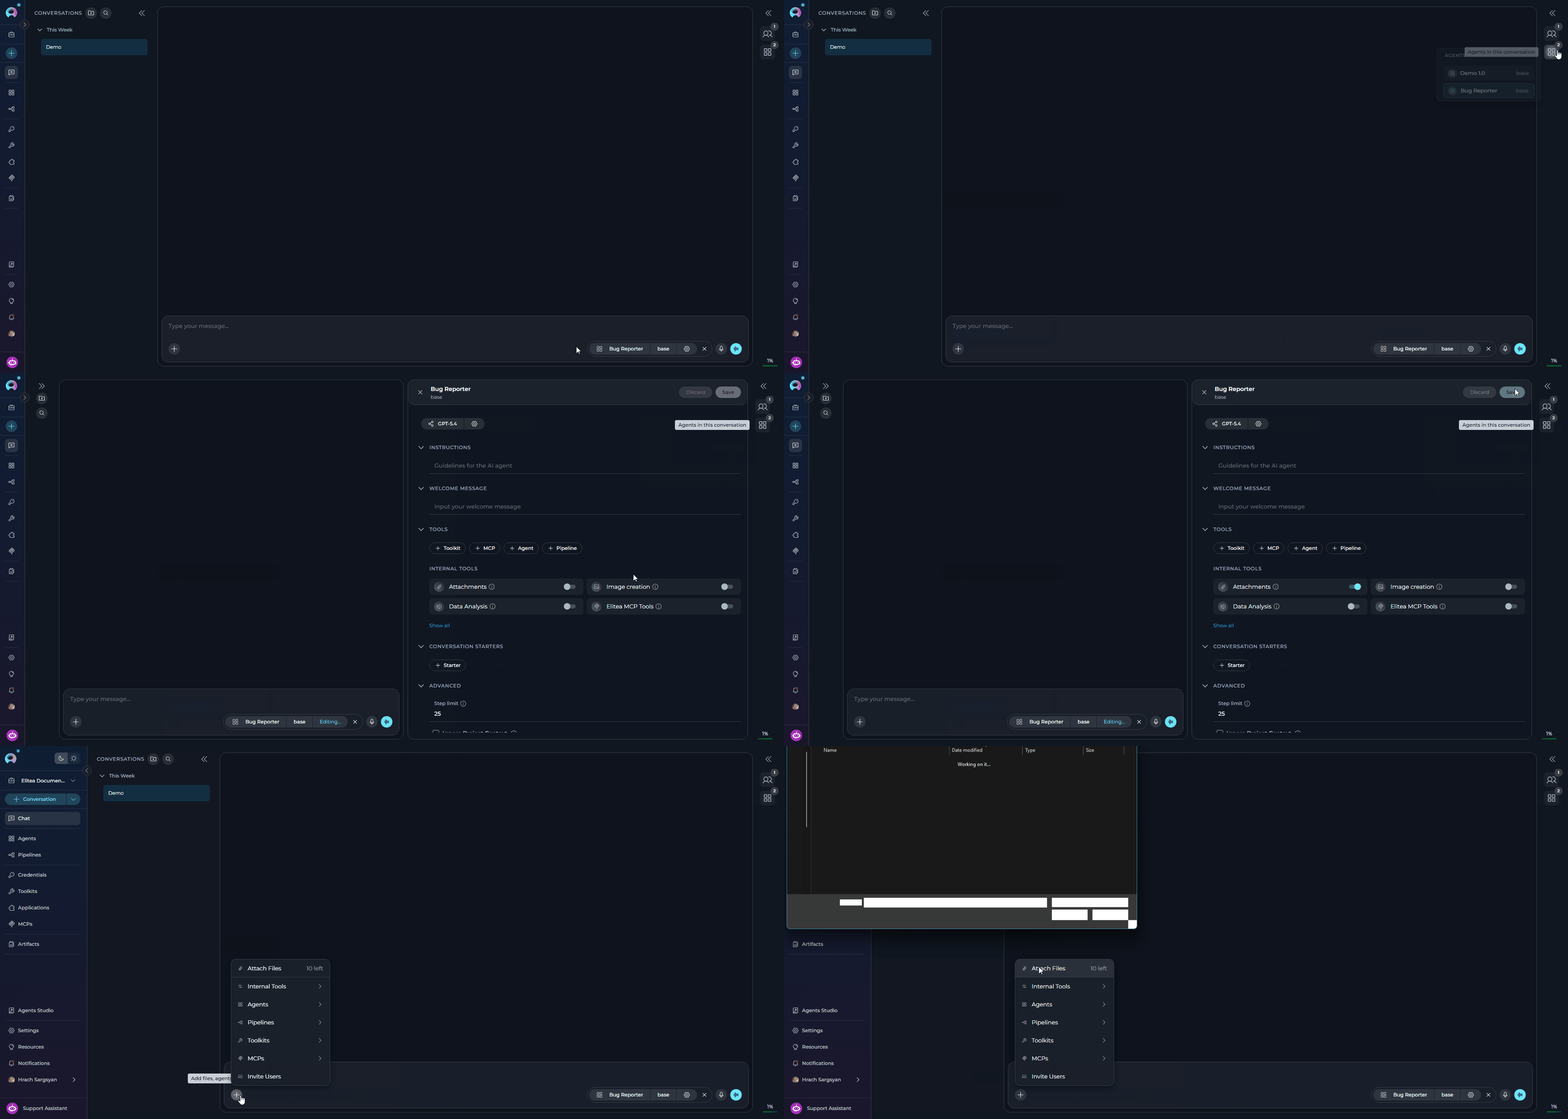
The availability of Attach Files in the+ menu is determined by the currently active participant.
-
If the active agent or pipeline has Allow attachments enabled, Attach Files is active in the
+menu - If you switch to an agent or pipeline without attachments enabled, Attach Files is disabled and shows the tooltip: “Attachments aren’t available for the selected agent or pipeline.”
-
In direct LLM or dummy conversations (no agent selected), Attach Files is always active
Using Attachments in Conversations
When attachments are available — either because you are in a direct LLM chat or using an agent/pipeline with Allow attachments enabled — the+ button in the message input toolbar gives access to Attach Files.
Send Message with Attachments
- After attaching files, thumbnails appear above the message input area
- Type a text prompt describing what you want the AI to do (required)
-
Click the Send button
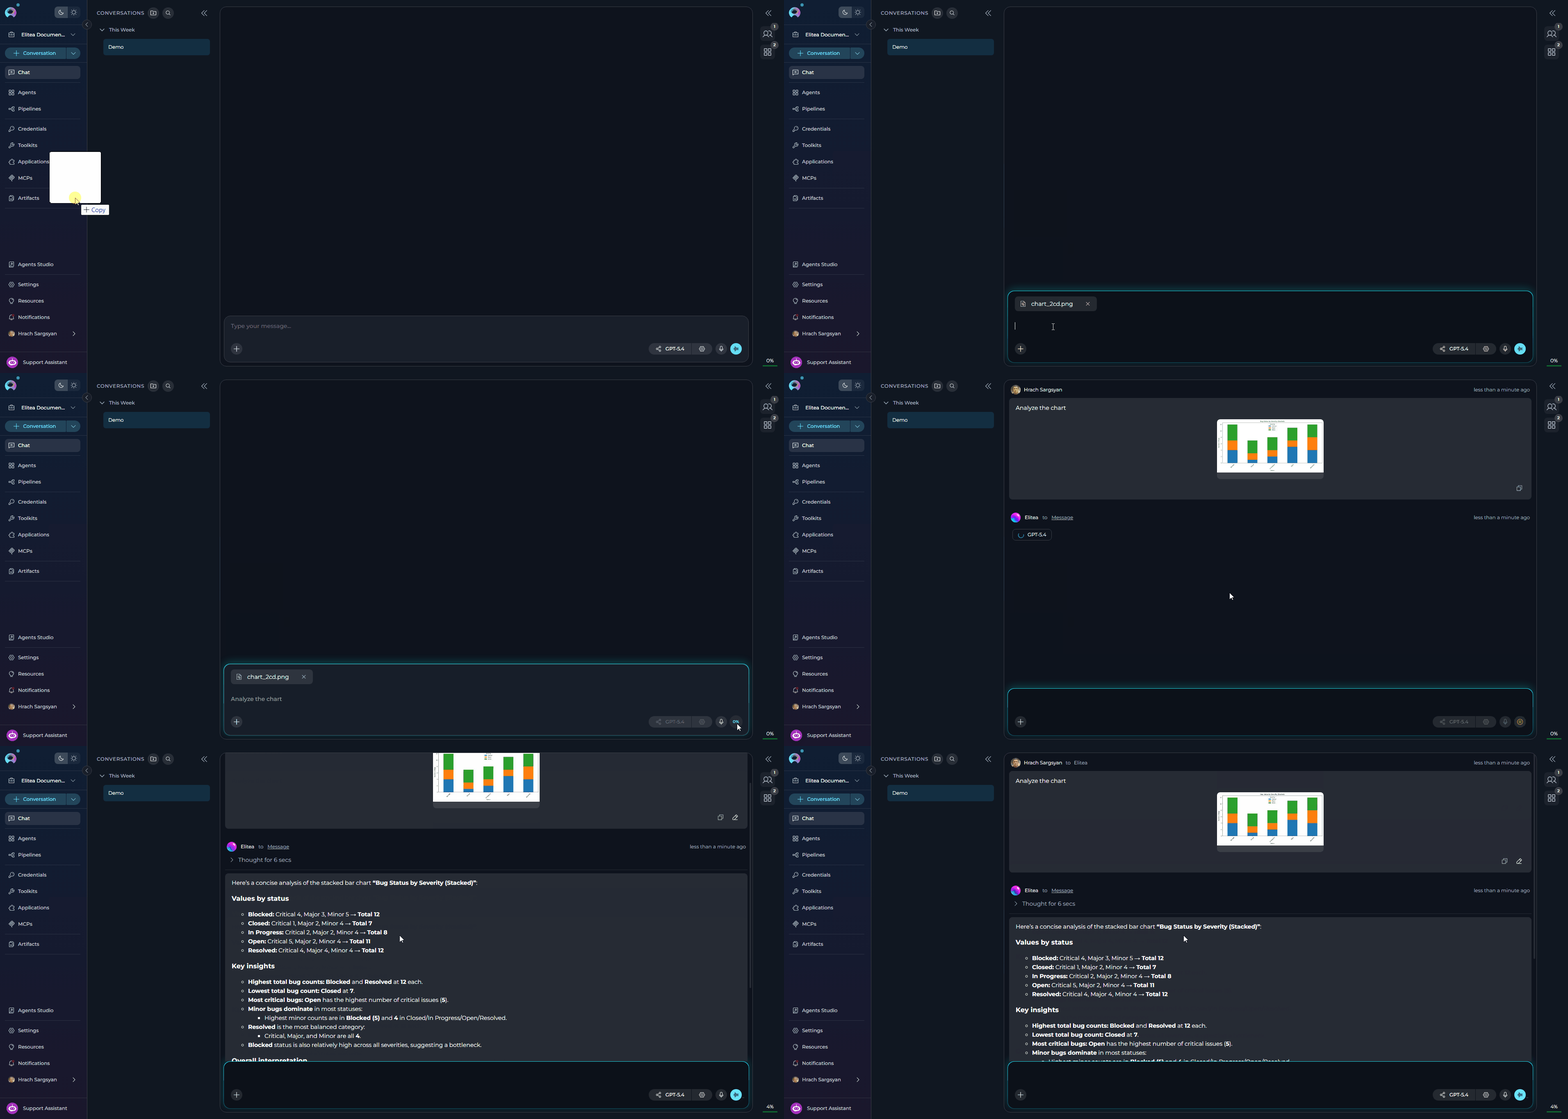
attachments Artifact bucket and can be viewed and managed from the Artifacts section in the main navigation.Manage Attachments in Chat
Edit the Last Message with Attachments
When you edit your last chat message, existing attachments remain visible and are not lost automatically. While editing the last message, you can:- Keep the existing attached files as they are
- Remove any existing attachment if you no longer want to send it
- Add a new attachment using the attach icon on the left side of the editor
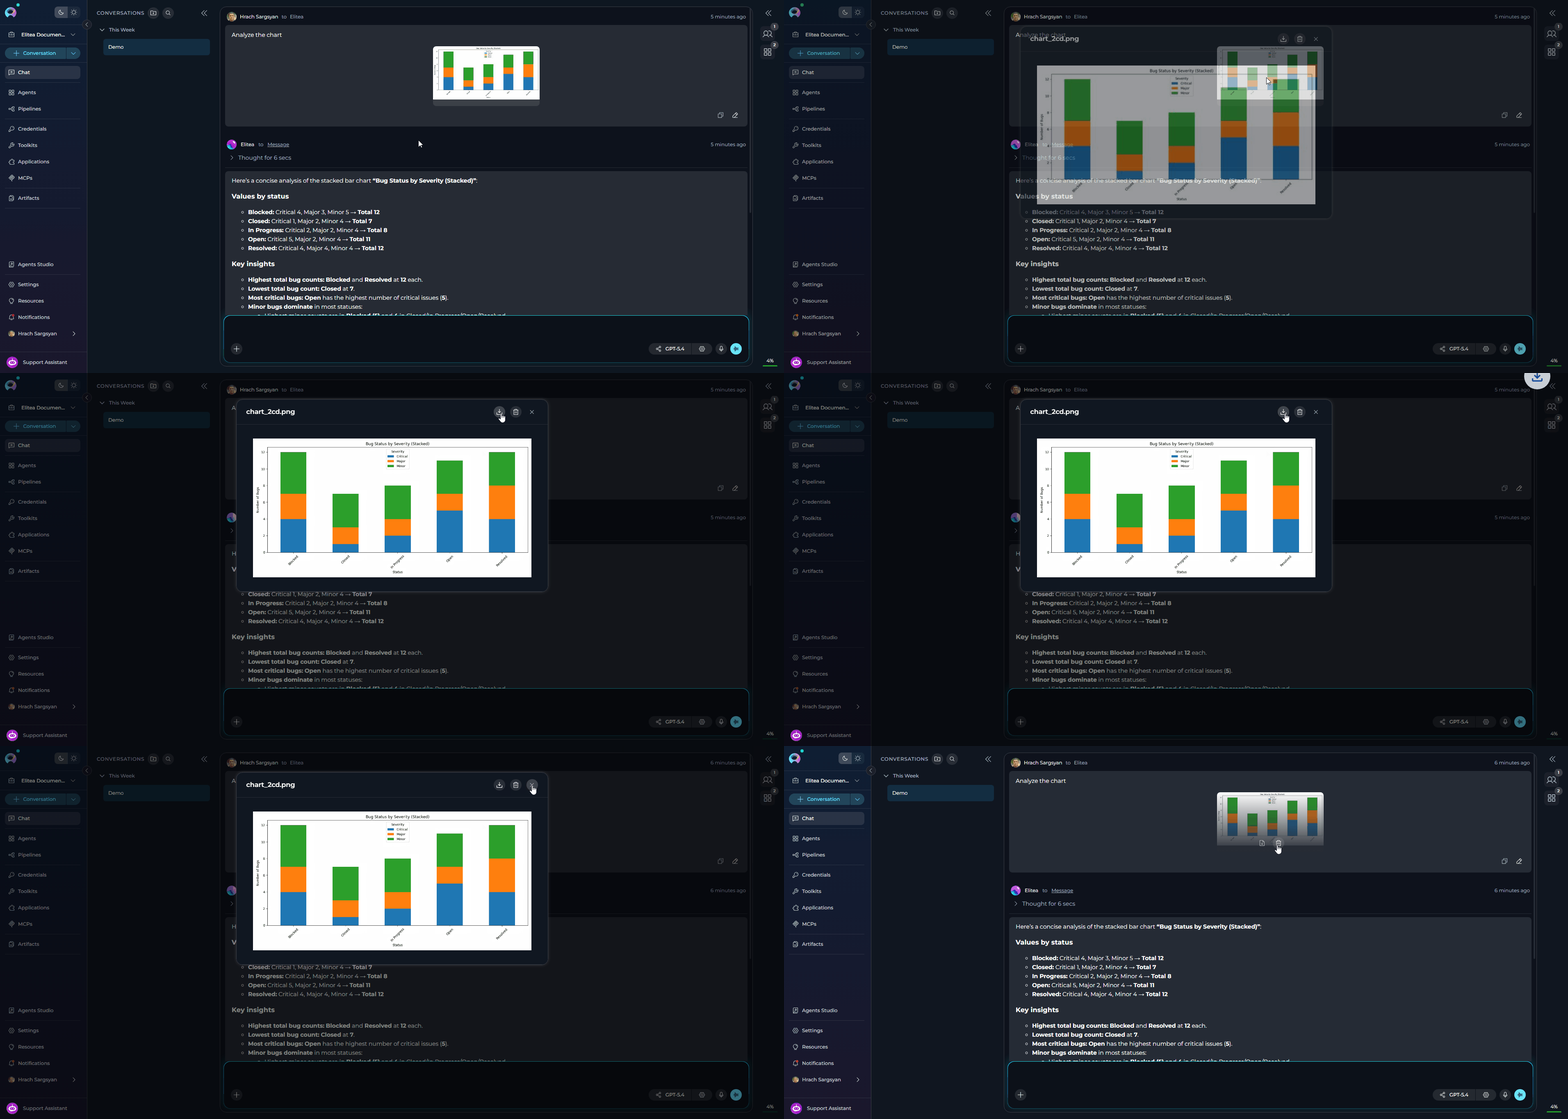
- Sent attachments display as clickable thumbnails in the chat history
- Click any thumbnail to view the full-size image or preview the file
- Hover over any attachment thumbnail in the chat
-
Two icons appear:
- Download icon: Save the file to your local system
- Delete icon (trash can): Remove the attachment
Delete Attachments
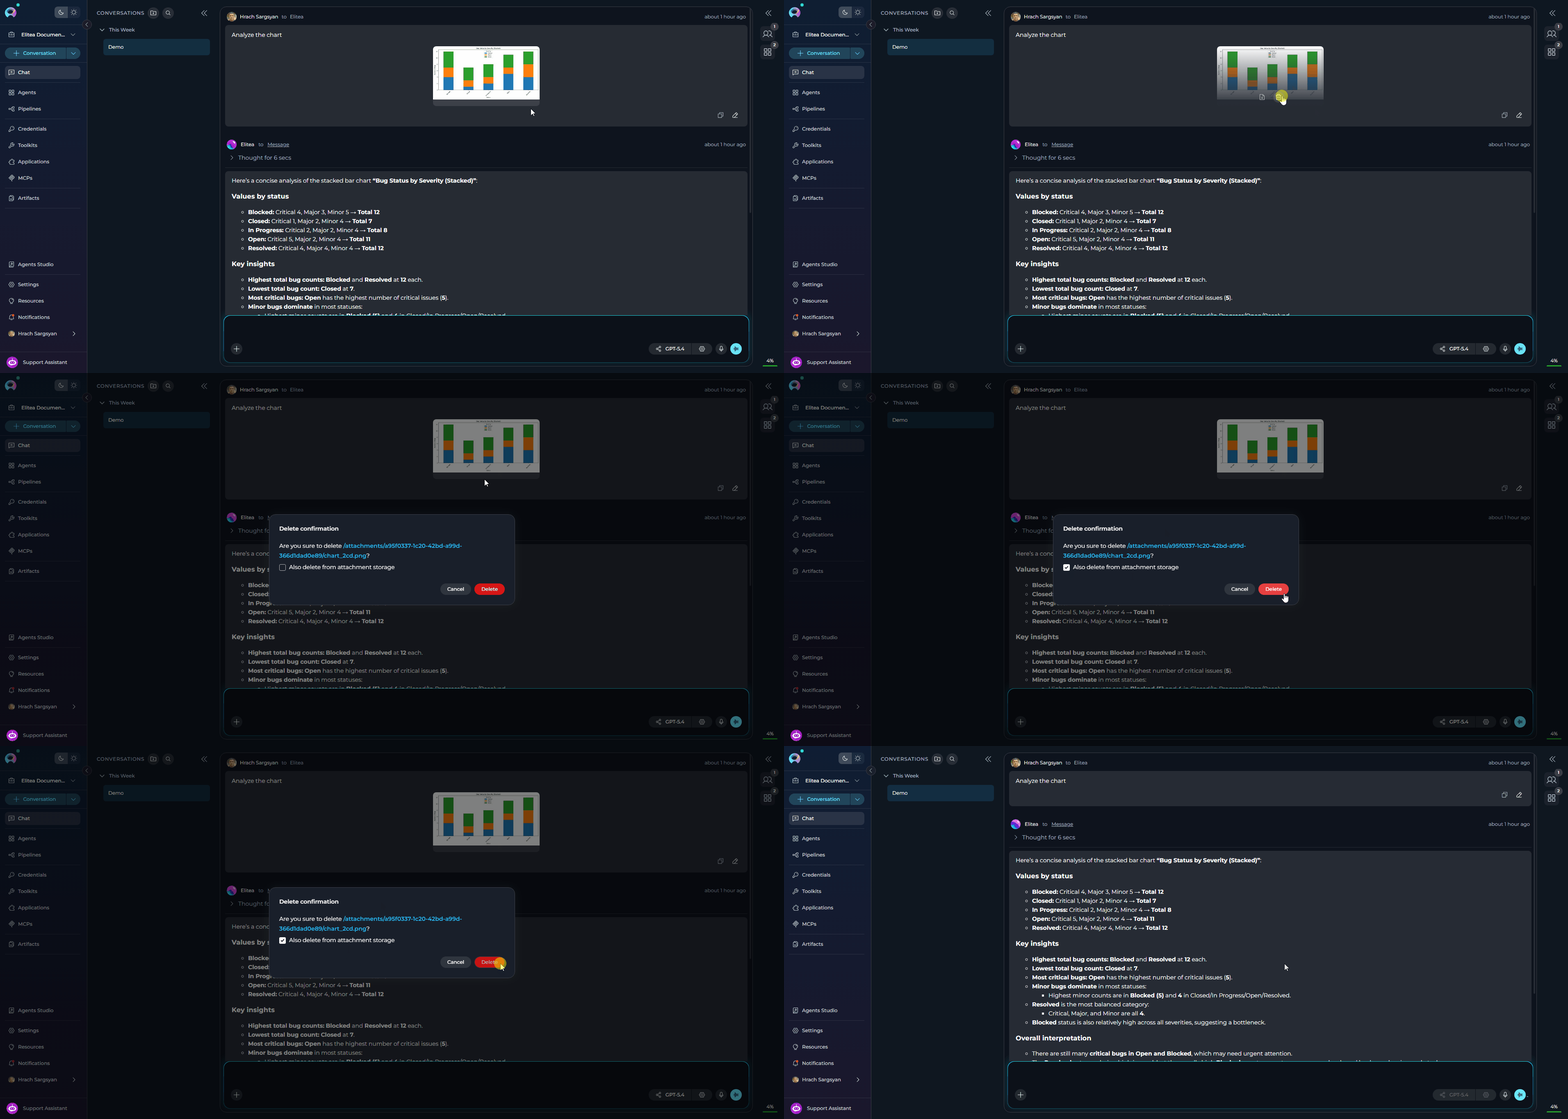
When clicking the delete (trash can) icon, a confirmation dialog provides two deletion options: Option 1: Delete from Chat Only (default)- Removes the thumbnail from the conversation
- Original file remains in the Artifact bucket
- File remains accessible via the Artifacts menu
- Check the box: “Also delete from attachment storage”
- Removes the thumbnail from the conversation
- Permanently deletes the file from the Artifact bucket
- File cannot be recovered
Working with Non-Image Files
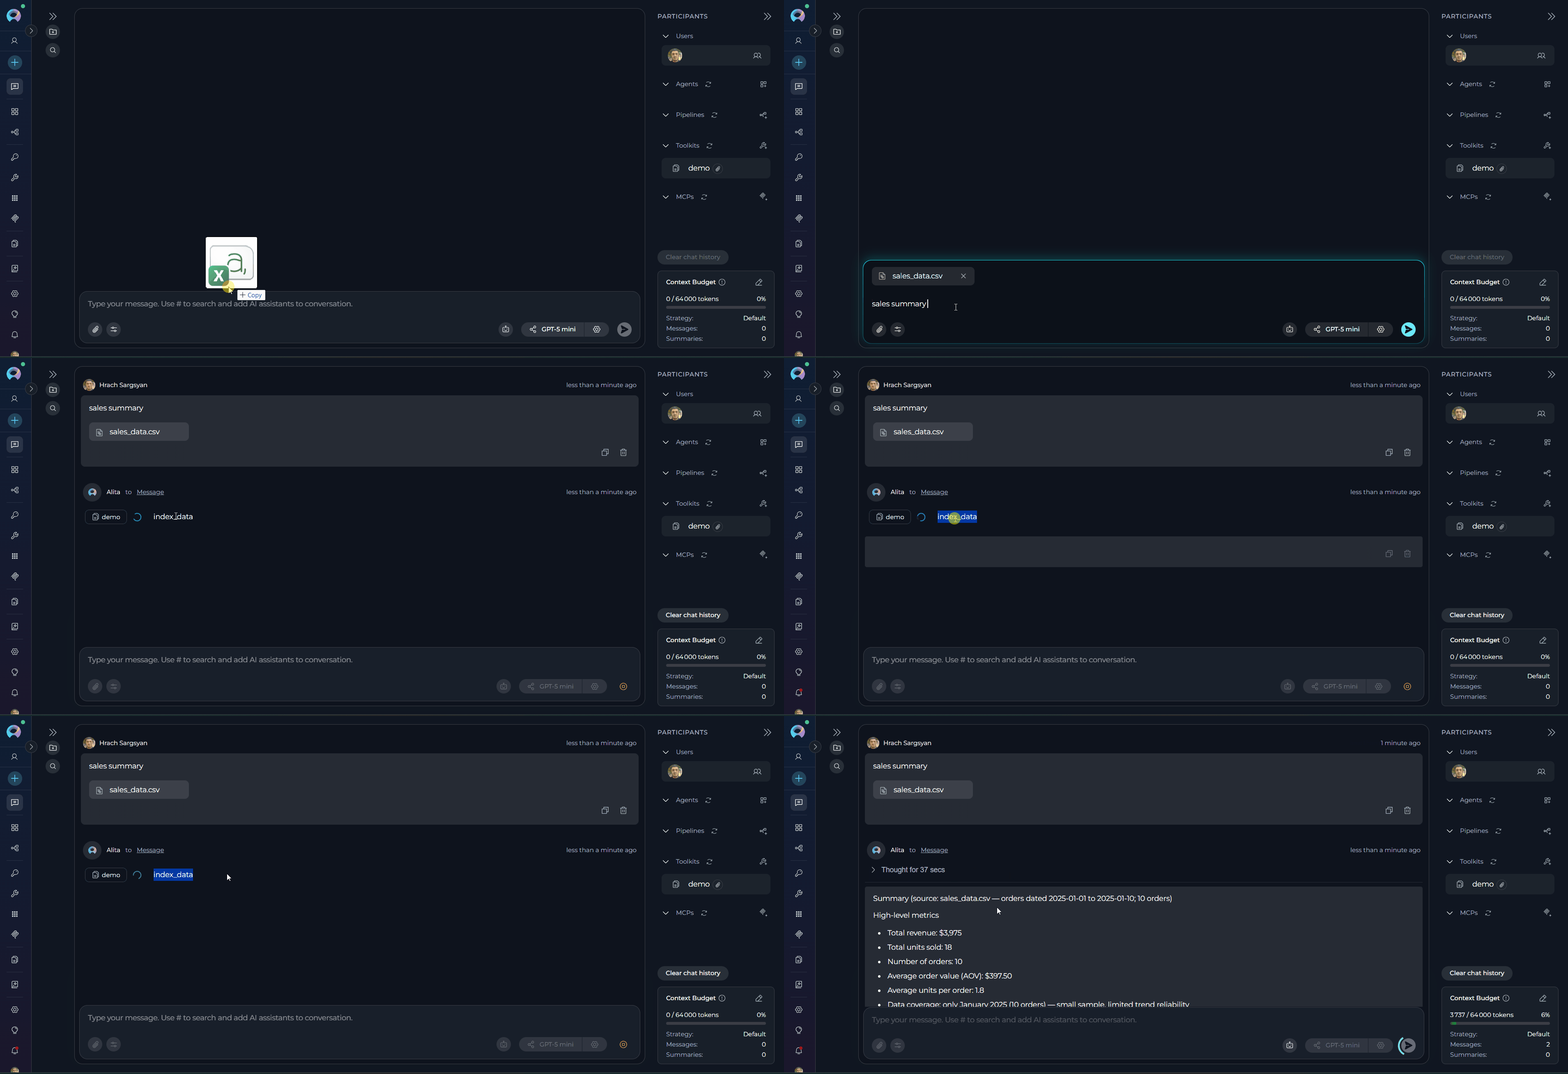
Non-image file attachments follow a different processing workflow than images. While images are analyzed directly by the LLM’s vision capabilities, other file types are indexed for semantic search and retrieval. Processing Workflow:- Upload: File is uploaded to the default
attachmentsbucket - Indexing: File content is automatically extracted and indexed into a vector database
- Retrieval: When you query, relevant content is retrieved through semantic search
attachments bucket.
Implications:
- Search results may include content from previously attached files (if using the same toolkit)
- Queries might retrieve information from multiple uploaded files
- Results may include content you didn’t intend to search
- Be specific in queries to avoid retrieving irrelevant content from other files
- Include context in queries to help narrow down relevant content
- Reference filenames when querying if you need content from a specific file
Structure your queries effectively
Structure your queries effectively
Include context in your prompt
Include context in your prompt
Query for specific sections
Query for specific sections
Use keywords from your files
Use keywords from your files
Supported File Types and Limits
Image Formats Raster images are sent directly to the LLM for visual analysis. Supported formats include:FAQ
Where are my attached files stored?
Where are my attached files stored?
attachments bucket. You can view and manage these files from the Artifacts menu in the main navigation.How long are files stored?
How long are files stored?
Can I use attachments with multiple agents in one conversation?
Can I use attachments with multiple agents in one conversation?
attachments bucket. All agents participating in that conversation can access the chat history, including attachments. Which agents can process attachments depends on their individual configuration — only agents with Allow attachments enabled can actively use attached files.Can I recover a deleted attachment?
Can I recover a deleted attachment?
Why can't I send a message with only an attachment and no text?
Why can't I send a message with only an attachment and no text?
How many tokens does an image consume?
How many tokens does an image consume?
- Claude (Anthropic): Fixed number of tokens per image (consult model documentation)
- GPT (OpenAI): Varies based on image size and resolution
What happens when I attach the same filename twice?
What happens when I attach the same filename twice?
image_20251106_143022_1.50KB.png). Both files are preserved in the bucket with distinct names — no error is shown and no data is overwritten.Can I use attachments in Pipeline conversations?
Can I use attachments in Pipeline conversations?
attachments to the pipeline’s modules and also adds an input_attachments state variable to the pipeline YAML. Once enabled, the paperclip icon becomes active when using that pipeline in a conversation.Troubleshooting
File size exceeds image limit
File size exceeds image limit
- Compress or resize the image below 5 MB
- For SVG files, the size limit does not apply
- Re-attach the file
Unexpected filename in chat after upload
Unexpected filename in chat after upload
image_20251106_143022_1.50KB.png)Cause: A file with the same name was already attached. The system automatically renames duplicates with a timestamp and file size suffix to avoid overwriting existing files.Solution: This is expected behavior. Both files are preserved. Use unique filenames if you need to distinguish uploads easily.Attachment visible in chat but not found in Artifacts
Attachment visible in chat but not found in Artifacts
- File was deleted directly from the Artifacts page
- Retention period expired and file was auto-deleted
Cannot delete attachment with Also delete from attachment storage option
Cannot delete attachment with Also delete from attachment storage option
- File was already deleted from the bucket via the Artifacts page
- Uncheck “Also delete from attachment storage”
- Delete from chat only
Maximum attachment limit reached
Maximum attachment limit reached
- Remove some attachments to stay within the limit
- Send multiple messages if needed
- Combine related content into fewer files when possible
Maximum image attachment limit reached
Maximum image attachment limit reached
Maximum N image attachments allowedCause: The number of non-SVG images attached would exceed the image attachment limit (default: 10). SVG files do not count toward this limit because they are processed as documents.Solution:- Remove some image attachments
- Send images across multiple messages
Total message size exceeds limit
Total message size exceeds limit
- Reduce number of attachments
- Compress images or files
- Send multiple messages with fewer attachments each
- Data Analysis - Analyze CSV and data files with Pandas capabilities
- Artifacts Menu - Manage buckets, retention policies, and file storage
- Agent Configuration - Configure agents with attachment support
- Chat Functionality - General chat features and usage
- Python Sandbox - Execute custom Python code with file access