

- Intelligent file format detection and data analysis
- Available in chats and agents
- Requests are formulated in natural language
- Files are uploaded directly to your conversations
- Creates downloadable visualizations of the analysis results
Prerequisites
To request data analysis, you need:- User role with chat edit access
- An active chat or agent configuration
- Data Analysis enabled in your chat or agent
How to Enable Data Analysis
The default state of the Data Analysis module — on or off — is defined in the project settings. If Data Analysis is turned off by default, you can turn it on for your current conversation or agent.For a Conversation
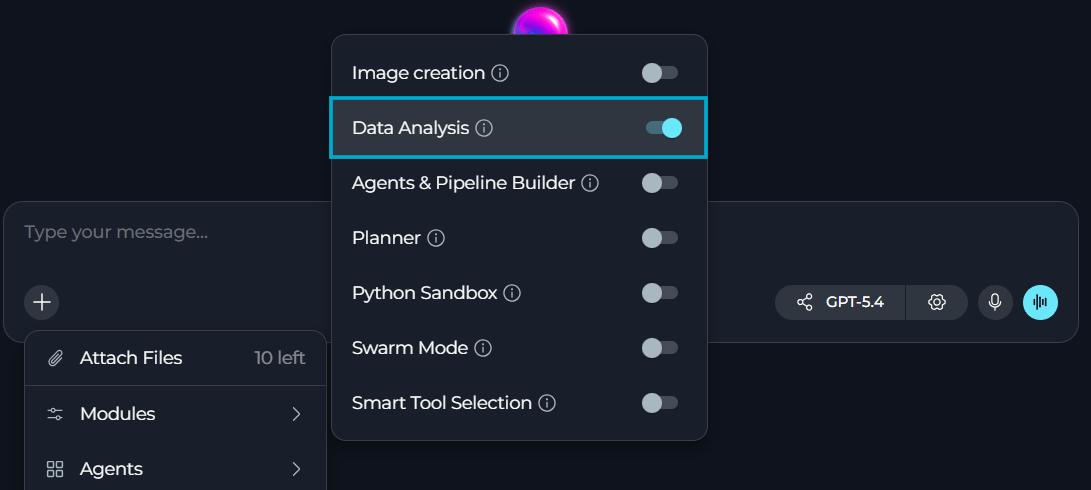
- Go to the conversation.
- Select + in the chat input toolbar.
- Select Modules → Data Analysis in the list.
- Toggle Data Analysis on.
For an Agent
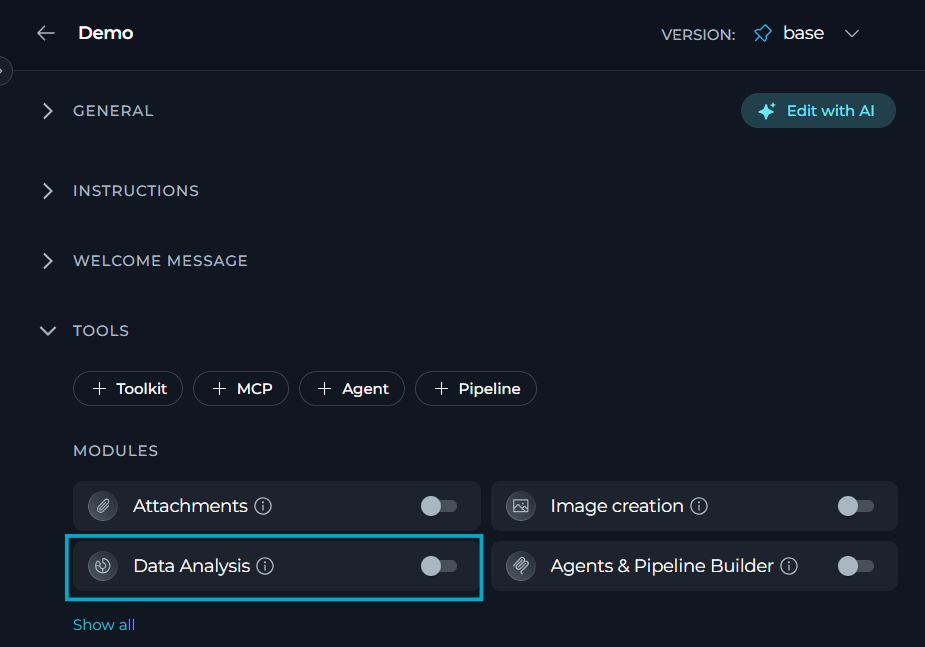
- Select Agents.
- Select the agent to configure, or create a new agent.
- In the TOOLS section, find Modules.
- Find Data Analysis. Select Show all if you do not see it immediately.
- Toggle Data Analysis on.
- Select Save.
How to Use Data Analysis
To process your data with Data Analysis, simply upload your data files and request analysis operations in natural language:- Upload data files to your chat.
- Ask the AI assistant in natural language to perform analysis.
- Get the analysis results: summaries, transformations, charts, and downloadable files.
- Data Summary: Descriptive statistics, data profiling, and overview reports
- Data Filtering: Row and column filtering based on conditions
- Transformations: Data cleaning, column operations, and restructuring
- Aggregation: Grouping, totals, averages, and statistical calculations
- Visualization: Automatic chart generation (bar charts, line graphs, histograms, etc.)
- Export: Save transformed data as downloadable files
- Always upload your data file to the chat before requesting analysis
- Maximum size for uploaded files: 150MB
- For very large datasets (>100MB) or complex custom operations, consider using the Python Sandbox instead
Get natural language data summary
Get natural language data summary
- Open the chat and click +.
- Check that Data Analysis is enabled.
- Upload a small sample file (CSV) and ask the assistant to return a summary.
- Ask the assistant:
Please show summary statistics for sales_data.csv and the top 5 rows.
The AI assistant reads the uploaded data first, then performs the requested analysis.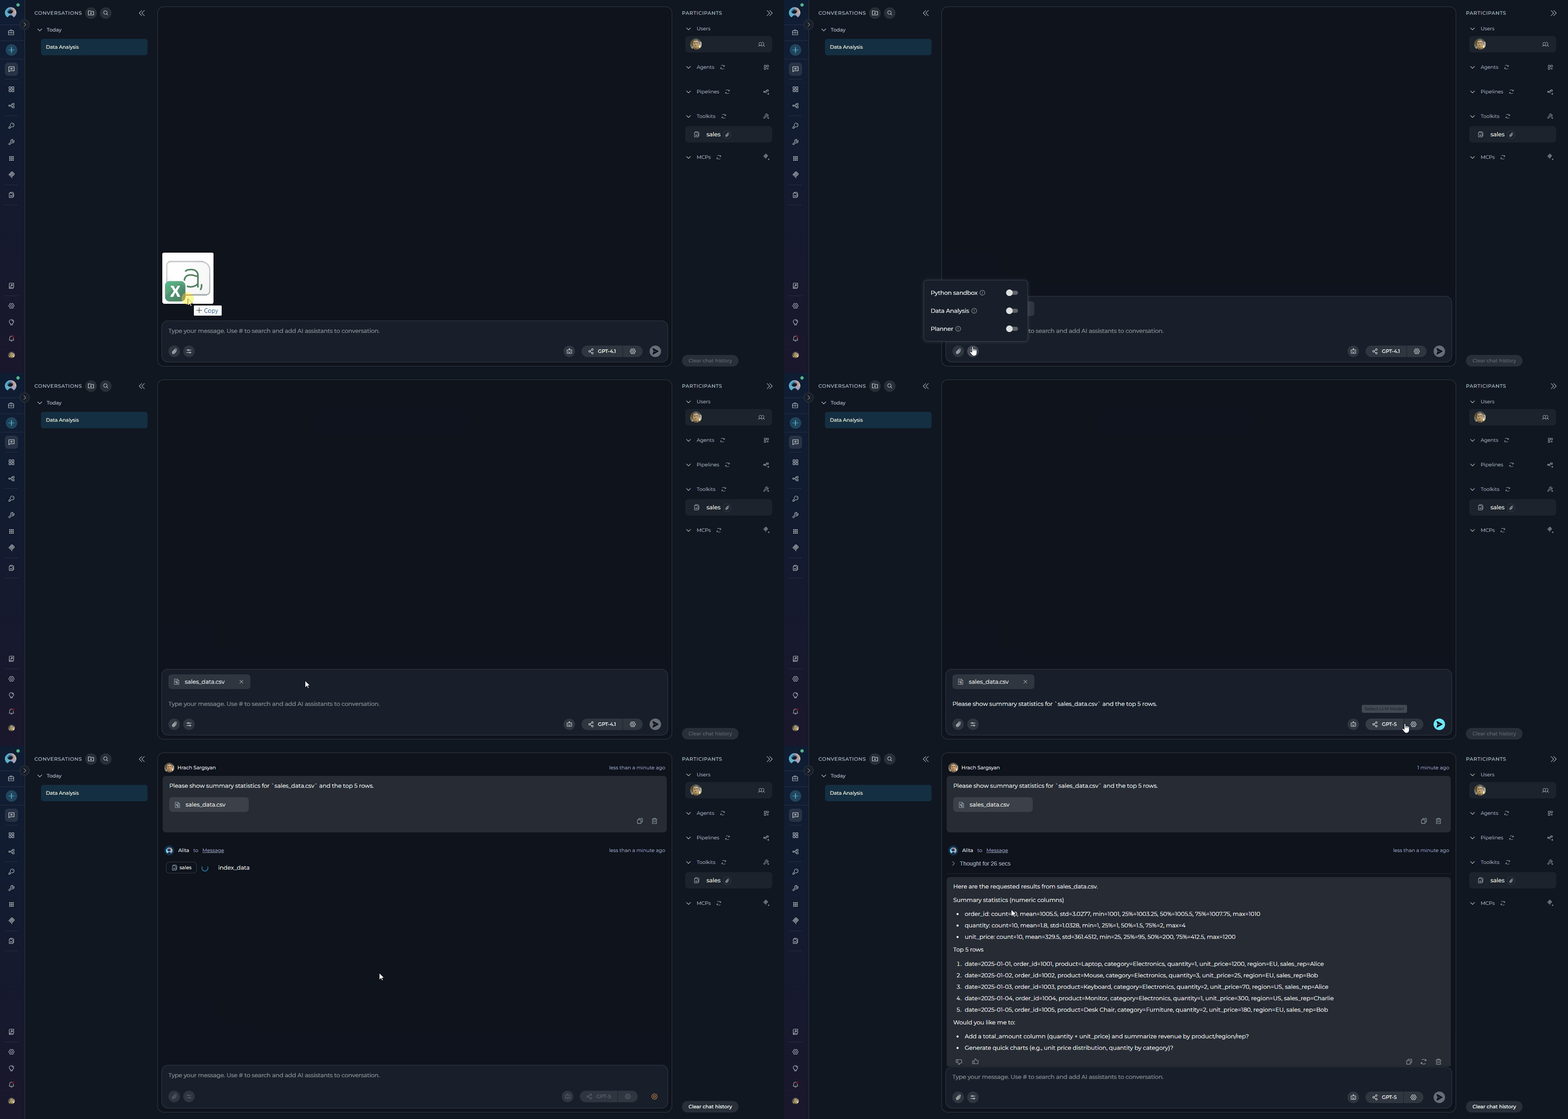
Summarize bug reports and highlight hotspots
Summarize bug reports and highlight hotspots
- Check that Data Analysis is enabled.
- Upload your
.xlsxfile. - Ask the assistant:
Summarize Sprint 1 bug reports in bug_reports.csv: total count, trend over time, top 3 modules by number of reports, and recommended priorities for fixes.
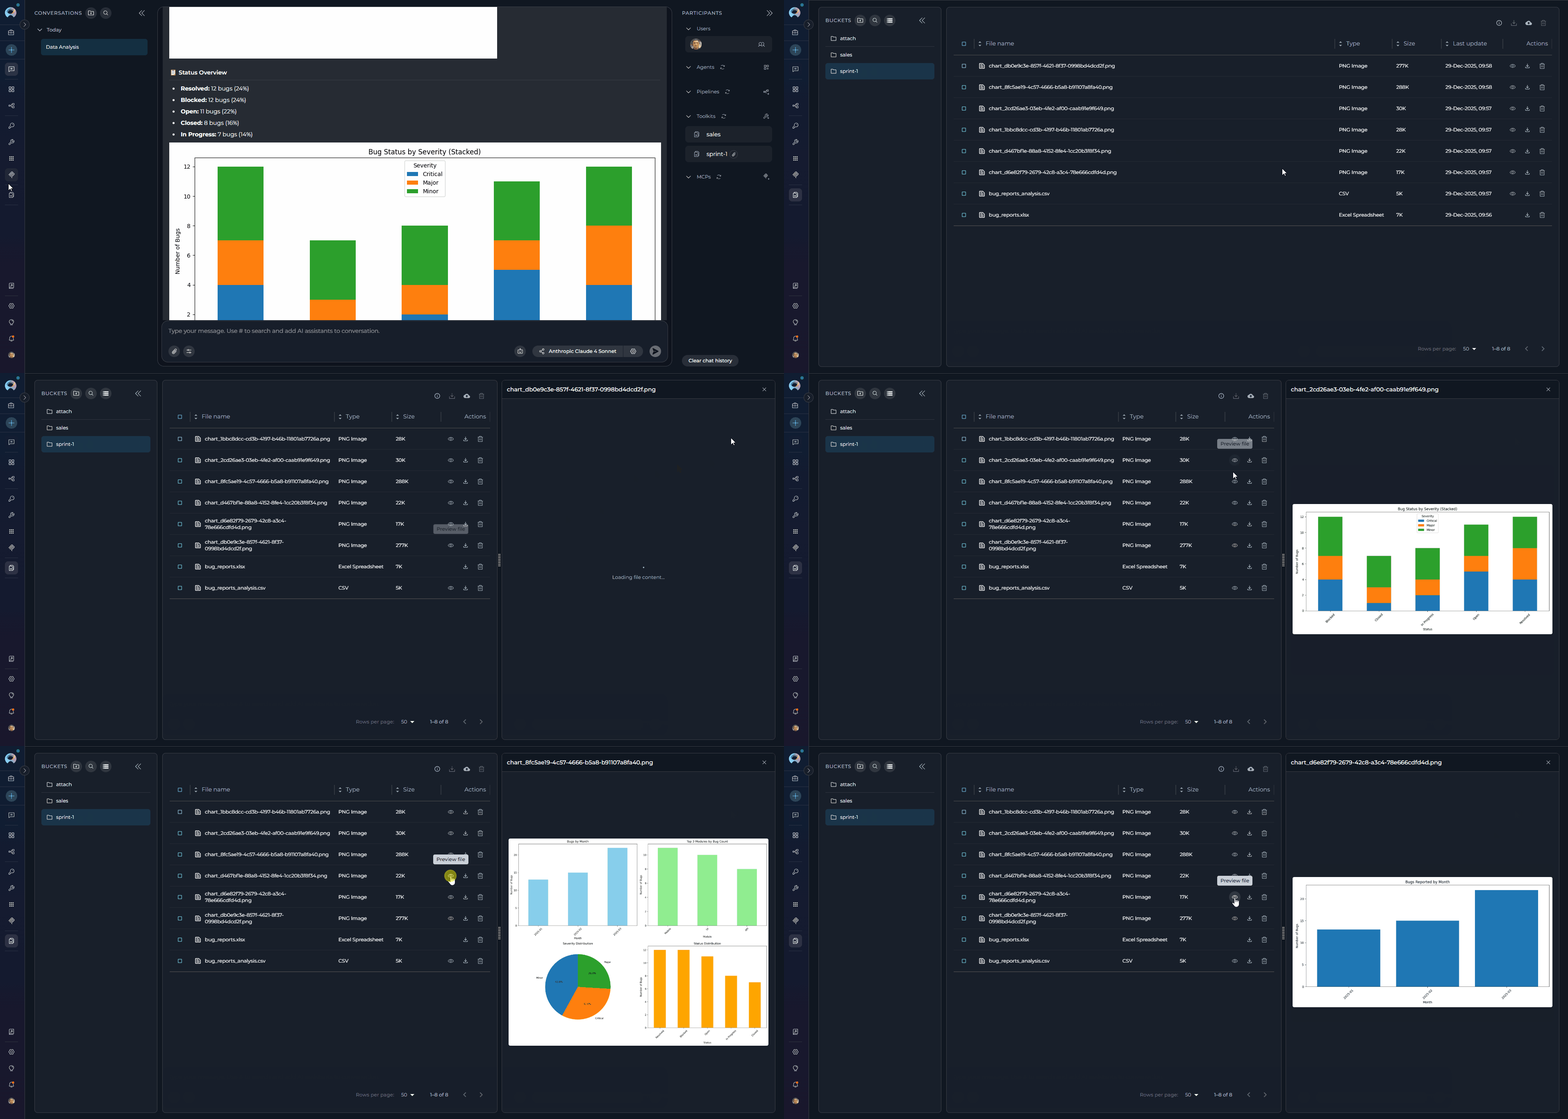
The AI assistant reads the uploaded data, then performs the requested analysis. If a chart is helpful (for example a histogram of sales or a time series), the assistant will generate one or more charts and save each chart as an image file in chat.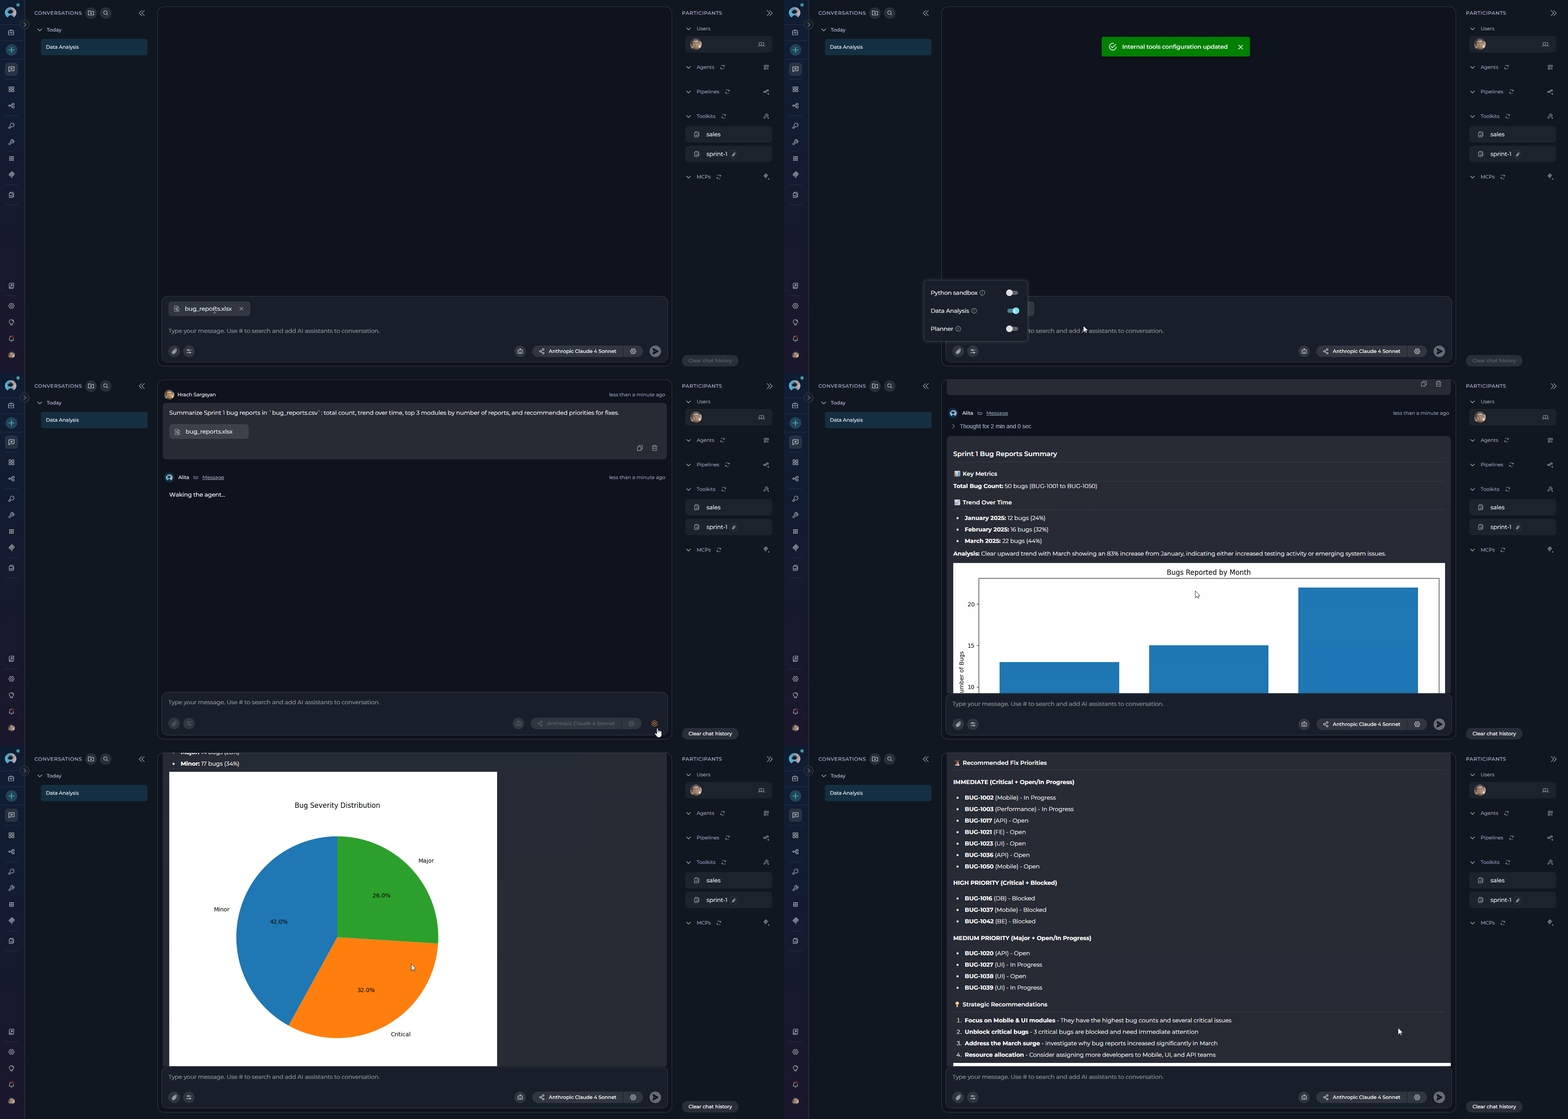
Best Practices
Keep dataset size reasonable
Keep dataset size reasonable
Upload moderately sized files for interactive analysis. Very large datasets may cause timeouts or higher latency. Consider using Python Sandbox for datasets larger than 100MB.
Use descriptive queries
Use descriptive queries
Provide clear, specific analysis requests. Instead of “analyze this data”, try “Calculate monthly sales totals and create a bar chart showing top 5 products by revenue”.
Be precise with column names and formats
Be precise with column names and formats
Refer to column names exactly as they appear in your dataset and provide example values when helpful (for dates, currencies, or categories).
Be explicit about outputs
Be explicit about outputs
When you need a specific output (for example, a downloadable CSV of filtered rows, an aggregated table, or a PNG chart), state it clearly in your request: “Save filtered rows as CSV” or “Generate a time-series chart and export as PNG”.
Work in small iterative steps
Work in small iterative steps
Break complex analyses into smaller steps (load → inspect → filter → aggregate → visualize). This reduces errors and makes results easier to validate.
Prefer reproducible transformations
Prefer reproducible transformations
If you expect to re-run the same workflow, ask the assistant to save the processed data and include the intended filename. This makes it easy to re-open or share results later.
Use Python Sandbox for custom code
Use Python Sandbox for custom code
For advanced custom logic, very large datasets, or specialized operations, enable the Python sandbox and provide code snippets directly.
Watch output size
Watch output size
Requests that ask for extensive detailed outputs may be truncated. Use summaries or downloadable files for large results.
Validate sensitive data handling
Validate sensitive data handling
Avoid uploading sensitive data. Remove or anonymize personal information before uploading.
Handle encoding issues
Handle encoding issues
For CSV files with special characters, ensure UTF-8 encoding.
Troubleshooting
I do not see the Data Analysis module
I do not see the Data Analysis module
Possible causes:
- Data Analysis is not enabled
- Modules are hidden because the project has no available modules
- Network connectivity issues
- Refresh the page and try again.
- Enable Data Analysis in Modules.
- Contact your project administrator.
File format not recognized or read errors
File format not recognized or read errors
Possible causes:
- Unsupported file format uploaded
- Corrupted or malformed data file
- File encoding issues
- Large file causing read timeouts
- Ensure file has a supported format.
- Check file integrity and try re-uploading a clean version.
- Convert file to UTF-8 encoding if needed.
- For large files, consider using Python Sandbox instead.
No Data Analysis option in UI
No Data Analysis option in UI
Possible causes:
- Insufficient user permissions
- Modules are not accessible
- Modules are hidden because no tools pass the availability filter
- UI configuration issue
- Confirm you have chat edit access permissions.
- Check that Modules are visible — the icon is hidden entirely when no modules are available for the project.
- Check that Data Analysis appears in the list.
- Refresh the page and try accessing the popup again.
- If the icon is missing, contact your project administrator to confirm modules are enabled for the project.
Data Analysis requests timeout or fail
Data Analysis requests timeout or fail
Possible causes:
- Very large datasets causing processing delays
- Complex analysis requests
- Network connectivity issues
- Reduce dataset size or use smaller sample files for testing.
- Break complex requests into smaller iterative steps.
- Prefer aggregated summaries over detailed outputs.
- Check network connection and retry the request.
- For very large data, consider enabling Python Sandbox instead.
Charts or exported files not generated
Charts or exported files not generated
Possible causes:
- Chart generation failed due to data issues
- File saving permissions issue
- Invalid filenames
- Verify data is suitable for the requested chart type.
- Check that file saving is working.
- Use valid filenames without special characters.
- Try simpler chart types first.
- Request download links explicitly in your prompt.
Code generation fails or produces errors
Code generation fails or produces errors
Possible causes:
- Ambiguous or overly complex queries
- Column names with special characters
- Data type mismatches
- Use clear, specific analysis requests with exact column names.
- Break complex queries into simpler steps.
- Provide example values for date formats, categories, etc.
- Try rephrasing the query if it fails.
- Check for error messages and adjust accordingly.
Memory or performance issues
Memory or performance issues
Possible causes:
- Loading very large datasets
- Complex operations on big datasets
- Multiple concurrent requests
- Insufficient system resources
- Use smaller sample datasets for initial testing.
- Consider using Python Sandbox for memory-intensive operations.
- Close other conversations to free up resources.
- Optimize queries to use less memory.
- Monitor system resource usage.