

Introduction
Why use scheduled indexing:- Automated data freshness: Keep indexes up-to-date automatically as source data evolves.
- Reduced manual overhead: Eliminate the need for manual reindexing operations.
- Consistent synchronization: Maintain predictable sync schedules across multiple indexes.
- Resource optimization: Schedule updates during off-peak hours to minimize system impact.
- User-specific schedules: Each user can configure independent schedules for the same index.
Prerequisites
Before configuring scheduled indexing, ensure the following requirements are met:Successful Index Creation
An index must already exist before scheduling can be configured.
Appropriate Permissions
You must have permission to modify toolkit and index scheduling settings.
Valid Index State
Scheduling is available only when the index is in a usable state. Indexes in cancelled or failed state must be reindexed successfully before a schedule can be turned on.
Personal Access Token
At least one valid, non-expired ELITEA personal access token is required for scheduled indexing operations. The token must still be valid at the time of scheduled execution. If all your tokens are expired, scheduled reindexing operations will fail. To manage your tokens, go to User Settings > Personal Access Tokens.
Credentials Configuration
If the toolkit requires credentials, you must select or create a valid credential configuration before turning on the schedule. Only credentials matching the project type are available: private project credentials for private projects, and team project credentials for team projects.
Configure Scheduled Indexing
Access Index Actions
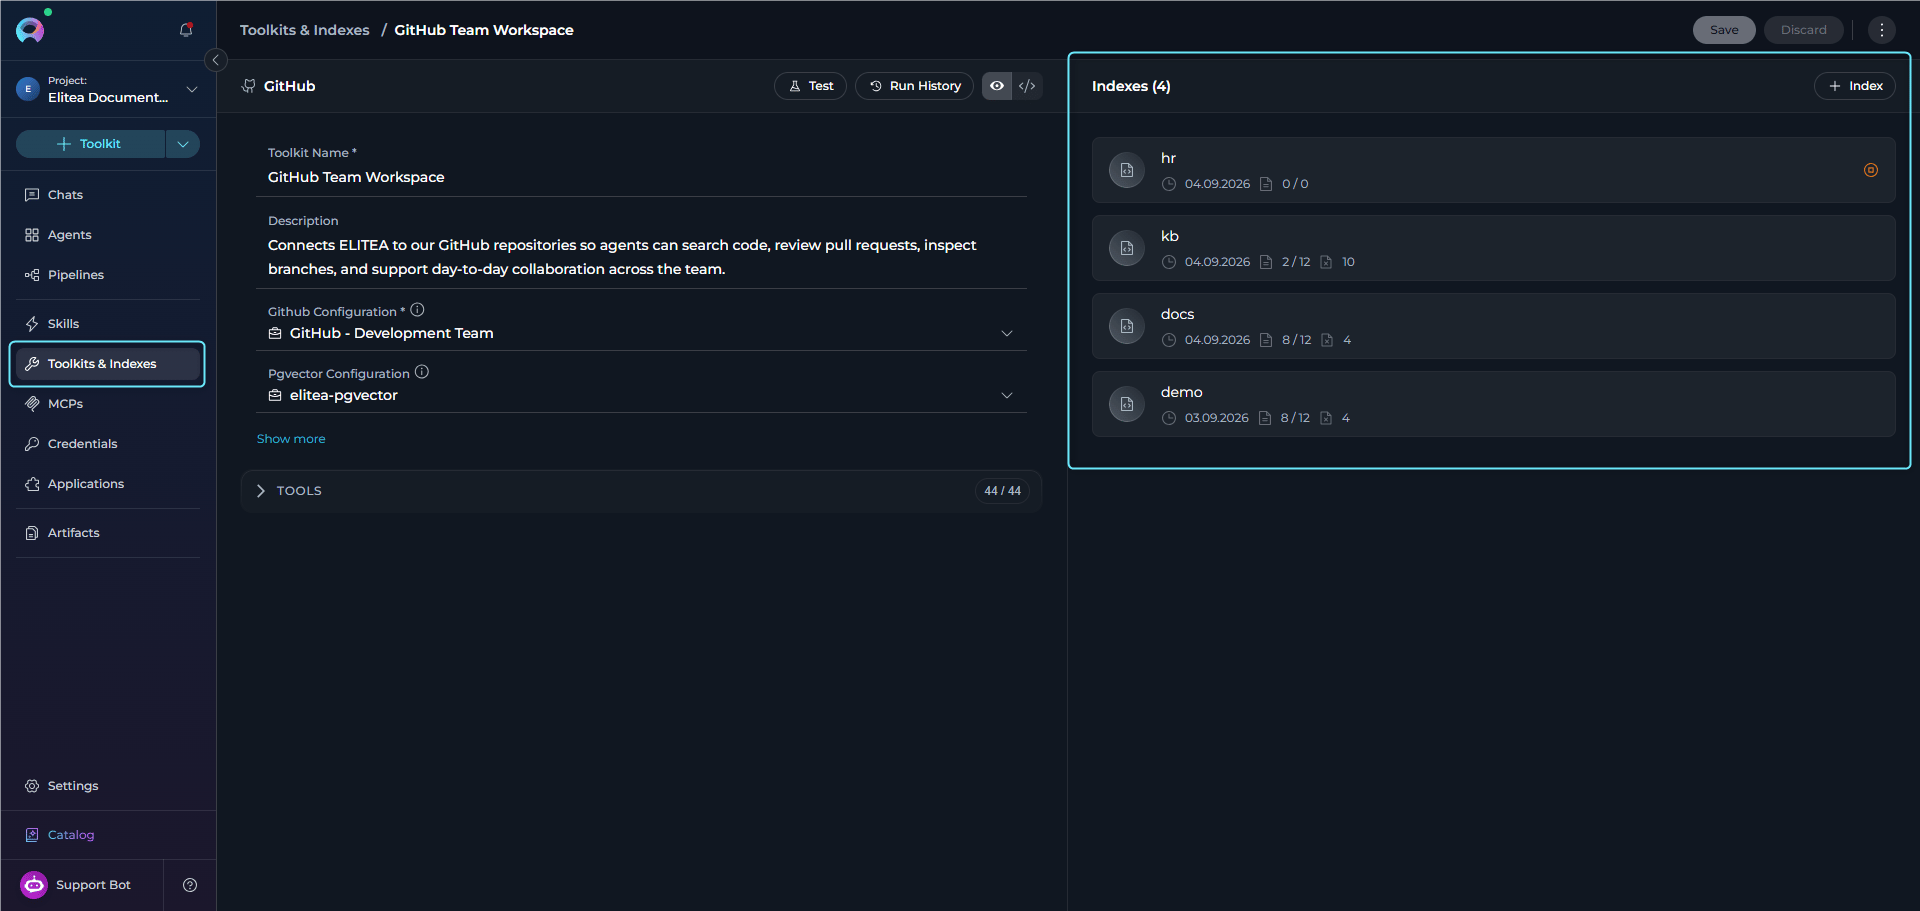
- Open the toolkit detail page to view the Indexes section in the right panel. A clock icon next to an index’s name indicates it already has a schedule configured.
- Select an existing index card to open its dedicated index page.
Configure Cron Expression
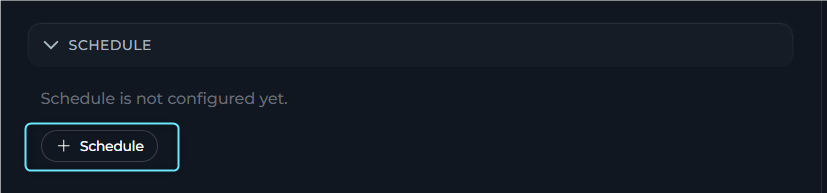
- Open Schedule Settings:
- If no schedule exists yet, select + Schedule.
- If a schedule already exists, select the edit icon on the schedule card.
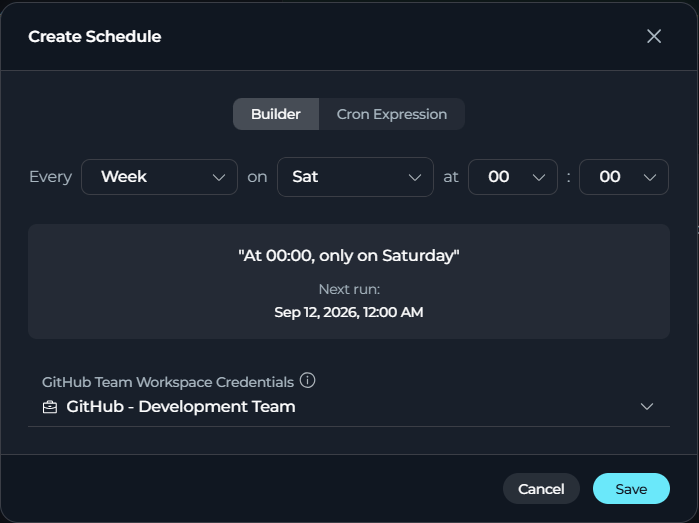
- Choose Schedule Type:
- Builder: Visual cron builder with interactive controls.
- Cron Expression: Manual text input for a cron expression.
Default ScheduleWhen first configured, the schedule defaults to
0 0 * * 6 (Every Saturday at midnight).- Use the visual builder to configure the schedule.
- The cron expression is generated automatically as you make selections.
- The preview updates in real time.
- Enter a cron expression directly in the text field (for example,
0 2 * * *). - Format guide shown below:
minute – hour – day (month) – month – day (week). - Select the info icon to open crontab.guru for help.
- The preview and validation update as you type.

- Configure Credentials (if required):
- Some toolkits require credentials for scheduled indexing.
- If required, a credentials dropdown appears below the cron configuration.
- Pre-selection: The credential currently configured for the toolkit is pre-selected automatically, so in most cases there is nothing to pick. Otherwise, select an existing credential configuration or create a new one.
- Available credentials are filtered by project type:
- If you are in a Private Project, only private project credentials are shown.
- If you are in a Team Project, only team project credentials are shown.

Toolkit Uses a Personal Credential in a Team ProjectIf the toolkit’s configured credential is a private (personal) credential but you are scheduling in a Team Project, it cannot be pre-selected — team schedules require a project credential. The modal shows the hint “This toolkit uses a personal credential; schedules in a team project need a project credential.” and you must select a project credential manually.
- Save Changes: Select Save to store the cron expression and credentials.
Review HistoryScheduled reindexing operations appear in the History page with the label “Reindexed.”
Schedule Card
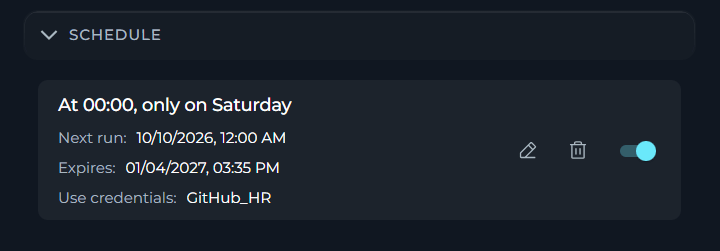
The Schedule section on the index page shows the current schedule state for the selected index. When a schedule exists, the schedule card displays the following information and actions. Information about the schedule:- The human-readable schedule summary.
- The next scheduled run date.
- The selected credentials, when credentials are required.
- Expires: the date the schedule will automatically turn off unless renewed (shown as Expired: once that date has passed).
- Edit the schedule configuration.
- Delete the schedule.
- Turn the schedule on or off.
A clock icon next to the index’s name in the Indexes section of the toolkit detail page indicates a schedule is configured, so you can spot scheduled indexes without opening each one.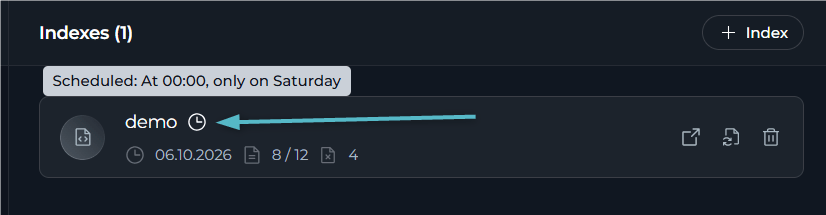
Schedule Notifications
You receive notifications for all indexing operations (initial indexing, manual reindexing, and scheduled reindexing). Successful operations:- Icon: Green success checkmark.
- Message format:
- Initial indexing:
Index {name} is successfully created: { "indexed": X }. - Reindex (manual):
Index {name} is successfully reindexed. { "reindexed": X, "indexed": Y }. - Reindex (scheduled):
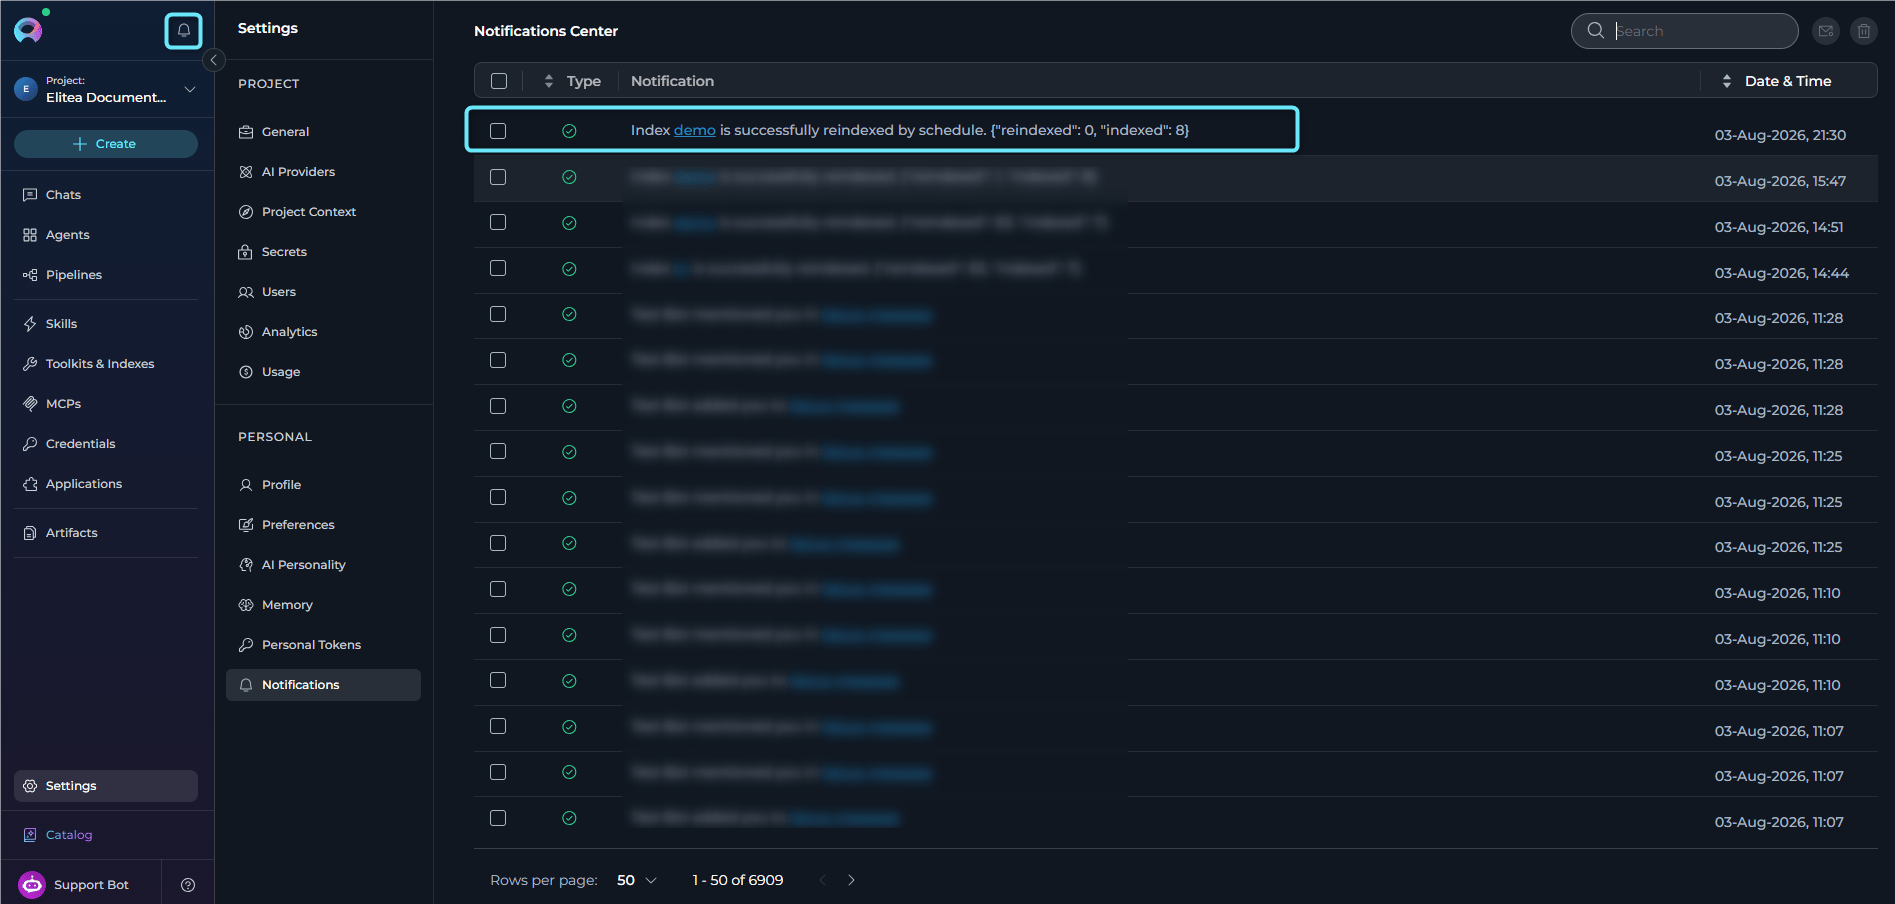
Index {name} is successfully reindexed by schedule. { "reindexed": X, "indexed": Y }.
- Initial indexing:
- Action: Select the notification to go to the index page in the Indexes section.
- Icon: Red error icon.
- Message:
Index {name} is failed. - Note: This applies to both initial indexing failures and reindexing failures.
- Action: Select the notification to view the index and check error details in the History page.
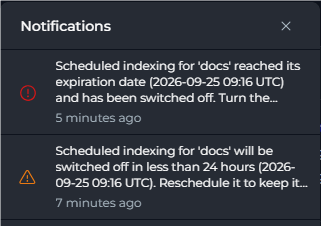
- Sent once at 7 days and once at 24 hours before the schedule’s expiration date: “Scheduled indexing for '' will be switched off in less than 7 days / 24 hours (). Reschedule it to keep it running.”
-
Sent once when the schedule actually expires and is switched off: “Scheduled indexing for '' reached its expiration date () and has been switched off. Turn the schedule back on to run it for another period.”
- Notifications appear in the notifications panel (bell icon in top navigation).
- Each notification shows the relative time (for example, “2 minutes ago,” “1 hour ago”).
- Selecting a notification goes directly to the specific index page in the Indexes section.
- Scheduled operations are clearly marked with “by schedule” text.
Schedule Expiration
Every schedule has an expiration date, calculated automatically from its cadence when the schedule is created or renewed: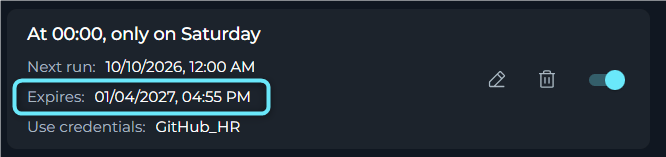
The 6× rule exists so a quarterly schedule is not retired after only two runs. A quarterly schedule (roughly every 90 days), for example, gets 6 × 90 = 540 days rather than the 180-day floor.
- It is automatically turned off (not deleted) — the cron expression, timezone, and credentials remain configured.
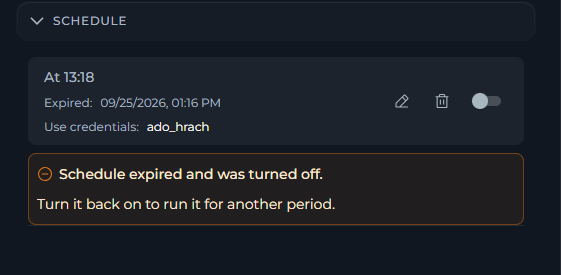
- The schedule card shows “Expired: ” with a banner: “Schedule expired and was turned off.”
-
Turn the schedule back on to resume it — this also resets the expiration date to a fresh full window.
Schedules created before this feature was introduced are priced starting from the first time the system checks them, not retroactively from their original creation date — so no existing schedule is unexpectedly disabled.
Cron Expressions
Scheduled indexing uses cron expressions to define when automatic reindexing occurs. A cron expression consists of five space-separated fields:
Special characters:
*(asterisk): Matches any value (for example,*in the hour field means “every hour”).,(comma): Lists multiple values (for example,1,15in the day field means “1st and 15th”).-(hyphen): Defines a range (for example,9-17in the hour field means “9 AM to 5 PM”)./(slash): Specifies step values (for example,*/2in the hour field means “every two hours”).

0 0 * * * (once per day at midnight) or less frequent.
Common Schedule Patterns
The following table lists verified schedule patterns for typical reindexing scenarios:Use crontab.guru to validate and understand cron expressions. The system also provides real-time validation and human-readable descriptions when you configure schedules. You can also select the info icon in the Schedule Settings modal to quickly access crontab.guru.
Manage Schedules
Edit schedules To modify an existing schedule:- Open Schedule Settings: Select the edit icon on the schedule card.
- Update Cron Expression: Enter the new expression in the modal.
- Validate & Save: Ensure the expression is valid, then select Save.
- No notification is shown for cron expression updates (only for enable/disable).
- Turn off the Schedule toggle on the schedule card.
- The saved cron expression and selected credentials remain attached to the schedule.
- When the schedule is turned off, the page shows a banner with the message “Schedule is turned off.”
- To resume scheduled reindexing, turn the toggle back on.
- Open the index page and locate the schedule card showing “Expired: ” and the “Schedule expired and was turned off.” banner.
- Turn the Schedule toggle back on.
- The schedule resumes with its existing cron expression and credentials, and its expiration date resets to a fresh full window.
Real-Life Example: Daily GitHub Repository Indexing
Daily GitHub Repository Example
Daily GitHub Repository Example
This example demonstrates how to set up automated daily reindexing for a GitHub repository index to keep code and documentation searches current.ScenarioGoal: Keep a GitHub repository index updated daily at 2:00 AM to reflect new commits, pull requests, and documentation changes.Index details:Notification received:Result:Your team can ask questions about the codebase and documentation using the most recent repository content, with automatic updates every day without manual intervention.
- Toolkit: GitHub toolkit for
ProjectAlita/projectalita.github.iorepository. - Index name:
docs. - State: Successfully created and completed.
- Desired schedule: Daily at 2:00 AM (during off-peak hours).
- Go to Toolkits > select the GitHub (ProjectAlita/projectalita.github.io) toolkit.
- The Indexes section appears in the right panel.
- Select the docs index card.
- Find the Schedule section on the index page.
- Select the toggle switch to turn on scheduling.
- Confirm the success notification that the schedule was turned on.
- Select the edit icon on the schedule card.
- The Schedule Settings modal opens showing the schedule.
-
Choose a configuration method:
Option A: Builder mode:
- Select Builder schedule type (if not already selected).
- Use the builder controls to configure the schedule for daily execution at 2:00 AM.
- The cron expression
0 2 * * *is generated automatically. - Verify the preview shows the expected schedule summary.
- Select Cron Expression schedule type.
- Clear the input and enter:
0 2 * * *. - Verify the preview updates to the expected schedule summary.
- Select Save to store the schedule.
- Toggle state: Confirmed on.
- Cron expression:
0 2 * * *(verified by reopening the schedule modal). - Schedule active: Automatic reindexing occurs daily at 2:00 AM.
- The system automatically triggers a reindexing operation for the
docsindex. - The index state changes to
in_progressduring the operation. - Progress is tracked and visible in the index interface.
- Upon completion, the index state returns to
completed. - A new entry appears in the History tab with label “Reindexed” and the timestamp.
- A notification is sent:
- Success:
Index docs is successfully reindexed by schedule. { "reindexed": X, "indexed": Y }. - Failure:
Index docs is failed.
- Success:
Troubleshooting
Schedule Toggle Is Disabled
Schedule Toggle Is Disabled
Symptom: The Schedule toggle switch is grayed out and cannot be selected.Causes and solutions:
Cron Expression Validation Errors
Cron Expression Validation Errors
Common validation errors and how to fix them:
Schedule Not Executing
Schedule Not Executing
Symptom: The schedule is turned on, but reindexing is not occurring at the configured time.Troubleshooting steps:
-
Verify cron expression:
- Open Schedule Settings and check the cron expression.
- Use crontab.guru to verify the expression matches your intent.
- Ensure the expression is not in the past (for example, a specific date or time that has passed).
-
Check index state:
- Ensure the index state is
completed, notfailedorcancelled. - If the state is invalid, manually reindex and then turn on the schedule again.
- Ensure the index state is
-
Confirm toggle is turned on:
- Verify the Schedule toggle is on (blue).
- If it is off, turn it on again.
-
Review system logs (if accessible):
- Check for backend errors during scheduled execution.
- Look for quota limitations or resource constraints.
-
Time zone considerations:
- Cron expressions execute in the server time zone.
- Verify the server time zone matches your expectations.
Schedule Turned On but No Notification
Schedule Turned On but No Notification
Symptom: When updating the cron expression, no success notification appears.Expected behavior: This is expected. Success notifications only appear when turning on or turning off the schedule toggle, not when modifying the cron expression or credentials.To verify configuration:
- Reopen the Schedule Settings modal.
- Confirm the cron expression shows your updated value.
- Confirm credentials are selected (if required).
Cannot Turn On Schedule — Credentials Required
Cannot Turn On Schedule — Credentials Required
Symptom: The Schedule toggle is turned off with the tooltip “Set credentials to turn on scheduling.”Cause: The toolkit requires credentials for scheduled indexing operations.Solution:
- Select the edit icon on the schedule card.
- In the Schedule Settings modal, scroll down to the credentials selector.
- Select an existing credential configuration from the dropdown (only credentials matching your project type are shown), or
- Select + Create new to create a credential configuration.
- Select Save to store the changes.
- The Schedule toggle is now turned on.
- Private project: Only private project credentials are available.
- Team project: Only team project credentials are available.
Scheduled Reindexing Fails — Token Error
Scheduled Reindexing Fails — Token Error
Symptom: Scheduled reindexing operations fail and you receive error notifications.Cause: No valid ELITEA personal access token is available, or all tokens have expired.Solution:
- Go to User Settings > Personal Access Tokens.
- Check if you have any active (non-expired) tokens.
- If all tokens are expired or no tokens exist:
- Select Generate New Token.
- Provide a token name and expiration date.
- Save the token.
- Return to the Indexes section and verify the schedule is still turned on.
- Wait for the next scheduled execution or manually trigger a reindex to test.
Schedule Turned Off Automatically (Expired)
Schedule Turned Off Automatically (Expired)
Symptom: A schedule that was working stops running on its own, the toggle shows off, and the card displays “Expired: .”Cause: Every schedule has an expiration date based on its cadence (90 days for frequent schedules, 180 days or 6× the interval for infrequent ones). This is expected behavior, not an error.Solution:
- Open the index page and find the schedule card.
- Turn the Schedule toggle back on.
- The schedule resumes with the same cron expression and credentials, and a fresh expiration window starts.
Limitations
Best Practices
Choose the Right Schedule
Choose the Right Schedule
-
Data change frequency: Match the schedule to how often your source data changes.
- Rapidly changing data (for example, active repositories): Daily.
- Moderately changing data (for example, documentation wikis): Weekly.
- Slowly changing data (for example, archived content): Monthly.
-
Off-peak hours: Schedule during low-usage periods.
- Early morning (for example, 2:00 AM to 5:00 AM).
- Weekends (for example, Saturday or Sunday midnight).
- Avoid business hours to prevent performance impact on users.
-
Resource considerations:
- Larger indexes take longer to reindex.
- Consider system load and concurrent operations.
- Stagger schedules for multiple indexes to avoid simultaneous heavy operations.
-
User needs vs. system load:
- Balance data freshness requirements with system resources.
- Do not schedule more frequently than necessary.
Manage Multiple Schedules
Manage Multiple Schedules
When managing schedules across multiple indexes:
-
Stagger execution times: Avoid scheduling multiple indexes at the same time.
- Index A:
0 2 * * *(daily at 2:00 AM). - Index B:
0 4 * * *(daily at 4:00 AM). - Index C:
0 6 * * *(daily at 6:00 AM).
- Index A:
-
Group by priority:
- Critical indexes: More frequent schedules.
- Reference indexes: Less frequent schedules.
- Document your schedules: Maintain a reference document listing all configured schedules for coordination.
Monitor & Maintain
Monitor & Maintain
- Regular review: Check the History tab periodically to verify schedules are executing successfully.
- Update schedules as needed: Adjust cron expressions when data change patterns evolve.
- Remove unused schedules: Turn off schedules for indexes that are no longer actively used.
- Test before production: Validate schedule configuration with a test index before applying to production indexes.
Guides & References
- Create & Use Indexes — Comprehensive guide to the Indexes section and index pages.
- Indexing Overview — General indexing concepts and architecture.
- Toolkits Menu — Guide to the Toolkit menu interface.