Overview
Jira indexing allows you to create searchable indexes from your Jira project management content:- Issues & Stories: User stories, bugs, tasks, epics, and sub-tasks with full descriptions
- Custom Fields: Project-specific fields, custom workflows, and metadata
- Attachments: Screenshots, documents, test files, and other media attached to issues
- Comments: Discussion threads, status updates, and collaborative input on issues
- Project Data: Sprint information, priorities, assignees, and project hierarchies
- Semantic Search: Find issues, bugs, and stories across projects using natural language queries
- Context-Aware Chat: Get AI-generated answers from your project data with citations to specific issues
- Cross-Project Discovery: Search across multiple Jira projects and issue types
- Knowledge Extraction: Transform Jira content into searchable organizational knowledge
- Project Analysis: Analyze patterns, trends, and relationships in your project management data
- Finding similar bugs or issues across projects for faster resolution
- Onboarding new team members by allowing them to ask questions about project history and processes
- Analyzing sprint retrospectives and team feedback for continuous improvement
- Support and customer service teams searching for known issues and solutions
- Project managers extracting insights from historical project data and decisions
Prerequisites
Before indexing Jira data, ensure you have:- Jira Credential: A Jira API token or authentication credentials configured in ELITEA
- Vector Storage: PgVector selected in Settings → AI Configuration
- Embedding Model: Selected in AI Configuration (defaults available) → AI Configuration
- Jira Toolkit: Configured with your Jira instance details and credentials
Required Permissions
Your Jira credential needs appropriate permissions based on what you want to index: For Content Access:- Read access to Jira projects and issues
- Permission to view the specific projects you want to index
- Access to view attachments (if including attachments)
- Permission to view comments and issue history
- Access to both public and restricted projects (based on your requirements)
- Basic Authentication: Username and API Key
- Bearer Token: Jira API token
Step-by-Step: Creating a Jira Credential
- Generate Jira API Token in your Atlassian account (Security → API Tokens)
- Create Credential in ELITEA: Navigate to Credentials → + Create → Jira → enter details and save
For complete credential setup steps including token generation and security best practices, see:
Step-by-Step: Configure Jira Toolkit
- Create Toolkit: Navigate to Toolkits → + Create → Jira
- Configure Settings: Set base URL, hosting option (Cloud/Server), and assign your Jira credential
- Enable Tools: Select
Index Data,List Collections,Search Index,Stepback Search Index,Stepback Summary Index, andRemove Indextools - Save Configuration
Tool Overview:
- Index Data: Creates searchable indexes from Jira issues and content
- List Collections: Lists all available collections/indexes to verify what’s been indexed
- Search Index: Performs semantic search across indexed content using natural language queries
- Stepback Search Index: Advanced search that breaks down complex questions into simpler parts for better results
- Stepback Summary Index: Generates summaries and insights from search results across indexed content
- Remove Index: Deletes existing collections/indexes when you need to clean up or start fresh
For complete toolkit configuration including hosting options and authentication setup, see:
Step-by-Step: Index Jira Data
All indexing operations are performed via the Indexes Tab Interface. This dedicated interface provides comprehensive index management with visual status indicators, real-time progress monitoring, and integrated search capabilities.
Step 1: Access the Interface
- Navigate to Toolkits: Go to Toolkits in the main navigation
- Select Your Jira Toolkit: Choose your configured Jira toolkit from the list
- Open Indexes Tab: Click on the Indexes tab in the toolkit detail view
- PgVector and Embedding Model are configured in Settings → AI Configuration
- The Index Data tool is enabled in your toolkit configuration
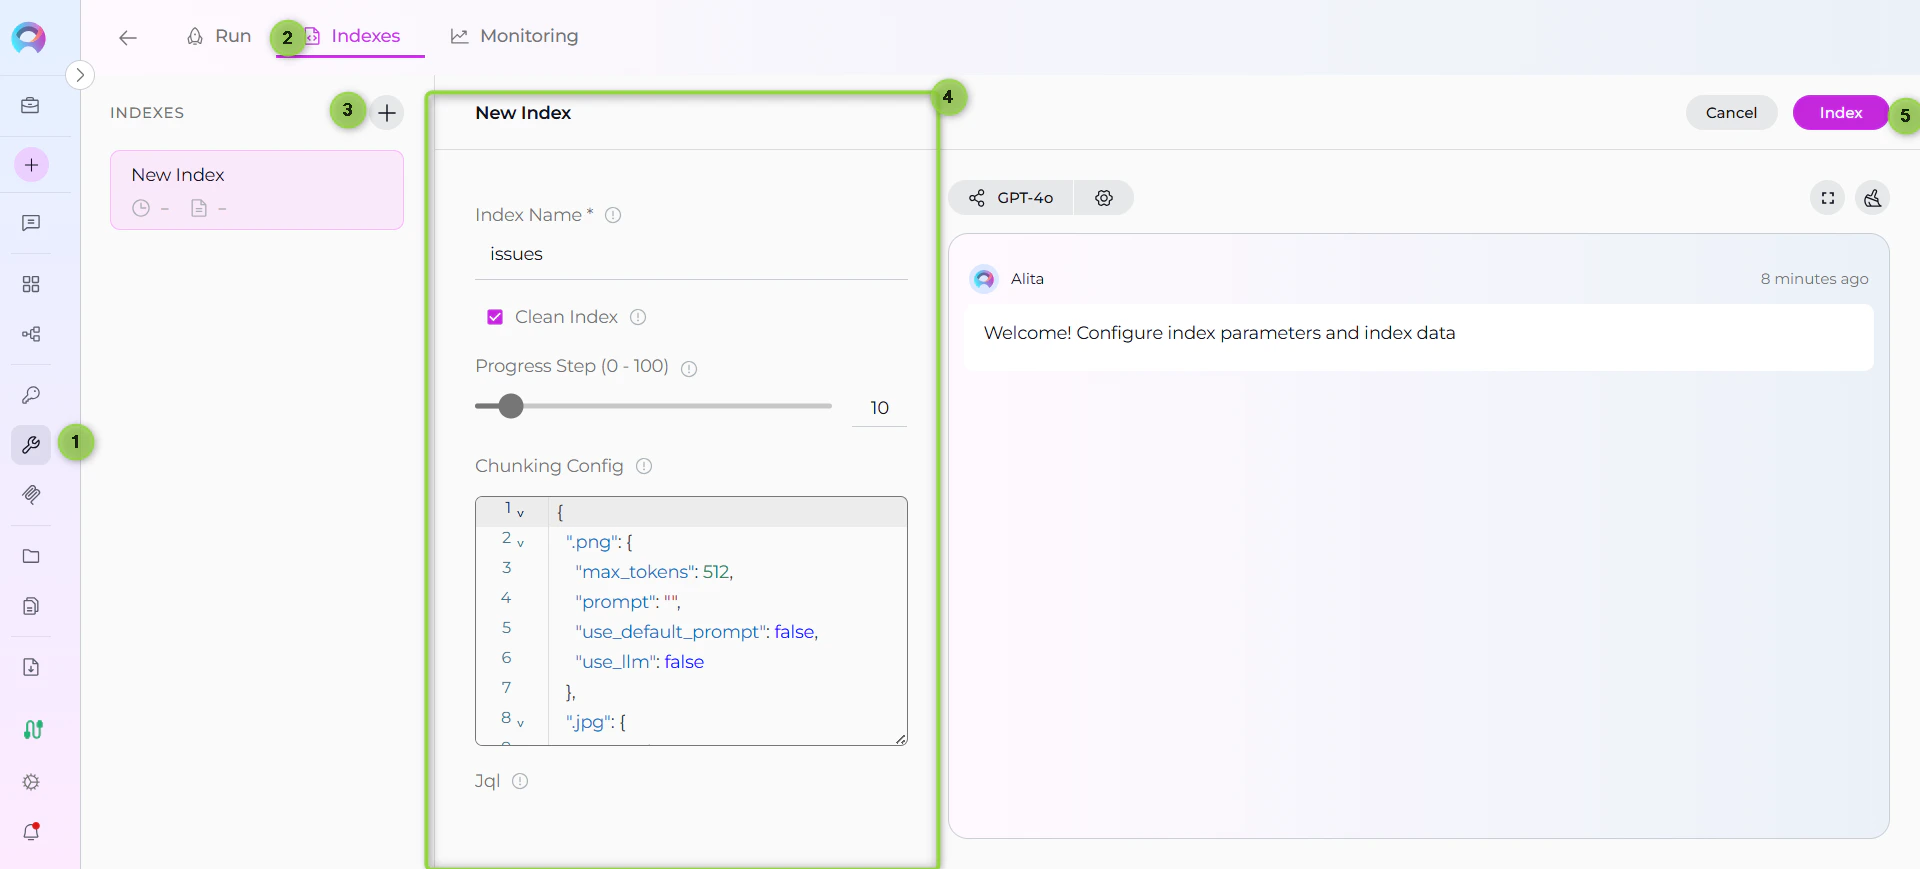
Step 2: Create a New Index
- Click Create New Index: In the Indexes sidebar, click the + Create New Index button
- New Index Form: The center panel displays the new index creation form
Step 3: Configure Index Parameters
Fill in the required and optional parameters for your Jira indexing:Step 4: Start Indexing
- Form Validation: The Index button remains inactive until all required fields are filled
- Review Configuration: Verify all parameters are correct
- Click Index Button: Start the indexing process
-
Monitor Progress: Watch real-time updates with visual indicators:
- 🔄 In Progress: Indexing is currently running
- ✅ Completed: All items indexed successfully
- ⚠️ Partially Indexed: Indexing finished but some files were skipped (unsupported extension, empty content, or errors). The index is fully usable for search and scheduling — review the skipped-file breakdown in the chat panel.
- ❌ Failed: Indexing encountered an error
For quick testing and validation, you can also use the Test Settings panel on the right side of the toolkit detail page. Select a model, choose the Index Data tool from the dropdown, configure parameters, and click Run Tool. However, the Indexes Tab Interface is the recommended approach for comprehensive index management.
Step 5: Verify Index Creation
After indexing completes, verify the index was created successfully:- Check Index Status: Visual indicators show completion status
- Review Index Details: Click on the created index to see metadata and document count
- Test Search: Use the Run tab to test search functionality with sample queries
Search and Chat with Indexed Data
Once your Jira data is indexed, you can use it in multiple ways:Using the Indexes Interface
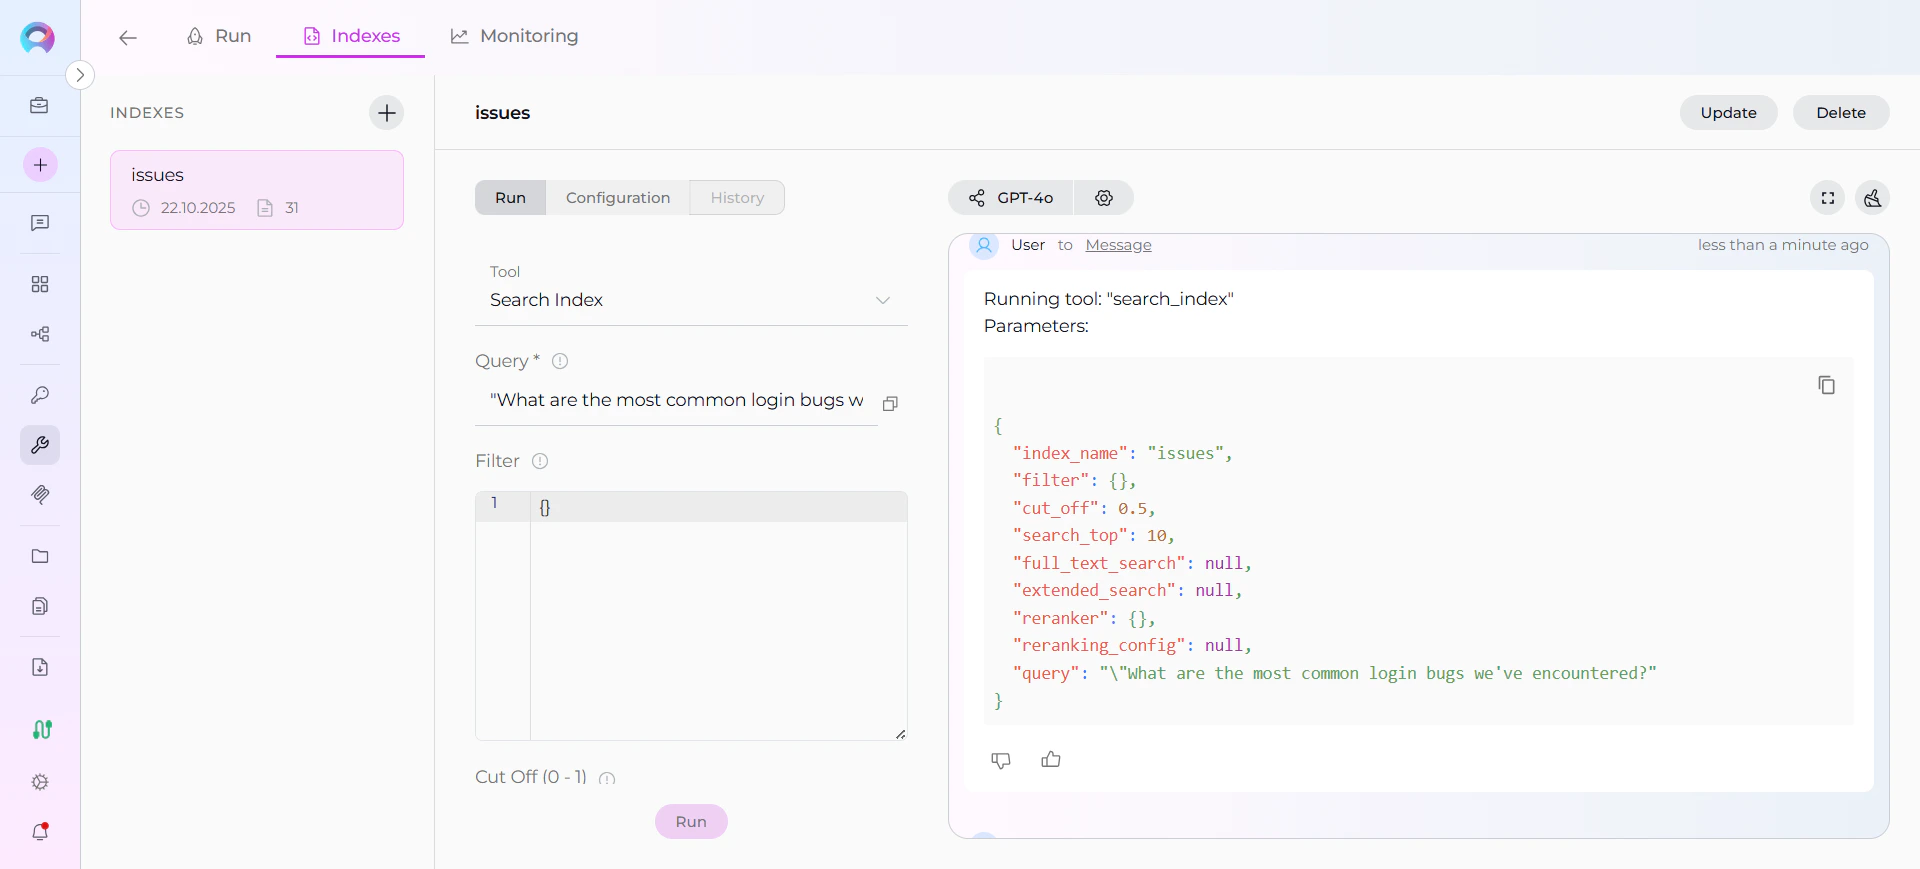
Direct Search via Indexes Tab:- Access Indexes Tab: Navigate to your Jira toolkit → Indexes tab
- Select Index: Click on your created index from the sidebar
- Open Run Tab: Click the Run tab in the center panel
- Choose Search Tool: Select from available search tools:
- Search Index: Basic semantic search
- Stepback Search Index: Advanced search with question breakdown
- Stepback Summary Index: Summarized insights from search results
- Enter Query: Type your natural language question
- View Results: See responses with citations to specific Jira issues
Using Toolkit in Conversations and Agents
Your Jira toolkit can be used in two main contexts:- In Conversations: Add the toolkit as a participant to ask questions and search your indexed Jira data
- In Agents: Include the toolkit when creating AI agents to give them access to your Jira project data
- Start a New Conversation or Create an Agent
- Add Toolkit as Participant: Select your Jira toolkit from the available toolkits
- Ask Natural Language Questions: The toolkit will automatically search your indexed data and provide relevant answers with citations
Real-Life Example Workflow
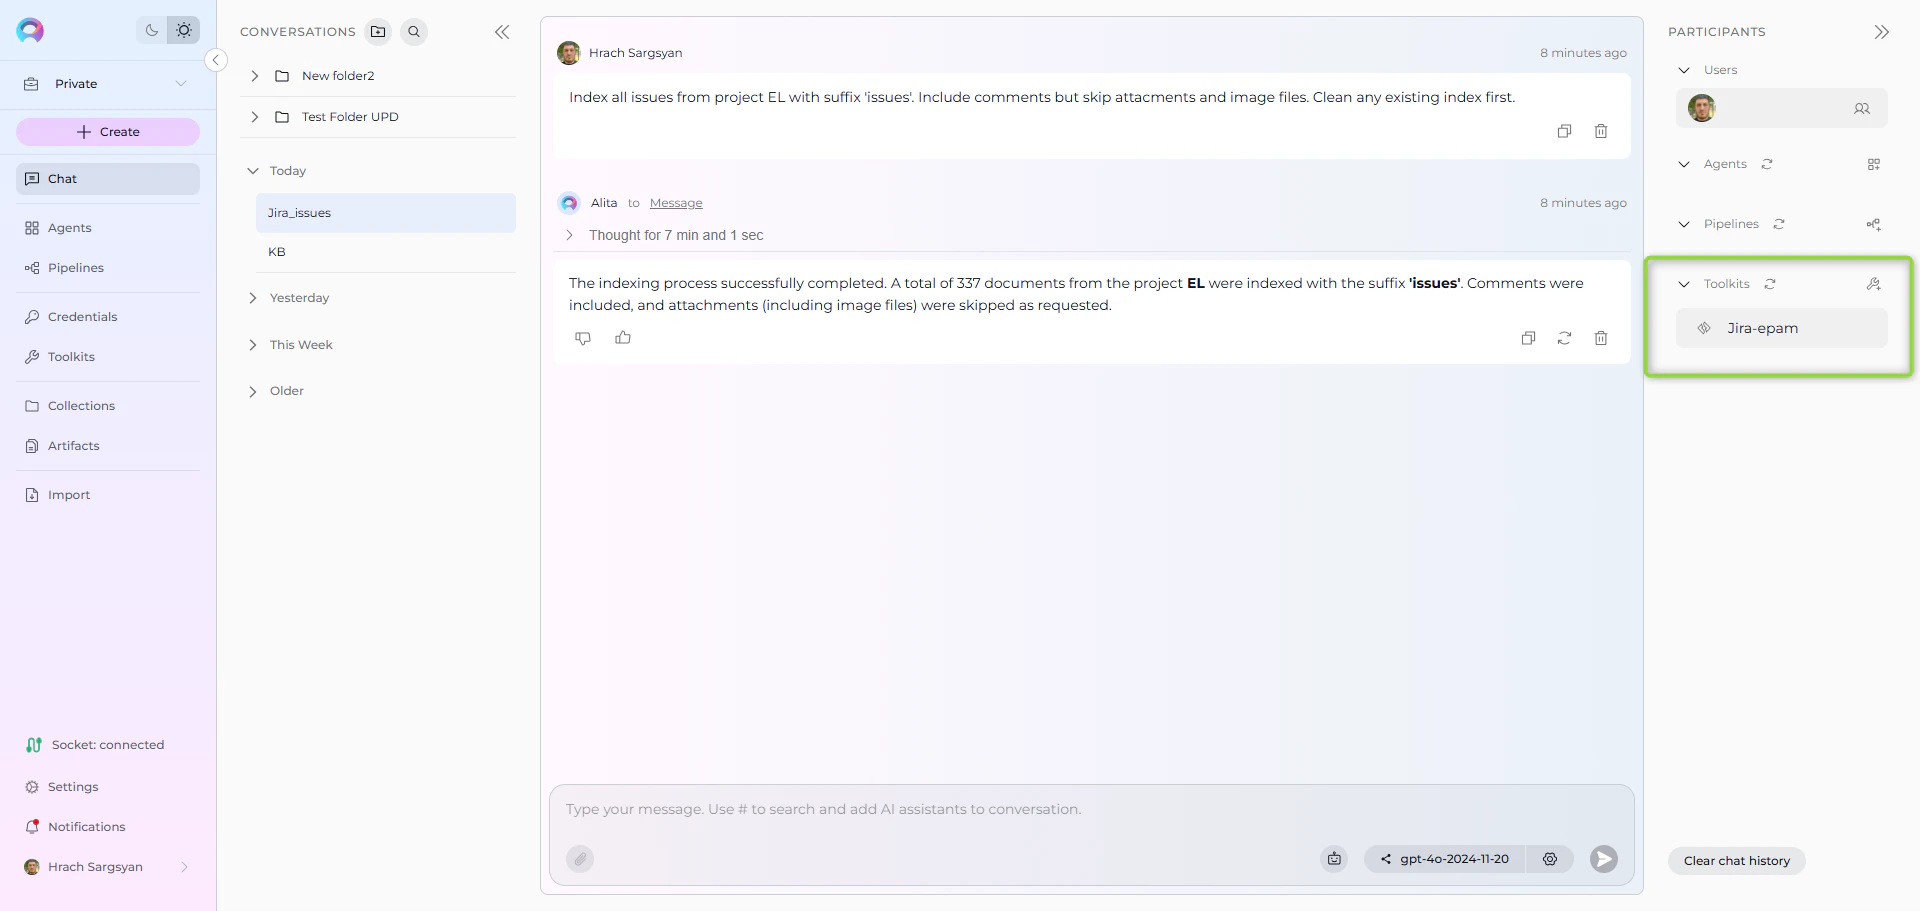
Let’s walk through a complete example of indexing and using a software project’s Jira data: Step 1: Setup Jira Toolkit for Software Project Step 2: Use in Conversations Add toolkit to a conversation and start asking questions:- Navigate to Conversations → + New Conversation
- In the participants section click + to add Toolkit
- Select your Jira toolkit from the available toolkits list
-
User Request in Chat:
“Index all issues from project EL with suffix ‘issues’. Include comments but skip attachments and image files. Clean any existing index first.”
-
User Request in Chat:
“List my collections”
- Jira Toolkit Response:

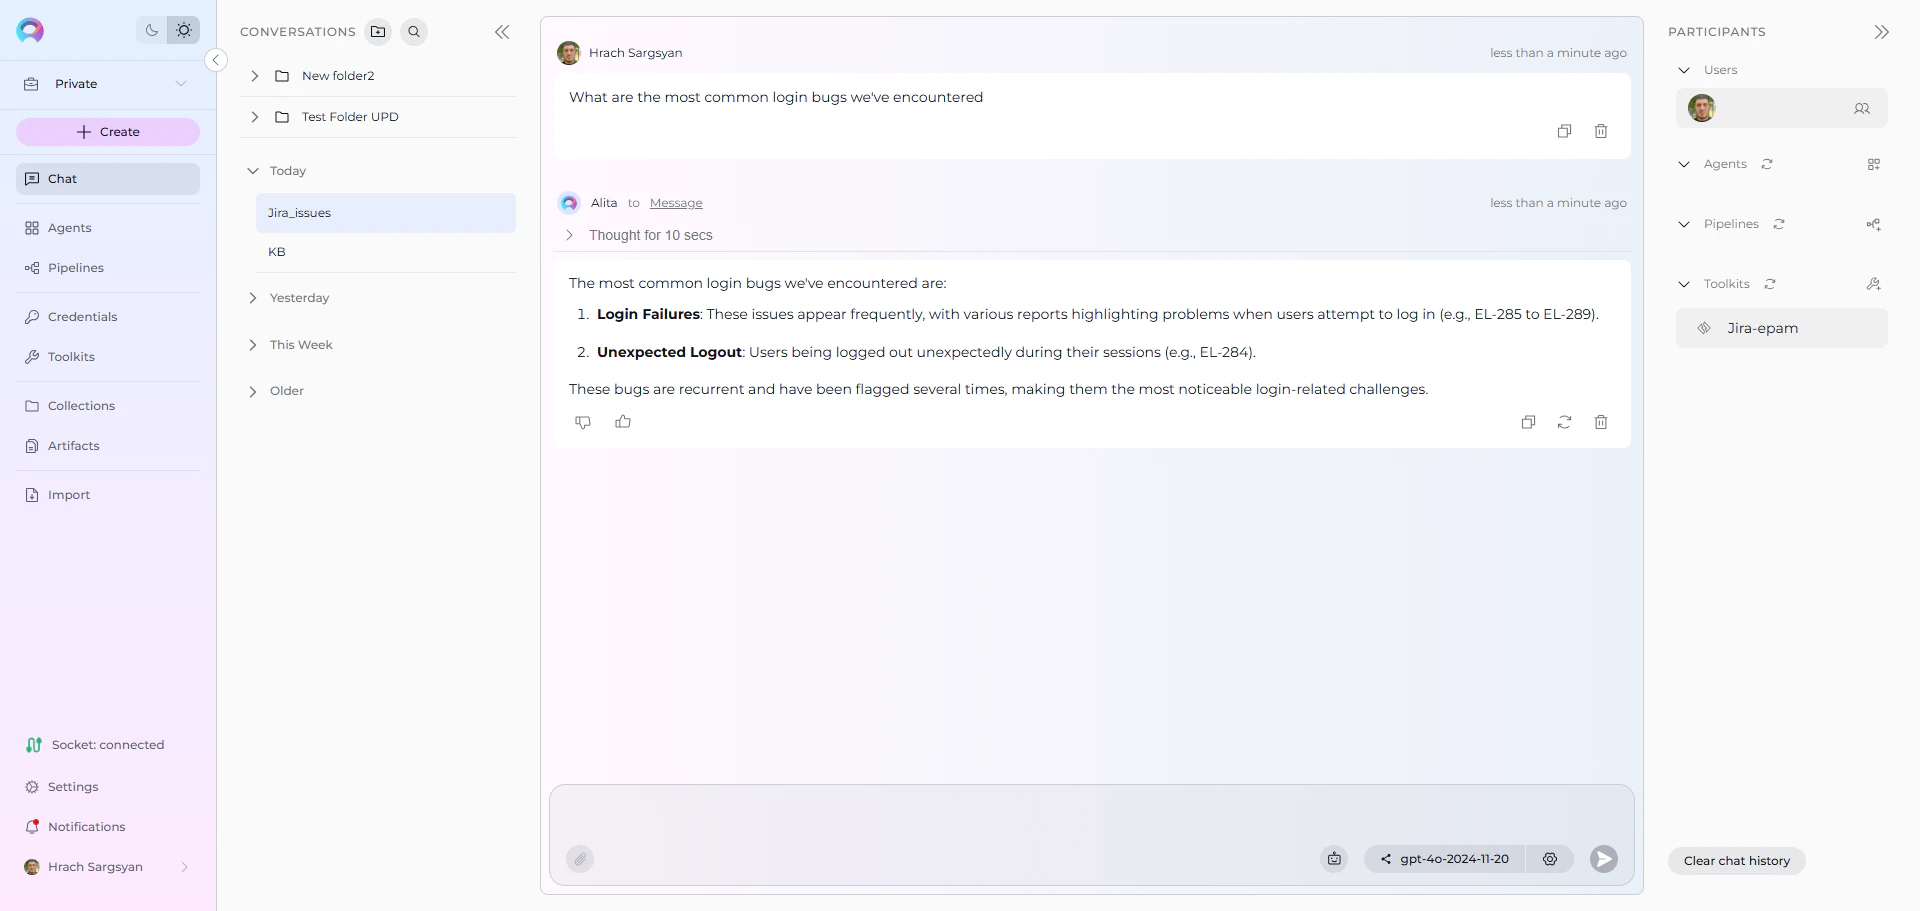
- User: “What are the most common login bugs we’ve encountered?”
-
Jira Toolkit: “Based on your indexed project data, here are the most common login bugs:
- Session Timeout Issues: Multiple reports of users being logged out unexpectedly (EL-234, EL-287, EL-301)
- Password Reset Failures: Email delivery issues preventing password resets (EL-156, EL-189)
- Two-Factor Authentication Problems: Users unable to complete 2FA setup (CALC-EL, CALC-EL)
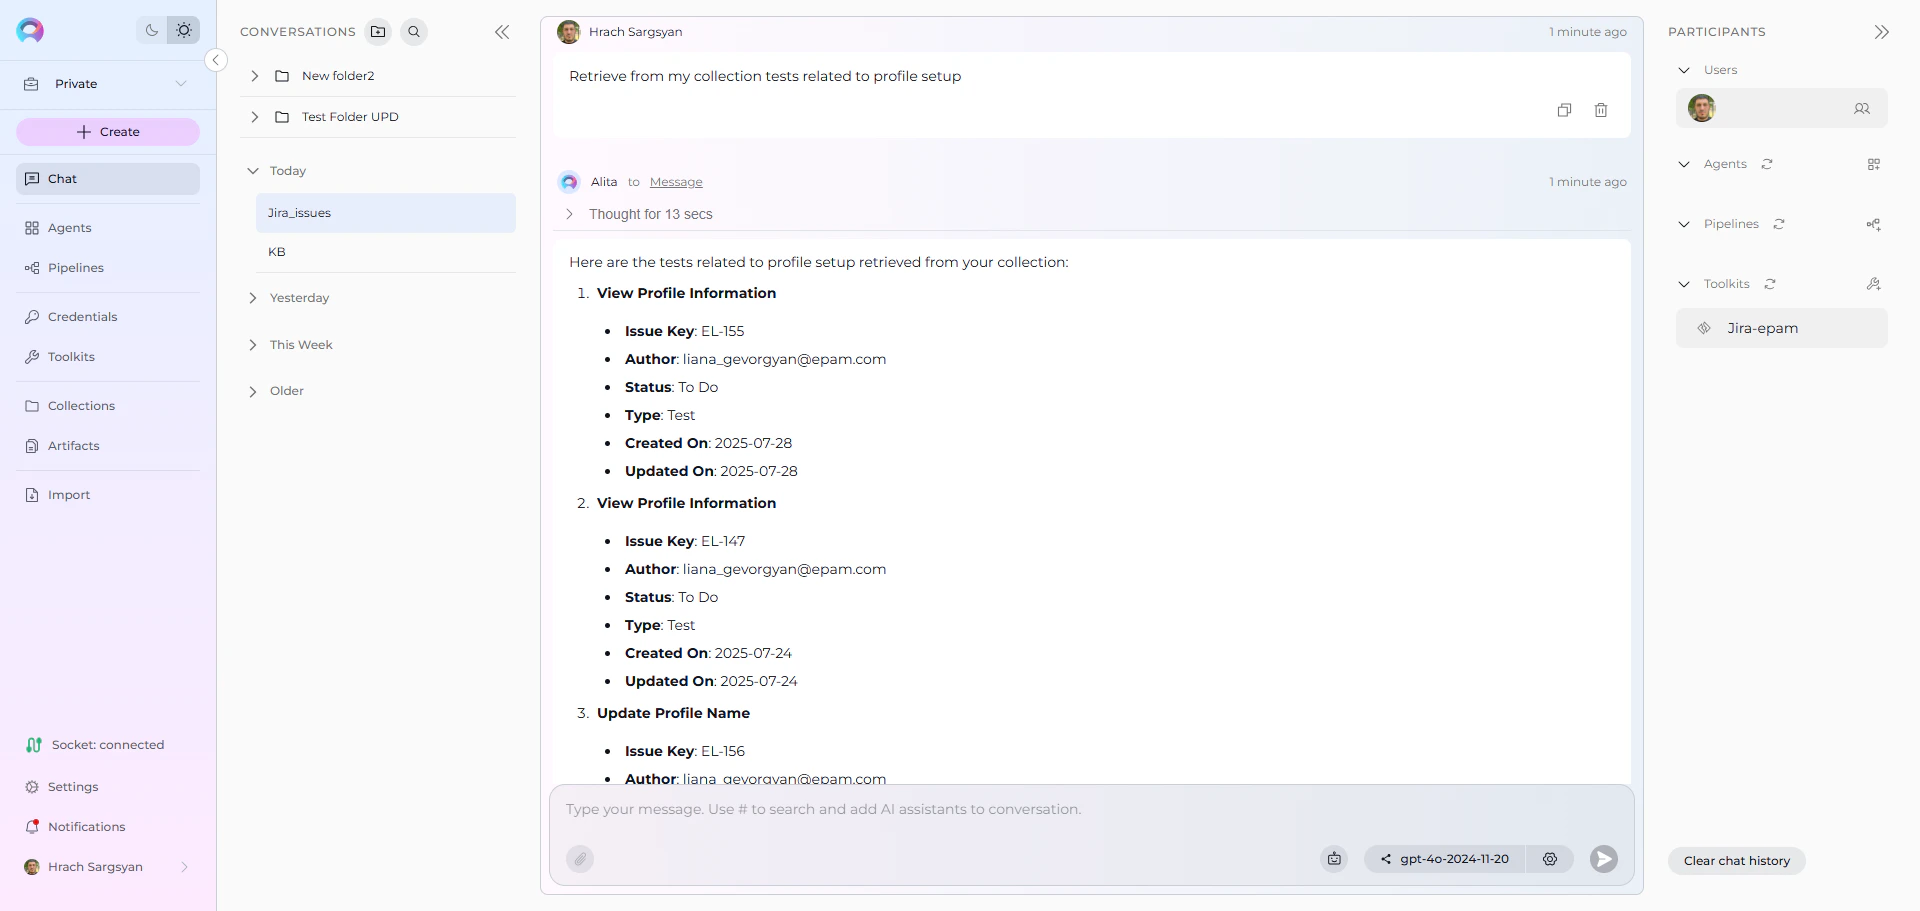
- User: “Retrieve from my collection tests related to profile setup”
-
Jira Toolkit: “Here are the tests related to profile setup from your indexed data:
Test Cases Found:
- User Profile Creation Test: Verify new user can create complete profile (CALC-445)
- Profile Validation Test: Test profile field validation and error handling (CALC-446)
- Profile Picture Upload Test: Test image upload functionality in user profiles (CALC-447)
- Test user accounts with different permission levels
- Valid and invalid profile data sets
- Image files for upload testing (various formats and sizes)
Troubleshooting & Tips
Common Errors and Solutions
“Indexes tab not visible” or “Tab disabled”:- Verify PgVector and Embedding Model are configured in Settings → AI Configuration
- Ensure the Index Data tool is enabled in your Jira toolkit configuration
- Check that your toolkit supports indexing (Jira is supported)
- Refresh the browser page and retry
- Verify all project-level prerequisites are met (PgVector and Embedding Model)
- Check that you have proper permissions for the toolkit
- Ensure the toolkit is properly saved with credentials
- Verify your Jira credential has the correct API token
- Ensure your token has appropriate permissions for the projects you want to index
- Check that your token hasn’t expired in your Atlassian account settings
- Verify your JQL syntax is correct using Jira’s query builder
- Common examples:
project=PROJ,status IN (Open, Resolved),updated >= -4w - Test your JQL query directly in Jira before using it for indexing
- Check your JQL filter isn’t too restrictive
- Verify the project key is correct and case-sensitive
- Try indexing without JQL filter first, then add restrictions
- Ensure your account has permission to view the specified projects
- Ensure PgVector is properly configured in Settings → AI Configuration
- Verify the vector database is running and accessible
- Check connection credentials and database permissions
- Restart the vector database service if connection issues persist
- Large attachments may cause timeouts; consider using Skip Attachment Extensions
- Binary files (executables, videos) should be excluded via Skip Attachment Extensions
- Check available storage space for the vector database
Performance and Scope Considerations
For Large Jira Projects:- Use specific JQL filters:
project=PROJ AND updated >= -12w(last 12 weeks) - Filter by issue type:
project=PROJ AND issuetype IN (Bug, Story) - Set reasonable Max Total Issues limits: start with 500-1000 issues for testing
- Consider indexing by project phases: current sprint, recent releases, archived items
Search Result Quality
If search returns few/no results:- Lower the cut-off score from 0.5 to 0.35 or 0.3
- Increase search_top from 10 to 20 or 30
- Try rephrasing your query with Jira-specific terms (issue keys, component names)
- Verify the indexed content contains relevant information for your query
- Include both issue descriptions and attachments for comprehensive coverage
- Use natural language queries rather than exact Jira field names
- Leverage stepback search for complex project questions that require reasoning
- Create separate indexes for different project types (development vs support, current vs archived)
Content-Specific Indexing Tips
For Software Development Projects:- Focus on bugs and stories:
issuetype IN (Bug, Story, Task) - Include recent issues:
updated >= -13w(last quarter) - Index both current and resolved issues for historical context
- Include all issue types for comprehensive ticket history
- Focus on resolved issues with solutions:
status=Resolved AND resolution!=Duplicate - Consider including comments as they often contain valuable troubleshooting steps
- Include epics and high-level planning issues:
issuetype IN (Epic, Initiative) - Index across multiple projects for portfolio-level insights
- Include both active and completed projects for lessons learned
References
For additional information and detailed setup instructions, see:
- Indexing Overview - General indexing concepts and features
- Create a Credential - Step-by-step credential creation guide
- How to Use Credentials - Credential management and Jira setup
- Toolkits Menu - Toolkit configuration and management
- Jira Toolkit Integration Guide - Complete Jira toolkit reference
- AI Configuration - Vector storage and embedding model setup
- Chat Menu - Creating conversations and adding toolkit participants