> ## Documentation Index
> Fetch the complete documentation index at: https://docs.elitea.ai/llms.txt
> Use this file to discover all available pages before exploring further.
# Loop Node Deprecation and Migration Guide
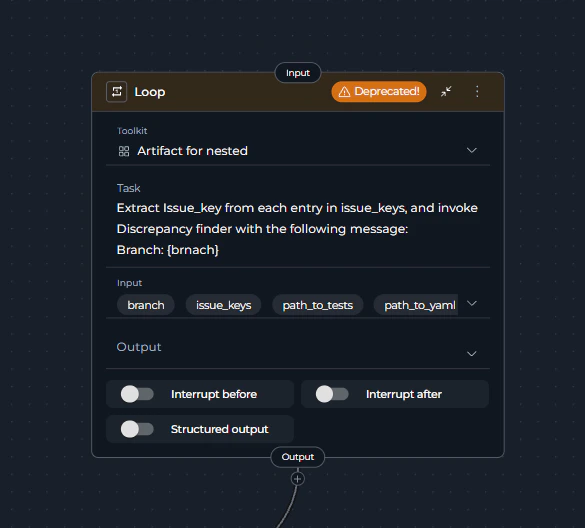
> The Loop node has been deprecated as of version 2.0.0 B2 and is no longer available for creating new pipelines. This node previously allowed automatic iteration
## Overview
This guide will help you migrate your existing pipelines from the deprecated Loop node to **manual loop patterns** using Router, State Modifier, and Code nodes.
* **Version 2.0.0 B2**: Loop node officially deprecated
* **Future versions**: Loop node may be removed entirely
* **Existing pipelines**: Loop nodes will continue to function for backward compatibility in version Version 2.0.0 B2
**All agents and pipelines have a step limit (default: 25)** to prevent endless loops.
When implementing manual loops, you MUST:
* Increase the step limit to match your expected iterations
* Set it close to real-world values (not excessively high)
* Test with small data sets first
**Why this matters:**
* Mistakes in logic or prompts can cause endless loops
* Endless loops waste tokens and increase costs
* Can create unwanted records or cause data loss in external systems (Confluence, JIRA, etc.)
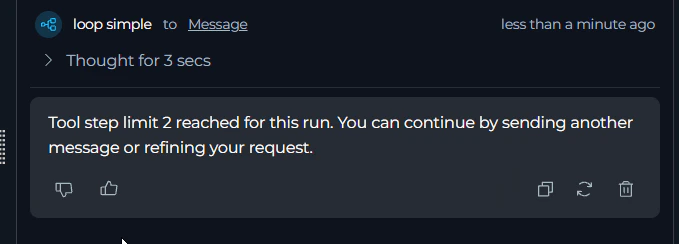
* Pipeline will error with "Step limit reached" if exceeded
## Why Was the Loop Node Deprecated?
The Loop node has been deprecated to simplify the pipeline architecture and provide more explicit control over iteration logic:
* **More explicit control**: Manual loop patterns make iteration logic visible and debuggable
* **Better flexibility**: You can customize loop behavior, exit conditions, and error handling
* **Clearer data flow**: Pipeline visualization shows exact execution paths
* **Reduced complexity**: Eliminates hidden batching and execution logic
## Understanding Loop Node Functionality
The **Loop node** automatically:
1. Accepted a prompt that generated a list of data batches
2. Executed a function (toolkit) or Agent for each item in the list
3. Aggregated results automatically
4. Handled iteration control internally
 ## Migration Strategy: Manual Loop Pattern
Replace Loop nodes with an explicit loop pattern using these components:
### Core Pattern Components
1. **Code Node, LLM Node or any other group of nodes**: Initialize the list/batch of items to process
2. **State Modifier Node**: Extract current item and increment index
3. **Router Node**: Check exit condition and control loop flow
4. **Execution Node**: Process the current item (Toolkit, LLM, Agent, or Code)
5. **State Modifier Node** (optional): Aggregate results
### Manual Loop Flow
```
Initialize Data → Get Item → Process Item → Aggregate Result → Increment Index → Check Exit → [Loop Back or END]
```
Manual loop patterns provide better observability, debugging capabilities, and control. While they require more nodes, they make your pipeline logic transparent and maintainable.
## Migration Examples
### Example 1: Simple Loop Pattern (Reading and Processing List Items)
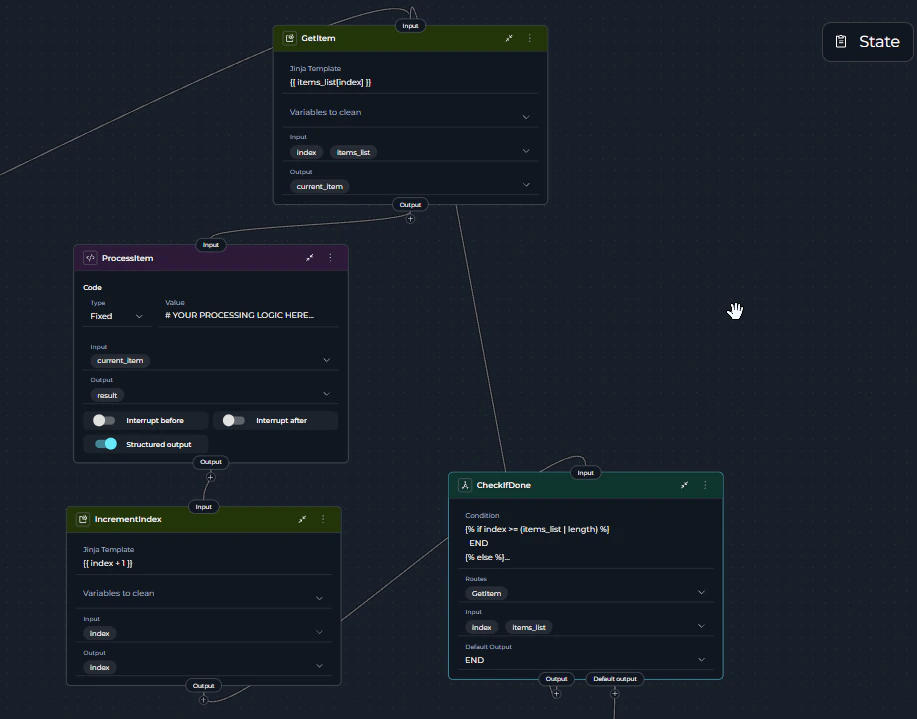
This simplified example shows the basic loop structure. Each node is shown as a placeholder to help you understand the pattern.
**Use Case**: Process a list of items one by one
**Pattern**: Initialize → Get Item → Process Item → Increment → Check → \[Loop Back or END]
#### Simplified Pipeline YAML
```yaml theme={null}
state:
input:
type: str
messages:
type: list
items_list:
type: list
value: [] # Will hold: ["Item 1", "Item 2", "Item 3"]
index:
type: number
value: 0
input:
type: str
items_list:
type: list
value: []
messages:
type: list
result:
type: str
value: ''
entry_point: InitializeList
nodes:
- id: InitializeList
type: code
code:
type: fixed
value: |-
# Create a simple list of items
items = ["Item 1", "Item 2", "Item 3"]
result = {
"items_list": items,
"index": 0
}
result
output:
- items_list
- index
structured_output: true
transition: GetItem
- id: GetItem
type: state_modifier
input:
- items_list
- index
output:
- current_item
template: '{{ items_list[index] }}'
transition: ProcessItem
- id: ProcessItem
type: code
code:
type: fixed
value: |-
# YOUR PROCESSING LOGIC HERE
# Example: call a toolkit, use LLM, transform data, etc.
current = alita_state.get('current_item', '')
result = {"result": f"Processed: {current}"}
result
input:
- current_item
output:
- result
structured_output: true
transition: IncrementIndex
- id: IncrementIndex
type: state_modifier
input:
- index
output:
- index
template: '{{ index + 1 }}'
transition: CheckIfDone
- id: CheckIfDone
type: router
condition: |-
{% if index >= (items_list | length) %}
END
{% else %}
GetItem
{% endif %}
default_output: END
input:
- index
- items_list
routes:
- GetItem
```
#### Flow Explanation
1. **InitializeList** (Code Node): Creates a list with 3 items and sets index to 0
2. **GetItem** (State Modifier): Extracts the current item using the index (`items_list[0]`, then `items_list[1]`, etc.)
3. **ProcessItem** (Code Node): **\[Replace this with your processing logic]** - could be toolkit, LLM, or any operation
4. **IncrementIndex** (State Modifier): Adds 1 to index (0 → 1 → 2 → 3)
5. **CheckIfDone** (Router): Checks if `index >= 3` (list length)
* If NO: Goes back to **GetItem** (loop continues)
* If YES: Goes to **END** (loop exits)
**Visual Loop Flow:**
```
InitializeList → GetItem → ProcessItem → IncrementIndex → CheckIfDone
(index=0) ↑ | | |
| ↓ ↓ ↓
└────────[Loop Back]───────────────[If index < length]
|
[If index >= length]
↓
END
```
## Migration Strategy: Manual Loop Pattern
Replace Loop nodes with an explicit loop pattern using these components:
### Core Pattern Components
1. **Code Node, LLM Node or any other group of nodes**: Initialize the list/batch of items to process
2. **State Modifier Node**: Extract current item and increment index
3. **Router Node**: Check exit condition and control loop flow
4. **Execution Node**: Process the current item (Toolkit, LLM, Agent, or Code)
5. **State Modifier Node** (optional): Aggregate results
### Manual Loop Flow
```
Initialize Data → Get Item → Process Item → Aggregate Result → Increment Index → Check Exit → [Loop Back or END]
```
Manual loop patterns provide better observability, debugging capabilities, and control. While they require more nodes, they make your pipeline logic transparent and maintainable.
## Migration Examples
### Example 1: Simple Loop Pattern (Reading and Processing List Items)
This simplified example shows the basic loop structure. Each node is shown as a placeholder to help you understand the pattern.
**Use Case**: Process a list of items one by one
**Pattern**: Initialize → Get Item → Process Item → Increment → Check → \[Loop Back or END]
#### Simplified Pipeline YAML
```yaml theme={null}
state:
input:
type: str
messages:
type: list
items_list:
type: list
value: [] # Will hold: ["Item 1", "Item 2", "Item 3"]
index:
type: number
value: 0
input:
type: str
items_list:
type: list
value: []
messages:
type: list
result:
type: str
value: ''
entry_point: InitializeList
nodes:
- id: InitializeList
type: code
code:
type: fixed
value: |-
# Create a simple list of items
items = ["Item 1", "Item 2", "Item 3"]
result = {
"items_list": items,
"index": 0
}
result
output:
- items_list
- index
structured_output: true
transition: GetItem
- id: GetItem
type: state_modifier
input:
- items_list
- index
output:
- current_item
template: '{{ items_list[index] }}'
transition: ProcessItem
- id: ProcessItem
type: code
code:
type: fixed
value: |-
# YOUR PROCESSING LOGIC HERE
# Example: call a toolkit, use LLM, transform data, etc.
current = alita_state.get('current_item', '')
result = {"result": f"Processed: {current}"}
result
input:
- current_item
output:
- result
structured_output: true
transition: IncrementIndex
- id: IncrementIndex
type: state_modifier
input:
- index
output:
- index
template: '{{ index + 1 }}'
transition: CheckIfDone
- id: CheckIfDone
type: router
condition: |-
{% if index >= (items_list | length) %}
END
{% else %}
GetItem
{% endif %}
default_output: END
input:
- index
- items_list
routes:
- GetItem
```
#### Flow Explanation
1. **InitializeList** (Code Node): Creates a list with 3 items and sets index to 0
2. **GetItem** (State Modifier): Extracts the current item using the index (`items_list[0]`, then `items_list[1]`, etc.)
3. **ProcessItem** (Code Node): **\[Replace this with your processing logic]** - could be toolkit, LLM, or any operation
4. **IncrementIndex** (State Modifier): Adds 1 to index (0 → 1 → 2 → 3)
5. **CheckIfDone** (Router): Checks if `index >= 3` (list length)
* If NO: Goes back to **GetItem** (loop continues)
* If YES: Goes to **END** (loop exits)
**Visual Loop Flow:**
```
InitializeList → GetItem → ProcessItem → IncrementIndex → CheckIfDone
(index=0) ↑ | | |
| ↓ ↓ ↓
└────────[Loop Back]───────────────[If index < length]
|
[If index >= length]
↓
END
```
 Replace the **ProcessItem** node with your actual processing logic:
* **Toolkit Node**: To call external services (Confluence, JIRA, etc.)
* **LLM Node**: To process items with AI
* **Agent Node**: To use AI agents
* **Code Node**: For custom Python logic
***
### Example 2: Writing Data to External Resource (Creating Multiple Confluence Pages)
This example shows how to create multiple items in an external system (Confluence pages).
**Use Case**: Create several documentation pages in Confluence from a list of topics
**Pattern**: Initialize Topics → Get Topic → Create Page → Increment → Check → \[Loop Back or END]
#### Pipeline YAML
```yaml theme={null}
state:
input:
type: str
messages:
type: list
index:
type: number
value: 0
topics_list:
type: list
value: []
current_topic:
type: str
value: ''
page_id:
type: str
value: ''
entry_point: InitializeTopics
nodes:
# Step 1: Create list of topics
- id: InitializeTopics
type: code
code:
type: fixed
value: |-
topics = [
{"title": "Getting Started", "space": "DOCS"},
{"title": "API Reference", "space": "DOCS"},
{"title": "Troubleshooting", "space": "DOCS"}
]
result = {"topics_list": topics, "index": 0}
result
output:
- topics_list
- index
structured_output: true
transition: GetTopic
# Step 2: Get current topic
- id: GetTopic
type: state_modifier
input:
- topics_list
- index
output:
- current_topic
template: '{{ topics_list[index] }}'
transition: CreatePage
# Step 3: Create Confluence page (placeholder - replace with your toolkit)
- id: CreatePage
type: code
code:
type: fixed
value: |-
# REPLACE WITH TOOLKIT NODE FOR CONFLUENCE
# Example: Use Confluence toolkit's create_page tool
result = {"page_id": page_id}
result
input:
- current_topic
output:
- page_id
structured_output: true
transition: IncrementIndex
# Step 4: Increment counter
- id: IncrementIndex
type: state_modifier
input:
- index
output:
- index
template: '{{ index + 1 }}'
transition: CheckIfDone
# Step 5: Check if all topics processed
- id: CheckIfDone
type: router
condition: |-
{% if index >= (topics_list | length) %}
END
{% else %}
GetTopic
{% endif %}
default_output: END
input:
- index
- topics_list
routes:
- GetTopic
```
#### Flow Explanation
1. **InitializeTopics**: Creates list of 3 topics to create pages for
2. **GetTopic**: Gets current topic from list using index
3. **CreatePage**: **\[Replace with Confluence Toolkit]** - Creates the page
4. **IncrementIndex**: Moves to next topic
5. **CheckIfDone**: Checks if all topics processed → loops back or ends
Replace the **CreatePage** Code node with a Toolkit node:
```yaml theme={null}
- id: CreatePage
type: toolkit
toolkit_name: Confluence
tool: create_page
input_mapping:
space_key:
type: fstring
value: '{current_topic["space"]}'
title:
type: fstring
value: '{current_topic["title"]}'
body:
type: fixed
value: 'Page content here'
```
```yaml theme={null}
- current_topic
- page_id
output:
- creation_results
structured_output: true
transition: IncrementIndex
# Step 6: Increment index
- id: IncrementIndex
type: state_modifier
input:
- index
output:
- index
template: '{{ index + 1 }}'
transition: CheckExit
# Step 7: Check if more topics to process
- id: CheckExit
type: router
condition: |-
{% if index >= (topics_list | length) %}
GenerateReport
{% else %}
GetNextTopic
{% endif %}
default_output: GenerateReport
input:
- index
- topics_list
routes:
- GetNextTopic
- GenerateReport
# Step 8a: Get next topic (loop back)
- id: GetNextTopic
type: state_modifier
input:
- topics_list
- index
output:
- current_topic
template: '{{ topics_list[index] }}'
transition: GenerateContent
# Step 9: Generate final report
- id: GenerateReport
type: state_modifier
input:
- creation_results
output:
- messages
template: |-
# Confluence Pages Creation Report
Successfully created {{ creation_results | length }} pages:
{% for result in creation_results %}
- {{ result.title }} (ID: {{ result.page_id }})
{% endfor %}
transition: END
```
#### Flow Explanation
1. **InitializeTopics** (Code Node): Creates list of topics with Confluence metadata
2. **GenerateContent** (LLM): Generates documentation content for current topic
3. **ExtractContent** (State Modifier): Extracts content from LLM response
4. **CreateConfluencePage** (Toolkit): Creates page in Confluence
5. **TrackResult** (Code Node): Records creation result with page ID
6. **IncrementIndex** (State Modifier): Moves to next topic
7. **CheckExit** (Router): Checks if all topics processed → continues or exits
8. **GetNextTopic** (State Modifier): Gets next topic from list (loop back to step 2)
9. **GenerateReport** (State Modifier): Creates summary of all created pages
***
## Configuring Step Limit for Loops
### What is Step Limit?
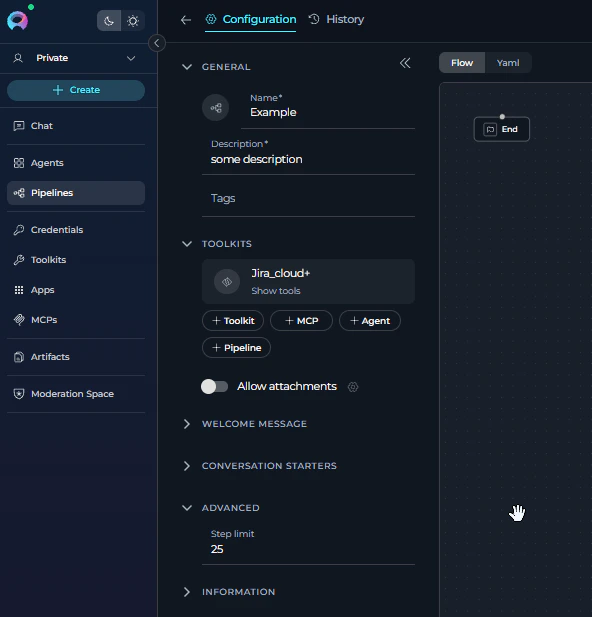
Every agent and pipeline has a **step limit** that controls the maximum number of execution steps allowed. The default value is **25 steps**.
Replace the **ProcessItem** node with your actual processing logic:
* **Toolkit Node**: To call external services (Confluence, JIRA, etc.)
* **LLM Node**: To process items with AI
* **Agent Node**: To use AI agents
* **Code Node**: For custom Python logic
***
### Example 2: Writing Data to External Resource (Creating Multiple Confluence Pages)
This example shows how to create multiple items in an external system (Confluence pages).
**Use Case**: Create several documentation pages in Confluence from a list of topics
**Pattern**: Initialize Topics → Get Topic → Create Page → Increment → Check → \[Loop Back or END]
#### Pipeline YAML
```yaml theme={null}
state:
input:
type: str
messages:
type: list
index:
type: number
value: 0
topics_list:
type: list
value: []
current_topic:
type: str
value: ''
page_id:
type: str
value: ''
entry_point: InitializeTopics
nodes:
# Step 1: Create list of topics
- id: InitializeTopics
type: code
code:
type: fixed
value: |-
topics = [
{"title": "Getting Started", "space": "DOCS"},
{"title": "API Reference", "space": "DOCS"},
{"title": "Troubleshooting", "space": "DOCS"}
]
result = {"topics_list": topics, "index": 0}
result
output:
- topics_list
- index
structured_output: true
transition: GetTopic
# Step 2: Get current topic
- id: GetTopic
type: state_modifier
input:
- topics_list
- index
output:
- current_topic
template: '{{ topics_list[index] }}'
transition: CreatePage
# Step 3: Create Confluence page (placeholder - replace with your toolkit)
- id: CreatePage
type: code
code:
type: fixed
value: |-
# REPLACE WITH TOOLKIT NODE FOR CONFLUENCE
# Example: Use Confluence toolkit's create_page tool
result = {"page_id": page_id}
result
input:
- current_topic
output:
- page_id
structured_output: true
transition: IncrementIndex
# Step 4: Increment counter
- id: IncrementIndex
type: state_modifier
input:
- index
output:
- index
template: '{{ index + 1 }}'
transition: CheckIfDone
# Step 5: Check if all topics processed
- id: CheckIfDone
type: router
condition: |-
{% if index >= (topics_list | length) %}
END
{% else %}
GetTopic
{% endif %}
default_output: END
input:
- index
- topics_list
routes:
- GetTopic
```
#### Flow Explanation
1. **InitializeTopics**: Creates list of 3 topics to create pages for
2. **GetTopic**: Gets current topic from list using index
3. **CreatePage**: **\[Replace with Confluence Toolkit]** - Creates the page
4. **IncrementIndex**: Moves to next topic
5. **CheckIfDone**: Checks if all topics processed → loops back or ends
Replace the **CreatePage** Code node with a Toolkit node:
```yaml theme={null}
- id: CreatePage
type: toolkit
toolkit_name: Confluence
tool: create_page
input_mapping:
space_key:
type: fstring
value: '{current_topic["space"]}'
title:
type: fstring
value: '{current_topic["title"]}'
body:
type: fixed
value: 'Page content here'
```
```yaml theme={null}
- current_topic
- page_id
output:
- creation_results
structured_output: true
transition: IncrementIndex
# Step 6: Increment index
- id: IncrementIndex
type: state_modifier
input:
- index
output:
- index
template: '{{ index + 1 }}'
transition: CheckExit
# Step 7: Check if more topics to process
- id: CheckExit
type: router
condition: |-
{% if index >= (topics_list | length) %}
GenerateReport
{% else %}
GetNextTopic
{% endif %}
default_output: GenerateReport
input:
- index
- topics_list
routes:
- GetNextTopic
- GenerateReport
# Step 8a: Get next topic (loop back)
- id: GetNextTopic
type: state_modifier
input:
- topics_list
- index
output:
- current_topic
template: '{{ topics_list[index] }}'
transition: GenerateContent
# Step 9: Generate final report
- id: GenerateReport
type: state_modifier
input:
- creation_results
output:
- messages
template: |-
# Confluence Pages Creation Report
Successfully created {{ creation_results | length }} pages:
{% for result in creation_results %}
- {{ result.title }} (ID: {{ result.page_id }})
{% endfor %}
transition: END
```
#### Flow Explanation
1. **InitializeTopics** (Code Node): Creates list of topics with Confluence metadata
2. **GenerateContent** (LLM): Generates documentation content for current topic
3. **ExtractContent** (State Modifier): Extracts content from LLM response
4. **CreateConfluencePage** (Toolkit): Creates page in Confluence
5. **TrackResult** (Code Node): Records creation result with page ID
6. **IncrementIndex** (State Modifier): Moves to next topic
7. **CheckExit** (Router): Checks if all topics processed → continues or exits
8. **GetNextTopic** (State Modifier): Gets next topic from list (loop back to step 2)
9. **GenerateReport** (State Modifier): Creates summary of all created pages
***
## Configuring Step Limit for Loops
### What is Step Limit?
Every agent and pipeline has a **step limit** that controls the maximum number of execution steps allowed. The default value is **25 steps**.
 ### Why Step Limit Exists
Step limits prevent endless loops that can:
* **Waste tokens**: Endless loops consume API tokens continuously
* **Increase costs**: More tokens = higher costs
* **Cause data issues**: May create duplicate records in Confluence, JIRA, or other systems
* **Lose data**: Failed loops may partially complete, leaving inconsistent state
### How to Set Step Limit
**For Agents:**
1. Open your Agent configuration
2. Scroll to **Advanced** section
3. Set **Step limit** to your expected number of iterations + buffer
**For Pipelines:**
1. Open your Pipeline in Flow Editor
2. Go to **Advanced Settings**
3. Set **Step limit** to your expected loop iterations + overhead
### Calculating Step Limit
**Formula:**
```
Step Limit = (Number of Items × Steps per Iteration) + Overhead + Safety Buffer
```
**Example 1: Simple Loop (3 items)**
* Items to process: 3
* Steps per iteration: 4 (GetItem → Process → Increment → Check)
* Overhead: 1 (Initialize)
* Safety buffer: 5
* **Total: 3 × 4 + 1 + 5 = 18**
**Example 2: Complex Loop (10 items)**
* Items to process: 10
* Steps per iteration: 6 (GetItem → Process → Aggregate → Increment → Check → ExtractData)
* Overhead: 2 (Initialize + Finalize)
* Safety buffer: 10
* **Total: 10 × 6 + 2 + 10 = 72**
- **Start conservative**: Set limit close to calculated value, not excessively high
- **Add buffer**: Always add 20-30% buffer for unexpected iterations
- **Test first**: Run with 2-3 items before full dataset
- **Monitor execution**: Check how many steps actually used
- **Avoid large values**: Don't set to 1000 "just in case" - this hides errors
### Step Limit Error
If your pipeline exceeds the step limit, you'll see:
```
Error: Step limit reached (25 steps)
Pipeline execution stopped to prevent endless loop
```
### Why Step Limit Exists
Step limits prevent endless loops that can:
* **Waste tokens**: Endless loops consume API tokens continuously
* **Increase costs**: More tokens = higher costs
* **Cause data issues**: May create duplicate records in Confluence, JIRA, or other systems
* **Lose data**: Failed loops may partially complete, leaving inconsistent state
### How to Set Step Limit
**For Agents:**
1. Open your Agent configuration
2. Scroll to **Advanced** section
3. Set **Step limit** to your expected number of iterations + buffer
**For Pipelines:**
1. Open your Pipeline in Flow Editor
2. Go to **Advanced Settings**
3. Set **Step limit** to your expected loop iterations + overhead
### Calculating Step Limit
**Formula:**
```
Step Limit = (Number of Items × Steps per Iteration) + Overhead + Safety Buffer
```
**Example 1: Simple Loop (3 items)**
* Items to process: 3
* Steps per iteration: 4 (GetItem → Process → Increment → Check)
* Overhead: 1 (Initialize)
* Safety buffer: 5
* **Total: 3 × 4 + 1 + 5 = 18**
**Example 2: Complex Loop (10 items)**
* Items to process: 10
* Steps per iteration: 6 (GetItem → Process → Aggregate → Increment → Check → ExtractData)
* Overhead: 2 (Initialize + Finalize)
* Safety buffer: 10
* **Total: 10 × 6 + 2 + 10 = 72**
- **Start conservative**: Set limit close to calculated value, not excessively high
- **Add buffer**: Always add 20-30% buffer for unexpected iterations
- **Test first**: Run with 2-3 items before full dataset
- **Monitor execution**: Check how many steps actually used
- **Avoid large values**: Don't set to 1000 "just in case" - this hides errors
### Step Limit Error
If your pipeline exceeds the step limit, you'll see:
```
Error: Step limit reached (25 steps)
Pipeline execution stopped to prevent endless loop
```
 **What to do:**
1. Check if loop logic is correct (Router condition, increment, etc.)
2. Verify you're not in an endless loop
3. If loop is correct, increase step limit appropriately
4. Re-run the pipeline
### When to Use LLM Instead of Loops
For **small iterations** (5-10 items or less), consider using an **LLM node or Agent** instead of manual loops:
**Use LLM/Agent when:**
* Processing fewer than 10 items
* Items can be processed in a single prompt
* You need intelligent interpretation of results
* Data fits within token limits
**Example:**
```yaml theme={null}
- id: ProcessAllItems
type: llm
input_mapping:
system:
type: fixed
value: |
Process the following list of items and return results for each:
{items_list}
task:
type: variable
value: items_list
```
**Benefits:**
* ✔️ Simpler pipeline (no loop logic needed)
* ✔️ Fewer steps (stays within default 25 limit)
* ✔️ LLM can process batch intelligently
* ✘ Limited by token context window
* ✘ All items must fit in one prompt
***
## Step-by-Step Migration Guide
### Step 1: Identify Your Loop Requirements
Answer these questions about your existing Loop node:
1. What list of items needs processing?
2. What should happen to each item?
3. Do you need to save results?
### Step 2: Build the Loop Pattern
Use the simple pattern from Example 1:
1. **Initialize**: Create your list
2. **Get Item**: Extract current item
3. **Process**: Do something with the item
4. **Increment**: Move to next item
5. **Check**: Are we done? If no, loop back
### Step 3: Test Your Loop
1. Start with just 2-3 items
2. Run the pipeline
3. Check that all items were processed
4. Verify results are correct
***
## Common Loop Patterns
### Pattern 1: Process Each Item
Simply process items without saving results.
**Example**: Send notifications, update records
```
Initialize → Get Item → Process → Increment → Check → [Loop or END]
```
### Pattern 2: Collect Results
Process items and save all results.
**Example**: Generate reports, validate data
```
Initialize → Get Item → Process → Save Result → Increment → Check → [Loop or Summary]
```
***
## Troubleshooting
### Error: Step Limit Reached
**Problem**: Pipeline stops with "Step limit reached (25 steps)" error
**Solution**:
1. **Check if endless loop**: Review Router condition and increment logic
2. **Calculate required steps**: Count items × steps per iteration
3. **Increase step limit**: Go to Advanced settings and increase the value
4. **Add safety buffer**: Set limit 20-30% higher than calculated
5. **Test with small data**: Verify loop works with 2-3 items first
**Example:** If processing 10 items with 5 steps each = 50 steps needed → Set limit to 65-70
### Loop Never Stops
**Problem**: Pipeline keeps running forever
**Solution**:
* Check that index increases each time (Step 4: Increment)
* Verify Router condition: `{% if index >= (items_list | length) %}`
* Add safety limit: `{% if index >= 100 %}`
### Error: List Index Out of Range
**Problem**: Can't access item at index
**Solution**:
* Start index at `0`, not `1`
* Make sure list has items before accessing
* Check Router exits before invalid index
### Only Last Result Shows
**Problem**: Previous results disappear
**Solution**:
* Initialize result variable as empty: `value: ''` or `value: []`
* Use correct template: `{{ existing + new }}` (not just `{{ new }}`)
***
## Frequently Asked Questions
### Why was the Loop node removed?
Loop nodes hid too much complexity. Manual loops make it clear what's happening at each step, making pipelines easier to understand and fix.
### Can I still use my old pipelines?
Yes. Existing Loop nodes will keep working. But we recommend updating to the new pattern for better control and future compatibility.
### What is the step limit and why does it matter?
Every pipeline has a **step limit (default: 25)** to prevent endless loops. When creating loops:
* You must increase the step limit to match your iterations
* Calculate: (items × steps per item) + overhead + buffer
* Set it close to real values - don't use 1000 "just in case"
* Mistakes in loop logic can cause endless loops that waste tokens and may corrupt external data
### Should I use a loop or an LLM for small datasets?
**For 5-10 items or less**, consider using an **LLM node or Agent** instead:
* Simpler pipeline (no loop needed)
* Stays within default 25 step limit
* LLM can process batch in one call
* Example: "Process these 5 items and return results" as a single LLM prompt
**For more than 10 items**, use manual loop pattern with increased step limit.
### Which node creates the list?
* **Code Node**: When reading files, calling APIs, or transforming data
* **LLM Node**: When AI needs to generate the list
### Can I stop the loop early?
Yes. Add a condition to your Router:
```yaml theme={null}
- id: CheckIfDone
type: router
condition: |-
{% if found_what_i_need or index >= (items_list | length) %}
END
{% else %}
GetItem
{% endif %}
```
### How do I handle errors?
Wrap processing in try/catch using Code node:
```yaml theme={null}
- id: ProcessItem
type: code
code:
value: |-
try:
# Your logic here
result = {"success": True}
except Exception as e:
result = {"success": False, "error": str(e)}
result
```
### Where can I learn more?
* **Router Node**: [Router Documentation](../../how-tos/pipelines/nodes/control-flow-nodes#router-node)
* **State Modifier**: [State Modifier Documentation](../../how-tos/pipelines/nodes/utility-nodes#state-modifier-node)
* **Code Node**: [Code Node Documentation](../../how-tos/pipelines/nodes/execution-nodes#code-node)
* **All Nodes**: [Nodes Overview](../../how-tos/pipelines/nodes/overview)
**What to do:**
1. Check if loop logic is correct (Router condition, increment, etc.)
2. Verify you're not in an endless loop
3. If loop is correct, increase step limit appropriately
4. Re-run the pipeline
### When to Use LLM Instead of Loops
For **small iterations** (5-10 items or less), consider using an **LLM node or Agent** instead of manual loops:
**Use LLM/Agent when:**
* Processing fewer than 10 items
* Items can be processed in a single prompt
* You need intelligent interpretation of results
* Data fits within token limits
**Example:**
```yaml theme={null}
- id: ProcessAllItems
type: llm
input_mapping:
system:
type: fixed
value: |
Process the following list of items and return results for each:
{items_list}
task:
type: variable
value: items_list
```
**Benefits:**
* ✔️ Simpler pipeline (no loop logic needed)
* ✔️ Fewer steps (stays within default 25 limit)
* ✔️ LLM can process batch intelligently
* ✘ Limited by token context window
* ✘ All items must fit in one prompt
***
## Step-by-Step Migration Guide
### Step 1: Identify Your Loop Requirements
Answer these questions about your existing Loop node:
1. What list of items needs processing?
2. What should happen to each item?
3. Do you need to save results?
### Step 2: Build the Loop Pattern
Use the simple pattern from Example 1:
1. **Initialize**: Create your list
2. **Get Item**: Extract current item
3. **Process**: Do something with the item
4. **Increment**: Move to next item
5. **Check**: Are we done? If no, loop back
### Step 3: Test Your Loop
1. Start with just 2-3 items
2. Run the pipeline
3. Check that all items were processed
4. Verify results are correct
***
## Common Loop Patterns
### Pattern 1: Process Each Item
Simply process items without saving results.
**Example**: Send notifications, update records
```
Initialize → Get Item → Process → Increment → Check → [Loop or END]
```
### Pattern 2: Collect Results
Process items and save all results.
**Example**: Generate reports, validate data
```
Initialize → Get Item → Process → Save Result → Increment → Check → [Loop or Summary]
```
***
## Troubleshooting
### Error: Step Limit Reached
**Problem**: Pipeline stops with "Step limit reached (25 steps)" error
**Solution**:
1. **Check if endless loop**: Review Router condition and increment logic
2. **Calculate required steps**: Count items × steps per iteration
3. **Increase step limit**: Go to Advanced settings and increase the value
4. **Add safety buffer**: Set limit 20-30% higher than calculated
5. **Test with small data**: Verify loop works with 2-3 items first
**Example:** If processing 10 items with 5 steps each = 50 steps needed → Set limit to 65-70
### Loop Never Stops
**Problem**: Pipeline keeps running forever
**Solution**:
* Check that index increases each time (Step 4: Increment)
* Verify Router condition: `{% if index >= (items_list | length) %}`
* Add safety limit: `{% if index >= 100 %}`
### Error: List Index Out of Range
**Problem**: Can't access item at index
**Solution**:
* Start index at `0`, not `1`
* Make sure list has items before accessing
* Check Router exits before invalid index
### Only Last Result Shows
**Problem**: Previous results disappear
**Solution**:
* Initialize result variable as empty: `value: ''` or `value: []`
* Use correct template: `{{ existing + new }}` (not just `{{ new }}`)
***
## Frequently Asked Questions
### Why was the Loop node removed?
Loop nodes hid too much complexity. Manual loops make it clear what's happening at each step, making pipelines easier to understand and fix.
### Can I still use my old pipelines?
Yes. Existing Loop nodes will keep working. But we recommend updating to the new pattern for better control and future compatibility.
### What is the step limit and why does it matter?
Every pipeline has a **step limit (default: 25)** to prevent endless loops. When creating loops:
* You must increase the step limit to match your iterations
* Calculate: (items × steps per item) + overhead + buffer
* Set it close to real values - don't use 1000 "just in case"
* Mistakes in loop logic can cause endless loops that waste tokens and may corrupt external data
### Should I use a loop or an LLM for small datasets?
**For 5-10 items or less**, consider using an **LLM node or Agent** instead:
* Simpler pipeline (no loop needed)
* Stays within default 25 step limit
* LLM can process batch in one call
* Example: "Process these 5 items and return results" as a single LLM prompt
**For more than 10 items**, use manual loop pattern with increased step limit.
### Which node creates the list?
* **Code Node**: When reading files, calling APIs, or transforming data
* **LLM Node**: When AI needs to generate the list
### Can I stop the loop early?
Yes. Add a condition to your Router:
```yaml theme={null}
- id: CheckIfDone
type: router
condition: |-
{% if found_what_i_need or index >= (items_list | length) %}
END
{% else %}
GetItem
{% endif %}
```
### How do I handle errors?
Wrap processing in try/catch using Code node:
```yaml theme={null}
- id: ProcessItem
type: code
code:
value: |-
try:
# Your logic here
result = {"success": True}
except Exception as e:
result = {"success": False, "error": str(e)}
result
```
### Where can I learn more?
* **Router Node**: [Router Documentation](../../how-tos/pipelines/nodes/control-flow-nodes#router-node)
* **State Modifier**: [State Modifier Documentation](../../how-tos/pipelines/nodes/utility-nodes#state-modifier-node)
* **Code Node**: [Code Node Documentation](../../how-tos/pipelines/nodes/execution-nodes#code-node)
* **All Nodes**: [Nodes Overview](../../how-tos/pipelines/nodes/overview)