> ## Documentation Index
> Fetch the complete documentation index at: https://docs.elitea.ai/llms.txt
> Use this file to discover all available pages before exploring further.
# AI Configuration
> The AI Configuration section provides comprehensive management of all models — AI models, embedding models, image generation models, voice recognition and text-to-speech models — used in your project environment as well as your default vector storage.
The available settings and configurations may vary depending on the selected project. Select the project in the project switcher to access its specific configurations.
***
## Accessing AI Configuration
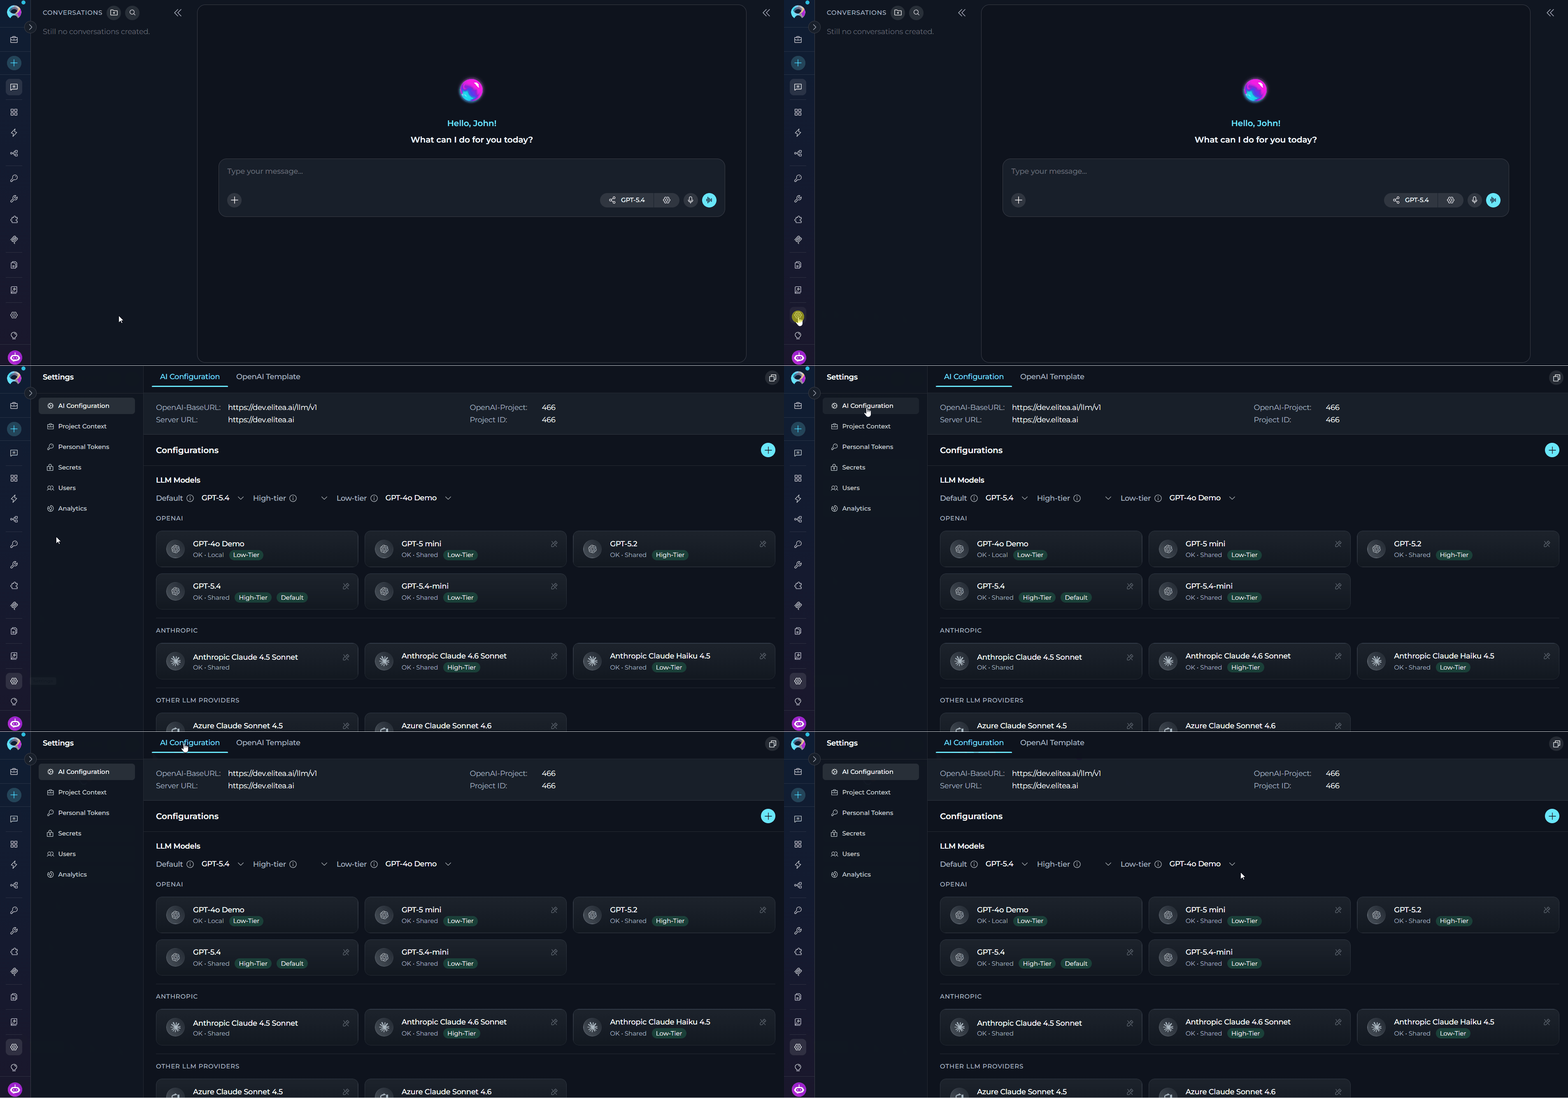
To find the AI Configurations, follow these steps:
1. Click on the **Settings** icon in the main navigation sidebar.
2. Select **AI Configuration** from the settings menu.
3. The AI Configuration interface will display with two tabs available:
* **AI Configuration** - Configurations management
* **OpenAI Template** - Code examples and templates
 ***
## AI Configuration Tab
### Server Configuration Fields
The top section displays essential server and project information with click-to-copy functionality:
***
## AI Configuration Tab
### Server Configuration Fields
The top section displays essential server and project information with click-to-copy functionality:
 | Field | Description |
| ------------------ | ---------------------------------------------------------------------------------------- |
| **OpenAI-BaseURL** | The API endpoint URL for OpenAI-compatible services (formatted as `{server_url}/llm/v2`) |
| **OpenAI-Project** | The project identifier used for OpenAI API compatibility |
| **Server URL** | The base server URL for your ELITEA instance |
| **Project ID** | The unique identifier for your current project |
* **Click to Copy** - Click any field value to copy it to your clipboard
* **Copy All** - Use the copy icon in the top-right corner to copy all configuration details at once
***
## Configurations
Here you can find all the available models and storages organized by their type. Click the **+** button in the header to add a new model or configuration.
### LLM Models
| Field | Description |
| ------------------ | ---------------------------------------------------------------------------------------- |
| **OpenAI-BaseURL** | The API endpoint URL for OpenAI-compatible services (formatted as `{server_url}/llm/v2`) |
| **OpenAI-Project** | The project identifier used for OpenAI API compatibility |
| **Server URL** | The base server URL for your ELITEA instance |
| **Project ID** | The unique identifier for your current project |
* **Click to Copy** - Click any field value to copy it to your clipboard
* **Copy All** - Use the copy icon in the top-right corner to copy all configuration details at once
***
## Configurations
Here you can find all the available models and storages organized by their type. Click the **+** button in the header to add a new model or configuration.
### LLM Models
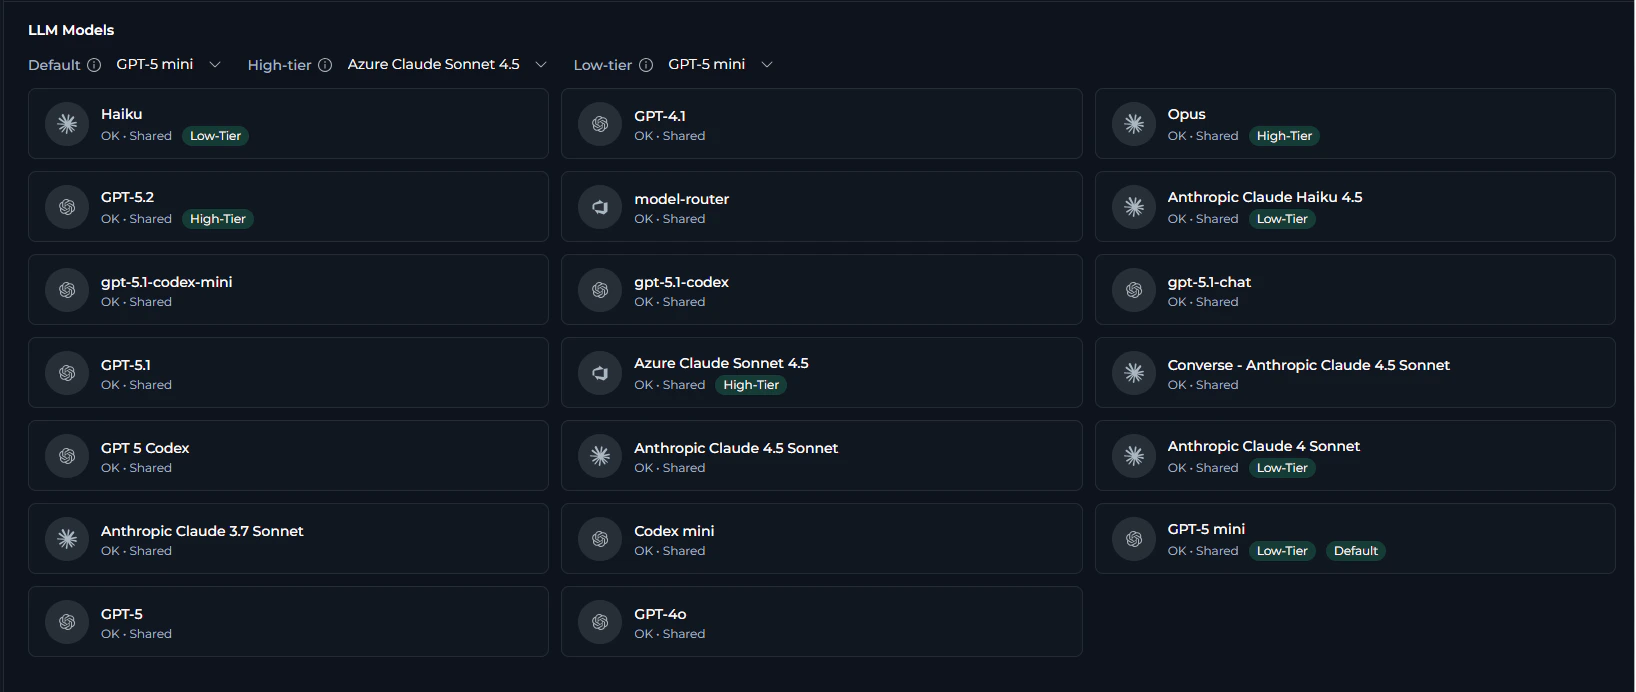 Displays configured Large Language Model providers and their models.
**Default Model Settings:**
| Setting | Description | Examples |
| --------------- | ------------------------------------------------------------------------------------------------------- | --------------------------------------------------------------- |
| **Default** ⓘ | Used for most activities by default. Start here; switch to Low-tier or High-tier when needed | General purpose models |
| **High-tier** ⓘ | More capable (and more expensive) models for complex workflows (multi-step reasoning, heavy tool usage) | Anthropic Sonnet 4.5/Opus, OpenAI GPT-5.2, Google Gemini 3 Pro |
| **Low-tier** ⓘ | Cheaper/faster models for routine tasks (diagram fixing, formatting, simple edits) | GPT mini from OpenAI, Gemini Flash from Google, Anthropic Haiku |
Each LLM configuration displays:
* **Icon** - Visual indicator of the provider (OpenAI, Azure, Vertex AI, Claude, Amazon Bedrock, Ollama, HuggingFace, AI Dial, etc.)
* **Model Name** - Display name of the configured model
* **Status Indicator** - Shows "OK • Shared" or "OK • Local" depending on sharing status
* **Tier Badges** - If applicable, displays "High-Tier", "Low-Tier", or "Default" badge
* **Click to Edit** - Click on any card to view or edit configuration details (if permissions allow)
To add a new LLM model:
1. Ensure that its credentials exist. If necessary, create AI credentials for your provider (see [AI Credentials](#ai-credentials))
2. Click the **+** button in the section header or the main sidebar
3. Choose **LLM Model** from the available configuration types
4. Fill all the required fields:
| Field | Description |
| ---------------------- | ----------------------------------------------------------------------------------------------- |
| **Display name** | Enter a friendly name for the model (e.g., "GPT-4o Production") |
| **ID**\* | Auto-populated from the *Display Name* |
| **Name** | Enter the exact model identifier from the provider (e.g., "gpt-4o", "claude-3-sonnet-20240229") |
| **Context window** | Specify the maximum context window size in tokens (e.g., 128000) |
| **Max output tokens** | Set the maximum output token limit (e.g., 16000) |
| **Supports reasoning** | Enable if the model supports reasoning capabilities (e.g., for GPT-5.1 o3-mini) |
| **Supports vision** | Enable if the model can process and understand images |
| **Low tier** | Mark this model as suitable for routine, cost-effective tasks |
| **High tier** | Mark this model as suitable for complex workflows requiring advanced capabilities |
| **Openai Compatible** | Mark this model as compatible with OpenAI's API |
| **Credentials** | Select the AI credential configuration from the dropdown |
5. Click **Save** to add the model. After this, the new model will appear in the *LLM Models* section.
Displays configured Large Language Model providers and their models.
**Default Model Settings:**
| Setting | Description | Examples |
| --------------- | ------------------------------------------------------------------------------------------------------- | --------------------------------------------------------------- |
| **Default** ⓘ | Used for most activities by default. Start here; switch to Low-tier or High-tier when needed | General purpose models |
| **High-tier** ⓘ | More capable (and more expensive) models for complex workflows (multi-step reasoning, heavy tool usage) | Anthropic Sonnet 4.5/Opus, OpenAI GPT-5.2, Google Gemini 3 Pro |
| **Low-tier** ⓘ | Cheaper/faster models for routine tasks (diagram fixing, formatting, simple edits) | GPT mini from OpenAI, Gemini Flash from Google, Anthropic Haiku |
Each LLM configuration displays:
* **Icon** - Visual indicator of the provider (OpenAI, Azure, Vertex AI, Claude, Amazon Bedrock, Ollama, HuggingFace, AI Dial, etc.)
* **Model Name** - Display name of the configured model
* **Status Indicator** - Shows "OK • Shared" or "OK • Local" depending on sharing status
* **Tier Badges** - If applicable, displays "High-Tier", "Low-Tier", or "Default" badge
* **Click to Edit** - Click on any card to view or edit configuration details (if permissions allow)
To add a new LLM model:
1. Ensure that its credentials exist. If necessary, create AI credentials for your provider (see [AI Credentials](#ai-credentials))
2. Click the **+** button in the section header or the main sidebar
3. Choose **LLM Model** from the available configuration types
4. Fill all the required fields:
| Field | Description |
| ---------------------- | ----------------------------------------------------------------------------------------------- |
| **Display name** | Enter a friendly name for the model (e.g., "GPT-4o Production") |
| **ID**\* | Auto-populated from the *Display Name* |
| **Name** | Enter the exact model identifier from the provider (e.g., "gpt-4o", "claude-3-sonnet-20240229") |
| **Context window** | Specify the maximum context window size in tokens (e.g., 128000) |
| **Max output tokens** | Set the maximum output token limit (e.g., 16000) |
| **Supports reasoning** | Enable if the model supports reasoning capabilities (e.g., for GPT-5.1 o3-mini) |
| **Supports vision** | Enable if the model can process and understand images |
| **Low tier** | Mark this model as suitable for routine, cost-effective tasks |
| **High tier** | Mark this model as suitable for complex workflows requiring advanced capabilities |
| **Openai Compatible** | Mark this model as compatible with OpenAI's API |
| **Credentials** | Select the AI credential configuration from the dropdown |
5. Click **Save** to add the model. After this, the new model will appear in the *LLM Models* section.
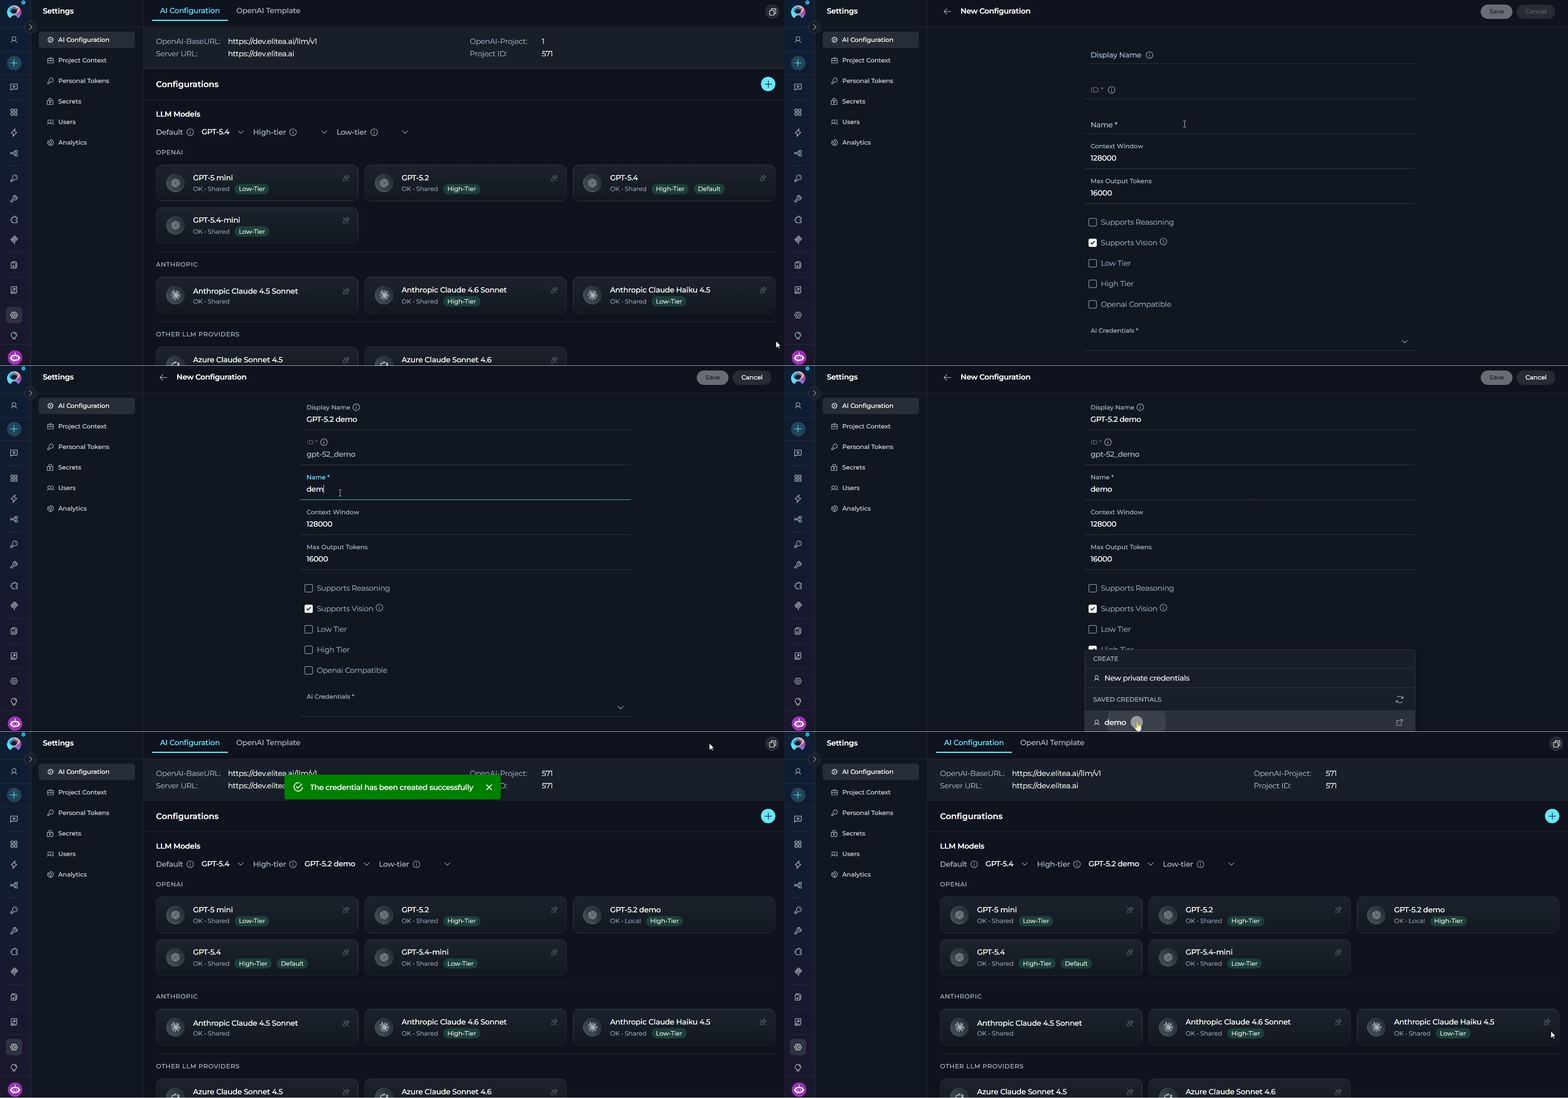 You can select the newly added model as the default one using the dropdowns in the section header.
If you mark the LLM model as *Low-tier* or *High-tier*, it will be preselected in the corresponding dropdown.
The model name must exactly match the provider's identifier. Refer to your provider's documentation:
* **OpenAI**: [Model names](https://platform.openai.com/docs/models)
* **Anthropic**: [Claude models](https://docs.anthropic.com/claude/docs/models-overview)
* **Azure OpenAI**: Deployment name from your Azure portal
* **Vertex AI**: Model names from Google Cloud console
### Embedding Models
You can select the newly added model as the default one using the dropdowns in the section header.
If you mark the LLM model as *Low-tier* or *High-tier*, it will be preselected in the corresponding dropdown.
The model name must exactly match the provider's identifier. Refer to your provider's documentation:
* **OpenAI**: [Model names](https://platform.openai.com/docs/models)
* **Anthropic**: [Claude models](https://docs.anthropic.com/claude/docs/models-overview)
* **Azure OpenAI**: Deployment name from your Azure portal
* **Vertex AI**: Model names from Google Cloud console
### Embedding Models
 Embedding models convert text into numerical vector representations (embeddings) that capture semantic meaning. These vectors enable similarity comparisons, semantic search, and retrieval-augmented generation (RAG) workflows. Embedding models are essential for features like document indexing, knowledge base search, and context retrieval.
**Default embedding model** generates embeddings (vectors) used for indexing and semantic search (RAG). Affects retrieval quality and performance.
Each embedding model configuration displays:
* **Icon** - Visual indicator of the provider (OpenAI, Azure, HuggingFace, etc.)
* **Model Name** - Display name of the configured embedding model
* **Status Indicator** - Shows "OK • Shared" or "OK • Local" depending on sharing status
* **Click to Edit** - Click on any card to view or edit configuration details (if permissions allow)
To add a new embedding model:
1. Ensure that its credentials exist. If necessary, create AI credentials for your provider (see [AI Credentials](#ai-credentials))
2. Click the **+** button in the section header or the main sidebar
3. Choose **Embedding Model** from the available configuration types
4. Fill all the required fields:
| Field | Description |
| ---------------- | ------------------------------------------------------------------------------------------- |
| **Display Name** | Enter a descriptive name (e.g., "OpenAI Embeddings Large") |
| **ID**\* | Auto-populated from the Display Name |
| **Name**\* | Enter the exact model identifier (e.g., "text-embedding-3-large", "text-embedding-ada-002") |
| **Credentials** | Select credentials from the dropdown |
5. Click **Save** to add the model. After this, the new model will beavailable for selecting
Embedding models convert text into numerical vector representations (embeddings) that capture semantic meaning. These vectors enable similarity comparisons, semantic search, and retrieval-augmented generation (RAG) workflows. Embedding models are essential for features like document indexing, knowledge base search, and context retrieval.
**Default embedding model** generates embeddings (vectors) used for indexing and semantic search (RAG). Affects retrieval quality and performance.
Each embedding model configuration displays:
* **Icon** - Visual indicator of the provider (OpenAI, Azure, HuggingFace, etc.)
* **Model Name** - Display name of the configured embedding model
* **Status Indicator** - Shows "OK • Shared" or "OK • Local" depending on sharing status
* **Click to Edit** - Click on any card to view or edit configuration details (if permissions allow)
To add a new embedding model:
1. Ensure that its credentials exist. If necessary, create AI credentials for your provider (see [AI Credentials](#ai-credentials))
2. Click the **+** button in the section header or the main sidebar
3. Choose **Embedding Model** from the available configuration types
4. Fill all the required fields:
| Field | Description |
| ---------------- | ------------------------------------------------------------------------------------------- |
| **Display Name** | Enter a descriptive name (e.g., "OpenAI Embeddings Large") |
| **ID**\* | Auto-populated from the Display Name |
| **Name**\* | Enter the exact model identifier (e.g., "text-embedding-3-large", "text-embedding-ada-002") |
| **Credentials** | Select credentials from the dropdown |
5. Click **Save** to add the model. After this, the new model will beavailable for selecting
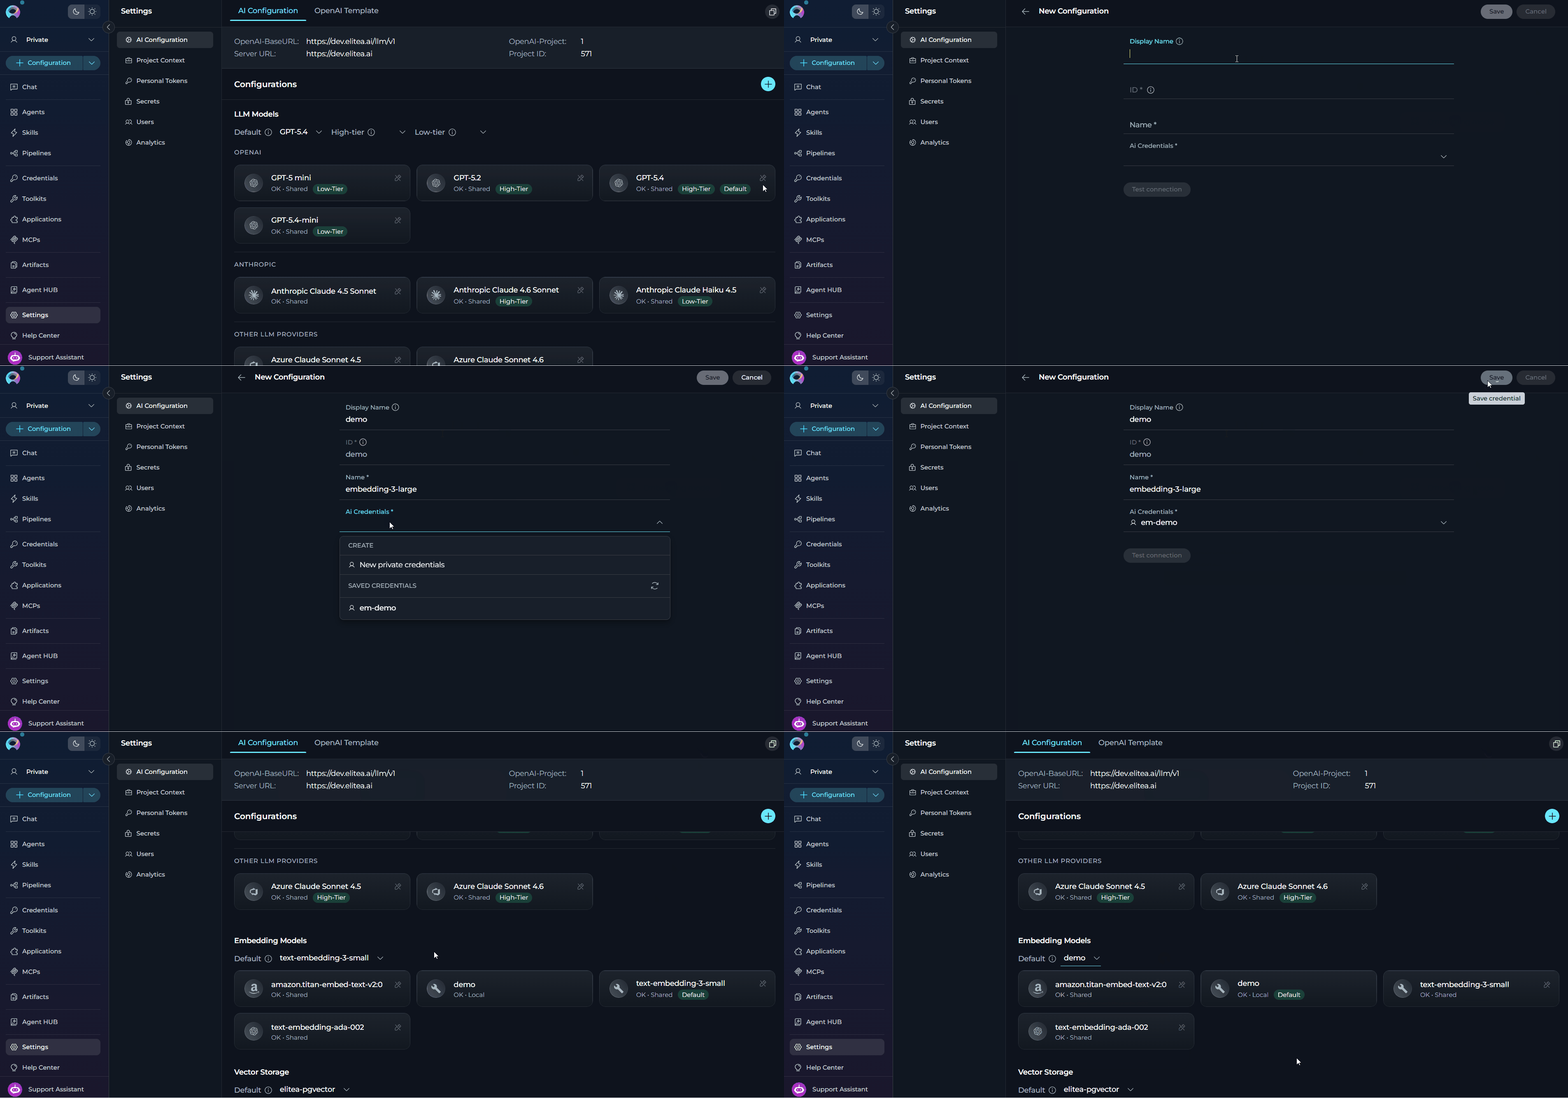 You can select the newly added model as the default one for RAG operations using the dropdowns in the section header.
* **OpenAI**: text-embedding-3-large (3072 dims), text-embedding-3-small (1536 dims), text-embedding-ada-002 (1536 dims)
* **Azure OpenAI**: Same models as OpenAI, use your Azure deployment name
* **HuggingFace**: sentence-transformers/all-MiniLM-L6-v2 (384 dims), BAAI/bge-large-en-v1.5 (1024 dims)
* **Vertex AI**: textembedding-gecko\@003 (768 dims)
### Vector Storage
You can select the newly added model as the default one for RAG operations using the dropdowns in the section header.
* **OpenAI**: text-embedding-3-large (3072 dims), text-embedding-3-small (1536 dims), text-embedding-ada-002 (1536 dims)
* **Azure OpenAI**: Same models as OpenAI, use your Azure deployment name
* **HuggingFace**: sentence-transformers/all-MiniLM-L6-v2 (384 dims), BAAI/bge-large-en-v1.5 (1024 dims)
* **Vertex AI**: textembedding-gecko\@003 (768 dims)
### Vector Storage
 Vector storage systems (vector databases) store and manage embedding vectors generated by embedding models. These specialized databases enable efficient similarity searches across large collections of embeddings, supporting features like semantic search, document retrieval, and knowledge base queries. Vector databases optimize storage and retrieval of high-dimensional vector data.
**Default vector storage** specifies where embeddings are stored for search or retrieval. Choose based on persistence and scale requirements
Each vector storage configuration displays:
* **Icon** - Visual indicator of the provider (PGVector, Chroma, etc.)
* **Storage Name** - Display name of the configured vector storage
* **Status Indicator** - Shows "OK • Shared" or "OK • Local" depending on sharing status
* **Click to Edit** - Click on any card to view or edit configuration details (if permissions allow)
To create a new vector storage configuration:
1. Click **+** button in the section header or the main sidebar
2. Choose **PGVector** from the available configuration types
3. Fill all the required fields:
| Field | Description |
| --------------------- | ------------------------------------------------------ |
| **Display Name** | Enter a descriptive name (e.g., "Production PGVector") |
| **ID**\* | Auto-populated from the Display Name |
| **Connection String** | PostgreSQL connection string |
4. Click **Save** to add the storage configuration
Vector storage systems (vector databases) store and manage embedding vectors generated by embedding models. These specialized databases enable efficient similarity searches across large collections of embeddings, supporting features like semantic search, document retrieval, and knowledge base queries. Vector databases optimize storage and retrieval of high-dimensional vector data.
**Default vector storage** specifies where embeddings are stored for search or retrieval. Choose based on persistence and scale requirements
Each vector storage configuration displays:
* **Icon** - Visual indicator of the provider (PGVector, Chroma, etc.)
* **Storage Name** - Display name of the configured vector storage
* **Status Indicator** - Shows "OK • Shared" or "OK • Local" depending on sharing status
* **Click to Edit** - Click on any card to view or edit configuration details (if permissions allow)
To create a new vector storage configuration:
1. Click **+** button in the section header or the main sidebar
2. Choose **PGVector** from the available configuration types
3. Fill all the required fields:
| Field | Description |
| --------------------- | ------------------------------------------------------ |
| **Display Name** | Enter a descriptive name (e.g., "Production PGVector") |
| **ID**\* | Auto-populated from the Display Name |
| **Connection String** | PostgreSQL connection string |
4. Click **Save** to add the storage configuration
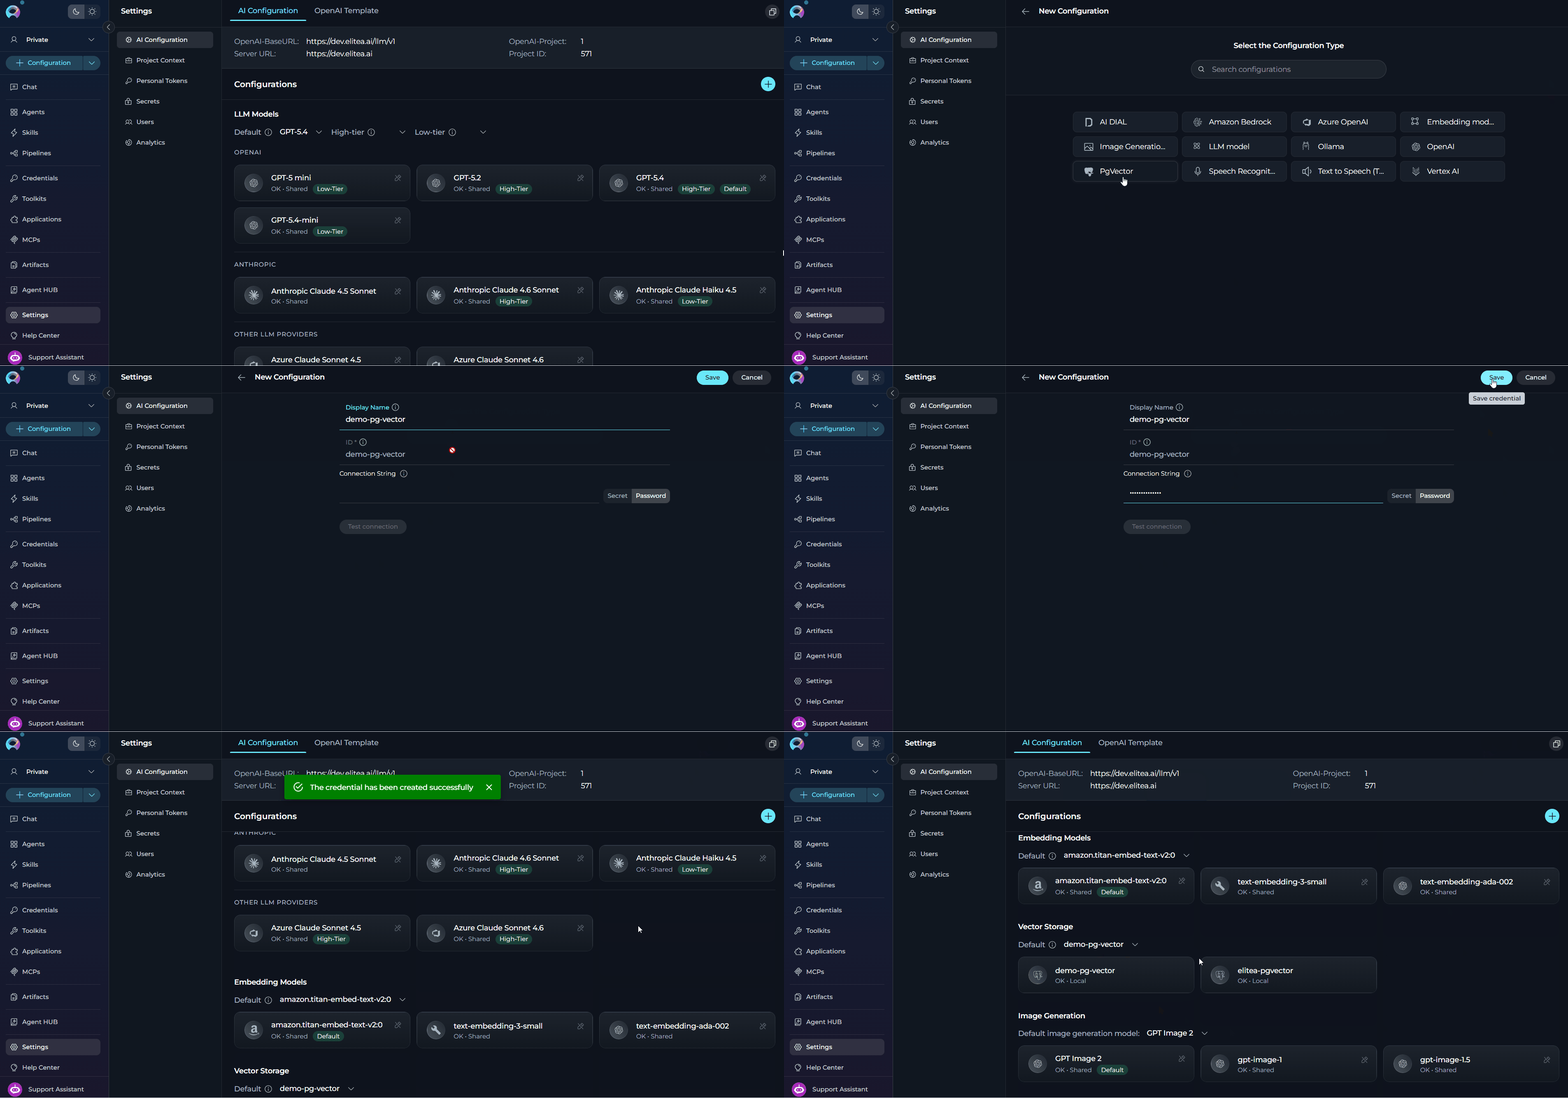 You can select the newly added storage configuration as the default one using the dropdowns in the section header.
For PGVector configurations, ensure the PostgreSQL database has the `pgvector` extension installed:
```sql theme={null}
CREATE EXTENSION IF NOT EXISTS vector;
```
### Image Generation
You can select the newly added storage configuration as the default one using the dropdowns in the section header.
For PGVector configurations, ensure the PostgreSQL database has the `pgvector` extension installed:
```sql theme={null}
CREATE EXTENSION IF NOT EXISTS vector;
```
### Image Generation
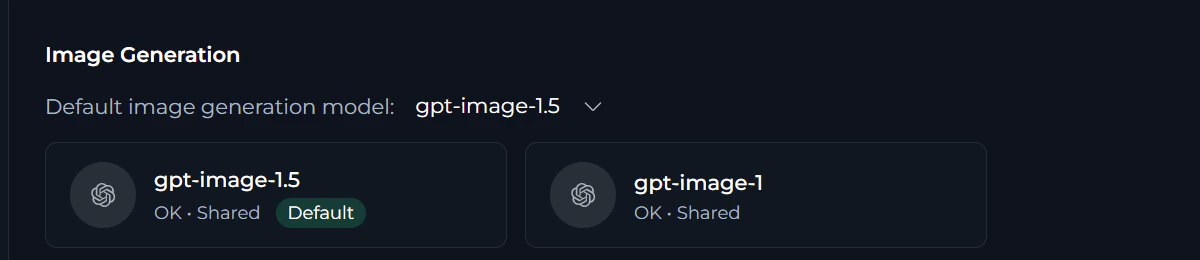 Image generation models create images from text descriptions (text-to-image) or modify existing images based on prompts. These AI models enable creative workflows, visual content creation, and automated image production based on natural language instructions.
**Default image generation model** Select the default model for image generation tasks
Each image generation model configuration displays:
* **Icon** - Visual indicator of the provider (OpenAI DALL-E, Azure, etc.)
* **Model Name** - Display name of the configured image generation model
* **Status Indicator** - Shows "OK • Shared" or "OK • Local" depending on sharing status
* **Click to Edit** - Click on any card to view or edit configuration details (if permissions allow)
To add a new image generation model:
1. Ensure that its credentials exist. If necessary, create AI credentials for your provider (see [AI Credentials](#ai-credentials))
2. Click the **+** button in the section header or the main sidebar
3. Choose **Image Generation Model** from the available configuration types
4. Fill all the required fields:
| Field | Description |
| ---------------- | --------------------------------------------------------------- |
| **Display Name** | Enter a descriptive name (e.g., "DALL-E 3 Standard") |
| **ID**\* | Auto-populated from the Display Name |
| **Name**\* | Enter the exact model identifier (e.g., "dall-e-3", "dall-e-2") |
| **Credentials** | Select the appropriate AI credential from the dropdown |
5. Click **Save** to add the model. After this, the new model will be available for the image generation.
Image generation models create images from text descriptions (text-to-image) or modify existing images based on prompts. These AI models enable creative workflows, visual content creation, and automated image production based on natural language instructions.
**Default image generation model** Select the default model for image generation tasks
Each image generation model configuration displays:
* **Icon** - Visual indicator of the provider (OpenAI DALL-E, Azure, etc.)
* **Model Name** - Display name of the configured image generation model
* **Status Indicator** - Shows "OK • Shared" or "OK • Local" depending on sharing status
* **Click to Edit** - Click on any card to view or edit configuration details (if permissions allow)
To add a new image generation model:
1. Ensure that its credentials exist. If necessary, create AI credentials for your provider (see [AI Credentials](#ai-credentials))
2. Click the **+** button in the section header or the main sidebar
3. Choose **Image Generation Model** from the available configuration types
4. Fill all the required fields:
| Field | Description |
| ---------------- | --------------------------------------------------------------- |
| **Display Name** | Enter a descriptive name (e.g., "DALL-E 3 Standard") |
| **ID**\* | Auto-populated from the Display Name |
| **Name**\* | Enter the exact model identifier (e.g., "dall-e-3", "dall-e-2") |
| **Credentials** | Select the appropriate AI credential from the dropdown |
5. Click **Save** to add the model. After this, the new model will be available for the image generation.
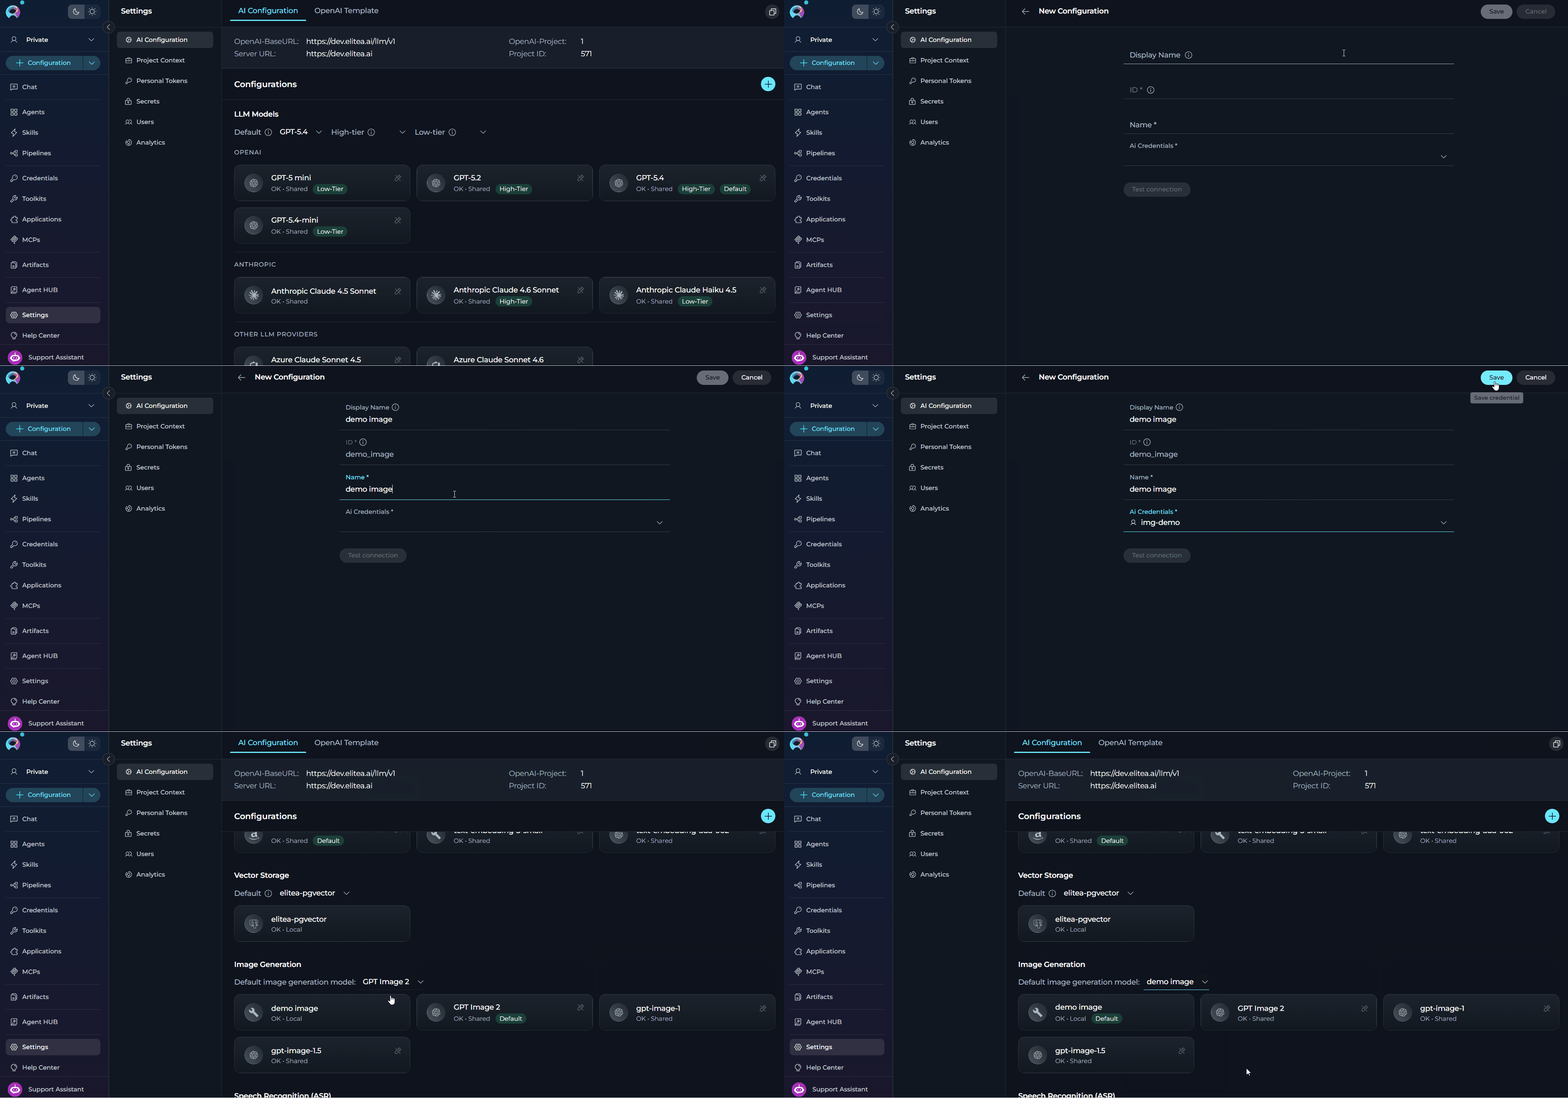 You can select the newly added model as the default one using the dropdowns in the section header.
* **OpenAI DALL-E 3**: High-quality image generation with text rendering capabilities
* **OpenAI DALL-E 2**: Fast image generation with good quality
* **Azure OpenAI**: DALL-E models through Azure endpoints
* **Other Providers**: Stability AI, Midjourney (if configured)
### Speech Recognition (ASR)
You can select the newly added model as the default one using the dropdowns in the section header.
* **OpenAI DALL-E 3**: High-quality image generation with text rendering capabilities
* **OpenAI DALL-E 2**: Fast image generation with good quality
* **Azure OpenAI**: DALL-E models through Azure endpoints
* **Other Providers**: Stability AI, Midjourney (if configured)
### Speech Recognition (ASR)
 Speech Recognition (ASR) models convert spoken audio into text. A configured ASR model powers the server-side **Voice Input** feature in Chat, Agents, and Pipelines — providing real-time transcription as users speak. When no ASR model is configured, Voice Input falls back to the browser's built-in Web Speech API. If neither is available, the microphone icon is hidden.
**Default ASR model** specifies the default model used for server-side voice transcription across Chat, Agents, and Pipelines.
**ASR Model Types**
ELITEA determines the transcription mode automatically based on the model name:
| Model Type | Name Pattern | Behavior |
| ------------------------ | ------------------------------------------------------------------------------------- | ----------------------------------------------------------------------------------------------------- |
| **Streaming (Realtime)** | Names that do **not** include `whisper` or `transcribe` | Low-latency streaming via OpenAI Realtime API; interim transcript results appear in real time |
| **Batch (Whisper)** | Names that include `whisper` or `transcribe` (e.g., `whisper-1`, `gpt-4o-transcribe`) | Batch HTTP transcription; audio is buffered and sent in chunks, transcript delivered after processing |
Each ASR configuration card displays:
* **Icon** — Visual indicator of the provider
* **Model Name** — Display name of the configured ASR model
* **Status Indicator** — Shows "OK • Shared" or "OK • Local" depending on sharing status
* **Click to Edit** — Click on any card to view or edit configuration details (if permissions allow)
To add a new ASR model:
1. Ensure that its credentials exist. If necessary, create AI credentials for your provider (see [AI Credentials](#ai-credentials))
2. Click the **+** button in the section header or the main sidebar
3. Choose **Speech Recognition (ASR)** from the available configuration types
4. Fill all the required fields:
| Field | Description |
| ---------------- | ------------------------------------------------------------------------------------------------------------------------------------------------------------------------------------------------------------------------ |
| **Display Name** | Enter a descriptive name (e.g., "OpenAI Whisper", "Realtime Transcription") |
| **ID\*** | Auto-populated from the Display Name |
| **Name\*** | Enter the exact model identifier from the provider (e.g., `whisper-1`, `gpt-4o-transcribe`). Names containing `whisper` or `transcribe` are treated as batch models; all others are treated as streaming/Realtime models |
| **Credentials** | Select the AI credential configuration from the dropdown |
5. Click **Save** to add the model. After this, the new model will appear in the *Speech Recognition (ASR)* section.
Speech Recognition (ASR) models convert spoken audio into text. A configured ASR model powers the server-side **Voice Input** feature in Chat, Agents, and Pipelines — providing real-time transcription as users speak. When no ASR model is configured, Voice Input falls back to the browser's built-in Web Speech API. If neither is available, the microphone icon is hidden.
**Default ASR model** specifies the default model used for server-side voice transcription across Chat, Agents, and Pipelines.
**ASR Model Types**
ELITEA determines the transcription mode automatically based on the model name:
| Model Type | Name Pattern | Behavior |
| ------------------------ | ------------------------------------------------------------------------------------- | ----------------------------------------------------------------------------------------------------- |
| **Streaming (Realtime)** | Names that do **not** include `whisper` or `transcribe` | Low-latency streaming via OpenAI Realtime API; interim transcript results appear in real time |
| **Batch (Whisper)** | Names that include `whisper` or `transcribe` (e.g., `whisper-1`, `gpt-4o-transcribe`) | Batch HTTP transcription; audio is buffered and sent in chunks, transcript delivered after processing |
Each ASR configuration card displays:
* **Icon** — Visual indicator of the provider
* **Model Name** — Display name of the configured ASR model
* **Status Indicator** — Shows "OK • Shared" or "OK • Local" depending on sharing status
* **Click to Edit** — Click on any card to view or edit configuration details (if permissions allow)
To add a new ASR model:
1. Ensure that its credentials exist. If necessary, create AI credentials for your provider (see [AI Credentials](#ai-credentials))
2. Click the **+** button in the section header or the main sidebar
3. Choose **Speech Recognition (ASR)** from the available configuration types
4. Fill all the required fields:
| Field | Description |
| ---------------- | ------------------------------------------------------------------------------------------------------------------------------------------------------------------------------------------------------------------------ |
| **Display Name** | Enter a descriptive name (e.g., "OpenAI Whisper", "Realtime Transcription") |
| **ID\*** | Auto-populated from the Display Name |
| **Name\*** | Enter the exact model identifier from the provider (e.g., `whisper-1`, `gpt-4o-transcribe`). Names containing `whisper` or `transcribe` are treated as batch models; all others are treated as streaming/Realtime models |
| **Credentials** | Select the AI credential configuration from the dropdown |
5. Click **Save** to add the model. After this, the new model will appear in the *Speech Recognition (ASR)* section.
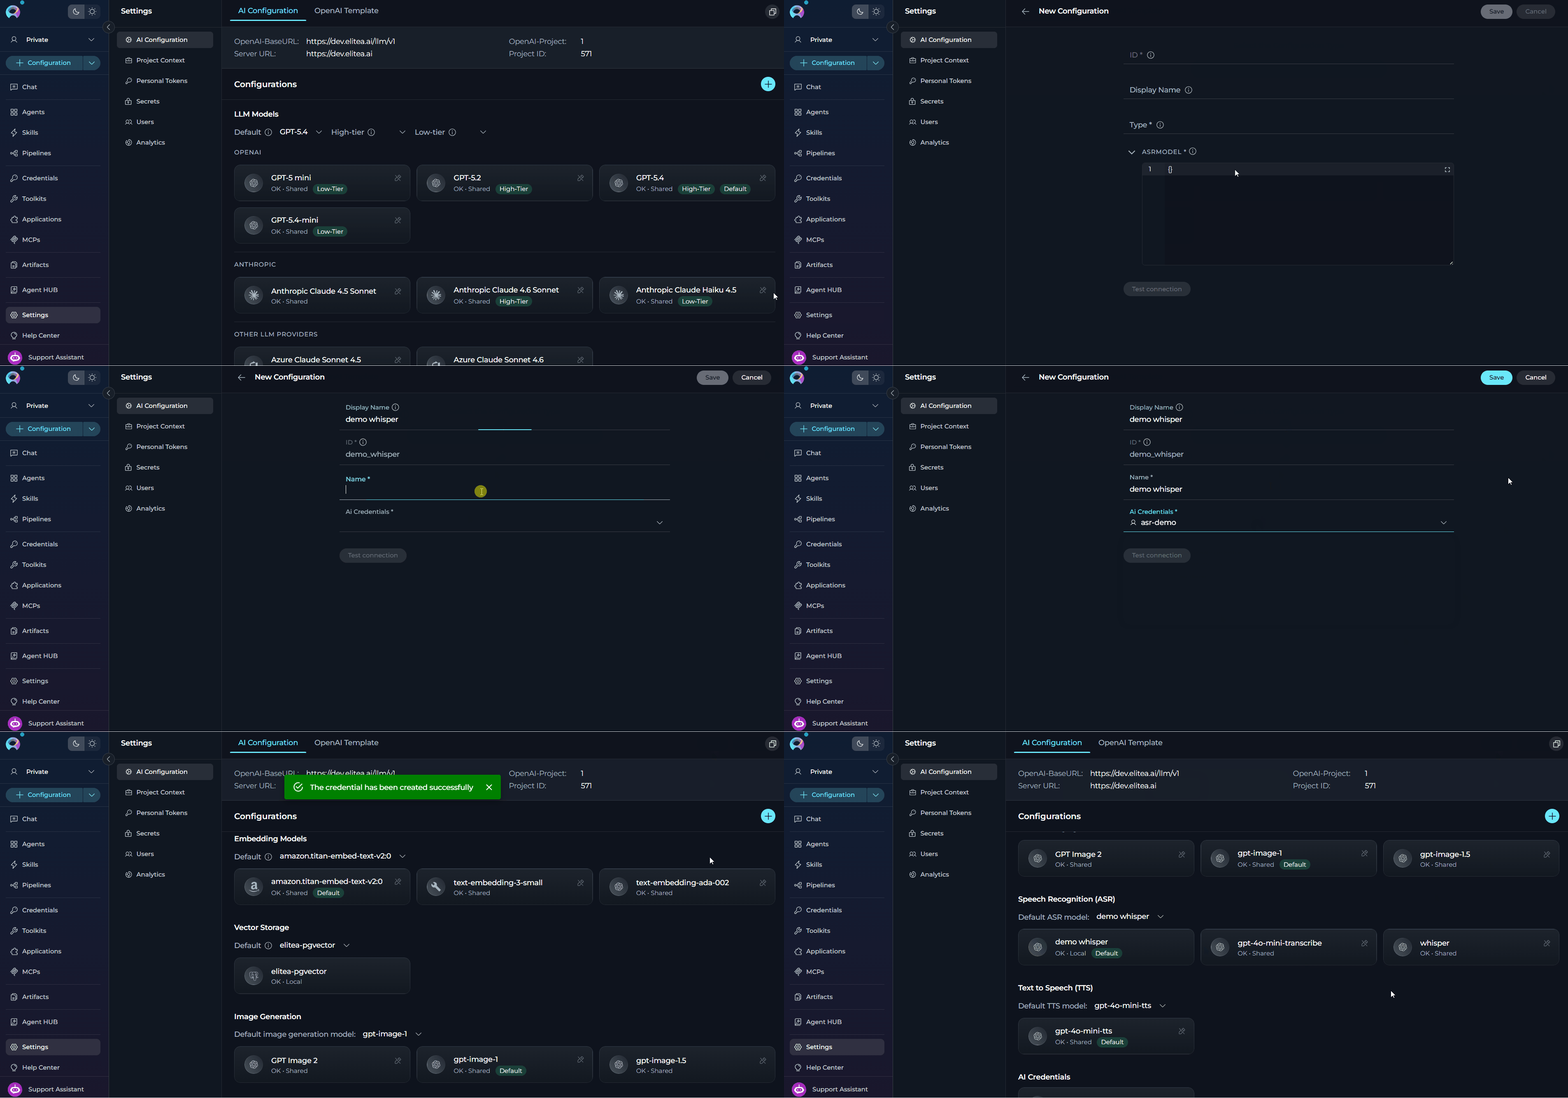 You can select the newly added model as the default one for voice input using the dropdowns in the section header.
The model name determines transcription mode. Use `whisper-1` or `gpt-4o-transcribe` for batch transcription. For real-time streaming, configure a model from the OpenAI Realtime API (e.g., via an AI Dial or Azure OpenAI credential supporting Realtime).
***
### Text to Speech (TTS)
You can select the newly added model as the default one for voice input using the dropdowns in the section header.
The model name determines transcription mode. Use `whisper-1` or `gpt-4o-transcribe` for batch transcription. For real-time streaming, configure a model from the OpenAI Realtime API (e.g., via an AI Dial or Azure OpenAI credential supporting Realtime).
***
### Text to Speech (TTS)
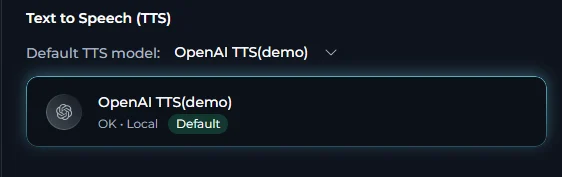 Text to Speech (TTS) models synthesize spoken audio from text. A configured TTS model powers the server-side **Text-to-Speech** and **Speaking Mode** features in Chat, Agents, and Pipelines — reading AI responses aloud using Web Audio API playback. When no TTS model is configured, playback falls back to the browser's built-in SpeechSynthesis API.
**Default TTS model** specifies the default model used for reading AI responses aloud across Chat, Agents, and Pipelines.
**If no TTS model is configured, the browser SpeechSynthesis API is used as a fallback.**
Each TTS configuration card displays:
* **Icon** — Visual indicator of the provider
* **Model Name** — Display name of the configured TTS model
* **Status Indicator** — Shows "OK • Shared" or "OK • Local" depending on sharing status
* **Click to Edit** — Click on any card to view or edit configuration details (if permissions allow)
To add a new TTS model:
1. Ensure that its credentials exist. If necessary, create AI credentials for your provider (see [AI Credentials](#ai-credentials))
2. Click the **+** button in the section header or the main sidebar
3. Choose **Text to Speech (TTS)** from the available configuration types
4. Fill all the required fields:
| Field | Description |
| ---------------- | ------------------------------------------------------------------------------ |
| **Display Name** | Enter a descriptive name (e.g., "OpenAI TTS", "Azure Neural Voice") |
| **ID\*** | Auto-populated from the Display Name |
| **Name\*** | Enter the exact model identifier from the provider (e.g., `tts-1`, `tts-1-hd`) |
| **Credentials** | Select the AI credential configuration from the dropdown |
5. Click **Save** to add the model. After this, the new model will appear in the *Text to Speech (TTS)* section.
Text to Speech (TTS) models synthesize spoken audio from text. A configured TTS model powers the server-side **Text-to-Speech** and **Speaking Mode** features in Chat, Agents, and Pipelines — reading AI responses aloud using Web Audio API playback. When no TTS model is configured, playback falls back to the browser's built-in SpeechSynthesis API.
**Default TTS model** specifies the default model used for reading AI responses aloud across Chat, Agents, and Pipelines.
**If no TTS model is configured, the browser SpeechSynthesis API is used as a fallback.**
Each TTS configuration card displays:
* **Icon** — Visual indicator of the provider
* **Model Name** — Display name of the configured TTS model
* **Status Indicator** — Shows "OK • Shared" or "OK • Local" depending on sharing status
* **Click to Edit** — Click on any card to view or edit configuration details (if permissions allow)
To add a new TTS model:
1. Ensure that its credentials exist. If necessary, create AI credentials for your provider (see [AI Credentials](#ai-credentials))
2. Click the **+** button in the section header or the main sidebar
3. Choose **Text to Speech (TTS)** from the available configuration types
4. Fill all the required fields:
| Field | Description |
| ---------------- | ------------------------------------------------------------------------------ |
| **Display Name** | Enter a descriptive name (e.g., "OpenAI TTS", "Azure Neural Voice") |
| **ID\*** | Auto-populated from the Display Name |
| **Name\*** | Enter the exact model identifier from the provider (e.g., `tts-1`, `tts-1-hd`) |
| **Credentials** | Select the AI credential configuration from the dropdown |
5. Click **Save** to add the model. After this, the new model will appear in the *Text to Speech (TTS)* section.
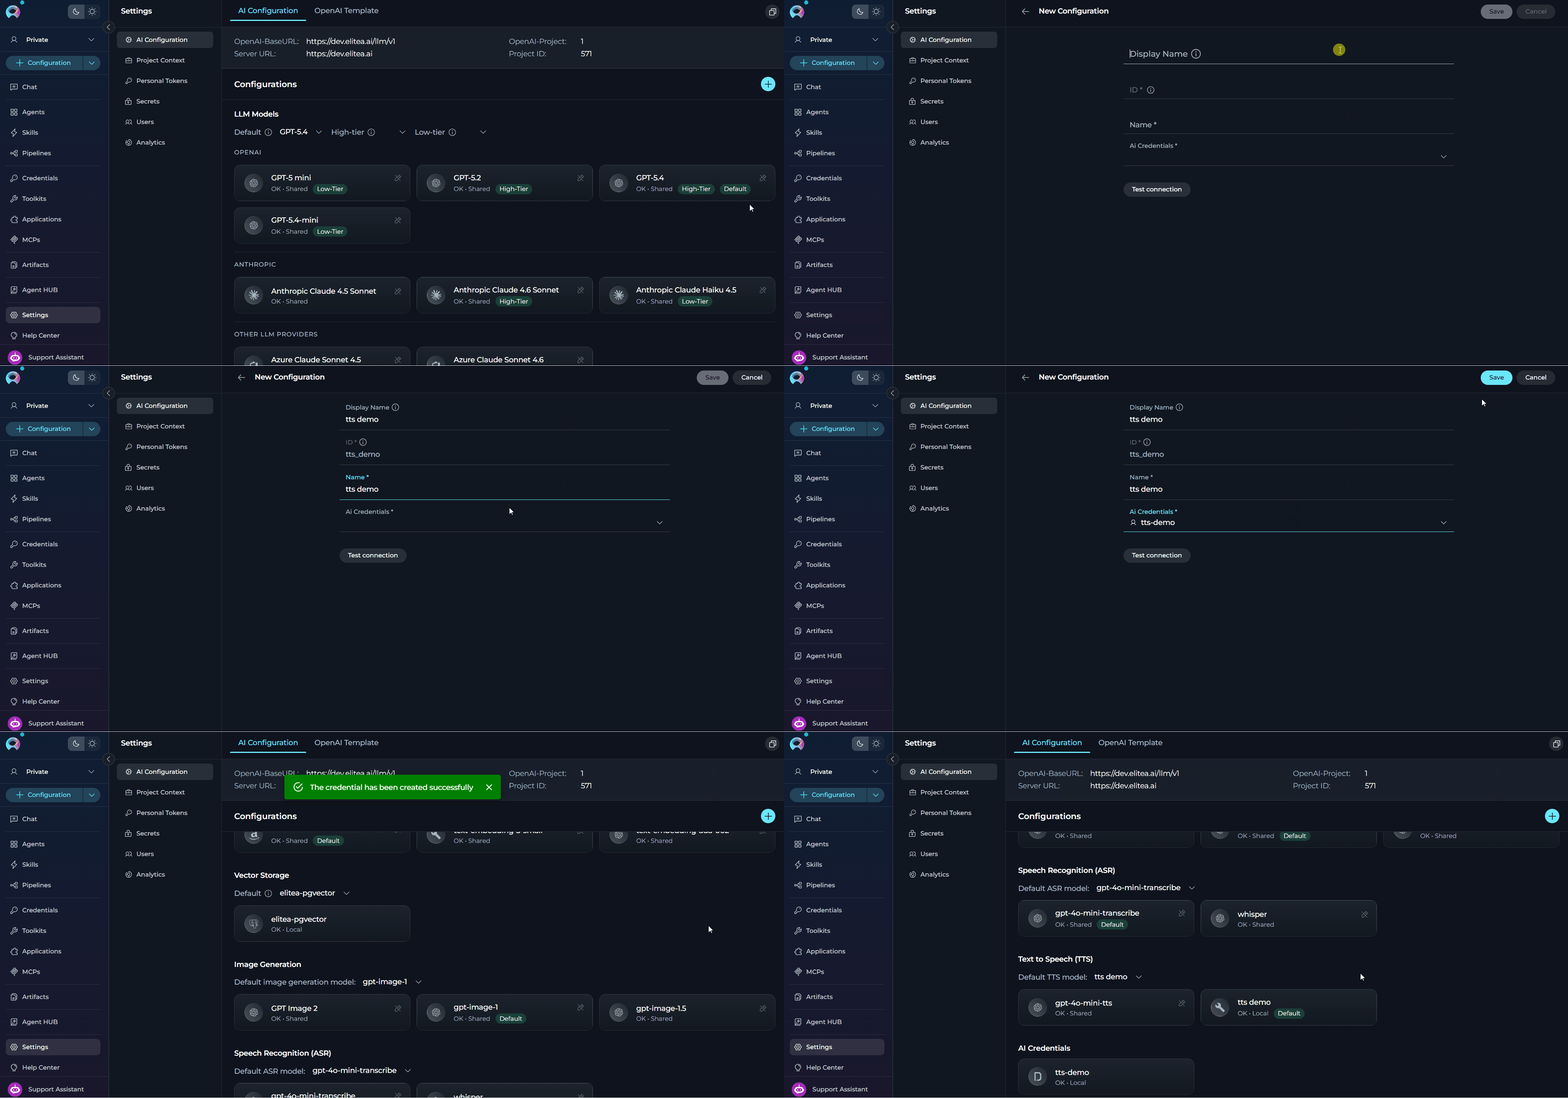 You can select the newly added model as the default one using the dropdowns in the section header.
Server-side TTS delivers audio as PCM-16-LE chunks via Socket.IO, played back through the Web Audio API at 24 kHz. Text is highlighted in sync with playback. Pause and resume are fully supported for both server-side and browser-fallback TTS.
***
### AI Credentials
The **AI Credentials** section only appears when credentials are configured in your project. If no credentials exist, this section will be hidden.
AI Credentials are authentication configurations that store API keys, tokens, endpoints, and connection strings for accessing AI service providers. These credentials serve as the foundation for other configurations, enabling secure communication with external AI platforms without exposing sensitive authentication details in individual model configurations. Multiple models can use the same credentials, providing for the centralized credential management.
Each AI Credentials configuration displays:
* **Icon** - Visual indicator of the provider (OpenAI, Azure, Anthropic, Vertex AI, etc.)
* **Credential Name** - Display name of the configured credentials
* **Status Indicator** - Shows "OK • Shared" or "OK • Local" depending on sharing status
* **Click to Edit** - Click on any card to view or edit configuration details (if permissions allow)
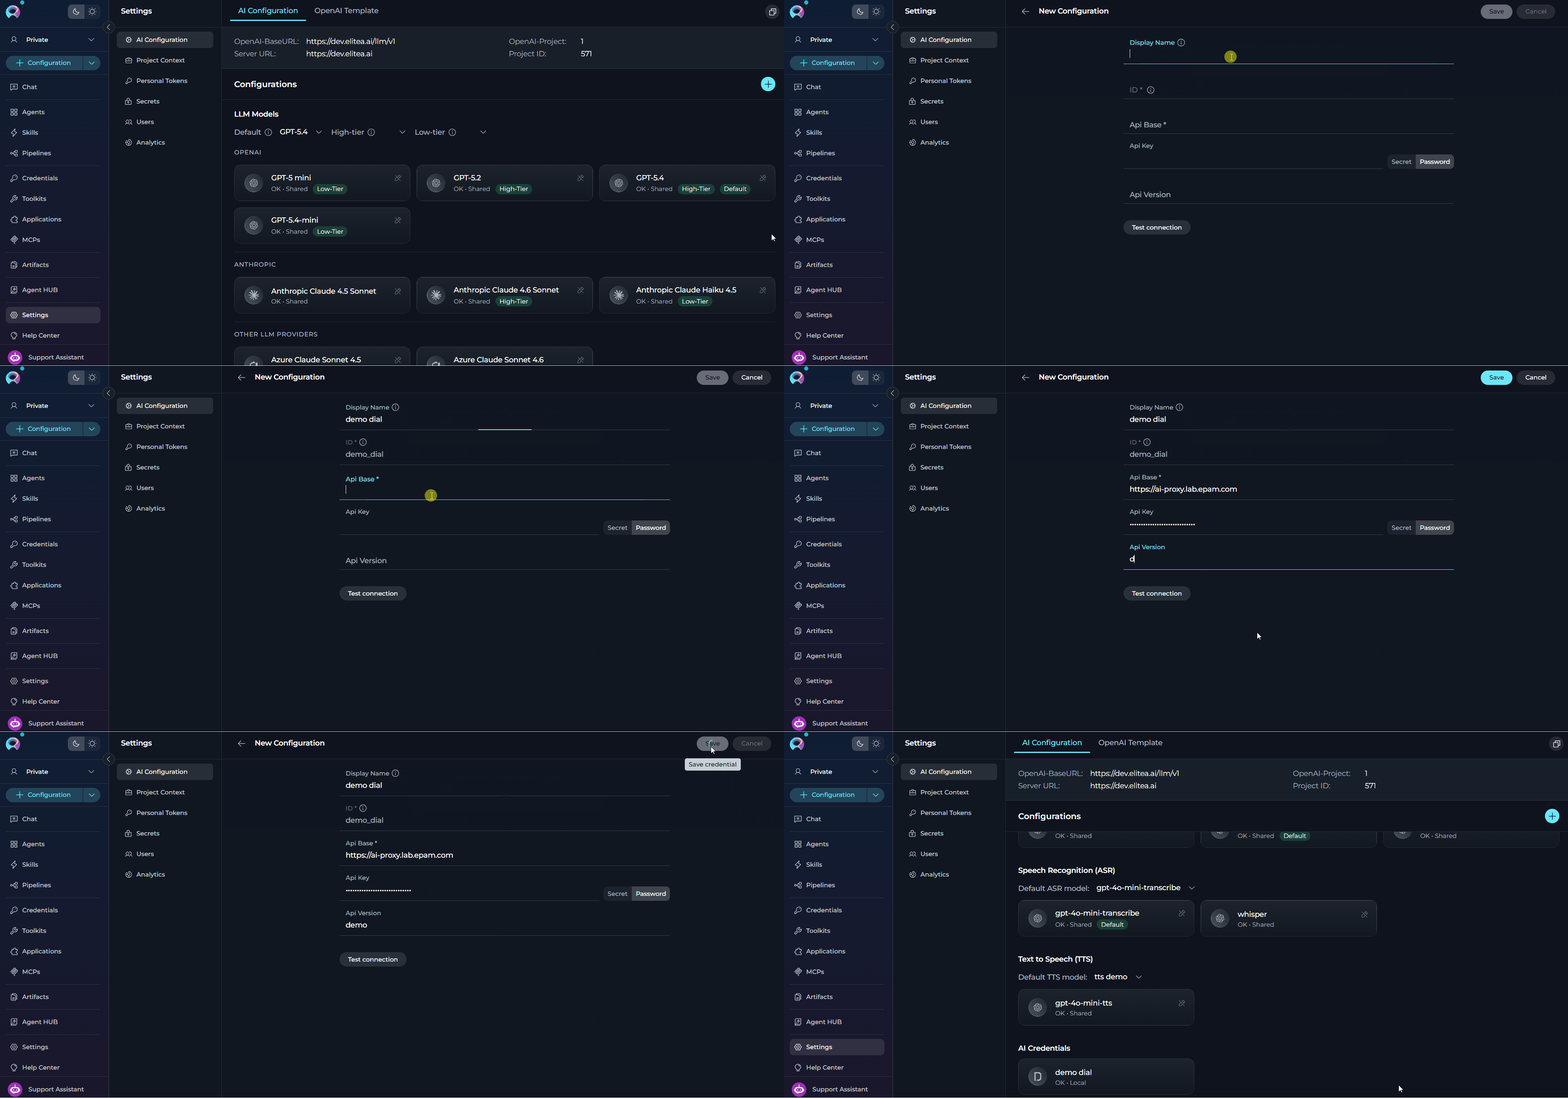
To add a new AI credentials:
1. Click the **+** button in the section header or the main sidebar
2. Choose **AI Credentials** from the available configuration types
3. Choose the AI service provider you want to configure:
| Provider | Description |
| ------------------ | -------------------------------- |
| **AI Dial** | For EPAM AI Dial platform |
| **Amazon Bedrock** | For AWS AI services |
| **Azure OpenAI** | For Azure-hosted OpenAI services |
| **Ollama** | For local/self-hosted models |
| **OpenAI** | For OpenAI API access |
| **Vertex AI** | For Google Cloud AI services |
4. Fill in all the provider-specific fields:
**For OpenAI:**
| Field | Description | Example |
| ------------------ | --------------------------------------------------------------------------- | --------------------------- |
| **Display Name**\* | Enter a descriptive name | "OpenAI Production Key" |
| **ID**\* | Auto-populated from the Display Name | |
| **Api Base**\* | OpenAI API endpoint URL | `https://api.openai.com/v1` |
| **Api Key** | Your OpenAI API key from [platform.openai.com](https://platform.openai.com) | `sk-proj-...` |
**For Azure OpenAI:**
| Field | Description | Example |
| ------------------ | -------------------------------------- | ---------------------------------------- |
| **Display Name**\* | Enter a descriptive name | "Azure OpenAI East US" |
| **ID**\* | Auto-populated from the Display Name | |
| **Api Base**\* | Azure OpenAI endpoint URL | `https://your-resource.openai.azure.com` |
| **Api Key** | Azure OpenAI API key from Azure portal | `a1b2c3d4e5f6...` |
| **Api Version** | Azure API version | `2024-02-15-preview` |
**For Vertex AI:**
| Field | Description | Example |
| ------------------------ | ------------------------------------------------------------------------ | ------------------------------------------------------- |
| **Display Name** | Enter a descriptive name | "GCP Vertex AI" |
| **ID**\* | Auto-populated from the Display Name | |
| **Vertex Project**\* | Google Cloud project ID | `my-gcp-project-123456` |
| **Vertex Location**\* | GCP region | `us-central1` |
| **Vertex Credentials**\* | Paste the complete JSON content from downloaded service account key file | `{"type": "service_account", "project_id": "...", ...}` |
**For Amazon Bedrock:**
| Field | Description | Example |
| ------------------------- | ------------------------------------ | ------------------------------------------ |
| **Display Name**\* | Enter a descriptive name | "AWS Bedrock US-East-1" |
| **ID**\* | Auto-populated from the Display Name | |
| **Aws Access Key Id** | IAM access key | `AKIAIOSFODNN7EXAMPLE` |
| **Aws Secret Access Key** | IAM secret access key | `wJalrXUtnFEMI/K7MDENG/bPxRfiCYEXAMPLEKEY` |
| **Aws Region Name** | AWS region | `us-east-1` |
**For AI Dial:**
| Field | Description | Example |
| ---------------- | ------------------------------------ | ------------------------------- |
| **Display Name** | Enter a descriptive name | "EPAM AI Dial Personal" |
| **ID**\* | Auto-populated from the Display Name | |
| **Api Base**\* | AI Dial endpoint URL | `https://ai-proxy.lab.epam.com` |
| **Api Key** | Your personal AI Dial token | `aidial_...` |
| **Api Version** | API version for AI Dial | `2025-04-01-preview` |
**For Ollama:**
| Field | Description | Example |
| ------------------ | ------------------------------------ | ------------------------ |
| **Display Name**\* | Enter a descriptive name | "Local Ollama Server" |
| **ID**\* | Auto-populated from the Display Name | |
| **Api Base**\* | Ollama server URL | `http://localhost:11434` |
5. Click **Save** to add the credentials.
You can select the newly added model as the default one using the dropdowns in the section header.
Server-side TTS delivers audio as PCM-16-LE chunks via Socket.IO, played back through the Web Audio API at 24 kHz. Text is highlighted in sync with playback. Pause and resume are fully supported for both server-side and browser-fallback TTS.
***
### AI Credentials
The **AI Credentials** section only appears when credentials are configured in your project. If no credentials exist, this section will be hidden.
AI Credentials are authentication configurations that store API keys, tokens, endpoints, and connection strings for accessing AI service providers. These credentials serve as the foundation for other configurations, enabling secure communication with external AI platforms without exposing sensitive authentication details in individual model configurations. Multiple models can use the same credentials, providing for the centralized credential management.
Each AI Credentials configuration displays:
* **Icon** - Visual indicator of the provider (OpenAI, Azure, Anthropic, Vertex AI, etc.)
* **Credential Name** - Display name of the configured credentials
* **Status Indicator** - Shows "OK • Shared" or "OK • Local" depending on sharing status
* **Click to Edit** - Click on any card to view or edit configuration details (if permissions allow)
To add a new AI credentials:
1. Click the **+** button in the section header or the main sidebar
2. Choose **AI Credentials** from the available configuration types
3. Choose the AI service provider you want to configure:
| Provider | Description |
| ------------------ | -------------------------------- |
| **AI Dial** | For EPAM AI Dial platform |
| **Amazon Bedrock** | For AWS AI services |
| **Azure OpenAI** | For Azure-hosted OpenAI services |
| **Ollama** | For local/self-hosted models |
| **OpenAI** | For OpenAI API access |
| **Vertex AI** | For Google Cloud AI services |
4. Fill in all the provider-specific fields:
**For OpenAI:**
| Field | Description | Example |
| ------------------ | --------------------------------------------------------------------------- | --------------------------- |
| **Display Name**\* | Enter a descriptive name | "OpenAI Production Key" |
| **ID**\* | Auto-populated from the Display Name | |
| **Api Base**\* | OpenAI API endpoint URL | `https://api.openai.com/v1` |
| **Api Key** | Your OpenAI API key from [platform.openai.com](https://platform.openai.com) | `sk-proj-...` |
**For Azure OpenAI:**
| Field | Description | Example |
| ------------------ | -------------------------------------- | ---------------------------------------- |
| **Display Name**\* | Enter a descriptive name | "Azure OpenAI East US" |
| **ID**\* | Auto-populated from the Display Name | |
| **Api Base**\* | Azure OpenAI endpoint URL | `https://your-resource.openai.azure.com` |
| **Api Key** | Azure OpenAI API key from Azure portal | `a1b2c3d4e5f6...` |
| **Api Version** | Azure API version | `2024-02-15-preview` |
**For Vertex AI:**
| Field | Description | Example |
| ------------------------ | ------------------------------------------------------------------------ | ------------------------------------------------------- |
| **Display Name** | Enter a descriptive name | "GCP Vertex AI" |
| **ID**\* | Auto-populated from the Display Name | |
| **Vertex Project**\* | Google Cloud project ID | `my-gcp-project-123456` |
| **Vertex Location**\* | GCP region | `us-central1` |
| **Vertex Credentials**\* | Paste the complete JSON content from downloaded service account key file | `{"type": "service_account", "project_id": "...", ...}` |
**For Amazon Bedrock:**
| Field | Description | Example |
| ------------------------- | ------------------------------------ | ------------------------------------------ |
| **Display Name**\* | Enter a descriptive name | "AWS Bedrock US-East-1" |
| **ID**\* | Auto-populated from the Display Name | |
| **Aws Access Key Id** | IAM access key | `AKIAIOSFODNN7EXAMPLE` |
| **Aws Secret Access Key** | IAM secret access key | `wJalrXUtnFEMI/K7MDENG/bPxRfiCYEXAMPLEKEY` |
| **Aws Region Name** | AWS region | `us-east-1` |
**For AI Dial:**
| Field | Description | Example |
| ---------------- | ------------------------------------ | ------------------------------- |
| **Display Name** | Enter a descriptive name | "EPAM AI Dial Personal" |
| **ID**\* | Auto-populated from the Display Name | |
| **Api Base**\* | AI Dial endpoint URL | `https://ai-proxy.lab.epam.com` |
| **Api Key** | Your personal AI Dial token | `aidial_...` |
| **Api Version** | API version for AI Dial | `2025-04-01-preview` |
**For Ollama:**
| Field | Description | Example |
| ------------------ | ------------------------------------ | ------------------------ |
| **Display Name**\* | Enter a descriptive name | "Local Ollama Server" |
| **ID**\* | Auto-populated from the Display Name | |
| **Api Base**\* | Ollama server URL | `http://localhost:11434` |
5. Click **Save** to add the credentials.
 * Never share API keys in public channels or commit them to version control
* Use environment-specific credentials (separate keys for dev, staging, production)
* Regularly rotate API keys for enhanced security
* Use "Local" credentials for personal testing, "Shared" only when necessary
* Monitor API usage to detect unauthorized access
One credential configuration can be used by multiple models. For example, a single OpenAI credential can support GPT-4o, GPT-3.5, and multiple embedding models, reducing the need for duplicate credential management.
***
### Default Models
Default models control which models are automatically selected for new chats and agents:
* **Default model** is used for most activities (new chats, agents, general operations)
* **High-tier model** is selected when high-capability processing is needed
* **Low-tier model** is used for routine, cost-effective tasks
* **Default embedding model** is used for text embedding operations
* **Default vector storage** is used for vector database operations
* **Default image generation model** is used for image generation tasks
* **Default ASR model** is used for server-side voice input (speech-to-text) in Chat, Agents, and Pipelines
* **Default TTS model** is used for reading AI responses aloud (text-to-speech) in Chat, Agents, and Pipelines
**Usage Impact:**
* New conversations use the default model unless manually changed.
* New agents use the default model unless manually configured.
* Existing conversations and agents retain their previously configured models.
* Changes apply immediately without requiring save.
Do not modify the default PG Vector or LLM models in the project, as this may break project functionality and system instability. These default models are essential for core platform operations.
***
## OpenAI Template
The *OpenAI Template* tab generates ready-to-use code examples for integrating applications with ELITEA's AI models using OpenAI-compatible API format. Templates are pre-configured with server settings and support cURL, Node.js, and Python, enabling quick implementation without manual setup.
**How to Access:**
Click "**OpenAI Template**" in the tab bar at the top of the *AI Configuration* section.
* Never share API keys in public channels or commit them to version control
* Use environment-specific credentials (separate keys for dev, staging, production)
* Regularly rotate API keys for enhanced security
* Use "Local" credentials for personal testing, "Shared" only when necessary
* Monitor API usage to detect unauthorized access
One credential configuration can be used by multiple models. For example, a single OpenAI credential can support GPT-4o, GPT-3.5, and multiple embedding models, reducing the need for duplicate credential management.
***
### Default Models
Default models control which models are automatically selected for new chats and agents:
* **Default model** is used for most activities (new chats, agents, general operations)
* **High-tier model** is selected when high-capability processing is needed
* **Low-tier model** is used for routine, cost-effective tasks
* **Default embedding model** is used for text embedding operations
* **Default vector storage** is used for vector database operations
* **Default image generation model** is used for image generation tasks
* **Default ASR model** is used for server-side voice input (speech-to-text) in Chat, Agents, and Pipelines
* **Default TTS model** is used for reading AI responses aloud (text-to-speech) in Chat, Agents, and Pipelines
**Usage Impact:**
* New conversations use the default model unless manually changed.
* New agents use the default model unless manually configured.
* Existing conversations and agents retain their previously configured models.
* Changes apply immediately without requiring save.
Do not modify the default PG Vector or LLM models in the project, as this may break project functionality and system instability. These default models are essential for core platform operations.
***
## OpenAI Template
The *OpenAI Template* tab generates ready-to-use code examples for integrating applications with ELITEA's AI models using OpenAI-compatible API format. Templates are pre-configured with server settings and support cURL, Node.js, and Python, enabling quick implementation without manual setup.
**How to Access:**
Click "**OpenAI Template**" in the tab bar at the top of the *AI Configuration* section.
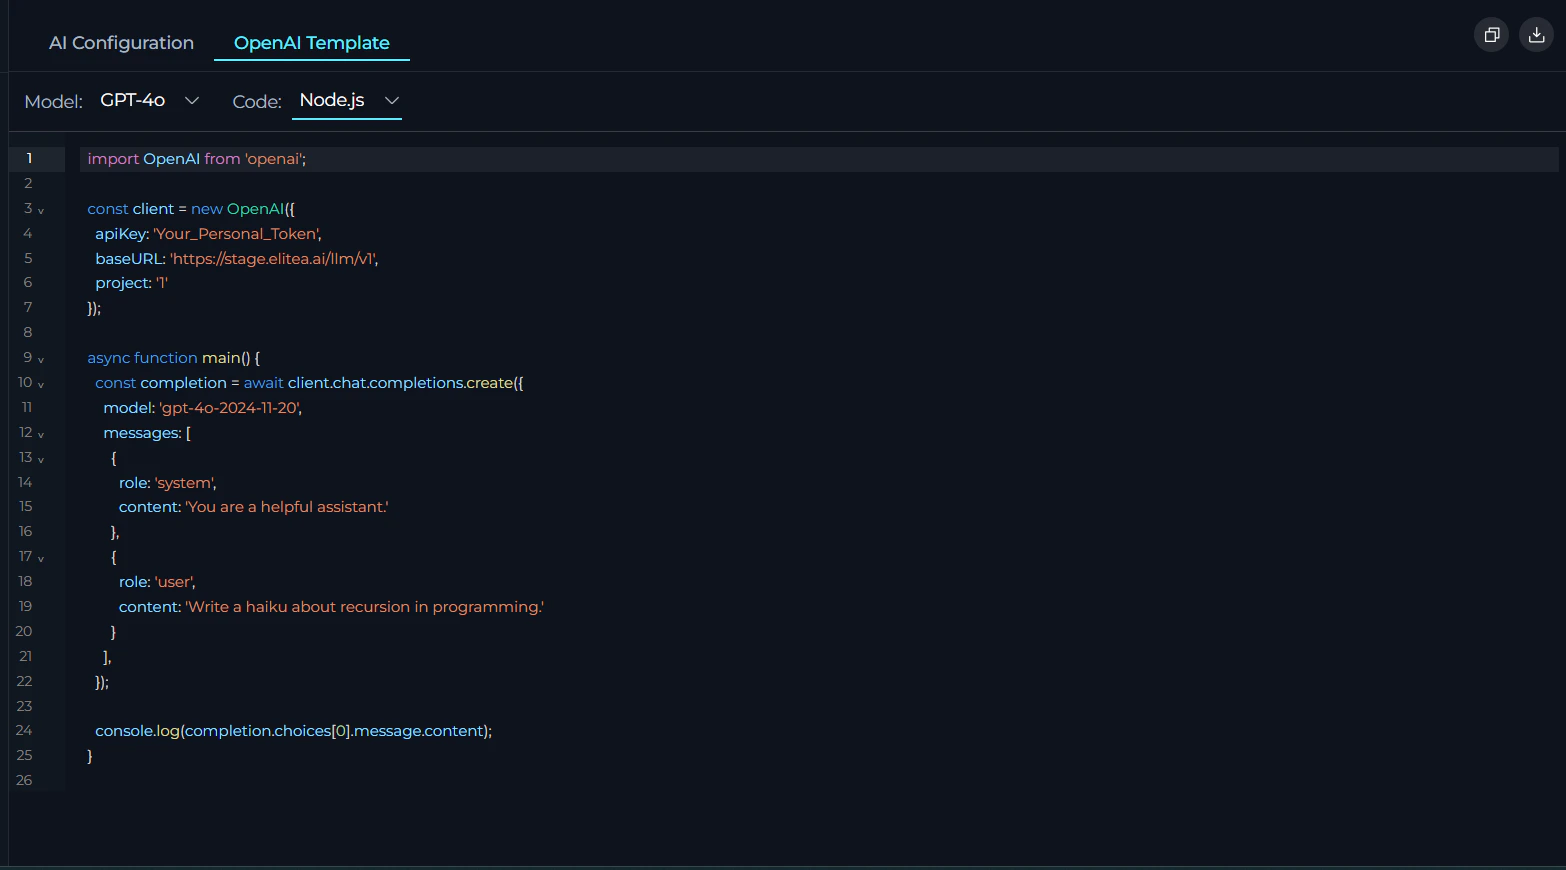 **Model and Language Selection:**
* **Model** dropdown - Select from available configured LLM models
* **Code** dropdown - Choose programming language (cURL, Node.js, or Python)
**Action Buttons:**
* **Copy Button** - Copy the code example to clipboard
* **Download Button** - Download code example file with appropriate extension:
* cURL → `api_example.sh`
* Node.js → `api_example.js`
* Python → `api_example.py`
**Code Example Features:**
* Pre-configured with server URL, project ID, and model settings
* Dynamic updates based on selected model and language
* Includes authentication placeholder (`Your_Personal_Token`)
* Syntax highlighting for better readability
***
## Troubleshooting
**Problem:** "No access to LLM" message is displayed when using custom LLM configurations. The exact message may vary depending on the provider.
**Solution Steps:**
1. **Verify Provider Access:** Use your model provider's platform help center or documentation pages to confirm you have access to the specific LLM mentioned in your configuration
2. **Test Credentials:** Use a CURL request to verify that your credentials can successfully access the model
3. **Check Model Availability:** Ensure the model name exactly matches the provider's model identifier
4. **Validate Authentication:** Confirm your API keys, tokens, or authentication credentials are valid and not expired
**Problem:** Receiving 401 (Unauthorized) or 403 (Forbidden) errors when testing credentials.
**Solution Steps:**
1. **Check Credential Values:**
* Verify API keys, tokens, or passwords are correct
* Ensure there are no extra spaces or hidden characters
* Confirm credentials haven't expired
2. **Verify Permissions:**
* Ensure your account has necessary permissions
* Check if you need specific scopes or roles enabled
* Verify service URLs are accurate and accessible
3. **Provider-Specific Checks:**
* **OpenAI:** Verify your API key starts with `sk-` and is from the correct organization
* **Azure OpenAI:** Confirm the API version matches your deployment and endpoint URL is correct
* **Vertex AI:** Ensure the service account JSON has the required IAM permissions
* **Amazon Bedrock:** Verify IAM user has `bedrock:InvokeModel` permissions
**Problem:** Unable to connect to AI provider endpoints (Connection refused, timeout, SSL errors).
**Solution Steps:**
1. **Network Connectivity:**
* Verify you can reach the endpoint URL from your network
* Check if there are firewall or proxy restrictions
* Ensure the endpoint URL is correct and accessible
2. **SSL/Certificate Issues:**
* Verify the endpoint uses a valid SSL certificate
* Check if your organization uses custom certificates
* For self-hosted solutions, ensure certificates are properly configured
3. **URL Format:**
* Ensure URLs start with `http://` or `https://`
* Remove trailing slashes from base URLs
* Verify the hostname is correct (no typos)
**Problem:** Errors indicating the specified model doesn't exist or isn't available.
**Solution Steps:**
1. **Verify Model Name:**
* Check the exact model identifier from provider documentation
* Model names are case-sensitive
* Ensure no extra spaces or characters in the model name
2. **Check Model Availability:**
* Confirm the model is available in your region
* Verify your subscription/account has access to the model
* Check if the model has been deprecated or renamed
3. **Provider Documentation:**
* **OpenAI:** Check [platform.openai.com/docs/models](https://platform.openai.com/docs/models)
* **Anthropic:** Check [docs.anthropic.com/claude/docs/models-overview](https://docs.anthropic.com/claude/docs/models-overview)
* **Azure OpenAI:** Use your deployment name from Azure portal
* **Vertex AI:** Check Google Cloud console for available models
**Problem:** EPAM AI Dial fails with personal tokens.
**Common Issues:**
* **Limited Model Access:** EPAM AI Dial personal tokens provided to EPAMers have access to a very limited model list
* **Permission Issues:** Token may lack necessary permissions for specific models
* **Token Scope:** Personal tokens may have restricted capabilities
**Resolution Steps:**
1. **Verify Model Access:**
* Review the AI Dial documentation for permission check procedures
* Execute permission verification requests for your specific model
* Confirm your token has access to the model you're trying to use
2. **Token Management:**
* Check token expiration date
* Verify token permissions and scopes
* Consider using project-level tokens if available for broader model access
3. **Contact Support:**
* Contact EPAM AI Dial administrators if additional model access is required
* Request specific model permissions if needed
**Problem:** Newly created credentials don't show up in dropdown menus or configurations lists.
**Solution Steps:**
1. **Verify Creation:**
* Confirm the credential was successfully saved
* Check for any error messages during creation
* Refresh the page or credential list
2. **Check Permissions:**
* Ensure you have permissions to view the credential
* Verify you're viewing the correct project scope
* Check if credential is marked as "Local" vs "Shared"
3. **Credential Type:**
* Confirm the credential type matches the configuration you want to use
* Verify the credential hasn't been deleted by another user
**Problem:** Receiving rate limit or quota exceeded errors from AI providers.
**Solution Steps:**
1. **Check Usage Limits:**
* Review your provider's rate limits and quotas
* Check your current usage in the provider's dashboard
* Verify your subscription tier and limits
2. **Implement Best Practices:**
* Use appropriate tier models (Low-tier for routine tasks)
* Implement retry logic with exponential backoff
* Consider upgrading your plan if consistently hitting limits
3. **Monitor Usage:**
* Track API usage across your team
* Set up alerts for approaching quota limits
* Consider using project-level credentials for better visibility
**Model and Language Selection:**
* **Model** dropdown - Select from available configured LLM models
* **Code** dropdown - Choose programming language (cURL, Node.js, or Python)
**Action Buttons:**
* **Copy Button** - Copy the code example to clipboard
* **Download Button** - Download code example file with appropriate extension:
* cURL → `api_example.sh`
* Node.js → `api_example.js`
* Python → `api_example.py`
**Code Example Features:**
* Pre-configured with server URL, project ID, and model settings
* Dynamic updates based on selected model and language
* Includes authentication placeholder (`Your_Personal_Token`)
* Syntax highlighting for better readability
***
## Troubleshooting
**Problem:** "No access to LLM" message is displayed when using custom LLM configurations. The exact message may vary depending on the provider.
**Solution Steps:**
1. **Verify Provider Access:** Use your model provider's platform help center or documentation pages to confirm you have access to the specific LLM mentioned in your configuration
2. **Test Credentials:** Use a CURL request to verify that your credentials can successfully access the model
3. **Check Model Availability:** Ensure the model name exactly matches the provider's model identifier
4. **Validate Authentication:** Confirm your API keys, tokens, or authentication credentials are valid and not expired
**Problem:** Receiving 401 (Unauthorized) or 403 (Forbidden) errors when testing credentials.
**Solution Steps:**
1. **Check Credential Values:**
* Verify API keys, tokens, or passwords are correct
* Ensure there are no extra spaces or hidden characters
* Confirm credentials haven't expired
2. **Verify Permissions:**
* Ensure your account has necessary permissions
* Check if you need specific scopes or roles enabled
* Verify service URLs are accurate and accessible
3. **Provider-Specific Checks:**
* **OpenAI:** Verify your API key starts with `sk-` and is from the correct organization
* **Azure OpenAI:** Confirm the API version matches your deployment and endpoint URL is correct
* **Vertex AI:** Ensure the service account JSON has the required IAM permissions
* **Amazon Bedrock:** Verify IAM user has `bedrock:InvokeModel` permissions
**Problem:** Unable to connect to AI provider endpoints (Connection refused, timeout, SSL errors).
**Solution Steps:**
1. **Network Connectivity:**
* Verify you can reach the endpoint URL from your network
* Check if there are firewall or proxy restrictions
* Ensure the endpoint URL is correct and accessible
2. **SSL/Certificate Issues:**
* Verify the endpoint uses a valid SSL certificate
* Check if your organization uses custom certificates
* For self-hosted solutions, ensure certificates are properly configured
3. **URL Format:**
* Ensure URLs start with `http://` or `https://`
* Remove trailing slashes from base URLs
* Verify the hostname is correct (no typos)
**Problem:** Errors indicating the specified model doesn't exist or isn't available.
**Solution Steps:**
1. **Verify Model Name:**
* Check the exact model identifier from provider documentation
* Model names are case-sensitive
* Ensure no extra spaces or characters in the model name
2. **Check Model Availability:**
* Confirm the model is available in your region
* Verify your subscription/account has access to the model
* Check if the model has been deprecated or renamed
3. **Provider Documentation:**
* **OpenAI:** Check [platform.openai.com/docs/models](https://platform.openai.com/docs/models)
* **Anthropic:** Check [docs.anthropic.com/claude/docs/models-overview](https://docs.anthropic.com/claude/docs/models-overview)
* **Azure OpenAI:** Use your deployment name from Azure portal
* **Vertex AI:** Check Google Cloud console for available models
**Problem:** EPAM AI Dial fails with personal tokens.
**Common Issues:**
* **Limited Model Access:** EPAM AI Dial personal tokens provided to EPAMers have access to a very limited model list
* **Permission Issues:** Token may lack necessary permissions for specific models
* **Token Scope:** Personal tokens may have restricted capabilities
**Resolution Steps:**
1. **Verify Model Access:**
* Review the AI Dial documentation for permission check procedures
* Execute permission verification requests for your specific model
* Confirm your token has access to the model you're trying to use
2. **Token Management:**
* Check token expiration date
* Verify token permissions and scopes
* Consider using project-level tokens if available for broader model access
3. **Contact Support:**
* Contact EPAM AI Dial administrators if additional model access is required
* Request specific model permissions if needed
**Problem:** Newly created credentials don't show up in dropdown menus or configurations lists.
**Solution Steps:**
1. **Verify Creation:**
* Confirm the credential was successfully saved
* Check for any error messages during creation
* Refresh the page or credential list
2. **Check Permissions:**
* Ensure you have permissions to view the credential
* Verify you're viewing the correct project scope
* Check if credential is marked as "Local" vs "Shared"
3. **Credential Type:**
* Confirm the credential type matches the configuration you want to use
* Verify the credential hasn't been deleted by another user
**Problem:** Receiving rate limit or quota exceeded errors from AI providers.
**Solution Steps:**
1. **Check Usage Limits:**
* Review your provider's rate limits and quotas
* Check your current usage in the provider's dashboard
* Verify your subscription tier and limits
2. **Implement Best Practices:**
* Use appropriate tier models (Low-tier for routine tasks)
* Implement retry logic with exponential backoff
* Consider upgrading your plan if consistently hitting limits
3. **Monitor Usage:**
* Track API usage across your team
* Set up alerts for approaching quota limits
* Consider using project-level credentials for better visibility