> ## Documentation Index
> Fetch the complete documentation index at: https://docs.elitea.ai/llms.txt
> Use this file to discover all available pages before exploring further.
# OpenAPI
> Connect ELITEA to any OpenAPI-compatible service — import a spec and turn any REST API into callable tools for your agents.
## Introduction
**Purpose of this Guide**
This guide is your definitive resource for integrating and utilizing the **OpenAPI toolkit** within ELITEA. It provides a comprehensive, step-by-step walkthrough, from understanding OpenAPI specifications to configuring the toolkit in ELITEA and effectively using it within your Agents. By following this guide, you will unlock the power of universal REST API integration, enabling your ELITEA agents to interact with virtually any API that provides an OpenAPI specification. This integration empowers you to leverage AI-driven automation to extend ELITEA's capabilities across diverse platforms and services, transforming API documentation into actionable agent tools.
**Brief Overview of OpenAPI**
OpenAPI (formerly known as Swagger) is an industry-standard specification format for describing REST APIs. It provides a language-agnostic way to document API endpoints, parameters, request/response formats, and authentication methods. The OpenAPI specification serves as a contract between API providers and consumers, making API integration predictable and automated.
**Key Features of OpenAPI:**
* **Standardized API Documentation:** Define API structure using JSON or YAML format with consistent schema
* **Operation Definitions:** Each API endpoint has an operationId, description, parameters, and response schemas
* **Authentication Schemes:** Built-in support for various authentication methods including API Key, OAuth 2.0, and Basic Auth
* **Request/Response Validation:** Schema definitions ensure data consistency and validation
* **Tool Generation:** Enables automated tool creation from API documentation
* **Multi-Language Support:** Works across programming languages and platforms
Integrating OpenAPI with ELITEA brings these standardized API capabilities directly into your AI-powered workflows. Your ELITEA Agents can automatically generate tools for each API endpoint, interact with diverse REST APIs, and automate complex multi-service workflows through intelligent automation.
**Supported Formats:**
* **JSON** (recommended for consistency and broad compatibility)
* **YAML** (also fully supported for human readability)
* **URL** (pointing to publicly accessible OpenAPI specifications)
* **Raw text** (containing complete specification content)
## Toolkit's Account Setup and Configuration
The OpenAPI toolkit requires an OpenAPI specification and authentication credentials (if the API requires authentication). The credentials you configure in this section will be used when creating your OpenAPI Configuration credential in ELITEA (Step 1 of the integration process).
### API Access Requirements
Before integrating with ELITEA, ensure you have the following from your API provider:
1. **OpenAPI Specification File:** The complete API documentation in OpenAPI format (JSON or YAML)
2. **API Access:** Valid credentials or API keys if the API requires authentication
3. **Base URL:** The API's base URL
**Obtaining Your OpenAPI Specification:**
1. **From API Provider:** Most API providers publish their OpenAPI specifications in their developer documentation. Look for links labeled "API Specification," "OpenAPI Schema," or "Swagger Documentation."
2. **Generate from Code:** If you have access to the API implementation, many frameworks can automatically generate OpenAPI specifications (e.g., FastAPI for Python, Swashbuckle for .NET, SpringDoc for Java).
3. **Manual Creation:** Use [Swagger Editor](https://editor.swagger.io/) to create or edit OpenAPI specifications manually.
4. **Convert YAML to JSON:** If you have a YAML specification and prefer JSON, use [Swagger Editor](https://editor.swagger.io/) or online conversion tools.
### Authentication Credentials
Depending on your API's security requirements, you may need:
**For API Key Authentication:**
* API Key or Token value
* Authentication type (Bearer, Basic, or Custom Header)
* Custom header name (if using Custom authentication type)
**For OAuth 2.0 Authentication:**
* Client ID
* Client Secret
* Token URL (OAuth token endpoint)
* Authorization URL (optional, for authorization code flows)
* Scope (optional, space-separated permissions)
**For Public APIs:**
* No authentication credentials required
## System Integration with ELITEA
To integrate OpenAPI with ELITEA, you need to follow a three-step process: **Create Credentials → Create Toolkit → Use in Agents**. This workflow ensures secure authentication and proper configuration.
Starting with release 2.0.0 B2, users are **required** to create and select credentials for all existing OpenAPI toolkits. If your API does not require authentication, you must create an **Anonymous credential** and select it in your toolkit configuration.
**For existing toolkit migration instructions**, see the [OpenAPI Toolkit Migration Guide](../../migration/v2.0.1/openapi-toolkit-migration).
### Step 1: Create OpenAPI Configuration Credentials
Before creating a toolkit, you must first create OpenAPI Configuration credentials in ELITEA:
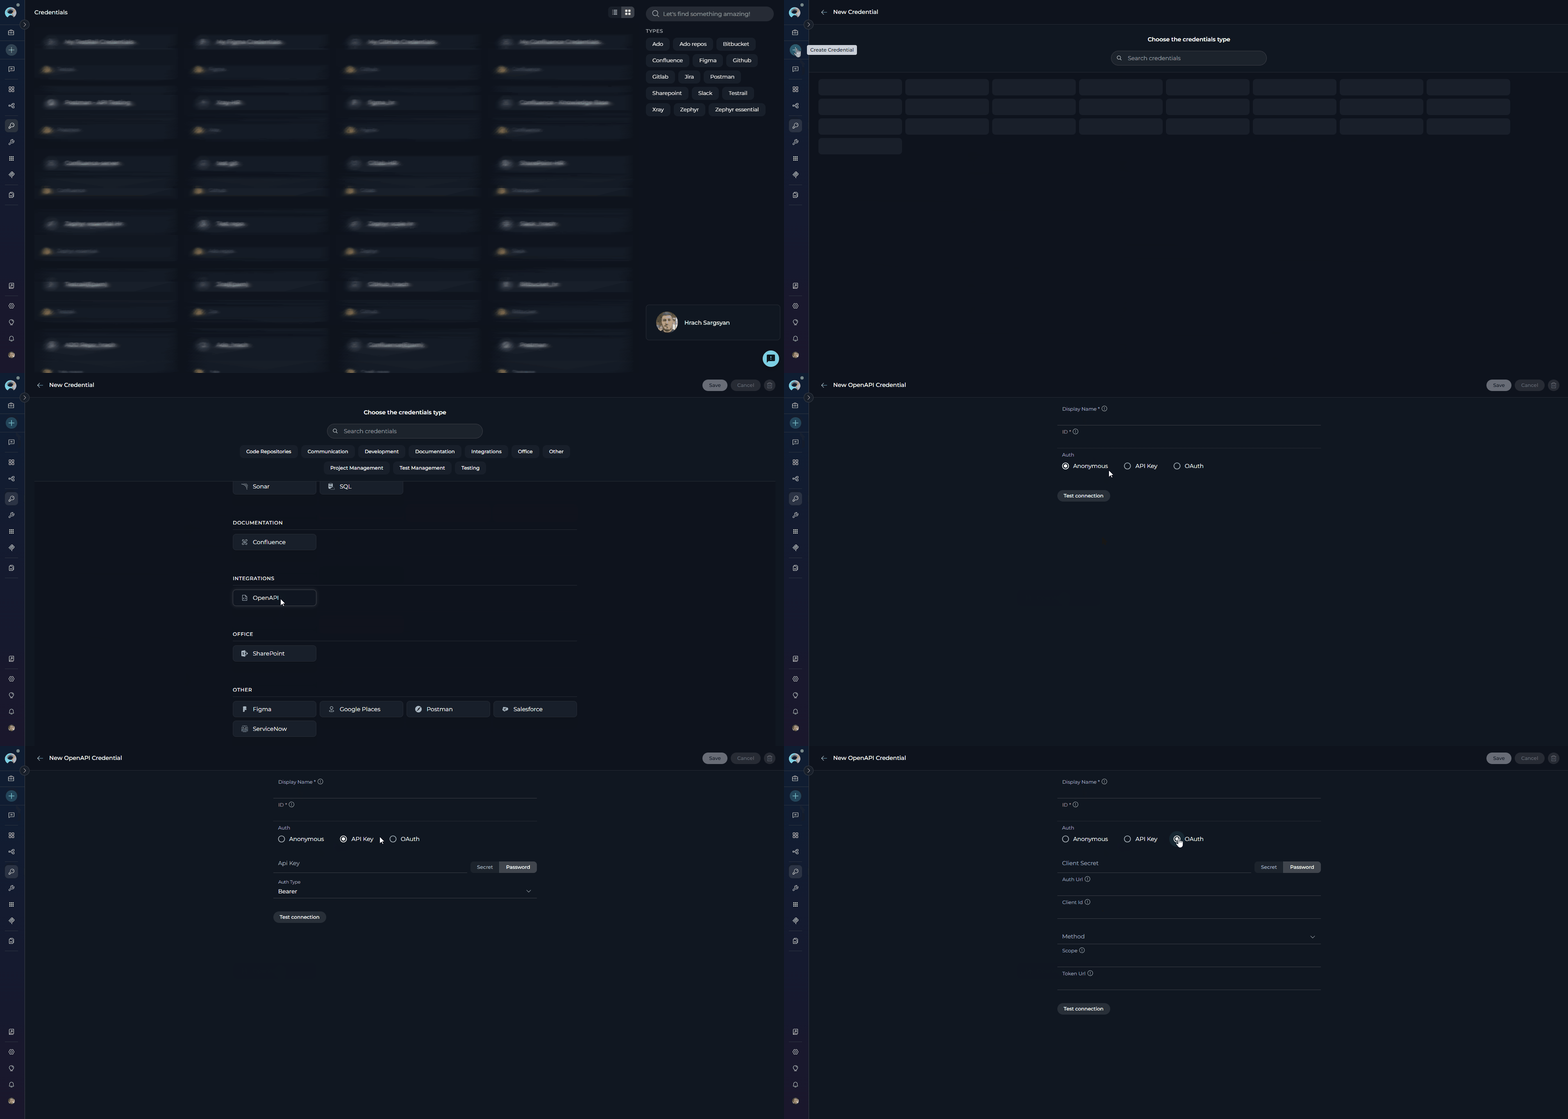
1. **Navigate to Credentials Menu:** Open the sidebar and select **[Credentials](../../menus/credentials)**.
2. **Create New Credential:** Click the **`+ Create`** button.
3. **Select OpenAPI Configuration:** Choose **OpenAPI Configuration** as the credential type.
4. **Configure Credential Details:**
* **Display Name:** Enter a descriptive name (e.g., "GitHub API - Production", "Petstore API Key")
5. **Configure Authentication Method:** Choose one of the following based on your API requirements:
* **API Key Authentication:** For Bearer tokens, Basic auth, or Custom headers
* **OAuth 2.0 Authentication:** For OAuth flows
* **Anonymous:** For public APIs without authentication requirements
6. **Fill Authentication Fields:** Depending on your selected authentication method (see [Authentication Methods Reference](#authentication-methods-reference) below for detailed field descriptions)
7. **Save Credential:** Click **Save** to create the credential
 It's highly recommended to use **[Secrets](../../menus/settings/secrets)** for API keys and sensitive values instead of entering them directly. Create a secret first, then reference it in your credential configuration.
#### Authentication Methods Reference
The OpenAPI Configuration credential supports multiple authentication methods. Configure the appropriate method based on your API's security requirements:
***
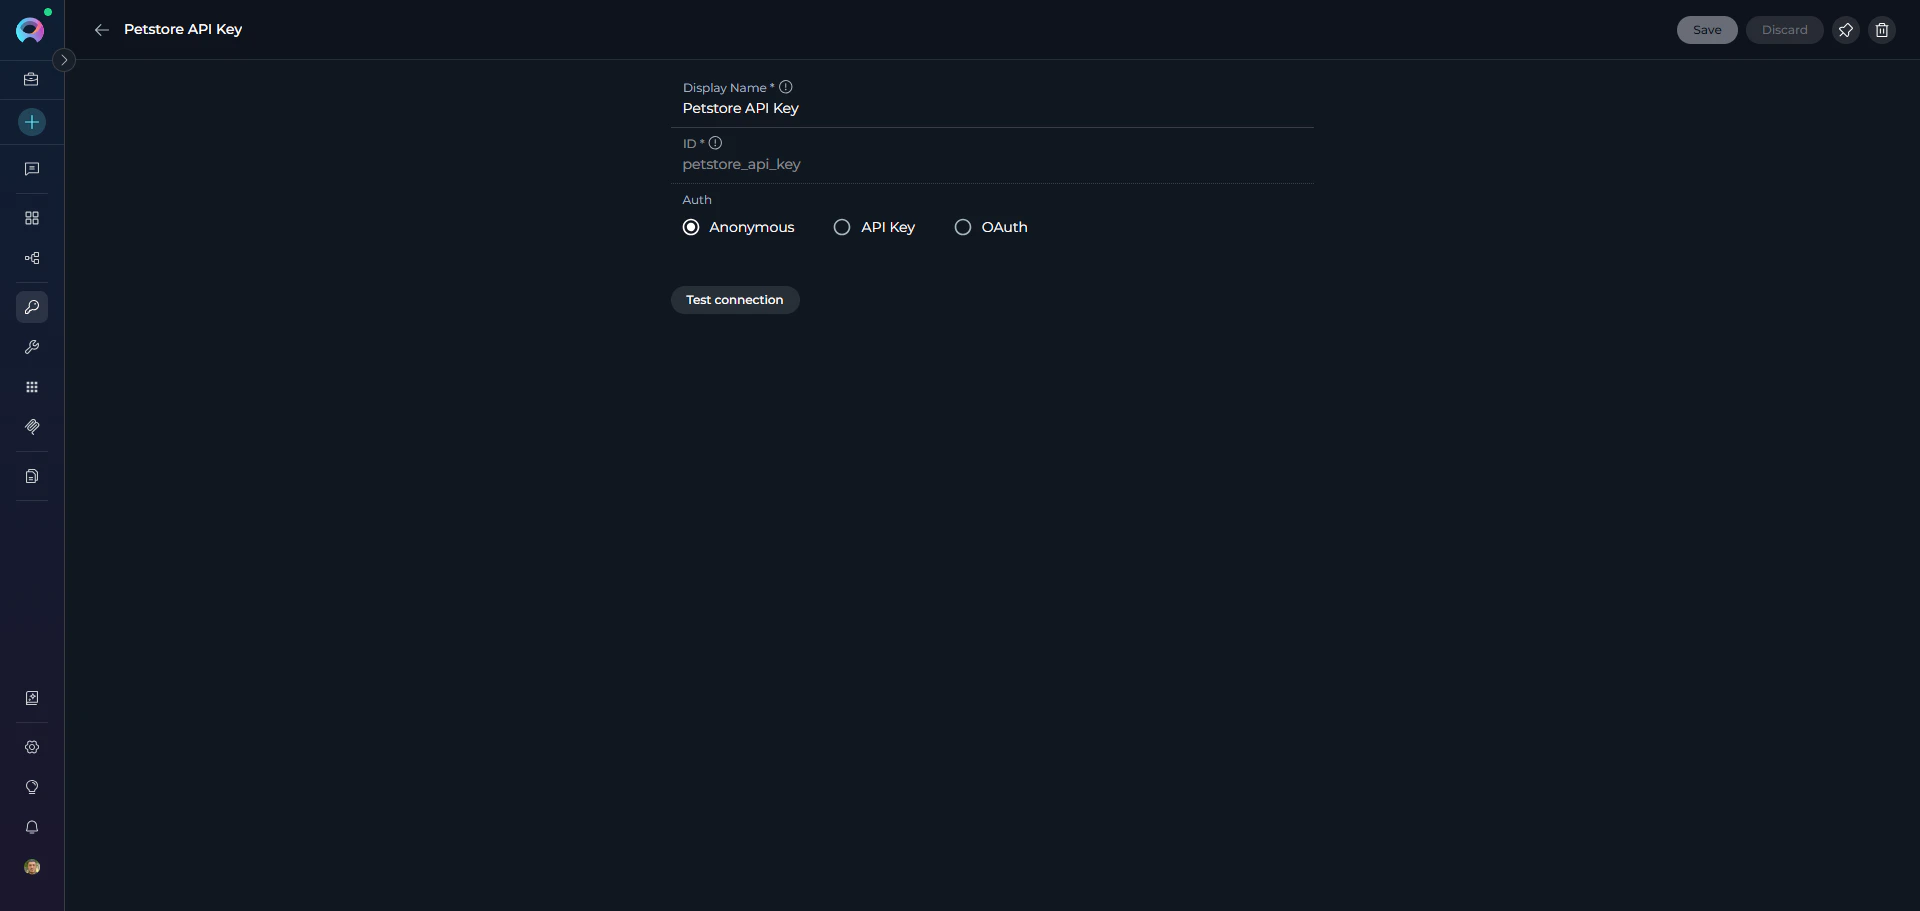
**Anonymous**
**Used for:** Public APIs that don't require authentication
**Configuration:**
* Select the **Anonymous** option when creating your OpenAPI Configuration credential
* Leave all authentication fields empty
* No authentication headers will be added to requests
* Note: Uncommon for production APIs; most APIs require some form of authentication
It's highly recommended to use **[Secrets](../../menus/settings/secrets)** for API keys and sensitive values instead of entering them directly. Create a secret first, then reference it in your credential configuration.
#### Authentication Methods Reference
The OpenAPI Configuration credential supports multiple authentication methods. Configure the appropriate method based on your API's security requirements:
***
**Anonymous**
**Used for:** Public APIs that don't require authentication
**Configuration:**
* Select the **Anonymous** option when creating your OpenAPI Configuration credential
* Leave all authentication fields empty
* No authentication headers will be added to requests
* Note: Uncommon for production APIs; most APIs require some form of authentication
 ***
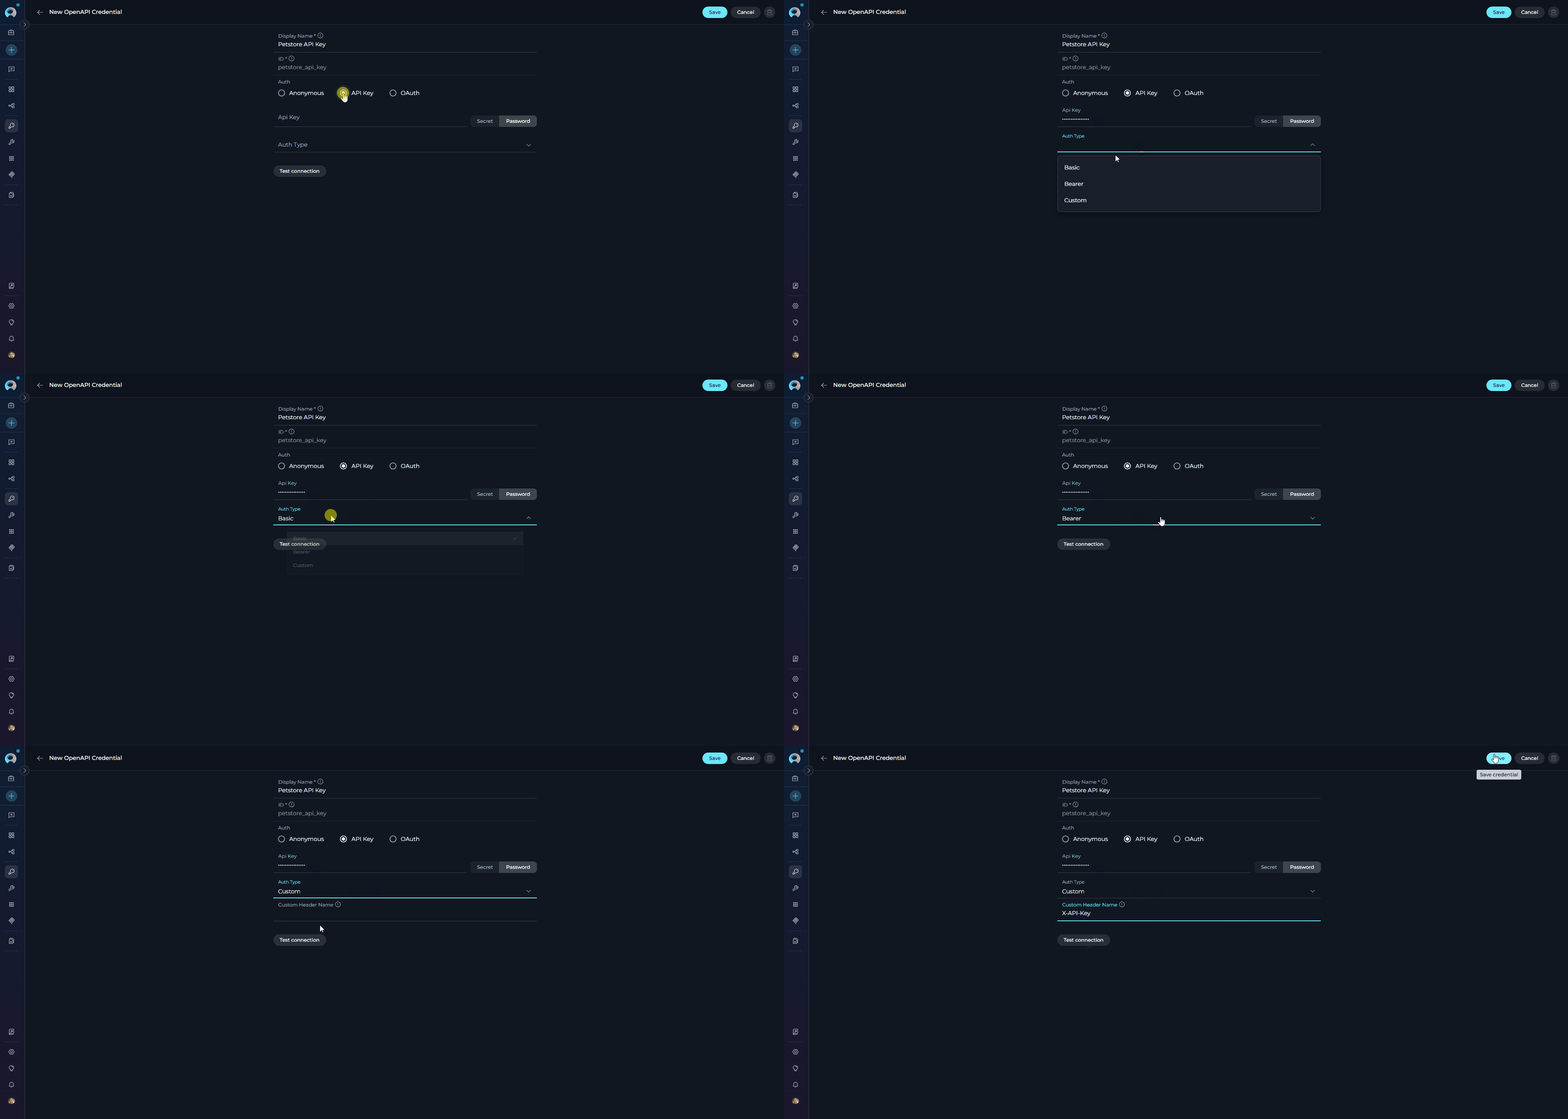
**API Key Authentication**
**Used for:** APIs that require API keys in headers (Bearer tokens, Basic auth, or custom headers)
**Configuration Fields:**
1. **Api Key** (Required)
* Your API key or token value
* Can reference ELITEA Secrets for enhanced security
2. **Auth Type** (Required)
| Auth Type | Required | Description | Header Result | Additional Field |
| -------------------- | -------- | ------------------------------------------------- | --------------------------------- | ----------------------------------------------------------------------------------------------------------------------------------------------------- |
| **Bearer** (default) | Yes | Most common for modern APIs | `Authorization: Bearer ` | None |
| **Basic** | Yes | Legacy authentication method | `Authorization: Basic ` | None |
| **Custom** | Yes | For APIs with non-standard authentication headers | Custom header with specified name | **Custom Header Name** (Required): The header name where your API key will be sent. Examples: `X-API-Key`, `X-Auth-Token`, `api-key`, `X-Custom-Auth` |
***
**API Key Authentication**
**Used for:** APIs that require API keys in headers (Bearer tokens, Basic auth, or custom headers)
**Configuration Fields:**
1. **Api Key** (Required)
* Your API key or token value
* Can reference ELITEA Secrets for enhanced security
2. **Auth Type** (Required)
| Auth Type | Required | Description | Header Result | Additional Field |
| -------------------- | -------- | ------------------------------------------------- | --------------------------------- | ----------------------------------------------------------------------------------------------------------------------------------------------------- |
| **Bearer** (default) | Yes | Most common for modern APIs | `Authorization: Bearer ` | None |
| **Basic** | Yes | Legacy authentication method | `Authorization: Basic ` | None |
| **Custom** | Yes | For APIs with non-standard authentication headers | Custom header with specified name | **Custom Header Name** (Required): The header name where your API key will be sent. Examples: `X-API-Key`, `X-Auth-Token`, `api-key`, `X-Custom-Auth` |
 ***
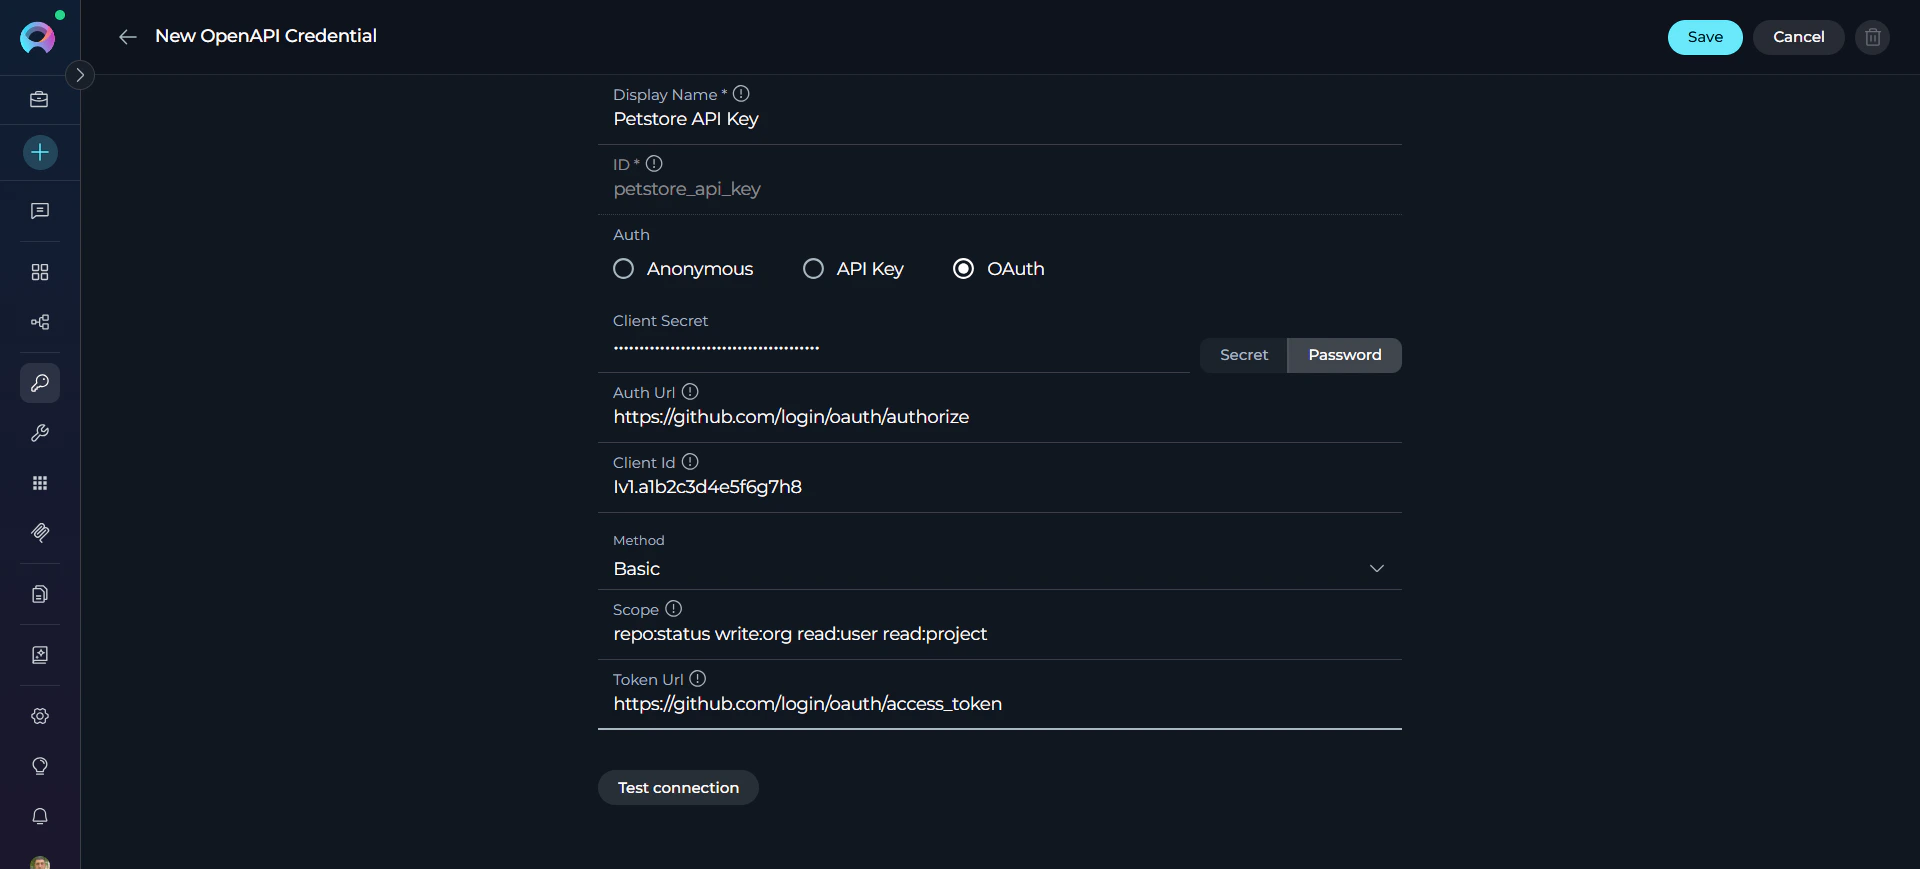
**OAuth 2.0 Authentication**
**Used for:** APIs that use OAuth 2.0 for authentication and authorization
**Configuration Fields:**
| Field | Required | Description | Example / Structure |
| ------------------ | -------- | ----------------------------------------------------------------------------------------------------------------------------------------------------------------------------------------------------------------------------------------------------------------- | --------------------------------------------------------------------------------------------------------------------------------------- |
| **client\_id** | Yes | Your OAuth application's client identifier. This is a public identifier obtained from the API provider's developer console when you register your application. Structure varies by provider. | **GitHub:** `Iv1.a1b2c3d4e5f6g7h8` |
| **client\_secret** | Yes | Your OAuth application's client secret (confidential key). This proves your application's identity to the authorization server. **Never share or commit this to code!** Stored as SecretStr (encrypted). Recommended: Use ELITEA Secrets instead of direct entry. | **GitHub:** `ghp_1234567890abcdefghijklmnopqrstuv` |
| **token\_url** | Yes | OAuth token endpoint URL where access tokens are obtained. This is the endpoint that exchanges authorization codes or credentials for access tokens. Always starts with `https://`. Provided in API documentation. | **GitHub:** `https://github.com/login/oauth/access_token` |
| **auth\_url** | No | Authorization endpoint URL where users are redirected for login and consent. Required for authorization code flows (user interaction). Not needed for client credentials flow (server-to-server). Always starts with `https://`. | **GitHub:** `https://github.com/login/oauth/authorize`
***
**OAuth 2.0 Authentication**
**Used for:** APIs that use OAuth 2.0 for authentication and authorization
**Configuration Fields:**
| Field | Required | Description | Example / Structure |
| ------------------ | -------- | ----------------------------------------------------------------------------------------------------------------------------------------------------------------------------------------------------------------------------------------------------------------- | --------------------------------------------------------------------------------------------------------------------------------------- |
| **client\_id** | Yes | Your OAuth application's client identifier. This is a public identifier obtained from the API provider's developer console when you register your application. Structure varies by provider. | **GitHub:** `Iv1.a1b2c3d4e5f6g7h8` |
| **client\_secret** | Yes | Your OAuth application's client secret (confidential key). This proves your application's identity to the authorization server. **Never share or commit this to code!** Stored as SecretStr (encrypted). Recommended: Use ELITEA Secrets instead of direct entry. | **GitHub:** `ghp_1234567890abcdefghijklmnopqrstuv` |
| **token\_url** | Yes | OAuth token endpoint URL where access tokens are obtained. This is the endpoint that exchanges authorization codes or credentials for access tokens. Always starts with `https://`. Provided in API documentation. | **GitHub:** `https://github.com/login/oauth/access_token` |
| **auth\_url** | No | Authorization endpoint URL where users are redirected for login and consent. Required for authorization code flows (user interaction). Not needed for client credentials flow (server-to-server). Always starts with `https://`. | **GitHub:** `https://github.com/login/oauth/authorize`
**Leave empty** if using client credentials flow |
| **scope** | No | Space-separated list of OAuth scopes (permissions) that define what API operations and data the access token can access. Scope names are API-specific and case-sensitive. Multiple scopes separated by spaces. | **Combined example:** `repo:status write:org read:user read:project`
**Leave empty** for default scopes |
| **method** | No | Token exchange method that determines how client credentials are sent to the token endpoint.
**`default`**: Sends credentials in POST request body
**`Basic`**: Sends credentials in Authorization header | **Use `default`** (most common)
**Use `Basic`** if API documentation explicitly requires it
**Default:** `default` if omitted |
**Important:** All required OAuth fields (client\_id, client\_secret, token\_url) must be provided together. Partial OAuth configuration will result in a validation error.
 ***
### Step 2: Create OpenAPI Toolkit
Once your credentials are configured, create the OpenAPI toolkit:
1. **Navigate to Toolkits Menu:** Open the sidebar and select **[Toolkits](../../menus/toolkits)**.
2. **Create New Toolkit:** Click the **`+ Create`** button.
3. **Select OpenAPI:** Choose **OpenAPI** from the list of available toolkit types.
4. **Configure Toolkit Details:**
* **Toolkit Name:** Enter a descriptive name for your toolkit (e.g., "GitHub API - Public Repos", "Petstore API")
* **Description:** Optional multiline text field for adding context about your toolkit and its purpose.
5. **Configure Credentials:**
* **OpenAPI credentials configuration:** Select your previously created OpenAPI Configuration credential from the dropdown (created in Step 1). For public APIs without authentication, select an Anonymous credential.
6. **Configure Base URL (Optional):**
* **Base Url:** Enter an absolute base URL (starting with `http://` or `https://`) if your OpenAPI specification uses relative server URLs (e.g., `/api/v3`) or has no `servers` entry. Example: `https://petstore3.swagger.io`. Leave empty if your specification already contains absolute server URLs.
7. **Configure OpenAPI Specification:**
* **Schema:** Provide your OpenAPI specification using one of these methods:
* **Copy & Paste:** Copy the complete JSON or YAML content and paste directly into the field
* **Drag & Drop:** Drag your specification file (`.json`, `.yaml`, `.yml`) directly into the Schema field
* **File Upload:** Click the "choose file" link and select your specification file
* The editor supports both JSON and YAML syntax highlighting
* Click the fullscreen icon (⛶) for an expanded editing view when working with large specifications
8. **Review Available API Endpoints (Tools):** After providing a valid specification, the "Api Endpoints" accordion displays all available operations. Each operation with `operationId` becomes an available tool. You can expand rows to view details, sort by columns, and navigate using pagination for large specifications.
9. **Save Toolkit:** Click **Save** to create the toolkit
***
### Step 2: Create OpenAPI Toolkit
Once your credentials are configured, create the OpenAPI toolkit:
1. **Navigate to Toolkits Menu:** Open the sidebar and select **[Toolkits](../../menus/toolkits)**.
2. **Create New Toolkit:** Click the **`+ Create`** button.
3. **Select OpenAPI:** Choose **OpenAPI** from the list of available toolkit types.
4. **Configure Toolkit Details:**
* **Toolkit Name:** Enter a descriptive name for your toolkit (e.g., "GitHub API - Public Repos", "Petstore API")
* **Description:** Optional multiline text field for adding context about your toolkit and its purpose.
5. **Configure Credentials:**
* **OpenAPI credentials configuration:** Select your previously created OpenAPI Configuration credential from the dropdown (created in Step 1). For public APIs without authentication, select an Anonymous credential.
6. **Configure Base URL (Optional):**
* **Base Url:** Enter an absolute base URL (starting with `http://` or `https://`) if your OpenAPI specification uses relative server URLs (e.g., `/api/v3`) or has no `servers` entry. Example: `https://petstore3.swagger.io`. Leave empty if your specification already contains absolute server URLs.
7. **Configure OpenAPI Specification:**
* **Schema:** Provide your OpenAPI specification using one of these methods:
* **Copy & Paste:** Copy the complete JSON or YAML content and paste directly into the field
* **Drag & Drop:** Drag your specification file (`.json`, `.yaml`, `.yml`) directly into the Schema field
* **File Upload:** Click the "choose file" link and select your specification file
* The editor supports both JSON and YAML syntax highlighting
* Click the fullscreen icon (⛶) for an expanded editing view when working with large specifications
8. **Review Available API Endpoints (Tools):** After providing a valid specification, the "Api Endpoints" accordion displays all available operations. Each operation with `operationId` becomes an available tool. You can expand rows to view details, sort by columns, and navigate using pagination for large specifications.
9. **Save Toolkit:** Click **Save** to create the toolkit
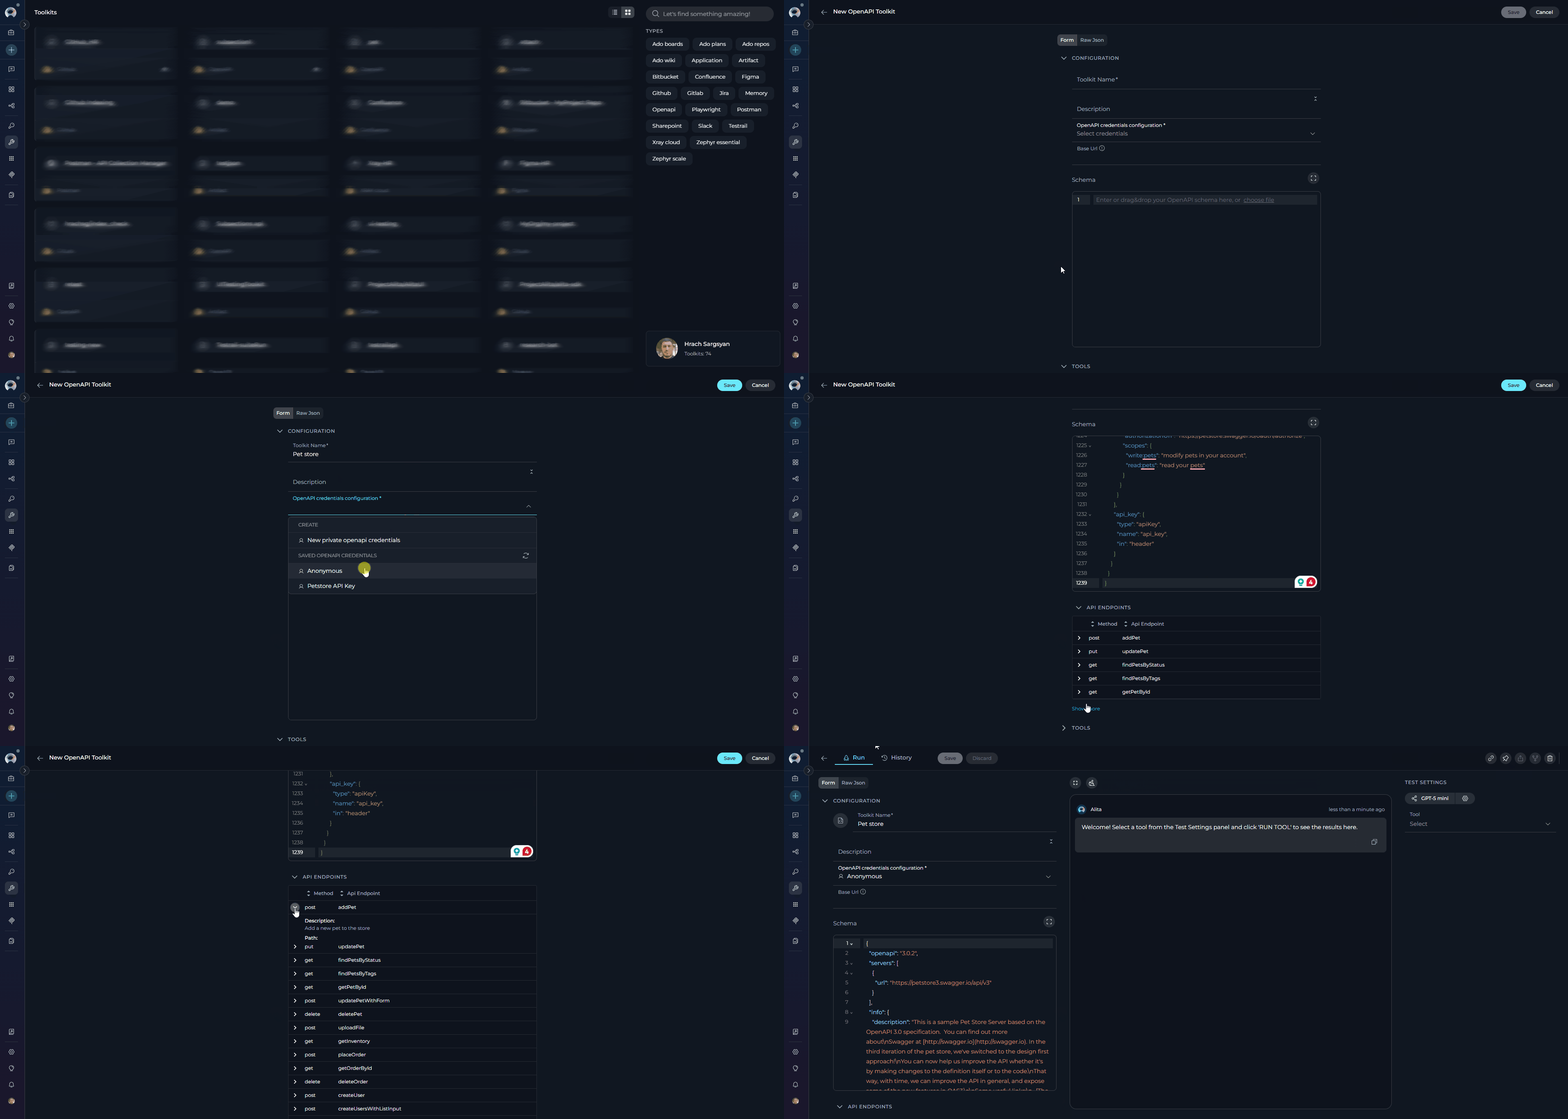 You can use the official Petstore specification at `https://petstore3.swagger.io/api/v3/openapi.json` or paste the complete specification directly into the Schema field.
***
#### Understanding Generated Tools
**How Tools Are Created**
The OpenAPI Toolkit automatically generates **one tool per API operation** (operationId) defined in your specification:
**Tool Naming:**
* Tool names come directly from the `operationId` field in your OpenAPI specification
* Example: If your spec has `operationId: "getPetById"`, the tool will be named `getPetById`
* **Important**: If an operation lacks an `operationId`, it will be skipped (not available as a tool)
***
**Accessing and Testing Tools**
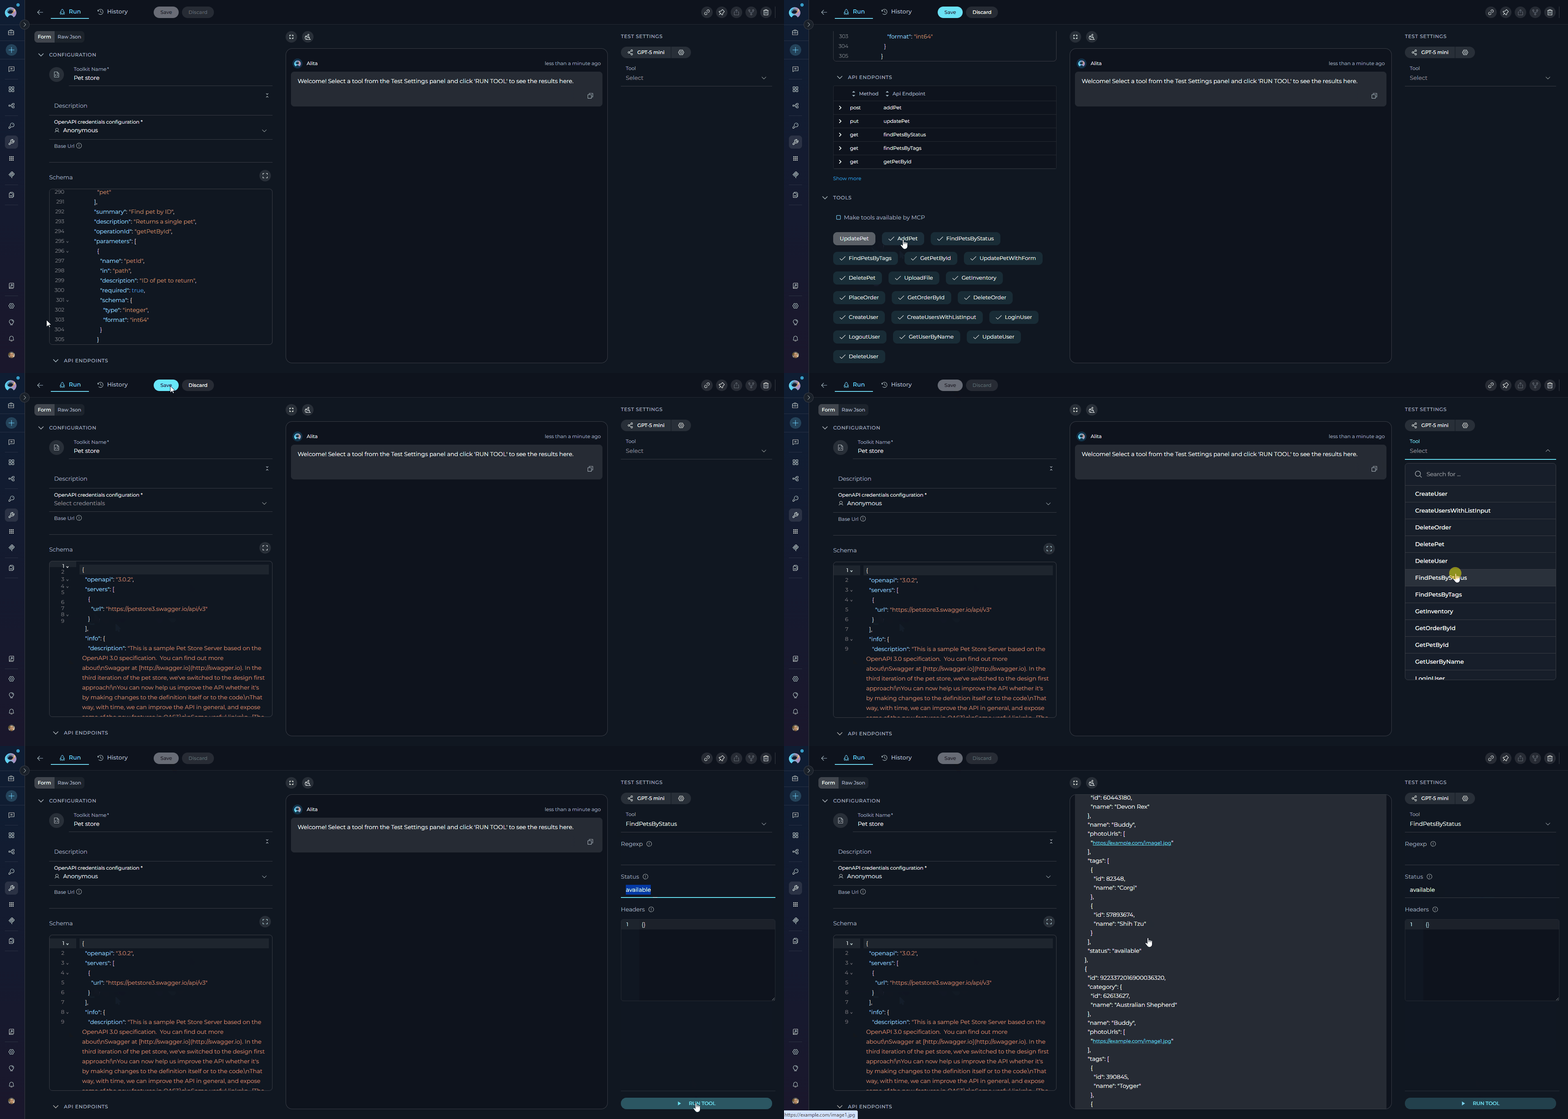
After saving your toolkit, all generated tools become available in the **TOOLS** section on the toolkit's detail page:
1. **View Available Tools:** Navigate to your saved toolkit to see the TOOLS section displaying all generated operations
2. **Select a Tool:** Click on any tool from the TOOLS list to open it
3. **Test in TEST SETTINGS Panel:** Use the TEST SETTINGS panel on the right side to:
* Configure required parameters (path, query, headers)
* Provide request body data for POST/PUT/PATCH operations
* Execute the tool and view the API response
* Verify authentication and endpoint connectivity
* Debug parameter configurations before using in agents
You can use the official Petstore specification at `https://petstore3.swagger.io/api/v3/openapi.json` or paste the complete specification directly into the Schema field.
***
#### Understanding Generated Tools
**How Tools Are Created**
The OpenAPI Toolkit automatically generates **one tool per API operation** (operationId) defined in your specification:
**Tool Naming:**
* Tool names come directly from the `operationId` field in your OpenAPI specification
* Example: If your spec has `operationId: "getPetById"`, the tool will be named `getPetById`
* **Important**: If an operation lacks an `operationId`, it will be skipped (not available as a tool)
***
**Accessing and Testing Tools**
After saving your toolkit, all generated tools become available in the **TOOLS** section on the toolkit's detail page:
1. **View Available Tools:** Navigate to your saved toolkit to see the TOOLS section displaying all generated operations
2. **Select a Tool:** Click on any tool from the TOOLS list to open it
3. **Test in TEST SETTINGS Panel:** Use the TEST SETTINGS panel on the right side to:
* Configure required parameters (path, query, headers)
* Provide request body data for POST/PUT/PATCH operations
* Execute the tool and view the API response
* Verify authentication and endpoint connectivity
* Debug parameter configurations before using in agents
 ***
### Step 3: Use OpenAPI Toolkit in Agents
Once your OpenAPI toolkit is created, you can use it in various ELITEA features:
#### **In Agents:**
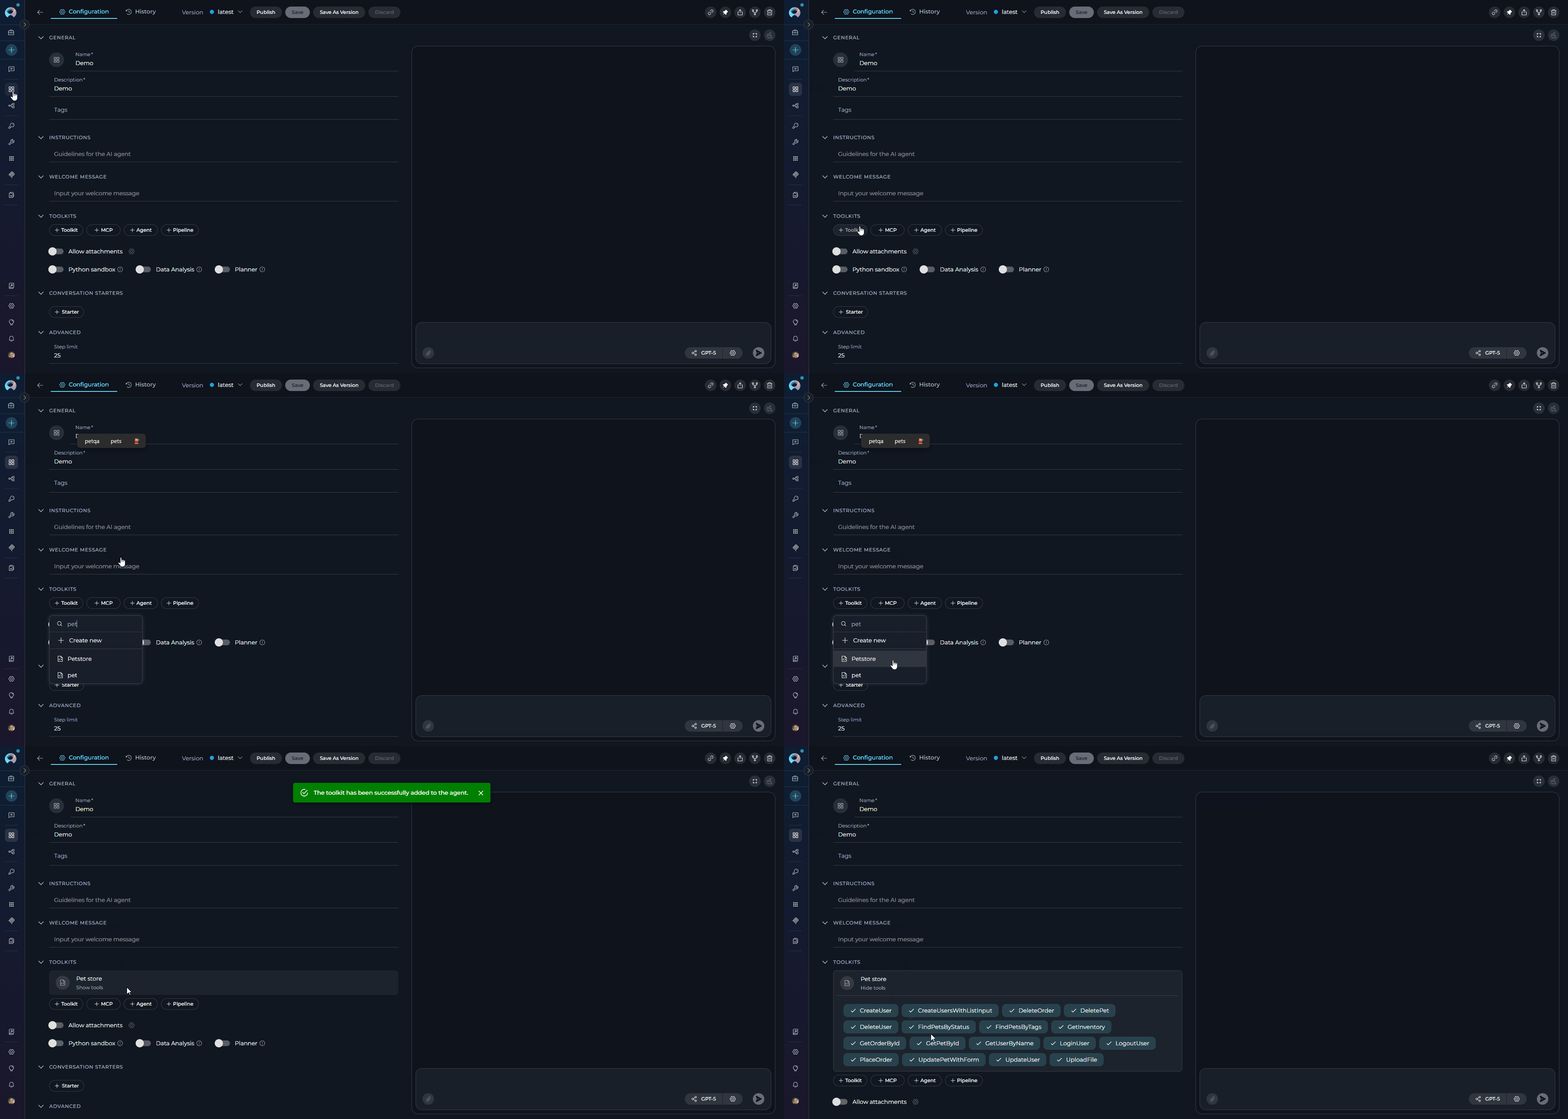
1. **Navigate to Agents:** Open the sidebar and select **[Agents](../../menus/agents)**.
2. **Create or Edit Agent:** Click **`+ Create`** for a new agent or select an existing agent to edit.
3. **Add OpenAPI Toolkit:**
* In the **"TOOLKITS"** section of the agent configuration, click the **"+Toolkit"** icon
* Select your OpenAPI toolkit from the dropdown menu
* The toolkit will be added to your agent with all configured API endpoints available as tools
Your agent can now interact with the API using the configured toolkit and automatically generated tools.
***
### Step 3: Use OpenAPI Toolkit in Agents
Once your OpenAPI toolkit is created, you can use it in various ELITEA features:
#### **In Agents:**
1. **Navigate to Agents:** Open the sidebar and select **[Agents](../../menus/agents)**.
2. **Create or Edit Agent:** Click **`+ Create`** for a new agent or select an existing agent to edit.
3. **Add OpenAPI Toolkit:**
* In the **"TOOLKITS"** section of the agent configuration, click the **"+Toolkit"** icon
* Select your OpenAPI toolkit from the dropdown menu
* The toolkit will be added to your agent with all configured API endpoints available as tools
Your agent can now interact with the API using the configured toolkit and automatically generated tools.
 #### **In Pipelines:**
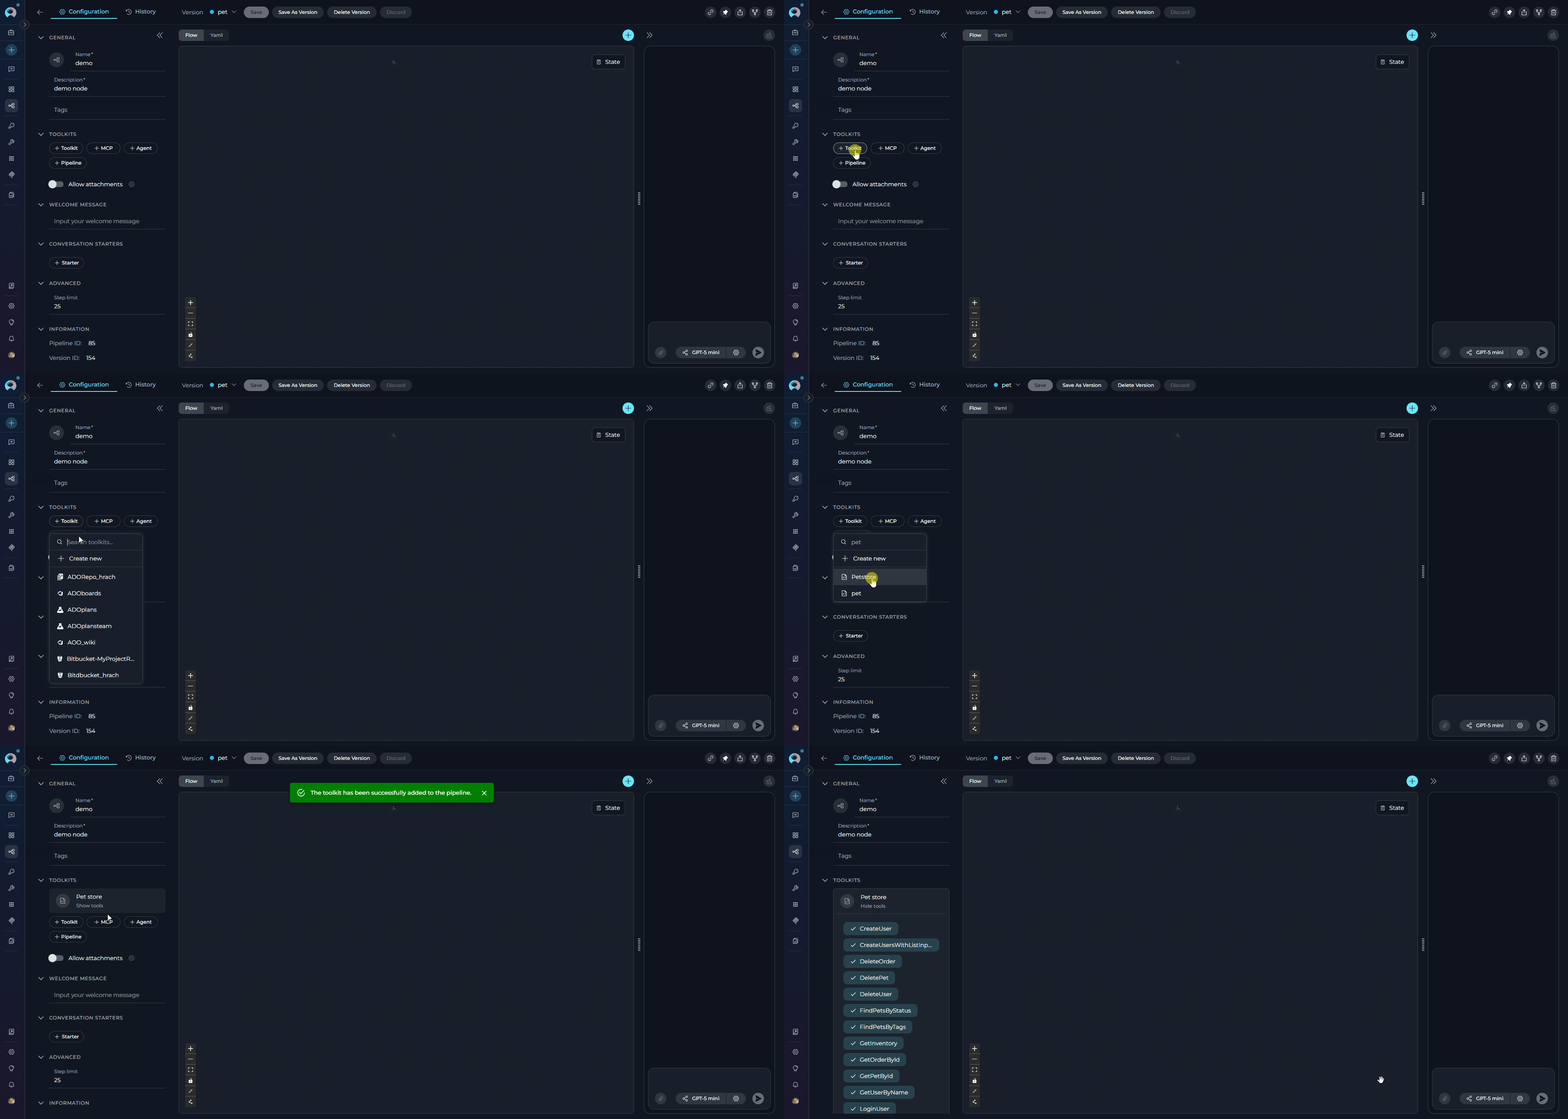
1. **Navigate to Pipelines:** Open the sidebar and select **[Pipelines](../../menus/pipelines)**.
2. **Create or Edit Pipeline:** Either create a new pipeline or select an existing pipeline to edit.
3. **Add OpenAPI Toolkit:**
* In the **"TOOLKITS"** section of the pipeline configuration, click the **"+Toolkit"** icon
* Select your OpenAPI toolkit from the dropdown menu
* The toolkit will be added to your pipeline with all configured API endpoints available
#### **In Pipelines:**
1. **Navigate to Pipelines:** Open the sidebar and select **[Pipelines](../../menus/pipelines)**.
2. **Create or Edit Pipeline:** Either create a new pipeline or select an existing pipeline to edit.
3. **Add OpenAPI Toolkit:**
* In the **"TOOLKITS"** section of the pipeline configuration, click the **"+Toolkit"** icon
* Select your OpenAPI toolkit from the dropdown menu
* The toolkit will be added to your pipeline with all configured API endpoints available
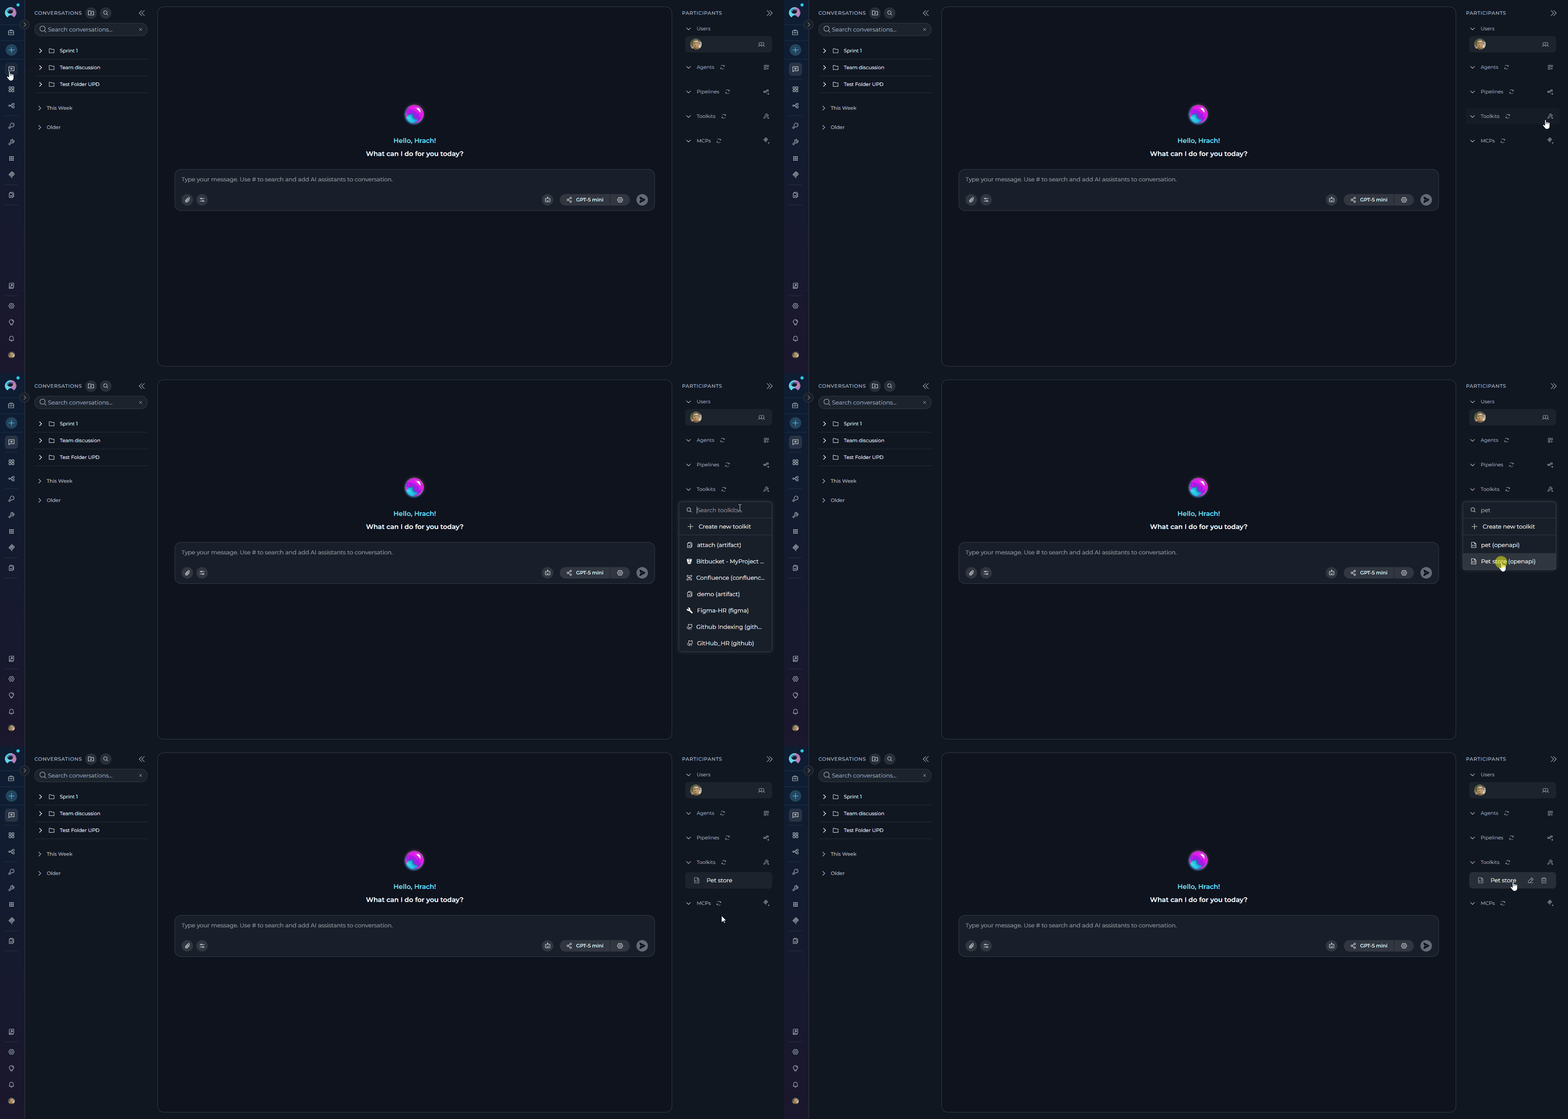
 #### **In Chat:**
1. **Navigate to Chat:** Open the sidebar and select **[Chat](../../menus/chat)**.
2. **Start New Conversation:** Click **+Create** or open an existing conversation.
3. **Add Toolkit to Conversation:**
* In the chat Participants section, look for the **Toolkits** element
* Click to add a toolkit and select your OpenAPI toolkit from the available options
* The toolkit will be added to your conversation with all API endpoints available as tools
4. **Use Toolkit in Chat:** You can now directly interact with your API by asking questions or requesting actions that will trigger the OpenAPI toolkit tools.
#### **In Chat:**
1. **Navigate to Chat:** Open the sidebar and select **[Chat](../../menus/chat)**.
2. **Start New Conversation:** Click **+Create** or open an existing conversation.
3. **Add Toolkit to Conversation:**
* In the chat Participants section, look for the **Toolkits** element
* Click to add a toolkit and select your OpenAPI toolkit from the available options
* The toolkit will be added to your conversation with all API endpoints available as tools
4. **Use Toolkit in Chat:** You can now directly interact with your API by asking questions or requesting actions that will trigger the OpenAPI toolkit tools.
 ## Instructions and Prompts for Using the OpenAPI Toolkit
To effectively instruct your ELITEA Agent to use the OpenAPI toolkit, you need to provide clear and precise instructions within the Agent's "Instructions" field. These instructions are crucial for guiding the Agent on *when* and *how* to utilize the available API tools to achieve your desired automation goals.
### Instruction Creation for OpenAI Agents
When crafting instructions for the OpenAPI toolkit, especially for OpenAI-based Agents, clarity and precision are paramount. Break down complex tasks into a sequence of simple, actionable steps. Explicitly define all parameters required for each tool and guide the Agent on how to obtain or determine the values for these parameters. OpenAI Agents respond best to instructions that are:
* **Direct and Action-Oriented:** Employ strong action verbs and clear commands to initiate actions. For example, "Use the 'getPetById' tool...", "Create a task named...", "Retrieve user data for...".
* **Parameter-Centric:** Clearly enumerate each parameter required by the tool. For each parameter, specify:
* Its name (exactly as defined in the OpenAPI specification)
* Its expected data type (string, integer, object, array, etc.)
* How the Agent should obtain the value – whether from user input, derived from previous steps in the conversation, retrieved from an external source, or a predefined static value
* **Contextually Rich:** Provide sufficient context so the Agent understands the overarching objective and the specific scenario in which each API tool should be applied within the broader workflow. Explain the desired outcome or goal for each tool invocation.
* **Step-by-Step Structure:** Organize instructions into a numbered or bulleted list of steps for complex workflows. This helps the Agent follow a logical sequence of actions.
* **Add Conversation Starters:** Include example conversation starters that users can use to trigger this functionality. For example, "Conversation Starters: 'Show me pet with ID 42', 'Create a new pet named Fluffy', 'List all available pets'"
When instructing your Agent to use an OpenAPI toolkit tool, adhere to this structured pattern:
1. **State the Goal:** Begin by clearly stating the objective you want to achieve with this step. For example, "Goal: To retrieve details of a specific pet by its ID."
2. **Specify the Tool:** Clearly indicate the specific API tool (operationId) to be used for this step. For example, "Tool: Use the 'getPetById' tool."
3. **Define Parameters:** Provide a detailed list of all parameters required by the selected tool. For each parameter:
* **Parameter Name:** ``
* **Value or Source:** ``
4. **Describe Expected Outcome (Optional but Recommended):** Briefly describe the expected result or outcome after the tool is successfully executed. For example, "Outcome: The Agent will display the full details of the specified pet."
5. **Add Conversation Starters:** Include example conversation starters that users can use to trigger this functionality. For example, "Conversation Starters: 'Show me pet 42', 'Get details for pet ID 123'"
#### Example Agent Instruction
**Agent Instruction for Petstore API:**
```markdown theme={null}
You have access to the Petstore API with the following tools:
- getPetById: Retrieve a pet by ID (requires petId parameter)
- addPet: Add a new pet (requires body_json with pet details)
- updatePet: Update existing pet (requires petId and body_json)
- deletePet: Delete a pet (requires petId parameter)
## When the user asks about a specific pet:
1. Use getPetById tool with the provided pet ID (must be an integer)
2. Present the pet information clearly including name, status, category, and photo URLs
Example interaction:
User: "Show me details for pet 42"
Tool call: getPetById(petId=42)
Response: Display pet name, status, and other details
## When the user wants to add a pet:
1. Collect required information (name, category, status, photo URLs)
2. Use addPet tool with properly formatted body_json:
{
"name": "string",
"category": {"id": 0, "name": "string"},
"status": "available",
"photoUrls": ["string"]
}
3. Confirm successful creation with the pet ID
## When the user wants to update a pet:
1. Get the pet ID and fields to update
2. Use updatePet tool with petId and body_json containing updated fields
3. Confirm the changes were applied
## When the user wants to delete a pet:
1. Confirm the pet ID to delete
2. Use deletePet tool with the petId parameter
3. Confirm successful deletion
## Parameter Guidelines:
- Path Parameters: Include as named arguments (e.g., petId=123)
- Query Parameters: Include as named arguments (e.g., status="available")
- Request Bodies: Pass as body_json string containing valid JSON
- Headers: Authentication headers are automatically applied
## Conversation Starters:
- "Show me pet 42"
- "Add a new pet named Fluffy"
- "Update pet 123 status to sold"
- "Delete pet 456"
```
### Chat Usage Example
The following example demonstrates how to interact with the OpenAPI toolkit in ELITEA Chat:
**Chat Example - Petstore API:**
```
User: "Show me the details of pet 42."
ELITEA Response: [ELITEA uses getPetById tool with petId=42]
🐾 **Pet Details** (ID: 42):
- **Name**: Fluffy
- **Category**: Dogs
- **Status**: Available
- **Photo URLs**:
- https://example.com/photos/fluffy1.jpg
- https://example.com/photos/fluffy2.jpg
This pet is currently available for adoption.
```
***
## Use Cases
The OpenAPI toolkit unlocks numerous automation possibilities for REST API integration within ELITEA:
**Scenario:** Fetch data from external services (CRM, financial APIs, analytics platforms) for analysis, reporting, or decision-making
**Example APIs:** Salesforce, Stripe, Google Analytics, database APIs
**Sample Workflow:**
```text theme={null}
Agent Instructions:
"You have access to the Sales CRM API. Use the following tools:
- getSalesData: Retrieve sales records (parameters: startDate, endDate, region)
- getCustomerDetails: Get customer information (parameter: customerId)
- getProductAnalytics: Analyze product performance (parameters: productId, period)
When analyzing sales:
1. Fetch data for the requested period
2. Calculate key metrics (total revenue, top customers, regional performance)
3. Present insights in a clear, structured format"
```
**Benefits:**
* Access external data without manual API calls
* Automated data aggregation and analysis
* Real-time insights from multiple data sources
* Intelligent data interpretation by LLM
**Scenario:** Automate creation, updating, and deletion of resources across external systems
**Example APIs:** Project management tools (Jira, Asana), cloud infrastructure (AWS, Azure), inventory systems
**Sample Workflow:**
```text theme={null}
Agent Instructions:
"You manage tasks in the Project Management API:
- createTask: Create new tasks (required: title, description; optional: dueDate, assignee, priority)
- updateTask: Modify existing tasks (required: taskId; optional: any field to update)
- deleteTask: Remove tasks (required: taskId)
- listTasks: Get all tasks (optional: projectId, status filter)
Task Management Guidelines:
- Always confirm task details before creation
- Include relevant project context
- Set realistic due dates
- Assign to appropriate team members"
```
**Benefits:**
* Streamline resource lifecycle management
* Reduce manual operations overhead
* Ensure consistent resource configuration
* Automate repetitive administrative tasks
**Scenario:** Chain multiple API calls across different services to automate complex, multi-step processes
**Example APIs:** Order management, inventory, email, notifications, payment processing
**Sample Workflow:**
```text theme={null}
Agent Instructions:
"You orchestrate order fulfillment using multiple APIs:
Order API:
- getNewOrders: Fetch pending orders
- updateOrderStatus: Mark order progress
Inventory API:
- checkStock: Verify product availability
- reduceInventory: Deduct ordered quantities
Email API:
- sendOrderConfirmation: Email customer confirmation
- sendShippingNotification: Email tracking information
Workflow:
1. Check for new orders every hour
2. Verify inventory availability
3. Update inventory levels
4. Send customer confirmation
5. Update order status to 'processing'"
```
**Benefits:**
* End-to-end process automation across multiple systems
* Reduced manual intervention and human error
* Consistent execution of complex workflows
* Intelligent decision-making at each step
**Scenario:** Connect and coordinate across multiple APIs in a single agent for complex workflows
**Example:** GitHub + Jira + Slack integration for development workflow automation
**Sample Workflow:**
```text theme={null}
Agent Instructions:
"You coordinate development workflow across tools:
GitHub API:
- getPullRequests: Fetch open PRs
- mergePullRequest: Merge approved PRs
Jira API:
- getIssueDetails: Fetch issue information
- updateIssueStatus: Move issues through workflow
Slack API:
- postMessage: Send notifications to channels
Workflow:
1. Monitor GitHub for approved pull requests
2. Check associated Jira issues
3. Merge PR if requirements met
4. Update Jira issue to 'Done'
5. Notify team in Slack"
```
**Benefits:**
* Seamless integration across development tools
* Automated status synchronization
* Reduced context switching for developers
* Consistent workflow enforcement
***
## Common Integration Patterns
**Use when**: Retrieving information, generating reports, analyzing data
**Operations**: GET requests only
**Complexity**: Low
**Use when**: Managing resources (Create, Read, Update, Delete)
**Operations**: GET, POST, PUT/PATCH, DELETE
**Complexity**: Medium
**Use when**: Automating processes spanning multiple operations
**Operations**: Sequential API calls with conditional logic
**Complexity**: High
**Use when**: Checking for new data or status changes periodically
**Operations**: Repeated GET requests with filtering
**Complexity**: Medium
**Use when**: Responding to external triggers or conditions
**Operations**: Conditional API calls based on data or events
**Complexity**: High
## Troubleshooting and Support
### Troubleshooting
**Problem:** "Description of schema is required" or "Invalid Open API schema file!"
**Troubleshooting Steps:**
1. Verify JSON/YAML syntax using [JSONLint](https://jsonlint.com/) or [YAML Lint](http://www.yamllint.com/)
2. Validate OpenAPI structure using [Swagger Editor](https://editor.swagger.io/)
3. Check that `paths` object exists and contains operations
4. Ensure each operation has both `description` and `operationId` fields
5. Verify parameter definitions include `name`, `in`, and schema/type
**Problem:** Some API endpoints don't appear in the Api Endpoints table
**Troubleshooting Steps:**
1. Review your OpenAPI specification for operations without `operationId`
2. Add unique `operationId` to every operation (e.g., `"operationId": "getPetById"`)
3. Re-upload the updated specification to the toolkit
4. Refresh the toolkit configuration to see all endpoints
**Problem:** "Action description is required" during agent execution
**Troubleshooting Steps:**
1. Review your OpenAPI specification for operations without `description` field
2. Add description to every operation (e.g., `"description": "Find pet by ID"`)
3. Re-upload the updated specification
4. Save and test the toolkit
**Problem:** HTTP 401 (Unauthorized) or 403 (Forbidden) errors
**Troubleshooting Steps:**
1. Verify API key/credentials are correct and not expired
2. Check authentication type matches API requirements (Bearer, Basic, Custom, OAuth)
3. For Custom auth, ensure `custom_header_name` matches API expectations
4. For OAuth, verify all required fields (client\_id, client\_secret, token\_url) are provided
5. Test authentication outside ELITEA using curl or Postman
6. Check if API requires additional headers or scopes
**Problem:** `missing_base_url` error - "Cannot execute HTTP request because the OpenAPI spec does not contain an absolute server URL"
**Troubleshooting Steps:**
1. Check if your specification's `servers[0].url` is relative (e.g., `/api/v3`)
2. In toolkit configuration, set the `base_url` field with absolute URL (e.g., `https://api.example.com`)
3. Alternatively, update your specification to use absolute server URLs
4. Save the toolkit and test again
**Problem:** `missing_required_inputs` error when executing API operations
**Troubleshooting Steps:**
1. Review the error details to identify which parameters are missing
2. Update agent instructions to explicitly provide all required parameters
3. Check OpenAPI specification for parameter requirements (required: true)
4. Ensure parameter names in agent instructions match specification exactly
5. For body parameters, verify `body_json` contains all required fields
**Problem:** `invalid_json_body` error - "body\_json must be valid JSON"
**Troubleshooting Steps:**
1. Validate JSON syntax in the `body_json` parameter
2. Ensure JSON is properly escaped in agent instructions
3. Use [JSONLint](https://jsonlint.com/) to verify JSON structure
4. Check for common issues: trailing commas, unescaped quotes, missing brackets
5. Provide JSON examples in agent instructions to guide the LLM
**Problem:** `http_error` with various status codes (400, 404, 500, etc.)
**Troubleshooting Steps:**
1. Review the full error message for HTTP status code and response
2. **400 Bad Request:** Check request parameters and body format
3. **404 Not Found:** Verify endpoint path and resource ID are correct
4. **429 Too Many Requests:** API rate limit exceeded; implement retry logic
5. **500 Internal Server Error:** API server issue; contact API provider
6. Test the same request directly using curl or Postman to isolate the issue
**Problem:** `operation_not_found` error - specified operation doesn't exist in specification
**Troubleshooting Steps:**
1. Verify the operationId exists in your OpenAPI specification
2. Check for typos in the operation name used by the agent
3. Ensure the operation is included in `selected_tools` (if tool selection is used)
4. Review the Api Endpoints table to see all available operations
5. Update agent instructions with correct operation names
### FAQ
Yes, you can add multiple OpenAPI toolkits to a single agent, each configured with different APIs and specifications.
Yes, both OpenAPI 2.0 (Swagger) and OpenAPI 3.x specifications are supported.
Yes, both JSON and YAML formats are fully supported. The toolkit will automatically parse either format.
The toolkit supports large specifications with no hard endpoint limit. However, providing many endpoints may impact LLM performance. Use the `selected_tools` feature to limit available tools to only those your agent needs.
Yes, edit your toolkit configuration and update the Schema field with the new specification, then save the changes.
Create separate OpenAPI Configuration credentials for each authentication method, then create separate toolkits for each, or use the `headers` parameter to add additional authentication headers per request.
Yes, as long as your ELITEA instance can reach the API's network endpoint. Ensure proper network routing, VPNs, and firewall rules are configured.
Use the Custom authentication type with `custom_header_name` to specify any header name your API requires. For complex authentication, you may need to handle token generation externally.
After saving your toolkit, open the toolkit detail page to access the TOOLS section. Select any tool from the list and use the TEST SETTINGS panel on the right side to configure parameters and execute the tool. This allows you to verify authentication, endpoint connectivity, and parameter configurations before using the toolkit in agents or chat.
Yes, that's the recommended approach! Create one credential and reuse it across all toolkits that access the same API.
Most API providers publish OpenAPI specifications in their developer documentation:
1. **Check API Documentation**: Look for "API Reference", "Developer Documentation", "Integration Guides", or "OpenAPI Specification"
2. **Common Locations**: `/swagger.json`, `/openapi.json`, or `/api-docs` endpoints
3. **File Names**: `swagger.json`, `openapi.json`, `swagger.yaml`, `openapi.yaml`, `api-spec.json`
4. **Request from Provider**: Contact the API provider if not publicly available
5. **Generate from Code**: Use tools like Swagger Codegen, FastAPI (Python), or Springdoc (Java Spring Boot)
Tool names come directly from the `operationId` field in your OpenAPI specification. After uploading your specification, check the "Api Endpoints" accordion in the toolkit configuration to see all available tool names. Use the exact operationId in your agent instructions.
**OpenAPI Configuration** (Recommended): Reusable credentials stored separately that can be shared across multiple toolkits with centralized management and Secrets integration.
**Direct Toolkit Authentication**: Authentication configured within each toolkit, less reusable but simpler for single-use cases.
Use the `body_json` parameter with a valid JSON string. The JSON must use double quotes, have no trailing commas, and be passed as a string (not an object). The toolkit parses and sends it as the request body.
Use the `headers` parameter available on all generated tools. Authentication headers from OpenAPI Configuration are automatically added; the `headers` parameter is for additional per-call headers.
Guide the agent in instructions to make multiple calls. Specify the pagination parameters (page, pageSize), check response indicators (hasMore, totalPages), and instruct the agent to repeat calls until all data is retrieved.
Common causes: Missing `operationId` (operations are skipped without it), invalid specification (validate at [Swagger Editor](https://editor.swagger.io/)), or missing descriptions. Add both `operationId` and `description` fields to all operations.
No hard limit, but large specifications (100+ endpoints) may impact LLM performance. Consider using `selected_tools` to enable only needed operations or break very large APIs into focused specifications per use case.
### Support Contact
For issues, questions, or assistance with OpenAPI integration, please refer to **[Contact Support](../../support/contact-support)** for detailed information on how to reach the ELITEA Support Team.
* **[OpenAPI Initiative](https://www.openapis.org/)**: Official OpenAPI home and community resources
* **[OpenAPI Specification](https://spec.openapis.org/oas/latest.html)**: Complete specification documentation and schema reference
* **[Swagger Editor](https://editor.swagger.io/)**: Online editor for creating, editing, and validating OpenAPI specifications
* **[JSONLint](https://jsonlint.com/)**: JSON validation tool for checking syntax errors
* **[YAML Lint](http://www.yamllint.com/)**: YAML validation tool for checking syntax errors
## Instructions and Prompts for Using the OpenAPI Toolkit
To effectively instruct your ELITEA Agent to use the OpenAPI toolkit, you need to provide clear and precise instructions within the Agent's "Instructions" field. These instructions are crucial for guiding the Agent on *when* and *how* to utilize the available API tools to achieve your desired automation goals.
### Instruction Creation for OpenAI Agents
When crafting instructions for the OpenAPI toolkit, especially for OpenAI-based Agents, clarity and precision are paramount. Break down complex tasks into a sequence of simple, actionable steps. Explicitly define all parameters required for each tool and guide the Agent on how to obtain or determine the values for these parameters. OpenAI Agents respond best to instructions that are:
* **Direct and Action-Oriented:** Employ strong action verbs and clear commands to initiate actions. For example, "Use the 'getPetById' tool...", "Create a task named...", "Retrieve user data for...".
* **Parameter-Centric:** Clearly enumerate each parameter required by the tool. For each parameter, specify:
* Its name (exactly as defined in the OpenAPI specification)
* Its expected data type (string, integer, object, array, etc.)
* How the Agent should obtain the value – whether from user input, derived from previous steps in the conversation, retrieved from an external source, or a predefined static value
* **Contextually Rich:** Provide sufficient context so the Agent understands the overarching objective and the specific scenario in which each API tool should be applied within the broader workflow. Explain the desired outcome or goal for each tool invocation.
* **Step-by-Step Structure:** Organize instructions into a numbered or bulleted list of steps for complex workflows. This helps the Agent follow a logical sequence of actions.
* **Add Conversation Starters:** Include example conversation starters that users can use to trigger this functionality. For example, "Conversation Starters: 'Show me pet with ID 42', 'Create a new pet named Fluffy', 'List all available pets'"
When instructing your Agent to use an OpenAPI toolkit tool, adhere to this structured pattern:
1. **State the Goal:** Begin by clearly stating the objective you want to achieve with this step. For example, "Goal: To retrieve details of a specific pet by its ID."
2. **Specify the Tool:** Clearly indicate the specific API tool (operationId) to be used for this step. For example, "Tool: Use the 'getPetById' tool."
3. **Define Parameters:** Provide a detailed list of all parameters required by the selected tool. For each parameter:
* **Parameter Name:** ``
* **Value or Source:** ``
4. **Describe Expected Outcome (Optional but Recommended):** Briefly describe the expected result or outcome after the tool is successfully executed. For example, "Outcome: The Agent will display the full details of the specified pet."
5. **Add Conversation Starters:** Include example conversation starters that users can use to trigger this functionality. For example, "Conversation Starters: 'Show me pet 42', 'Get details for pet ID 123'"
#### Example Agent Instruction
**Agent Instruction for Petstore API:**
```markdown theme={null}
You have access to the Petstore API with the following tools:
- getPetById: Retrieve a pet by ID (requires petId parameter)
- addPet: Add a new pet (requires body_json with pet details)
- updatePet: Update existing pet (requires petId and body_json)
- deletePet: Delete a pet (requires petId parameter)
## When the user asks about a specific pet:
1. Use getPetById tool with the provided pet ID (must be an integer)
2. Present the pet information clearly including name, status, category, and photo URLs
Example interaction:
User: "Show me details for pet 42"
Tool call: getPetById(petId=42)
Response: Display pet name, status, and other details
## When the user wants to add a pet:
1. Collect required information (name, category, status, photo URLs)
2. Use addPet tool with properly formatted body_json:
{
"name": "string",
"category": {"id": 0, "name": "string"},
"status": "available",
"photoUrls": ["string"]
}
3. Confirm successful creation with the pet ID
## When the user wants to update a pet:
1. Get the pet ID and fields to update
2. Use updatePet tool with petId and body_json containing updated fields
3. Confirm the changes were applied
## When the user wants to delete a pet:
1. Confirm the pet ID to delete
2. Use deletePet tool with the petId parameter
3. Confirm successful deletion
## Parameter Guidelines:
- Path Parameters: Include as named arguments (e.g., petId=123)
- Query Parameters: Include as named arguments (e.g., status="available")
- Request Bodies: Pass as body_json string containing valid JSON
- Headers: Authentication headers are automatically applied
## Conversation Starters:
- "Show me pet 42"
- "Add a new pet named Fluffy"
- "Update pet 123 status to sold"
- "Delete pet 456"
```
### Chat Usage Example
The following example demonstrates how to interact with the OpenAPI toolkit in ELITEA Chat:
**Chat Example - Petstore API:**
```
User: "Show me the details of pet 42."
ELITEA Response: [ELITEA uses getPetById tool with petId=42]
🐾 **Pet Details** (ID: 42):
- **Name**: Fluffy
- **Category**: Dogs
- **Status**: Available
- **Photo URLs**:
- https://example.com/photos/fluffy1.jpg
- https://example.com/photos/fluffy2.jpg
This pet is currently available for adoption.
```
***
## Use Cases
The OpenAPI toolkit unlocks numerous automation possibilities for REST API integration within ELITEA:
**Scenario:** Fetch data from external services (CRM, financial APIs, analytics platforms) for analysis, reporting, or decision-making
**Example APIs:** Salesforce, Stripe, Google Analytics, database APIs
**Sample Workflow:**
```text theme={null}
Agent Instructions:
"You have access to the Sales CRM API. Use the following tools:
- getSalesData: Retrieve sales records (parameters: startDate, endDate, region)
- getCustomerDetails: Get customer information (parameter: customerId)
- getProductAnalytics: Analyze product performance (parameters: productId, period)
When analyzing sales:
1. Fetch data for the requested period
2. Calculate key metrics (total revenue, top customers, regional performance)
3. Present insights in a clear, structured format"
```
**Benefits:**
* Access external data without manual API calls
* Automated data aggregation and analysis
* Real-time insights from multiple data sources
* Intelligent data interpretation by LLM
**Scenario:** Automate creation, updating, and deletion of resources across external systems
**Example APIs:** Project management tools (Jira, Asana), cloud infrastructure (AWS, Azure), inventory systems
**Sample Workflow:**
```text theme={null}
Agent Instructions:
"You manage tasks in the Project Management API:
- createTask: Create new tasks (required: title, description; optional: dueDate, assignee, priority)
- updateTask: Modify existing tasks (required: taskId; optional: any field to update)
- deleteTask: Remove tasks (required: taskId)
- listTasks: Get all tasks (optional: projectId, status filter)
Task Management Guidelines:
- Always confirm task details before creation
- Include relevant project context
- Set realistic due dates
- Assign to appropriate team members"
```
**Benefits:**
* Streamline resource lifecycle management
* Reduce manual operations overhead
* Ensure consistent resource configuration
* Automate repetitive administrative tasks
**Scenario:** Chain multiple API calls across different services to automate complex, multi-step processes
**Example APIs:** Order management, inventory, email, notifications, payment processing
**Sample Workflow:**
```text theme={null}
Agent Instructions:
"You orchestrate order fulfillment using multiple APIs:
Order API:
- getNewOrders: Fetch pending orders
- updateOrderStatus: Mark order progress
Inventory API:
- checkStock: Verify product availability
- reduceInventory: Deduct ordered quantities
Email API:
- sendOrderConfirmation: Email customer confirmation
- sendShippingNotification: Email tracking information
Workflow:
1. Check for new orders every hour
2. Verify inventory availability
3. Update inventory levels
4. Send customer confirmation
5. Update order status to 'processing'"
```
**Benefits:**
* End-to-end process automation across multiple systems
* Reduced manual intervention and human error
* Consistent execution of complex workflows
* Intelligent decision-making at each step
**Scenario:** Connect and coordinate across multiple APIs in a single agent for complex workflows
**Example:** GitHub + Jira + Slack integration for development workflow automation
**Sample Workflow:**
```text theme={null}
Agent Instructions:
"You coordinate development workflow across tools:
GitHub API:
- getPullRequests: Fetch open PRs
- mergePullRequest: Merge approved PRs
Jira API:
- getIssueDetails: Fetch issue information
- updateIssueStatus: Move issues through workflow
Slack API:
- postMessage: Send notifications to channels
Workflow:
1. Monitor GitHub for approved pull requests
2. Check associated Jira issues
3. Merge PR if requirements met
4. Update Jira issue to 'Done'
5. Notify team in Slack"
```
**Benefits:**
* Seamless integration across development tools
* Automated status synchronization
* Reduced context switching for developers
* Consistent workflow enforcement
***
## Common Integration Patterns
**Use when**: Retrieving information, generating reports, analyzing data
**Operations**: GET requests only
**Complexity**: Low
**Use when**: Managing resources (Create, Read, Update, Delete)
**Operations**: GET, POST, PUT/PATCH, DELETE
**Complexity**: Medium
**Use when**: Automating processes spanning multiple operations
**Operations**: Sequential API calls with conditional logic
**Complexity**: High
**Use when**: Checking for new data or status changes periodically
**Operations**: Repeated GET requests with filtering
**Complexity**: Medium
**Use when**: Responding to external triggers or conditions
**Operations**: Conditional API calls based on data or events
**Complexity**: High
## Troubleshooting and Support
### Troubleshooting
**Problem:** "Description of schema is required" or "Invalid Open API schema file!"
**Troubleshooting Steps:**
1. Verify JSON/YAML syntax using [JSONLint](https://jsonlint.com/) or [YAML Lint](http://www.yamllint.com/)
2. Validate OpenAPI structure using [Swagger Editor](https://editor.swagger.io/)
3. Check that `paths` object exists and contains operations
4. Ensure each operation has both `description` and `operationId` fields
5. Verify parameter definitions include `name`, `in`, and schema/type
**Problem:** Some API endpoints don't appear in the Api Endpoints table
**Troubleshooting Steps:**
1. Review your OpenAPI specification for operations without `operationId`
2. Add unique `operationId` to every operation (e.g., `"operationId": "getPetById"`)
3. Re-upload the updated specification to the toolkit
4. Refresh the toolkit configuration to see all endpoints
**Problem:** "Action description is required" during agent execution
**Troubleshooting Steps:**
1. Review your OpenAPI specification for operations without `description` field
2. Add description to every operation (e.g., `"description": "Find pet by ID"`)
3. Re-upload the updated specification
4. Save and test the toolkit
**Problem:** HTTP 401 (Unauthorized) or 403 (Forbidden) errors
**Troubleshooting Steps:**
1. Verify API key/credentials are correct and not expired
2. Check authentication type matches API requirements (Bearer, Basic, Custom, OAuth)
3. For Custom auth, ensure `custom_header_name` matches API expectations
4. For OAuth, verify all required fields (client\_id, client\_secret, token\_url) are provided
5. Test authentication outside ELITEA using curl or Postman
6. Check if API requires additional headers or scopes
**Problem:** `missing_base_url` error - "Cannot execute HTTP request because the OpenAPI spec does not contain an absolute server URL"
**Troubleshooting Steps:**
1. Check if your specification's `servers[0].url` is relative (e.g., `/api/v3`)
2. In toolkit configuration, set the `base_url` field with absolute URL (e.g., `https://api.example.com`)
3. Alternatively, update your specification to use absolute server URLs
4. Save the toolkit and test again
**Problem:** `missing_required_inputs` error when executing API operations
**Troubleshooting Steps:**
1. Review the error details to identify which parameters are missing
2. Update agent instructions to explicitly provide all required parameters
3. Check OpenAPI specification for parameter requirements (required: true)
4. Ensure parameter names in agent instructions match specification exactly
5. For body parameters, verify `body_json` contains all required fields
**Problem:** `invalid_json_body` error - "body\_json must be valid JSON"
**Troubleshooting Steps:**
1. Validate JSON syntax in the `body_json` parameter
2. Ensure JSON is properly escaped in agent instructions
3. Use [JSONLint](https://jsonlint.com/) to verify JSON structure
4. Check for common issues: trailing commas, unescaped quotes, missing brackets
5. Provide JSON examples in agent instructions to guide the LLM
**Problem:** `http_error` with various status codes (400, 404, 500, etc.)
**Troubleshooting Steps:**
1. Review the full error message for HTTP status code and response
2. **400 Bad Request:** Check request parameters and body format
3. **404 Not Found:** Verify endpoint path and resource ID are correct
4. **429 Too Many Requests:** API rate limit exceeded; implement retry logic
5. **500 Internal Server Error:** API server issue; contact API provider
6. Test the same request directly using curl or Postman to isolate the issue
**Problem:** `operation_not_found` error - specified operation doesn't exist in specification
**Troubleshooting Steps:**
1. Verify the operationId exists in your OpenAPI specification
2. Check for typos in the operation name used by the agent
3. Ensure the operation is included in `selected_tools` (if tool selection is used)
4. Review the Api Endpoints table to see all available operations
5. Update agent instructions with correct operation names
### FAQ
Yes, you can add multiple OpenAPI toolkits to a single agent, each configured with different APIs and specifications.
Yes, both OpenAPI 2.0 (Swagger) and OpenAPI 3.x specifications are supported.
Yes, both JSON and YAML formats are fully supported. The toolkit will automatically parse either format.
The toolkit supports large specifications with no hard endpoint limit. However, providing many endpoints may impact LLM performance. Use the `selected_tools` feature to limit available tools to only those your agent needs.
Yes, edit your toolkit configuration and update the Schema field with the new specification, then save the changes.
Create separate OpenAPI Configuration credentials for each authentication method, then create separate toolkits for each, or use the `headers` parameter to add additional authentication headers per request.
Yes, as long as your ELITEA instance can reach the API's network endpoint. Ensure proper network routing, VPNs, and firewall rules are configured.
Use the Custom authentication type with `custom_header_name` to specify any header name your API requires. For complex authentication, you may need to handle token generation externally.
After saving your toolkit, open the toolkit detail page to access the TOOLS section. Select any tool from the list and use the TEST SETTINGS panel on the right side to configure parameters and execute the tool. This allows you to verify authentication, endpoint connectivity, and parameter configurations before using the toolkit in agents or chat.
Yes, that's the recommended approach! Create one credential and reuse it across all toolkits that access the same API.
Most API providers publish OpenAPI specifications in their developer documentation:
1. **Check API Documentation**: Look for "API Reference", "Developer Documentation", "Integration Guides", or "OpenAPI Specification"
2. **Common Locations**: `/swagger.json`, `/openapi.json`, or `/api-docs` endpoints
3. **File Names**: `swagger.json`, `openapi.json`, `swagger.yaml`, `openapi.yaml`, `api-spec.json`
4. **Request from Provider**: Contact the API provider if not publicly available
5. **Generate from Code**: Use tools like Swagger Codegen, FastAPI (Python), or Springdoc (Java Spring Boot)
Tool names come directly from the `operationId` field in your OpenAPI specification. After uploading your specification, check the "Api Endpoints" accordion in the toolkit configuration to see all available tool names. Use the exact operationId in your agent instructions.
**OpenAPI Configuration** (Recommended): Reusable credentials stored separately that can be shared across multiple toolkits with centralized management and Secrets integration.
**Direct Toolkit Authentication**: Authentication configured within each toolkit, less reusable but simpler for single-use cases.
Use the `body_json` parameter with a valid JSON string. The JSON must use double quotes, have no trailing commas, and be passed as a string (not an object). The toolkit parses and sends it as the request body.
Use the `headers` parameter available on all generated tools. Authentication headers from OpenAPI Configuration are automatically added; the `headers` parameter is for additional per-call headers.
Guide the agent in instructions to make multiple calls. Specify the pagination parameters (page, pageSize), check response indicators (hasMore, totalPages), and instruct the agent to repeat calls until all data is retrieved.
Common causes: Missing `operationId` (operations are skipped without it), invalid specification (validate at [Swagger Editor](https://editor.swagger.io/)), or missing descriptions. Add both `operationId` and `description` fields to all operations.
No hard limit, but large specifications (100+ endpoints) may impact LLM performance. Consider using `selected_tools` to enable only needed operations or break very large APIs into focused specifications per use case.
### Support Contact
For issues, questions, or assistance with OpenAPI integration, please refer to **[Contact Support](../../support/contact-support)** for detailed information on how to reach the ELITEA Support Team.
* **[OpenAPI Initiative](https://www.openapis.org/)**: Official OpenAPI home and community resources
* **[OpenAPI Specification](https://spec.openapis.org/oas/latest.html)**: Complete specification documentation and schema reference
* **[Swagger Editor](https://editor.swagger.io/)**: Online editor for creating, editing, and validating OpenAPI specifications
* **[JSONLint](https://jsonlint.com/)**: JSON validation tool for checking syntax errors
* **[YAML Lint](http://www.yamllint.com/)**: YAML validation tool for checking syntax errors