> ## Documentation Index
> Fetch the complete documentation index at: https://docs.elitea.ai/llms.txt
> Use this file to discover all available pages before exploring further.
# Quick Start: Setting Up Your First MCP Server
> Set up a local MCP server that connects Elitea to VS Code, including bootstrap, configuration, and Copilot integration steps.
## Before You Start
Before you begin, make sure you have:
* ☑️ **VS Code installed** (version 1.99 or newer)
* ☑️ **GitHub Copilot** installed and configured in VS Code
* ☑️ **Python installed** on your computer (version 3.8 or newer) - [Download Python](https://www.python.org/downloads/)
* ☑️ **Your Elitea Project ID** (find this in Elitea Settings → [Configuration](../../menus/settings/ai-configuration#server-configuration-fields))
* ☑️ **Your Elitea Authentication Token** (create one in Elitea Settings → [Personal Tokens](../../getting-started/create-personal-access-token))
* ☑️ **Your Elitea deployment URL** (example: `https://next.elitea.ai`)
***
## What is MCP and Why Do I Need It?
**MCP** stands for Model Context Protocol. It's a way for different AI tools to talk to each other.
**Why it matters to you:** By setting up an MCP server, you can use your Elitea agents directly inside VS Code while you code. No need to switch windows or copy-paste between apps.
***
## Step-by-Step Setup
### Part 1: Install the Elitea MCP Client
The "client" is a small program that handles communication between VS Code and Elitea.
1. **Open PowerShell**
* Press `Windows key`, type "PowerShell", and press Enter
* This opens a window where you'll type commands
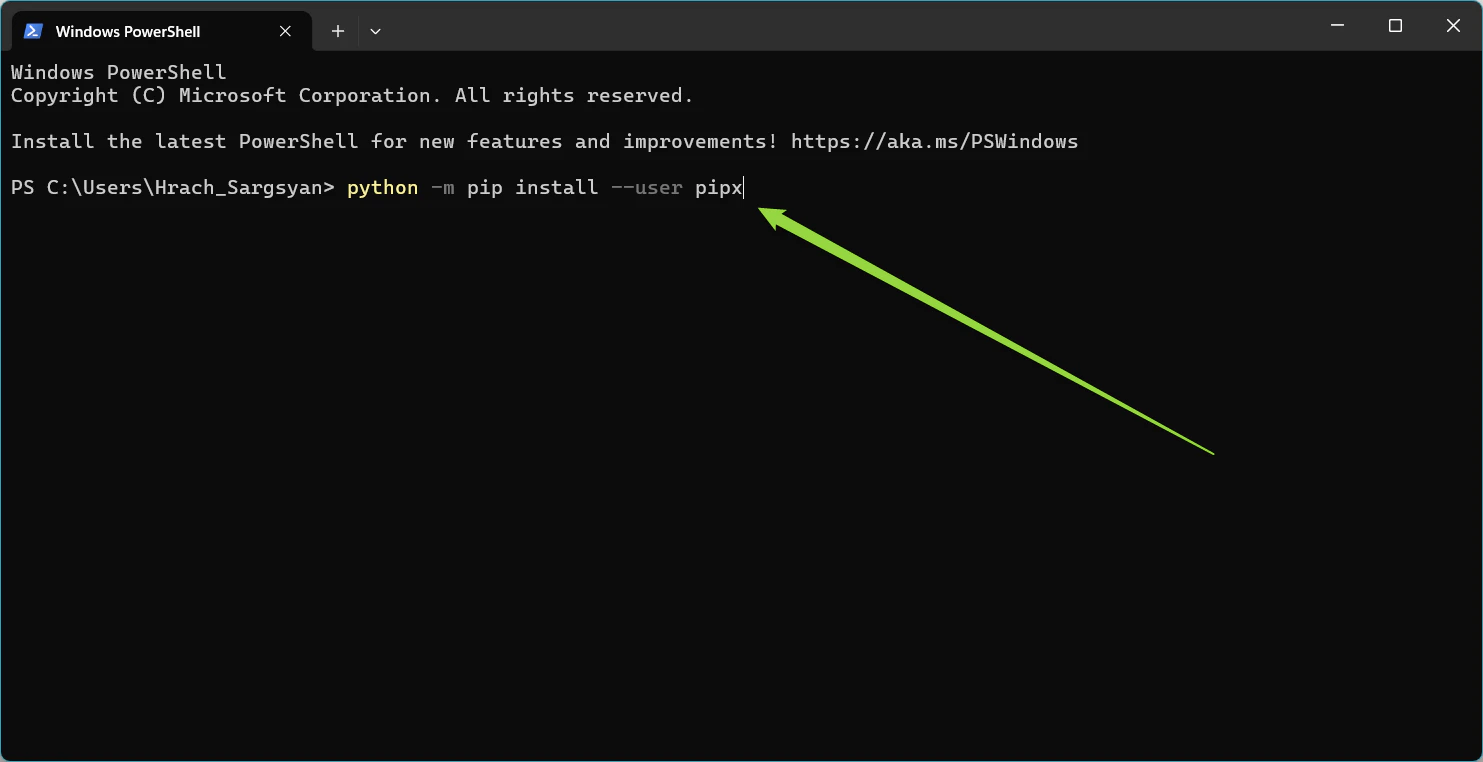
2. **Install pipx** (a tool that helps install Python programs)
* Copy this command and paste it into PowerShell, then press Enter:
```powershell theme={null}
python -m pip install --user pipx
```
* Wait for it to finish
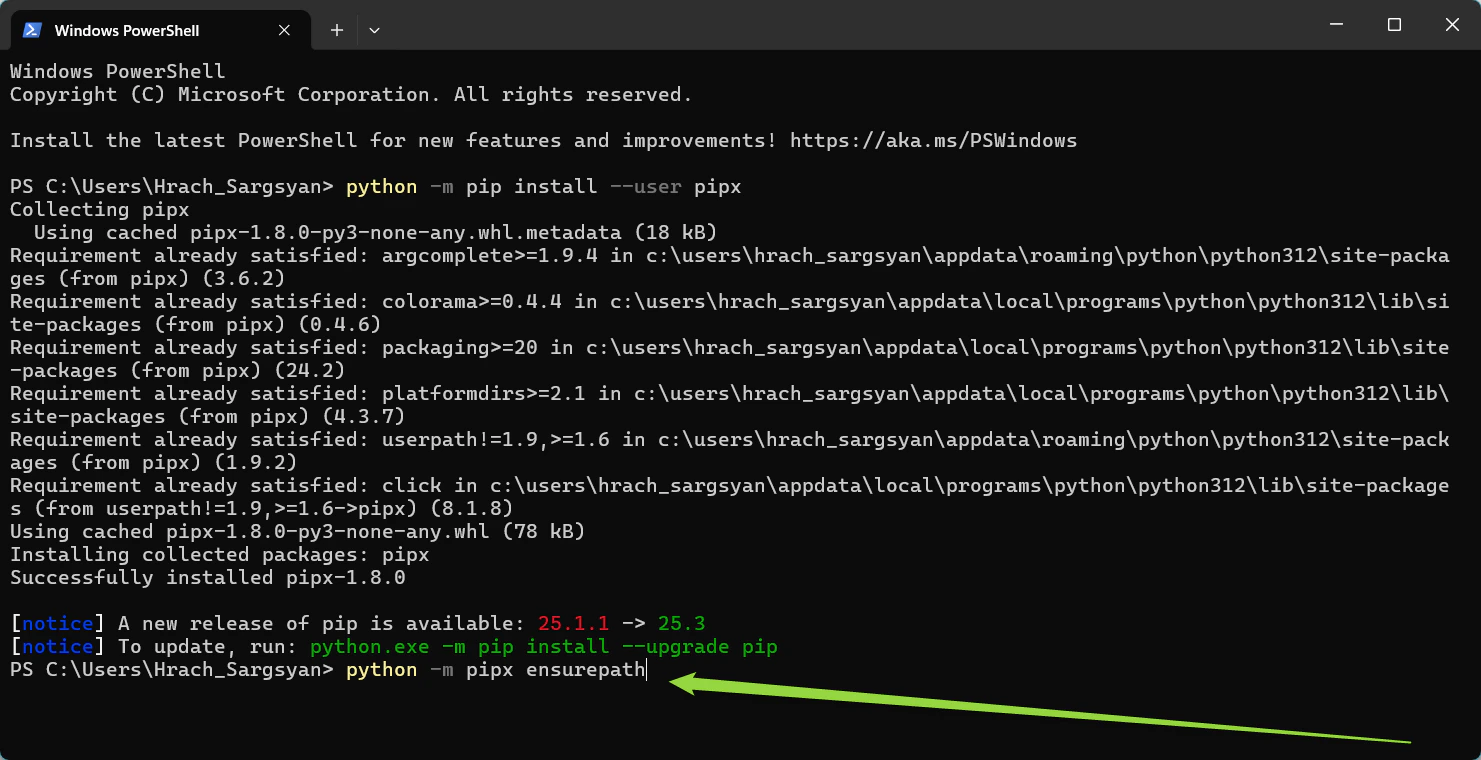
 3. **Set up pipx's path**
* This makes sure your computer can find pipx. Copy and run:
```powershell theme={null}
python -m pipx ensurepath
```
3. **Set up pipx's path**
* This makes sure your computer can find pipx. Copy and run:
```powershell theme={null}
python -m pipx ensurepath
```
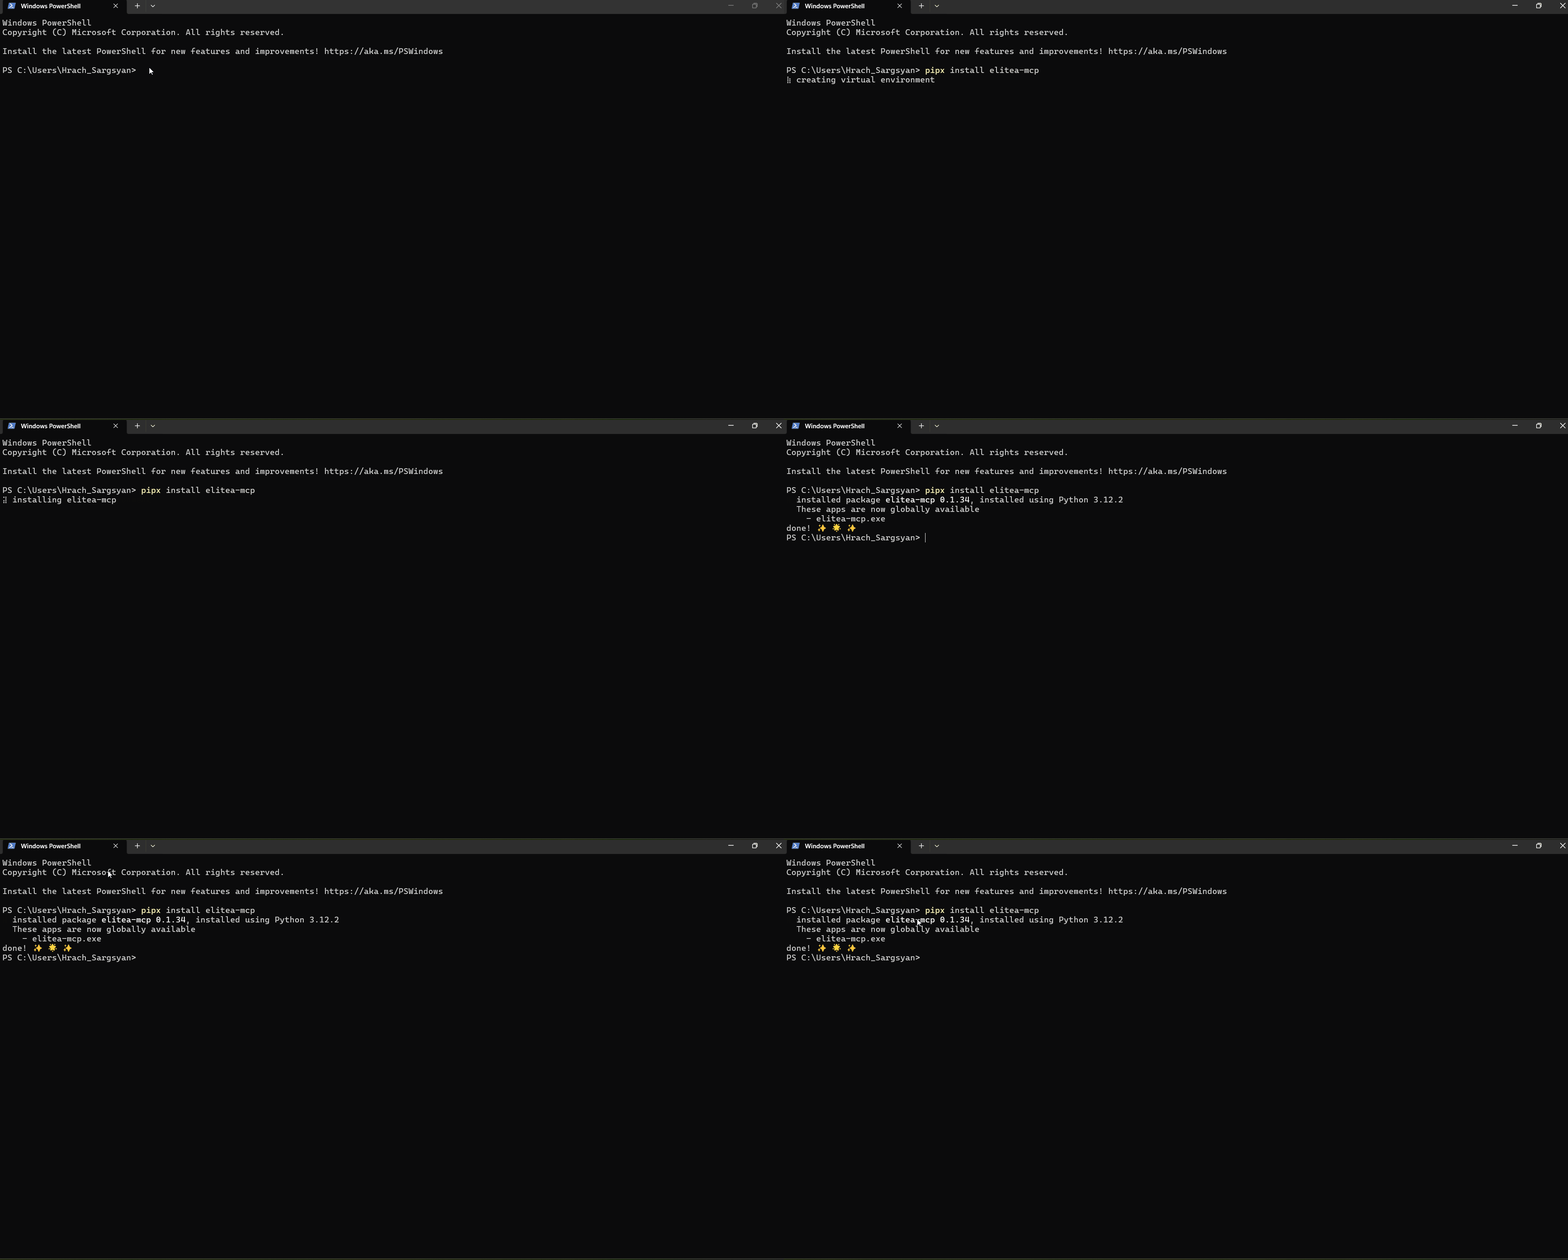
 4. **Install elitea-mcp**
* This is the actual client program. Copy and run:
```powershell theme={null}
pipx install elitea-mcp
```
* Wait for installation to complete
4. **Install elitea-mcp**
* This is the actual client program. Copy and run:
```powershell theme={null}
pipx install elitea-mcp
```
* Wait for installation to complete
 5. **Close and reopen PowerShell**
* This refreshes your environment so the new program is recognized
***
### Part 2: Configure the Client
Now you'll tell the client how to connect to your Elitea account.
1. **Run the setup wizard**
* In PowerShell, type:
```powershell theme={null}
elitea-mcp bootstrap
```
* Press Enter
2. **Answer the prompts**
* **Deployment URL:** Type your Elitea URL (example: `https://next.elitea.ai`) and press Enter
* **Authentication token:** Paste your token (the one you copied earlier) and press Enter
* **Host:** Just press Enter to accept the default (`0.0.0.0`)
* **Port:** Just press Enter to accept the default (`8000`)
* **Project ID:** You can either:
* Enter your Project ID number now (find it in Elitea Settings → Configuration), OR
* Press `Ctrl+C` to skip this step and add the Project ID later in VS Code (see Part 4)
3. **Verify success**
* You should see a message confirming the configuration was saved
* If you see errors, double-check your URL and token
5. **Close and reopen PowerShell**
* This refreshes your environment so the new program is recognized
***
### Part 2: Configure the Client
Now you'll tell the client how to connect to your Elitea account.
1. **Run the setup wizard**
* In PowerShell, type:
```powershell theme={null}
elitea-mcp bootstrap
```
* Press Enter
2. **Answer the prompts**
* **Deployment URL:** Type your Elitea URL (example: `https://next.elitea.ai`) and press Enter
* **Authentication token:** Paste your token (the one you copied earlier) and press Enter
* **Host:** Just press Enter to accept the default (`0.0.0.0`)
* **Port:** Just press Enter to accept the default (`8000`)
* **Project ID:** You can either:
* Enter your Project ID number now (find it in Elitea Settings → Configuration), OR
* Press `Ctrl+C` to skip this step and add the Project ID later in VS Code (see Part 4)
3. **Verify success**
* You should see a message confirming the configuration was saved
* If you see errors, double-check your URL and token
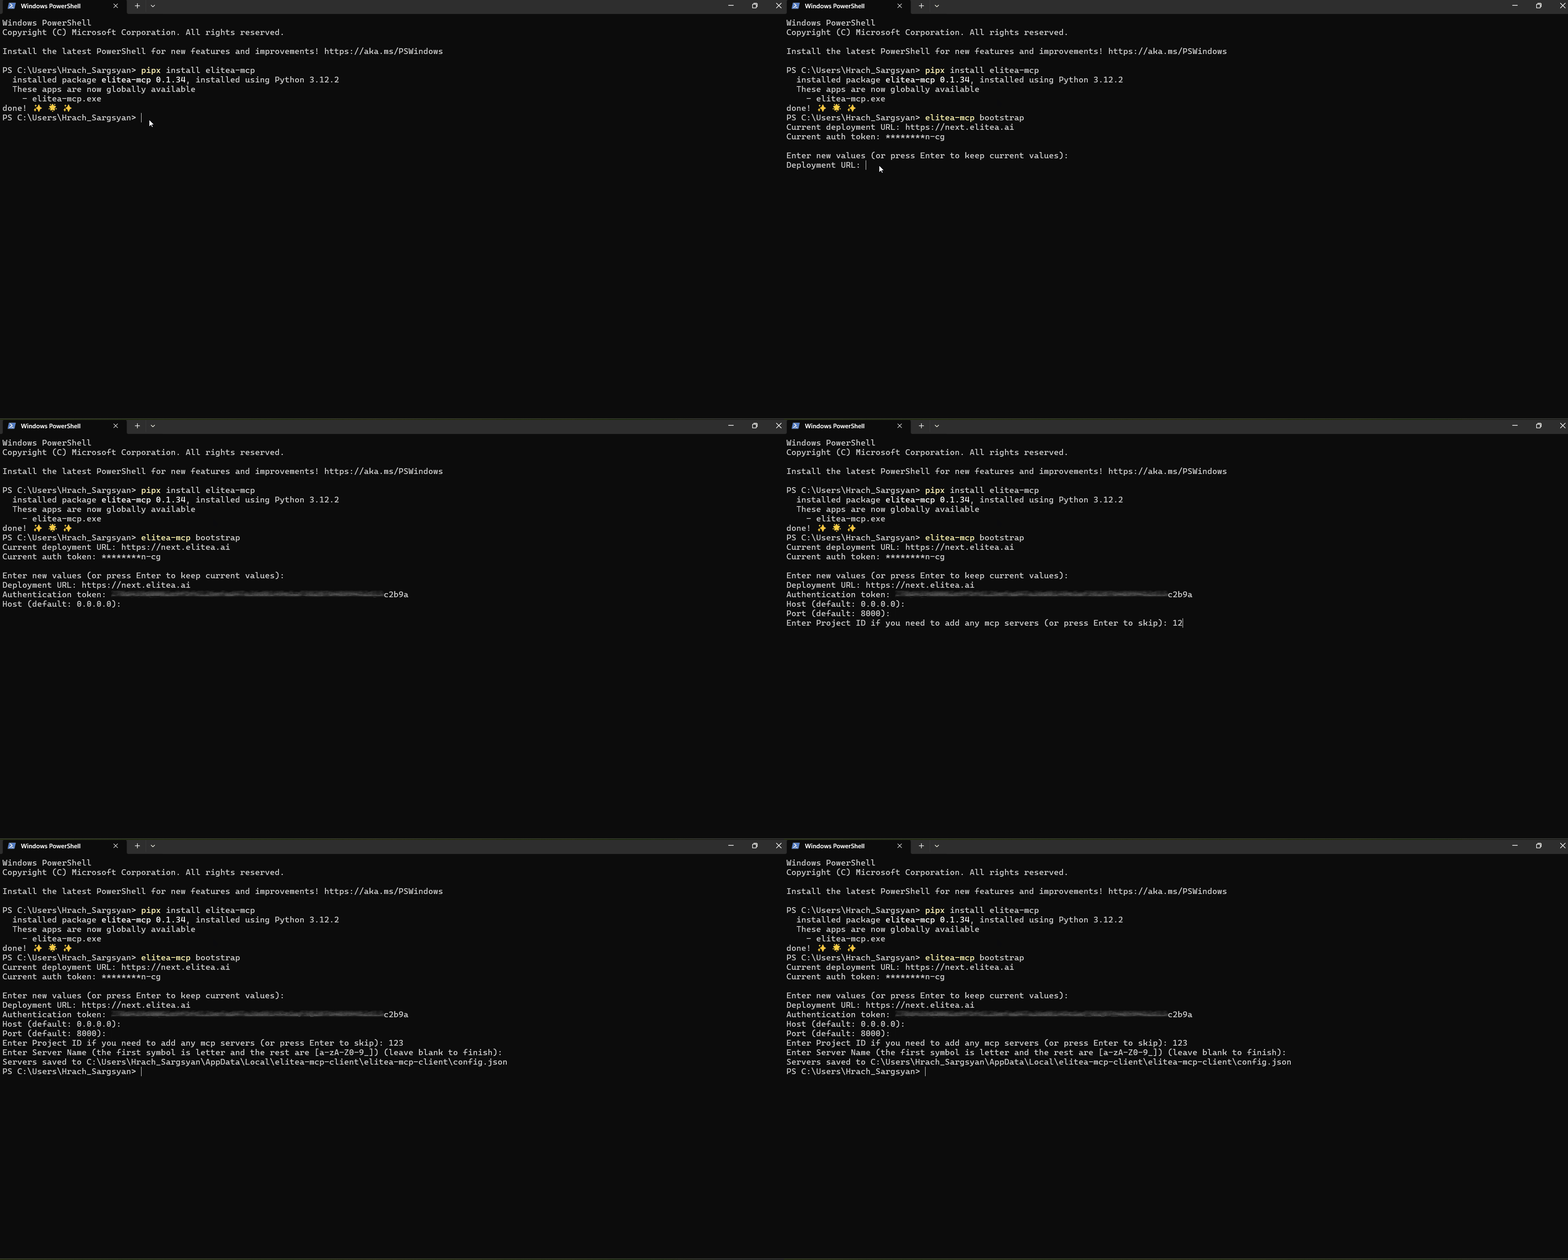 If the Project ID prompt keeps asking for a valid integer and won't accept an empty value, press `Ctrl+C` to cancel. Don't worry—your Deployment URL and Authentication Token have already been saved. You'll add the Project ID in VS Code's configuration file in Part 4 of this guide.
***
### Part 3: Connect to VS Code
Now you'll add the MCP server to VS Code so it can talk to Elitea.
1. **Open VS Code**
* Launch the VS Code application
2. **Open your project**
* Open the folder or workspace where you want to use Elitea agents
3. **Open GitHub Copilot Chat**
* Click the chat icon in the left sidebar (or press `Ctrl+Alt+I`)
If the Project ID prompt keeps asking for a valid integer and won't accept an empty value, press `Ctrl+C` to cancel. Don't worry—your Deployment URL and Authentication Token have already been saved. You'll add the Project ID in VS Code's configuration file in Part 4 of this guide.
***
### Part 3: Connect to VS Code
Now you'll add the MCP server to VS Code so it can talk to Elitea.
1. **Open VS Code**
* Launch the VS Code application
2. **Open your project**
* Open the folder or workspace where you want to use Elitea agents
3. **Open GitHub Copilot Chat**
* Click the chat icon in the left sidebar (or press `Ctrl+Alt+I`)
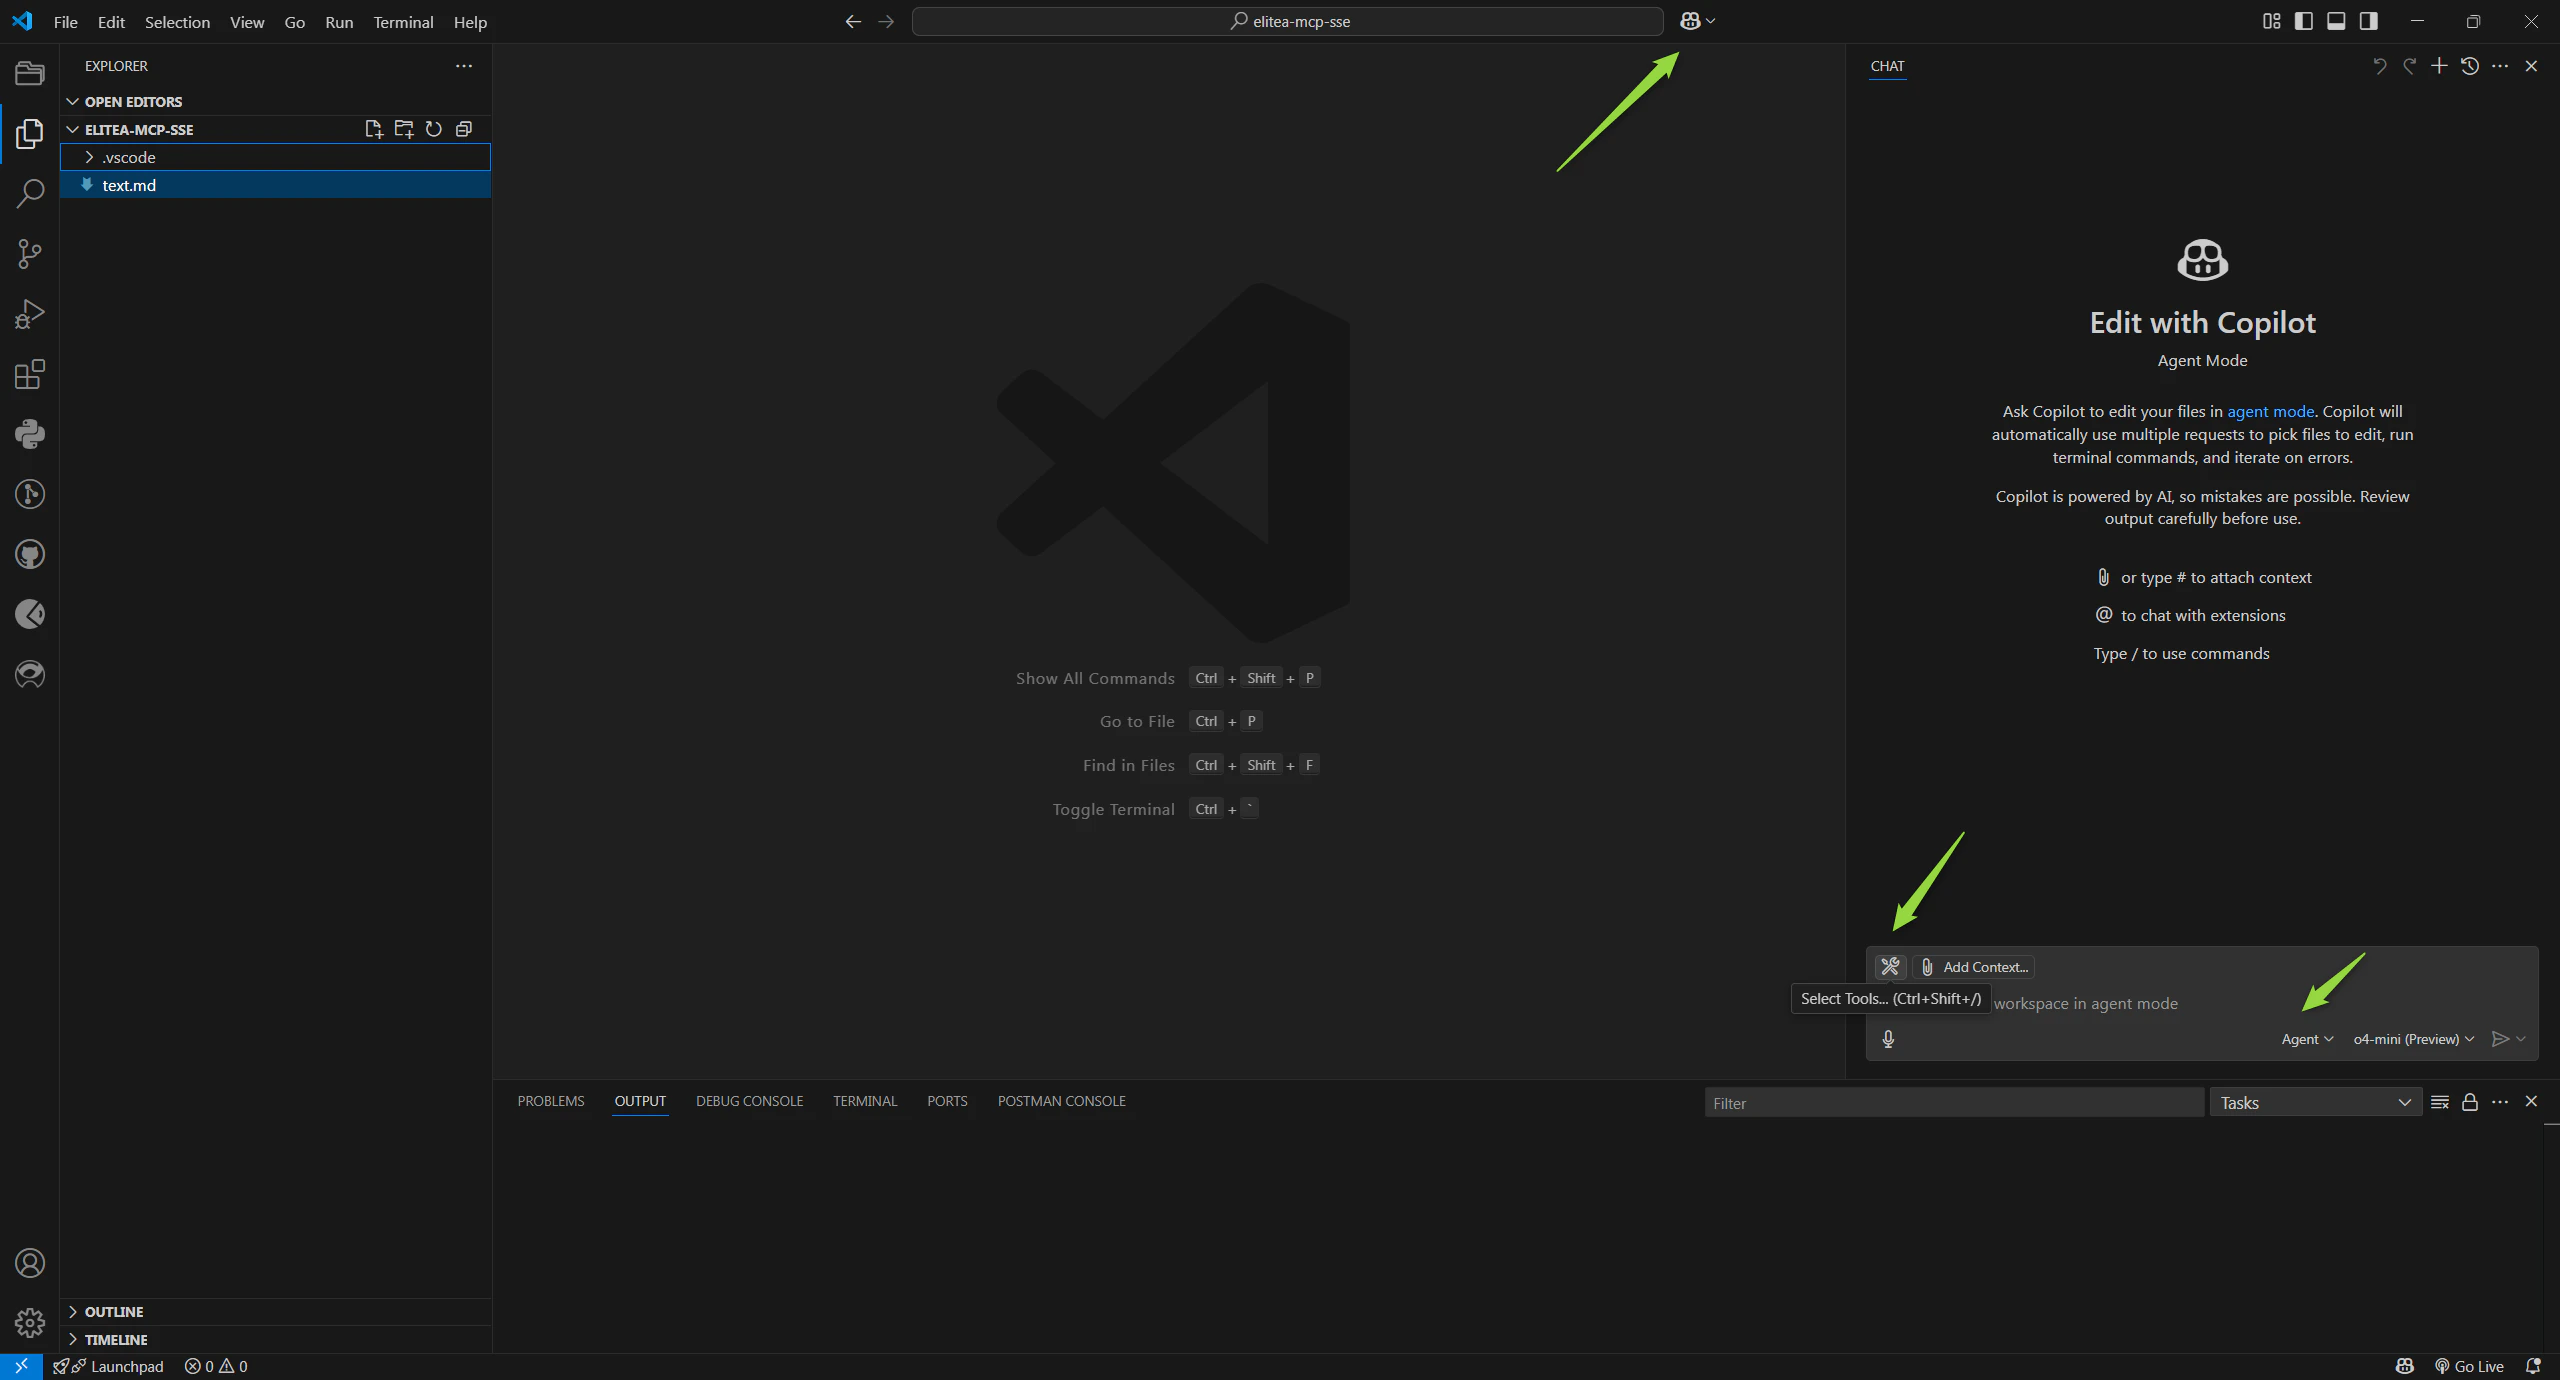 4. **Switch to Agent mode**
* In the chat panel, look for "Agent mode" and click it
* This enables the use of tools (like your Elitea agents)
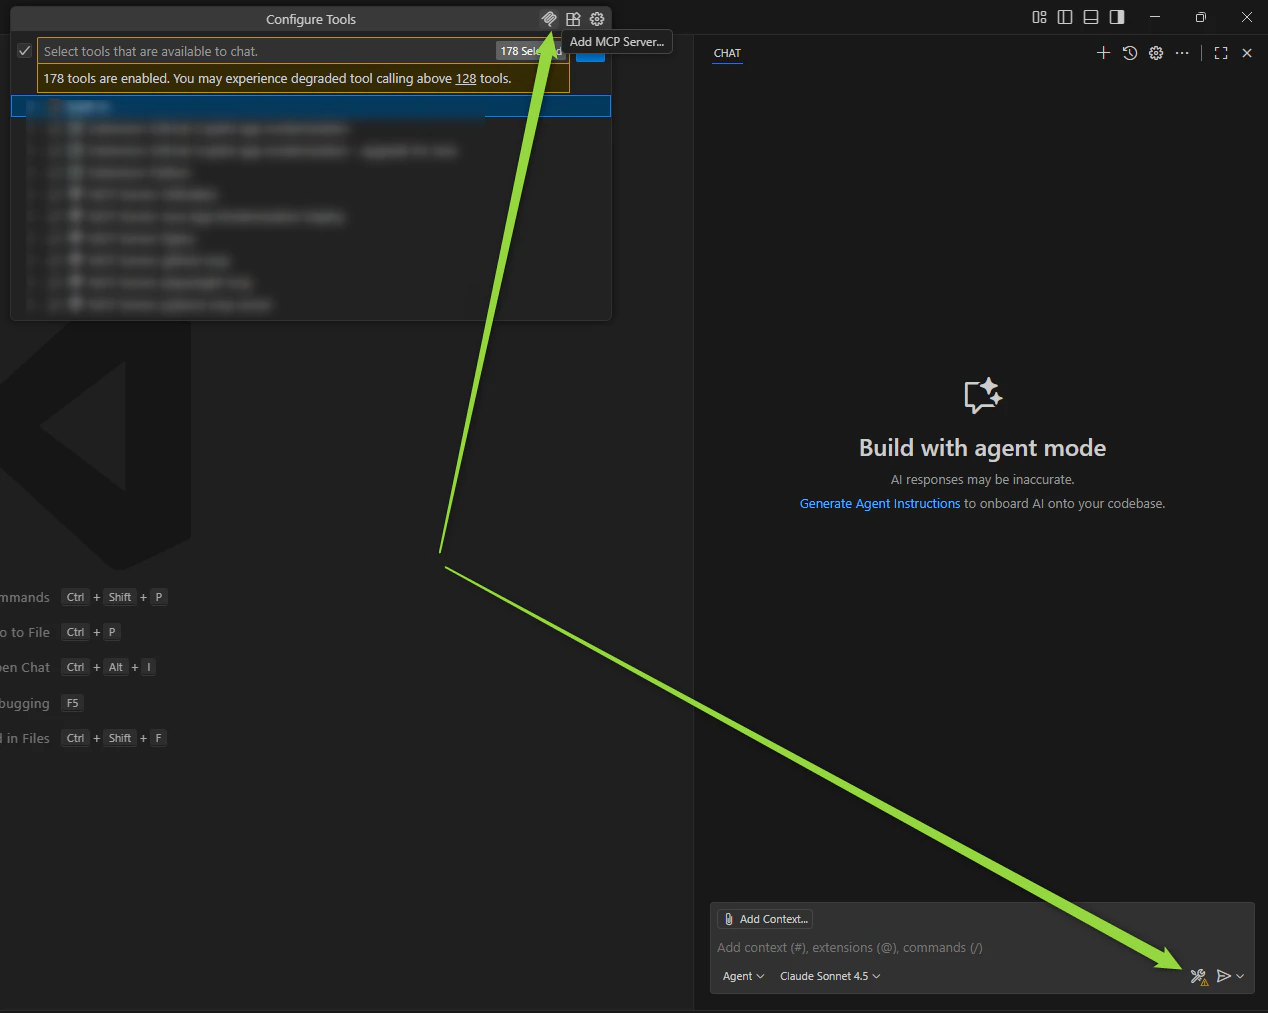
5. **Add the MCP server**
* Click the **Select Tools** icon (looks like a wrench or tools)
* Click **Add MCP Server** icon
* Click **+ Add MCP Server**
4. **Switch to Agent mode**
* In the chat panel, look for "Agent mode" and click it
* This enables the use of tools (like your Elitea agents)
5. **Add the MCP server**
* Click the **Select Tools** icon (looks like a wrench or tools)
* Click **Add MCP Server** icon
* Click **+ Add MCP Server**
 * Select **Command stdio**
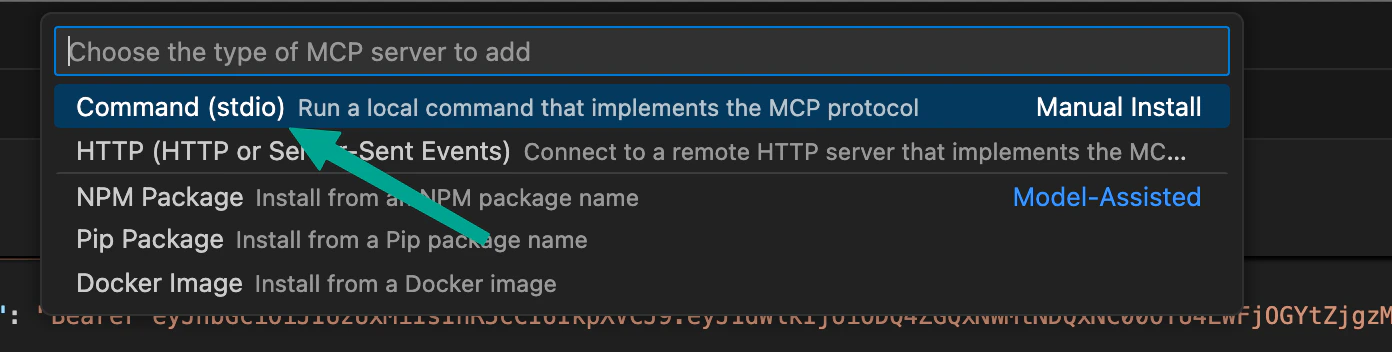 * For "Command", type: `elitea-mcp` and press Enter
 * For "Server ID", use the suggested name or type something like `elitea`
 6. **Choose where to save the settings**
* You'll see two options:
* **Workspace** – Only works in this project folder
* **Global** – Works in all your VS Code projects
* Choose based on your needs (Workspace is good for team projects)
6. **Choose where to save the settings**
* You'll see two options:
* **Workspace** – Only works in this project folder
* **Global** – Works in all your VS Code projects
* Choose based on your needs (Workspace is good for team projects)
 ***
### Part 4: Add Your Project ID
This tells the server which Elitea project to connect to.
#### Option A: If You Chose Workspace
1. **The config file opens automatically**
* After selecting Workspace, VS Code will automatically open `.vscode/mcp.json`
* If it doesn't open automatically, look for the file at `.vscode/mcp.json` and click to open it
2. **Add your project ID**
* Find the line that says `"args": []`
* Replace it with:
```json theme={null}
"args": ["run", "--project_id", "YOUR_PROJECT_ID"]
```
* Replace `YOUR_PROJECT_ID` with your actual number (example: `25`)
***
### Part 4: Add Your Project ID
This tells the server which Elitea project to connect to.
#### Option A: If You Chose Workspace
1. **The config file opens automatically**
* After selecting Workspace, VS Code will automatically open `.vscode/mcp.json`
* If it doesn't open automatically, look for the file at `.vscode/mcp.json` and click to open it
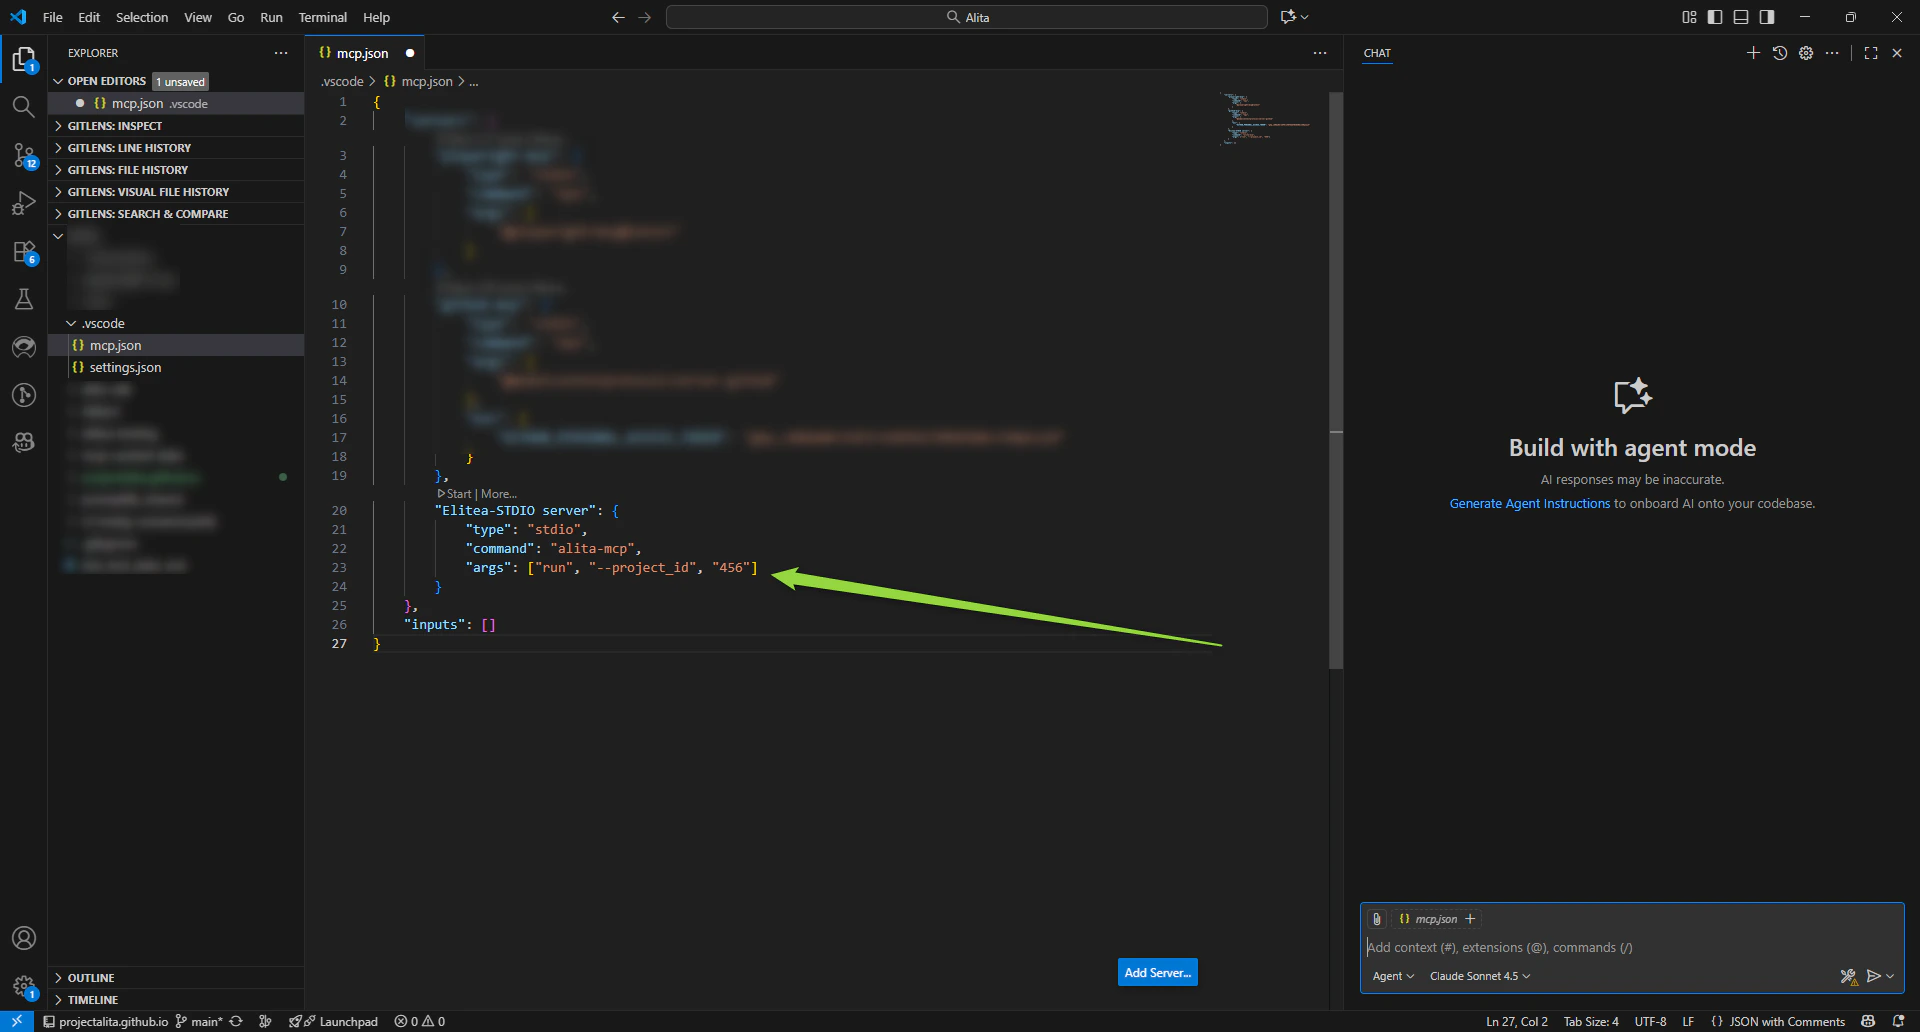
2. **Add your project ID**
* Find the line that says `"args": []`
* Replace it with:
```json theme={null}
"args": ["run", "--project_id", "YOUR_PROJECT_ID"]
```
* Replace `YOUR_PROJECT_ID` with your actual number (example: `25`)
 3. **Save the file**
* Press `Ctrl+S`
4. **Start the server**
* In Copilot Chat, click the **Start** button
3. **Save the file**
* Press `Ctrl+S`
4. **Start the server**
* In Copilot Chat, click the **Start** button
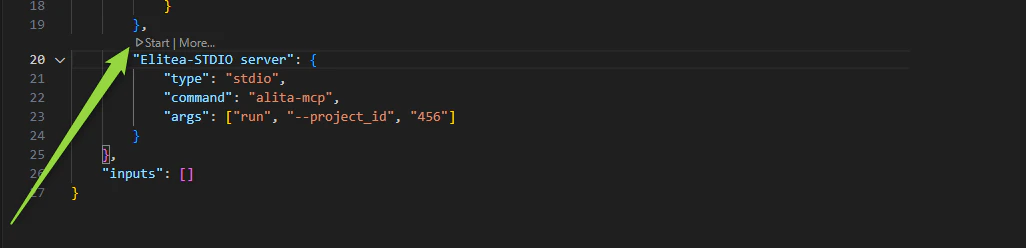 Make sure you have at least one agent tagged with `mcp`. Otherwise, no tools will be available when the server starts. See Part 5 for tagging instructions.
***
#### Option B: If You Chose Global
1. **The settings file opens automatically**
* After selecting Global, VS Code will automatically open your global `mcp.json` configuration file
* If it doesn't open automatically, look for a new tab in the VS Code editor with the file
2. **Add your project ID**
* Find the MCP server section you just added
* Find the line that says `"args": []`
* Replace it with:
```json theme={null}
"args": ["run", "--project_id", "YOUR_PROJECT_ID"]
```
* Replace `YOUR_PROJECT_ID` with your actual number
3. **Save the file**
* Press `Ctrl+S`
4. **Start the server**
* In Copilot Chat, click the **Start** button
Make sure you have at least one agent tagged with `mcp`. Otherwise, no tools will be available when the server starts. See Part 5 for tagging instructions.
***
#### Option B: If You Chose Global
1. **The settings file opens automatically**
* After selecting Global, VS Code will automatically open your global `mcp.json` configuration file
* If it doesn't open automatically, look for a new tab in the VS Code editor with the file
2. **Add your project ID**
* Find the MCP server section you just added
* Find the line that says `"args": []`
* Replace it with:
```json theme={null}
"args": ["run", "--project_id", "YOUR_PROJECT_ID"]
```
* Replace `YOUR_PROJECT_ID` with your actual number
3. **Save the file**
* Press `Ctrl+S`
4. **Start the server**
* In Copilot Chat, click the **Start** button
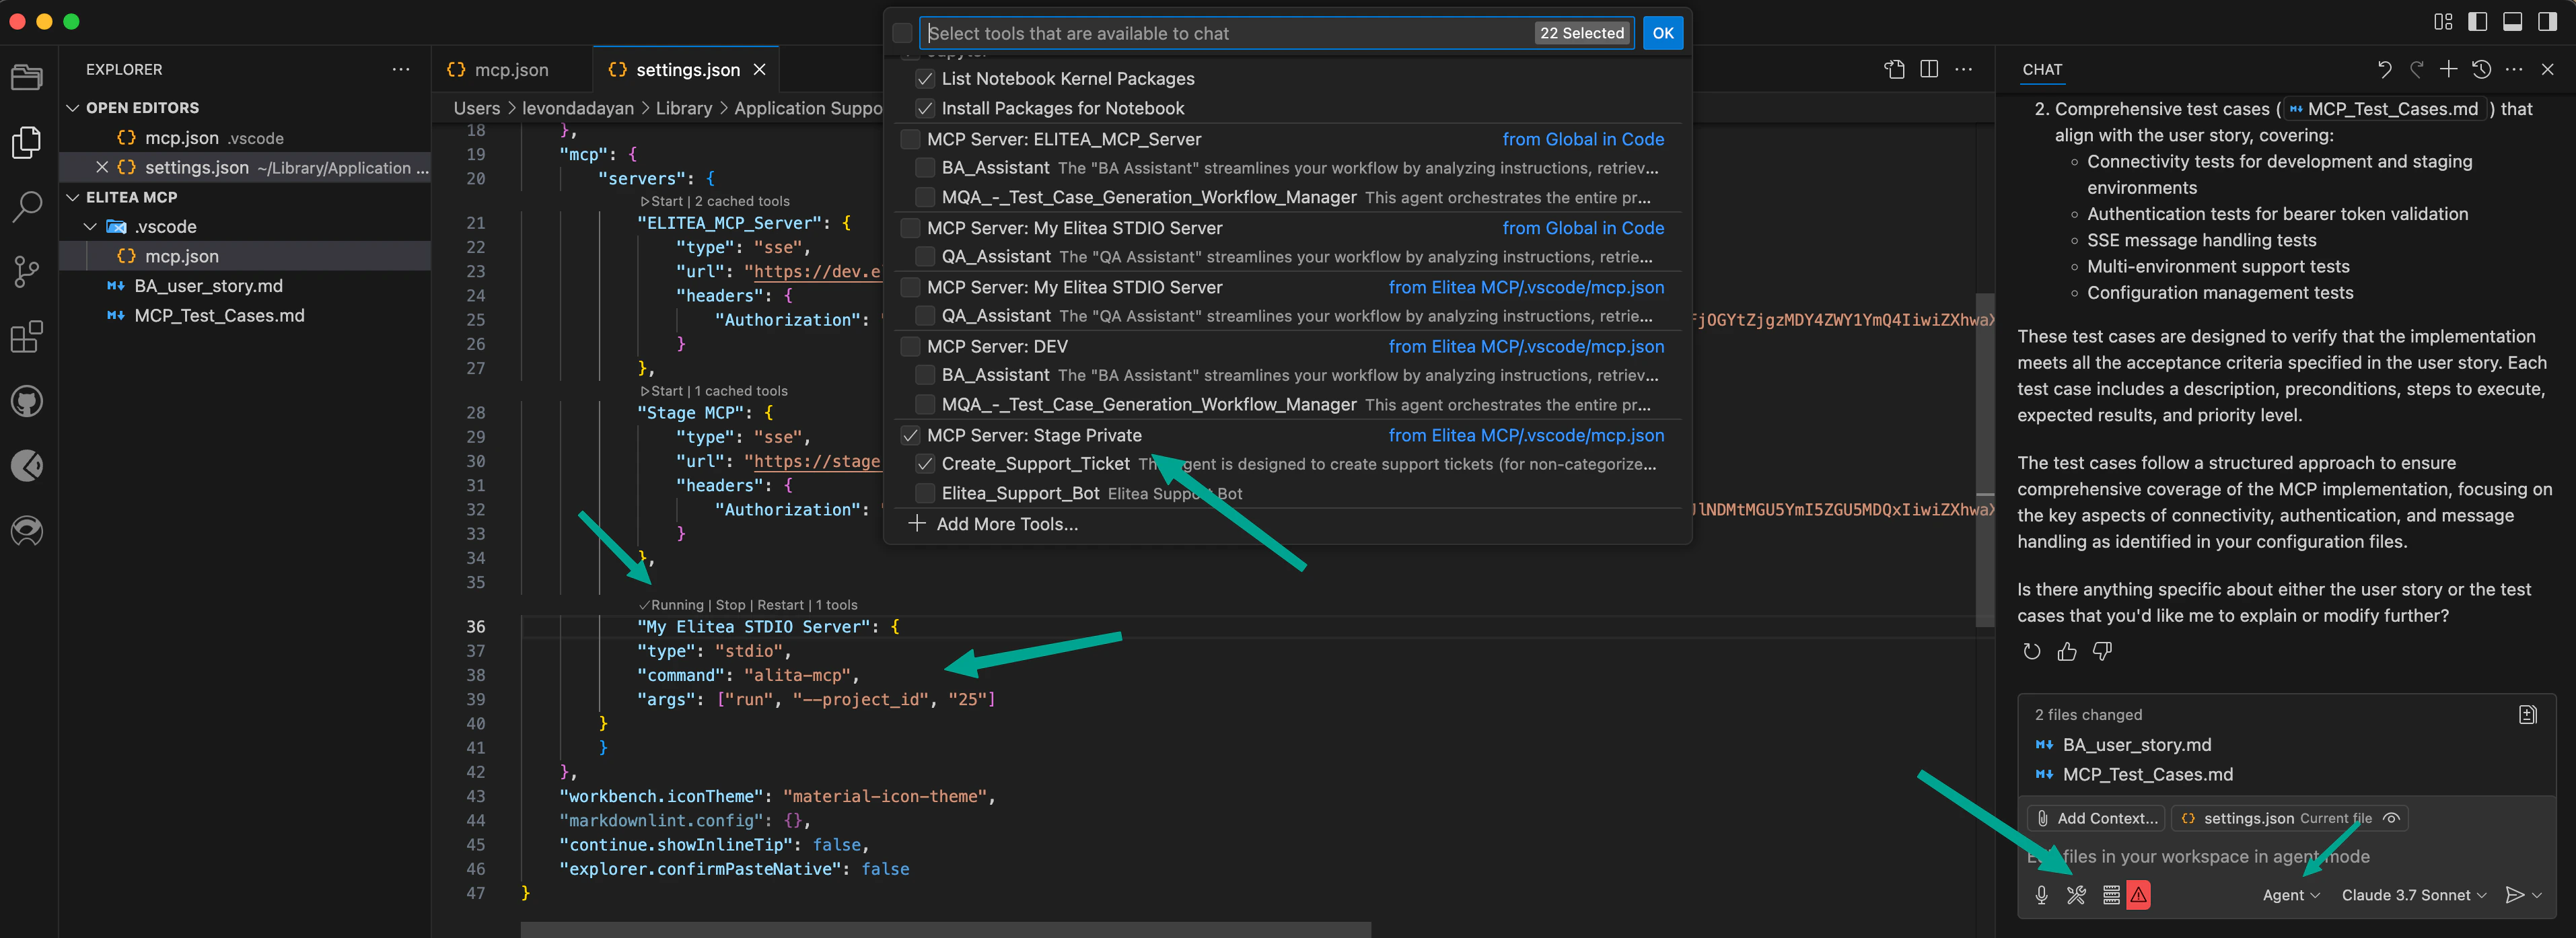 Make sure you have at least one agent tagged with `mcp`. Otherwise, no tools will be available when the server starts. See Part 5 for setup instructions.
***
### Part 5: Tag Your Agents
For an agent to be available as a tool, it must be tagged in Elitea.
#### Tagging Agents:
1. **Log into Elitea**
* Open your Elitea deployment in a web browser
2. **Find your agent**
* Navigate to the agent or pipeline you want to use
3. **Add the "mcp" tag**
* Look for the tags section
* Add a tag named `mcp` (all lowercase)
* Save your changes
Make sure you have at least one agent tagged with `mcp`. Otherwise, no tools will be available when the server starts. See Part 5 for setup instructions.
***
### Part 5: Tag Your Agents
For an agent to be available as a tool, it must be tagged in Elitea.
#### Tagging Agents:
1. **Log into Elitea**
* Open your Elitea deployment in a web browser
2. **Find your agent**
* Navigate to the agent or pipeline you want to use
3. **Add the "mcp" tag**
* Look for the tags section
* Add a tag named `mcp` (all lowercase)
* Save your changes
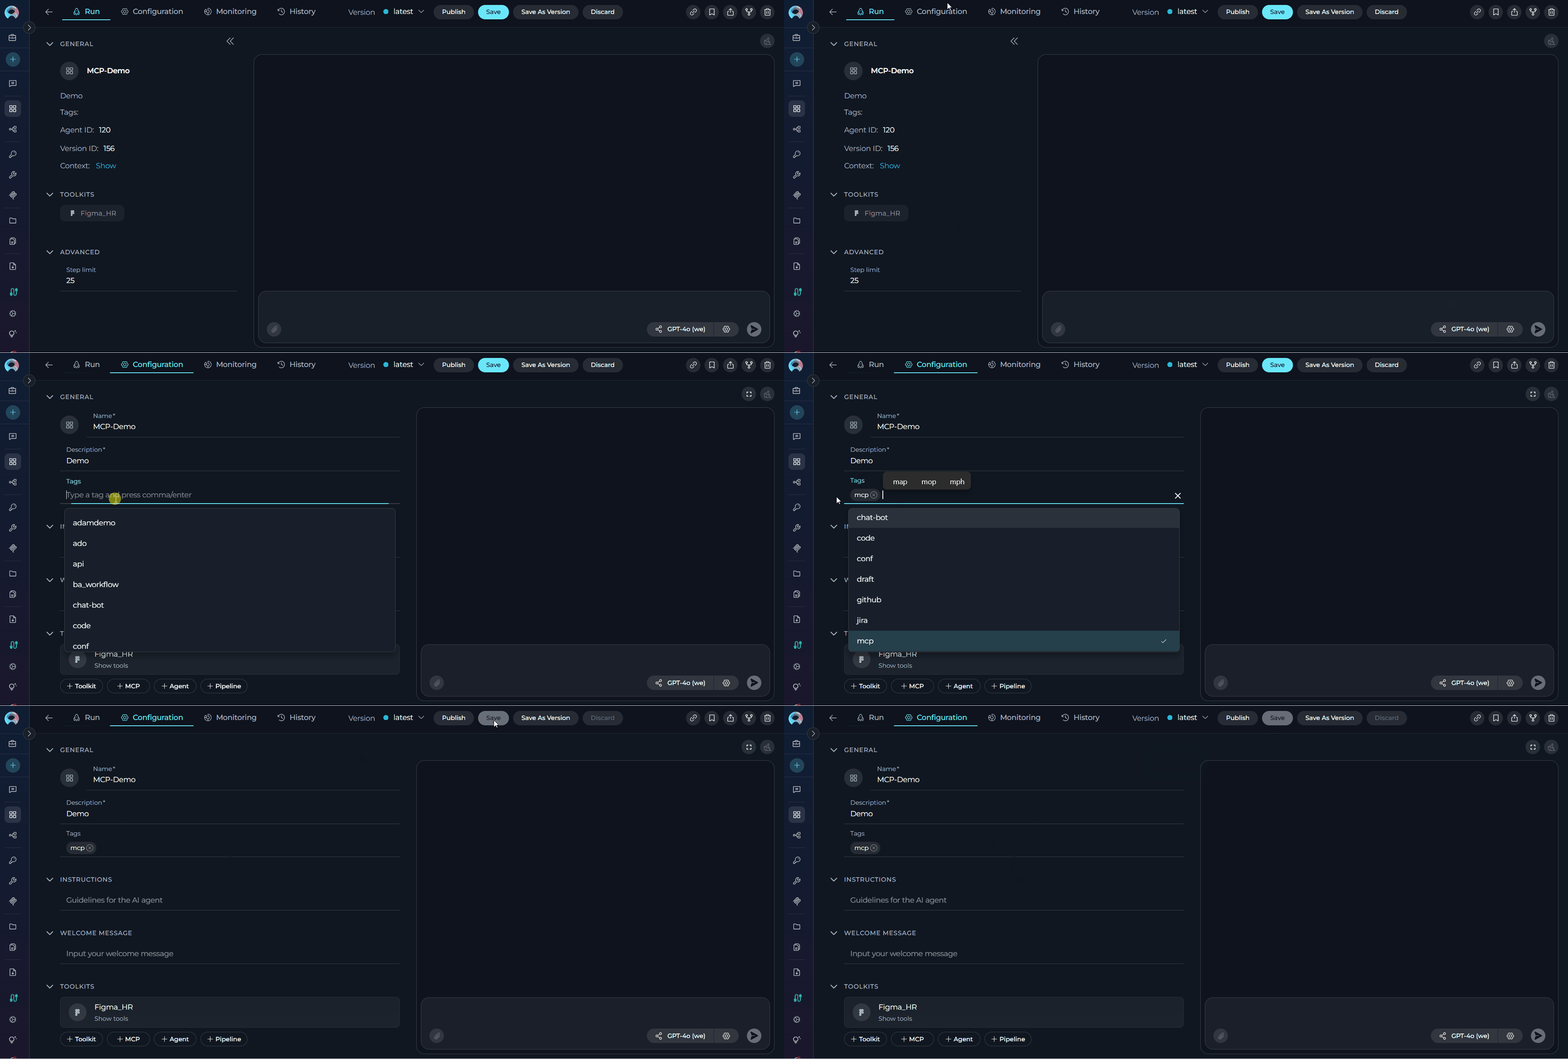 Only agents with the `mcp` tag will be visible in VS Code. Make sure to tag the agents you want to use before starting the server.
#### Complete Setup:
4. **Restart the MCP server in VS Code**
* Go back to VS Code
* In Copilot Chat, stop the server and start it again
* This syncs the newly tagged agents
Only agents with the `mcp` tag will be visible in VS Code. Make sure to tag the agents you want to use before starting the server.
#### Complete Setup:
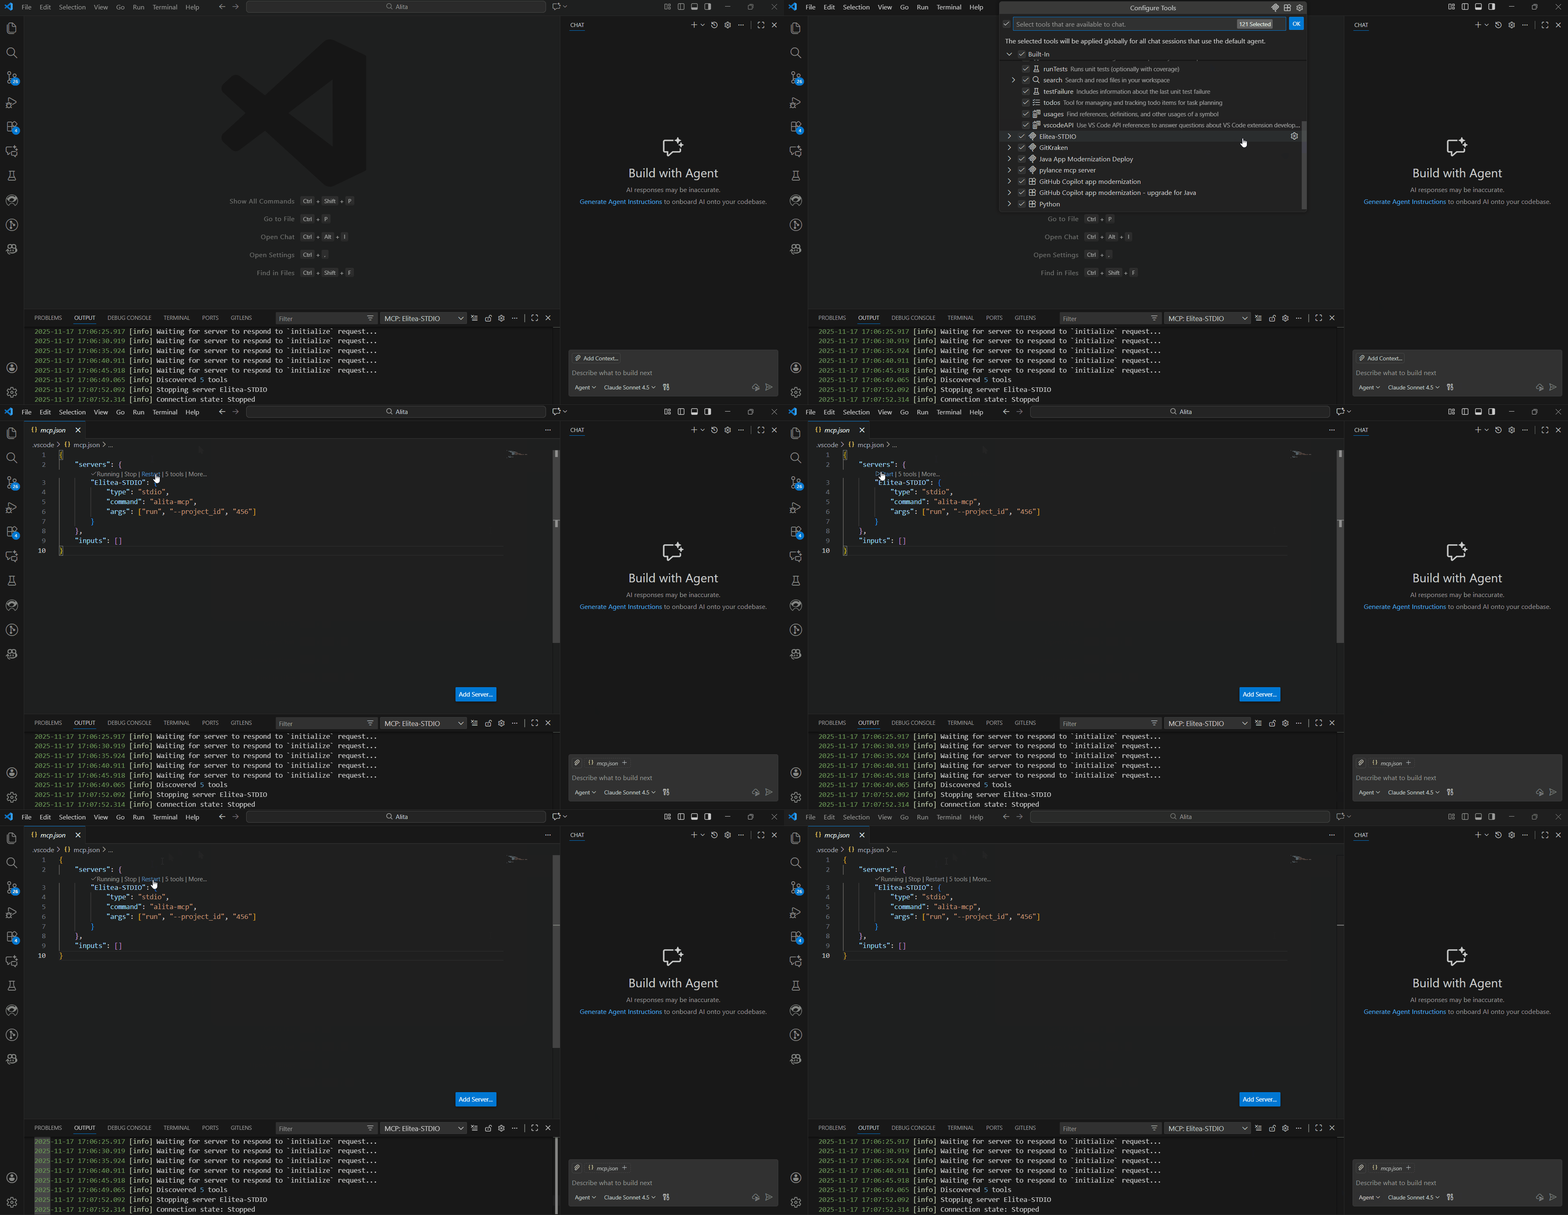
4. **Restart the MCP server in VS Code**
* Go back to VS Code
* In Copilot Chat, stop the server and start it again
* This syncs the newly tagged agents
 ***
### Part 6: Use Your Agent
Now you're ready to use your Elitea agent from VS Code!
1. **Open Copilot Chat**
* Make sure you're in Agent mode
2. **Click the Tools icon**
* You should see your tagged agents listed
***
### Part 6: Use Your Agent
Now you're ready to use your Elitea agent from VS Code!
1. **Open Copilot Chat**
* Make sure you're in Agent mode
2. **Click the Tools icon**
* You should see your tagged agents listed
 3. **Select the tools you want to use**
* All tools are selected by default
* You can deselect any you don't need right now
4. **Type your request**
* In the chat box, type `#` followed by your agent's name
* Example: `#BA Assistant Show me the scope of PLAN-3012`
3. **Select the tools you want to use**
* All tools are selected by default
* You can deselect any you don't need right now
4. **Type your request**
* In the chat box, type `#` followed by your agent's name
* Example: `#BA Assistant Show me the scope of PLAN-3012`
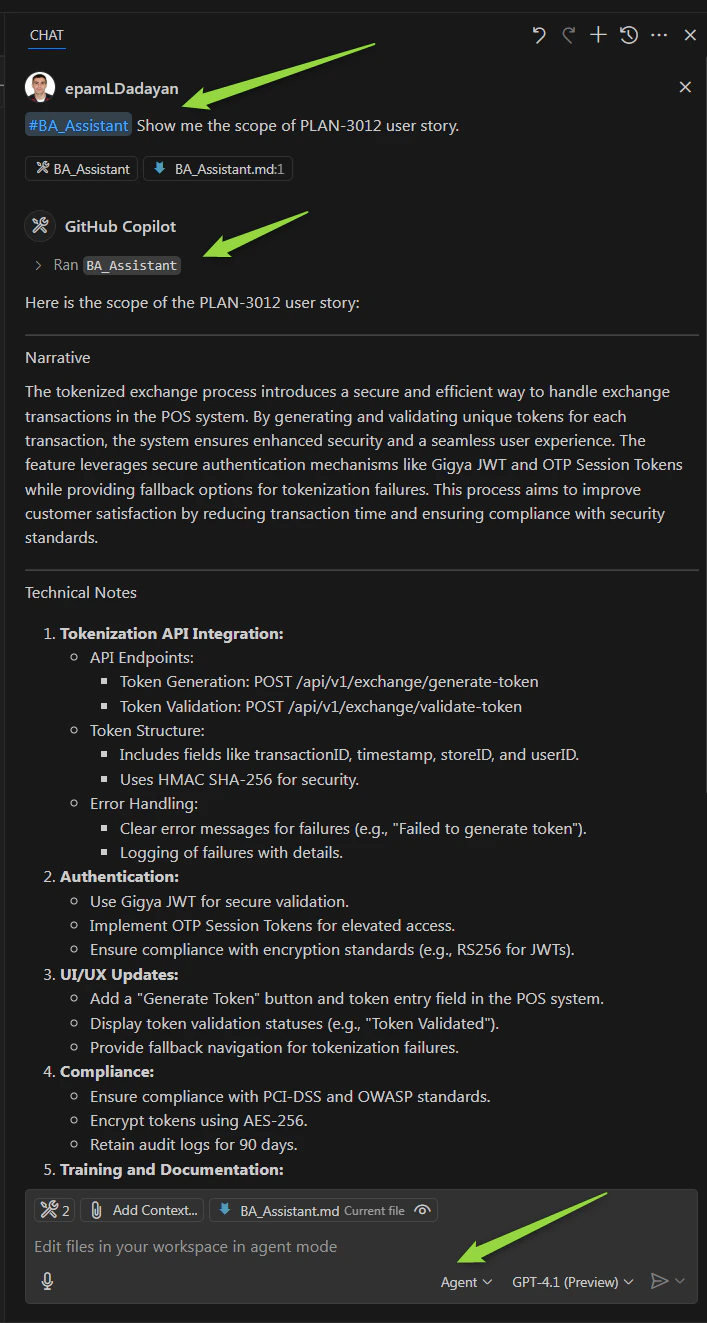 5. **Run the tool**
* Click **Run \[tool name]** when prompted
5. **Run the tool**
* Click **Run \[tool name]** when prompted
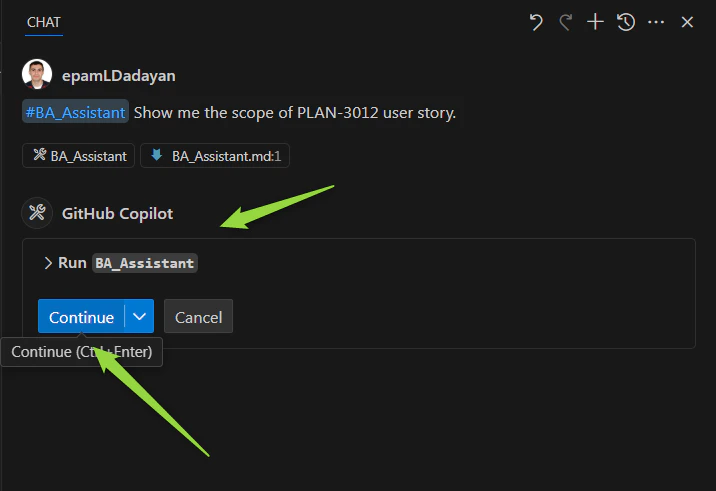 6. **Confirm execution**
* The first time, you'll be asked to confirm
* Click **Continue** (you can choose to auto-confirm for future runs)
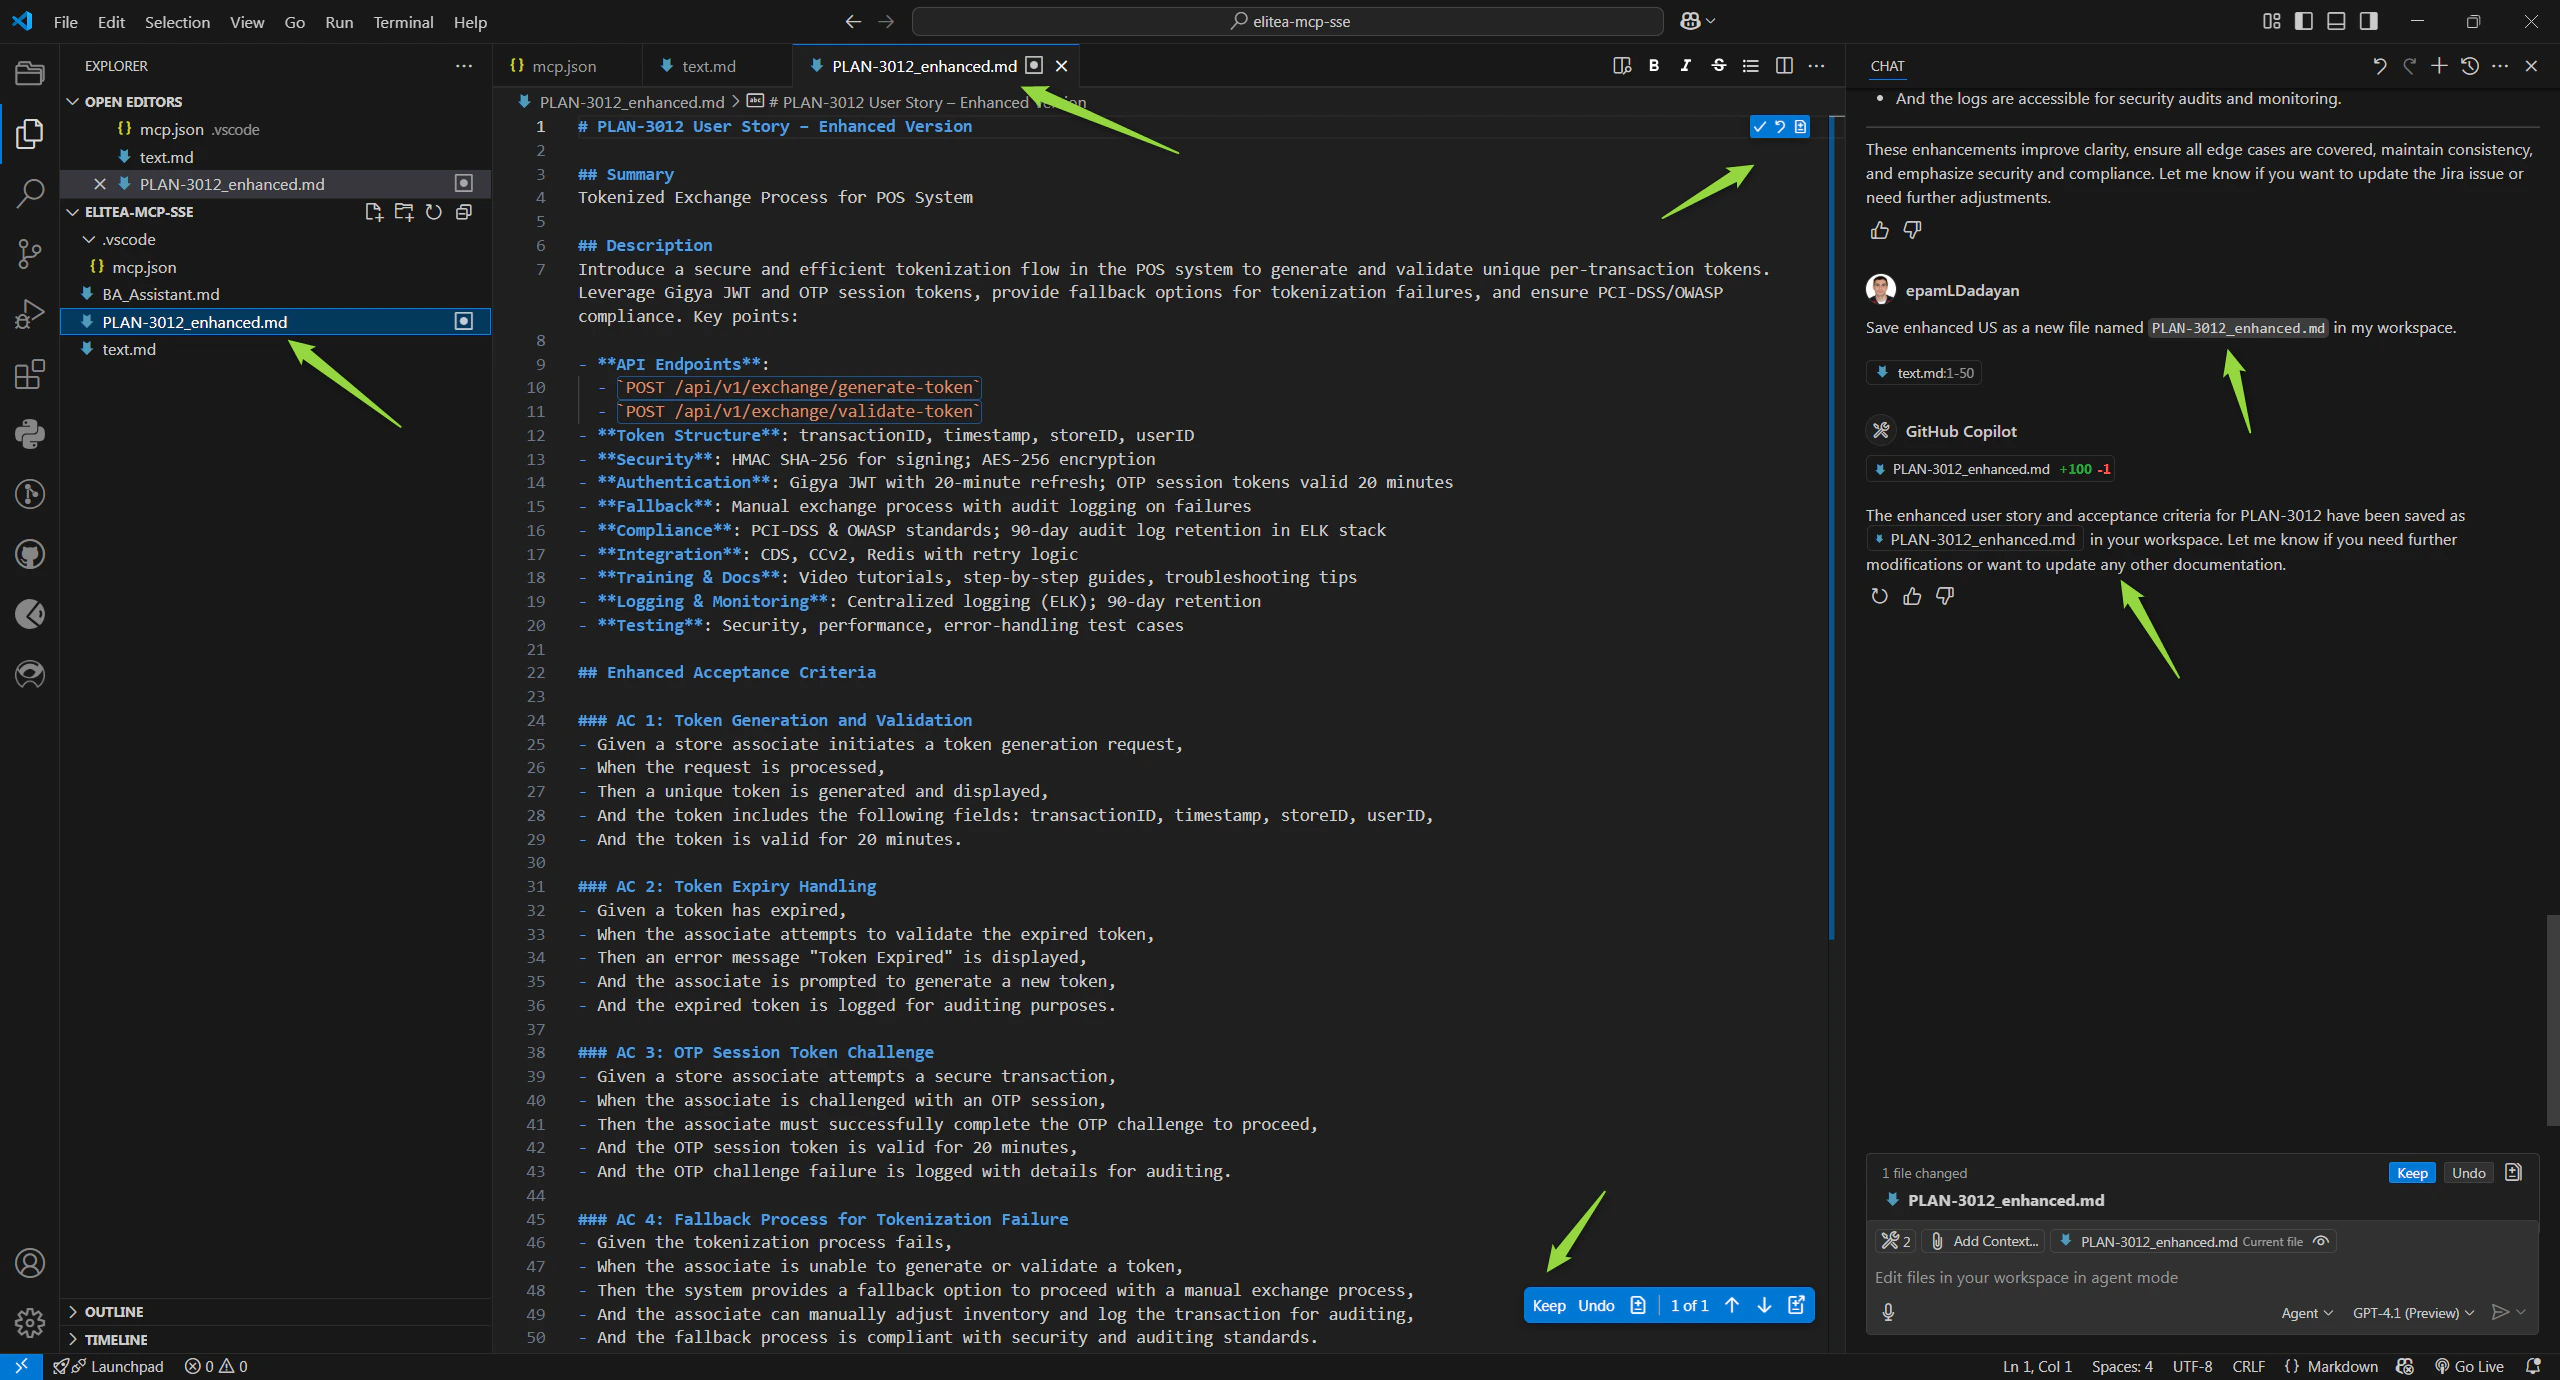
7. **Review the results**
* Your agent will execute and return results directly in the chat
6. **Confirm execution**
* The first time, you'll be asked to confirm
* Click **Continue** (you can choose to auto-confirm for future runs)
7. **Review the results**
* Your agent will execute and return results directly in the chat
 ***
## How to Know It's Working
✔️ **You've succeeded if:**
* The MCP server shows as "Running" in VS Code
* Your tagged agents appear in the Tools list
* When you call an agent, you see output in the chat
* No error messages appear
✘ **Something's wrong if:**
* You see "Command not found" errors → Reinstall the client
* No agents appear in the Tools list → Check that they're tagged with `mcp`
* Server won't start → Check your Project ID and authentication token
***
## Common Problems & Fixes
### Problem: "elitea-mcp: command not found"
**Fix:** Make sure you completed all installation steps, including `pipx ensurepath`. Close and reopen PowerShell.
### Problem: No agents showing up
**Fix:**
1. Make sure your agents are tagged with `mcp` in Elitea
2. Restart the MCP server in VS Code
3. Check you're using the correct Project ID
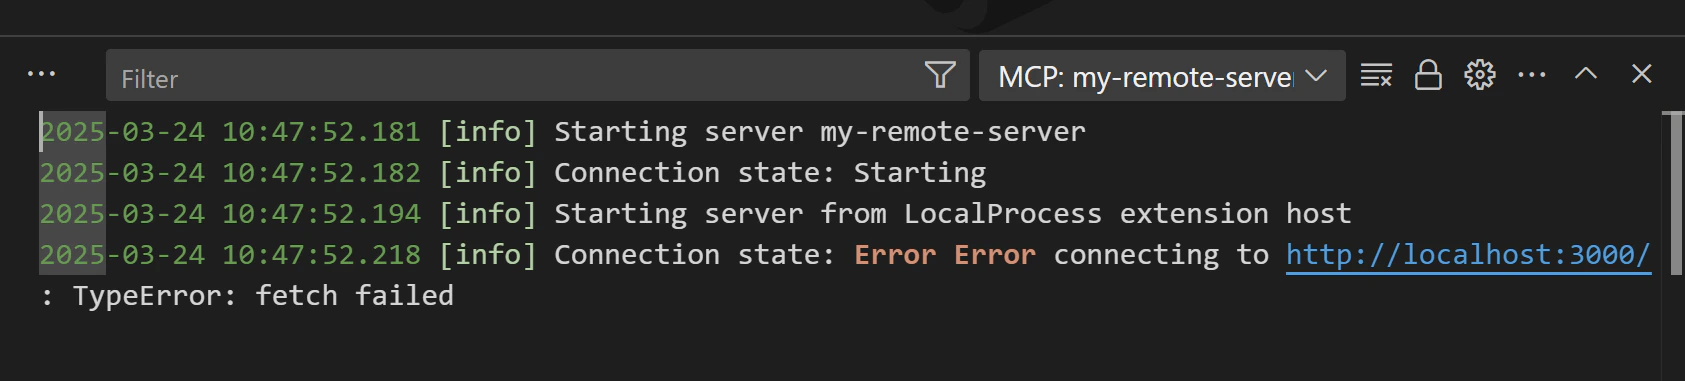
### Problem: "Error indicator" in VS Code
**Fix:**
1. Click the error in the Chat view
2. Select **Show Output** to see details
***
## How to Know It's Working
✔️ **You've succeeded if:**
* The MCP server shows as "Running" in VS Code
* Your tagged agents appear in the Tools list
* When you call an agent, you see output in the chat
* No error messages appear
✘ **Something's wrong if:**
* You see "Command not found" errors → Reinstall the client
* No agents appear in the Tools list → Check that they're tagged with `mcp`
* Server won't start → Check your Project ID and authentication token
***
## Common Problems & Fixes
### Problem: "elitea-mcp: command not found"
**Fix:** Make sure you completed all installation steps, including `pipx ensurepath`. Close and reopen PowerShell.
### Problem: No agents showing up
**Fix:**
1. Make sure your agents are tagged with `mcp` in Elitea
2. Restart the MCP server in VS Code
3. Check you're using the correct Project ID
### Problem: "Error indicator" in VS Code
**Fix:**
1. Click the error in the Chat view
2. Select **Show Output** to see details
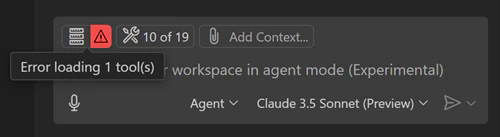 3. Look for specific error messages in the log
 ### Problem: Server keeps disconnecting
**Fix:**
1. Verify your authentication token is still valid
2. Check your internet connection
3. Confirm your Elitea deployment URL is correct
### Problem: Multiple elitea-mcp versions installed (pip and pipx conflict)
**Fix:**
If you see errors or unexpected behavior, you may have multiple versions of `elitea-mcp` installed. This happens when you installed it with both `pip` and `pipx`.
1. **Check for multiple installations:**
```powershell theme={null}
pip list | Select-String elitea-mcp
pipx list | Select-String elitea-mcp
```
2. **Remove the pip version (keep pipx):**
```powershell theme={null}
pip uninstall elitea-mcp -y
```
3. **Verify the correct version is active:**
```powershell theme={null}
where.exe elitea-mcp
```
You should see: `C:\Users\\.local\bin\elitea-mcp.exe`
4. **Restart VS Code and the MCP server**
The pipx installation is the recommended method as it isolates the tool in its own environment. If you previously installed with `pip`, it may conflict with the pipx version and cause the system to use the wrong (often outdated) version.
***
## What You Can Do Next
Now that your MCP server is running, you can:
* Call multiple agents in one conversation
* Use agents to analyze code, create documentation, or fetch data
* Automate repetitive tasks directly from VS Code
* Combine Elitea agents with other Copilot features
***
## Advanced Options
### Problem: Server keeps disconnecting
**Fix:**
1. Verify your authentication token is still valid
2. Check your internet connection
3. Confirm your Elitea deployment URL is correct
### Problem: Multiple elitea-mcp versions installed (pip and pipx conflict)
**Fix:**
If you see errors or unexpected behavior, you may have multiple versions of `elitea-mcp` installed. This happens when you installed it with both `pip` and `pipx`.
1. **Check for multiple installations:**
```powershell theme={null}
pip list | Select-String elitea-mcp
pipx list | Select-String elitea-mcp
```
2. **Remove the pip version (keep pipx):**
```powershell theme={null}
pip uninstall elitea-mcp -y
```
3. **Verify the correct version is active:**
```powershell theme={null}
where.exe elitea-mcp
```
You should see: `C:\Users\\.local\bin\elitea-mcp.exe`
4. **Restart VS Code and the MCP server**
The pipx installation is the recommended method as it isolates the tool in its own environment. If you previously installed with `pip`, it may conflict with the pipx version and cause the system to use the wrong (often outdated) version.
***
## What You Can Do Next
Now that your MCP server is running, you can:
* Call multiple agents in one conversation
* Use agents to analyze code, create documentation, or fetch data
* Automate repetitive tasks directly from VS Code
* Combine Elitea agents with other Copilot features
***
## Advanced Options
Click to expand advanced configuration options
**Using a Specific Application**
If you want to limit the MCP server to a single agent or pipeline, use this configuration:
```json theme={null}
"args": ["run", "--project_id", "25", "--app_id", "12", "--version_id", "3"]
```
* `app_id` is the ID of your specific agent
* `version_id` is the version number you want to use
### Multiple MCP Servers
You can set up multiple MCP servers for different projects:
1. Repeat the setup process
2. Use a different Server ID for each
3. Each server can point to a different Project ID
***
* [Elitea Settings & Configuration](../../menus/settings/ai-configuration)
* [MCP Protocol Official Docs](https://modelcontextprotocol.io/)
***