> ## Documentation Index
> Fetch the complete documentation index at: https://docs.elitea.ai/llms.txt
> Use this file to discover all available pages before exploring further.
# Interaction Nodes
> Interaction Nodes enable your pipeline to communicate with AI models and delegate tasks to specialized agents. These nodes form the "intelligent" layer of you
**Available Interaction Nodes:**
* **[LLM Node](#llm-node)** - Directly interact with Large Language Models
* **[Agent Node](#agent-node)** - Delegate tasks to pre-configured AI agents
***
## LLM Node
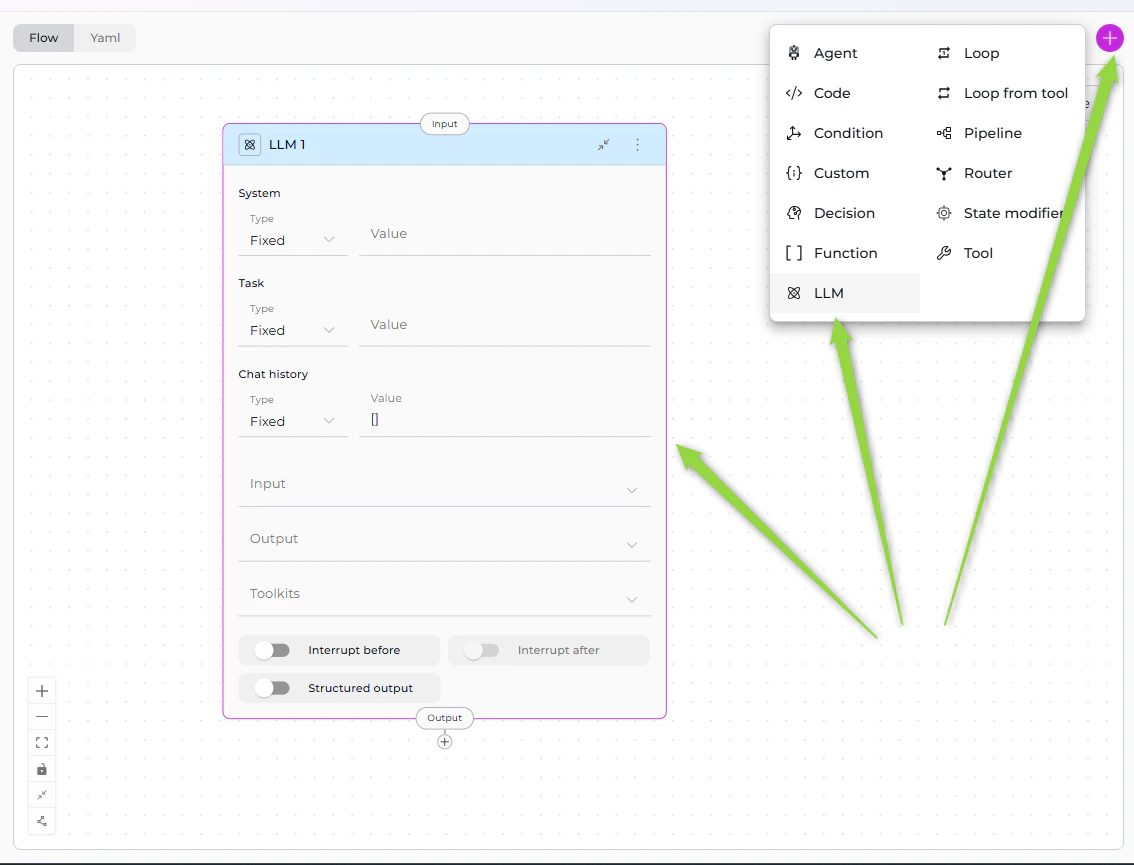
The LLM Node provides direct access to Large Language Models (GPT-4, Claude, etc.) for text generation, analysis, extraction, and decision-making. It's the most versatile interaction node, supporting chat history, tool calling, and structured output extraction.
If you have existing pipelines with old LLM node format, see the [v2.0.0 Migration Guide](../../../migration/v2.0.0/update-llm-nodes) for updating to the new System/Task structure.
 ### Purpose
Use the LLM Node to:
* **Generate text** based on prompts and context
* **Analyze content** and extract insights
* **Extract structured data** from unstructured text
* **Have conversations** with full chat history support
* **Call tools** via function calling
* **Make intelligent decisions** based on context
### Parameters
| Parameter | Purpose | Type Options & Examples |
| --------------------- | ----------------------------------------------------------------------------------- | ------------------------------------------------------------------------------------------------------------------------------------------------------------------------------------------------------------------------------------------------------------------------------ |
| **System** | Provide system-level instructions that set the LLM's behavior, role, or constraints | **`Fixed`** - Static system message
### Purpose
Use the LLM Node to:
* **Generate text** based on prompts and context
* **Analyze content** and extract insights
* **Extract structured data** from unstructured text
* **Have conversations** with full chat history support
* **Call tools** via function calling
* **Make intelligent decisions** based on context
### Parameters
| Parameter | Purpose | Type Options & Examples |
| --------------------- | ----------------------------------------------------------------------------------- | ------------------------------------------------------------------------------------------------------------------------------------------------------------------------------------------------------------------------------------------------------------------------------ |
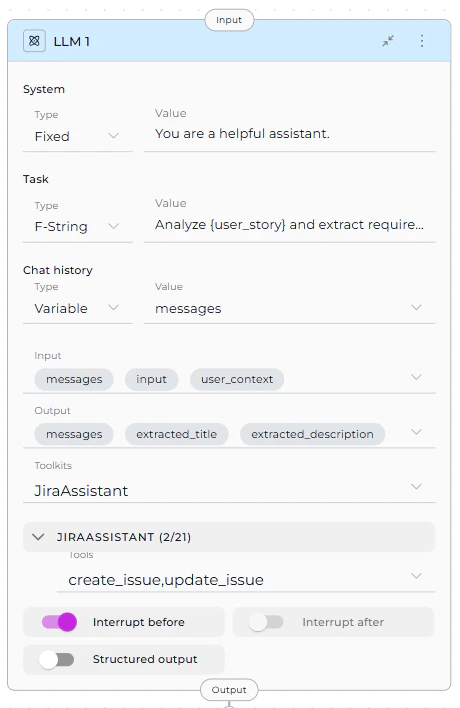
| **System** | Provide system-level instructions that set the LLM's behavior, role, or constraints | **`Fixed`** - Static system message
Example: "You are a helpful assistant."
**`F-String`** - System message with variables
Example: "You are a {role} expert."
**`Variable`** - System message from state
Example: custom\_system\_prompt |
| **Task** | Define the specific task or user request the LLM should process | **`Fixed`** - Static task
Example: "Summarize the text."
**`F-String`** - Task with embedded variables
Example: "Analyze {user_story} and extract requirements."
**`Variable`** - Task from state variable
Example: task\_instruction |
| **Chat History** | Provide conversation context from previous interactions | **`Fixed`** - No history
Example: \[]
**`F-String`** - Formatted conversation history
Example: "Previous conversation: {messages}"
**`Variable`** - Use conversation history
Example: messages |
| **Input** | Specify which state variables the LLM node reads from | **Default states:** `input`, `messages`
**Custom states:** Any defined state variables
Example:
`- input`
`- messages`
`- user_context` |
| **Output** | Define which state variables the LLM's response should populate | **Default:** `messages`
**Custom states:** Define specific variables
Example:
`- extracted_title`
`- extracted_description`
`- messages` |
| **Toolkits** | Bind external tools and MCPs to the LLM for function calling | **Toolkits** - Service integrations
**MCPs** - Model Context Protocol servers
Example:
`jira_toolkit:`
` - create_issue`
` - update_issue`
`slack_toolkit:`
` - send_message` |
| **Interrupt Before** | Pause pipeline execution before this node | **Enabled** / **Disabled**
Example: `enabled` or `disabled` |
| **Interrupt After** | Pause pipeline execution after this node for inspection | **Enabled** / **Disabled**
Example: `enabled` or `disabled` |
| **Structured Output** | Force LLM to return data in structured format matching output variables | **Enabled** - Response parsed into state variables
**Disabled** - Free-form text to `messages`
Example: `true` or `false` |
 **Yaml Configuration**
```Yaml theme={null}
nodes:
- id: Analyze_feedback
type: llm
prompt:
type: string
value: ''
input:
- input
- user_context
output:
- extracted_title
- messages
structured_output: false
transition: END
input_mapping:
system:
type: fixed
value: You are a helpful assistant
task:
type: fstring
value: Analyze {user_story} and extract requirements.
chat_history:
type: variable
value: messages
tool_names:
JiraAssistant:
- create_issue
- update_issue
interrupt_before:
- Analyze_feedback
state:
messages:
type: list
input:
type: str
extracted_title:
type: str
value: ''
user_context:
type: str
value: ''
```
When using **structured output** with **interrupts**, include `messages` in the output variables for meaningful interrupt output.
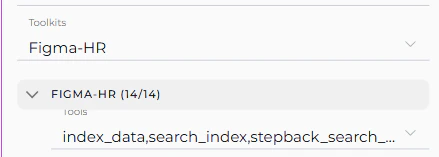
1. Select Toolkit/MCP from dropdown
2. Tool dropdown appears for that toolkit
3. Select specific tools to make available to the LLM
4. Repeat for multiple toolkits (each gets its own tool dropdown)
**Yaml Configuration**
```Yaml theme={null}
nodes:
- id: Analyze_feedback
type: llm
prompt:
type: string
value: ''
input:
- input
- user_context
output:
- extracted_title
- messages
structured_output: false
transition: END
input_mapping:
system:
type: fixed
value: You are a helpful assistant
task:
type: fstring
value: Analyze {user_story} and extract requirements.
chat_history:
type: variable
value: messages
tool_names:
JiraAssistant:
- create_issue
- update_issue
interrupt_before:
- Analyze_feedback
state:
messages:
type: list
input:
type: str
extracted_title:
type: str
value: ''
user_context:
type: str
value: ''
```
When using **structured output** with **interrupts**, include `messages` in the output variables for meaningful interrupt output.
1. Select Toolkit/MCP from dropdown
2. Tool dropdown appears for that toolkit
3. Select specific tools to make available to the LLM
4. Repeat for multiple toolkits (each gets its own tool dropdown)
 ### Best Practices
#### 1. Always Include `messages` in Output for Interrupts
When using structured output with interrupts:
✅ **Correct**:
```yaml theme={null}
output: ["extracted_data", "status", "messages"]
structured_output: true
```
❌ **Avoid**:
```yaml theme={null}
output: ["extracted_data", "status"] # Missing messages
structured_output: true
```
#### 2. Use Appropriate Prompt Types
* **Fixed**: For static, unchanging instructions
* **F-String**: When you need to inject specific state variables
* **Variable**: When the entire prompt comes from state
#### 3. Limit Tool Binding
Only bind tools the LLM actually needs:
✅ **Good**: Select specific relevant tools
```yaml theme={null}
toolkits:
jira_toolkit:
- create_issue
- update_issue
```
❌ **Avoid**: Binding all tools unnecessarily
```yaml theme={null}
toolkits:
jira_toolkit:
- [all 50+ tools selected] # Confuses LLM
```
#### 4. Structure Your Prompts
Use clear, structured prompts:
✅ **Good**:
```yaml theme={null}
prompt:
type: "fstring"
value: |
## Task
Analyze the user story: {user_story}
## Requirements
Extract:
1. Title
2. Description
3. Acceptance Criteria
## Output Format
Provide structured data for each field.
```
❌ **Avoid**: Vague prompts
```yaml theme={null}
prompt:
type: "fixed"
value: "Do something with the data"
```
#### 5. Specify Output Variables Clearly
Match output variables to what you're extracting:
✅ **Good**:
```yaml theme={null}
output: ["jira_project_id", "epic_id", "user_story_title", "messages"]
structured_output: true
```
#### 6. Use Chat History Wisely
* Include `messages` in input when context matters
* Use `[]` (empty array) for stateless single-turn requests
#### 7. Test with Interrupts
Use interrupts during development to verify LLM outputs:
```yaml theme={null}
interrupt_after: true # Pause after this node to inspect results
```
#### 8. Handle Tool Calling Errors
When using toolkits, account for potential tool failures in your prompt:
```yaml theme={null}
prompt:
type: "fixed"
value: |
Use available tools to complete the task.
If a tool fails, explain what went wrong and suggest alternatives.
```
***
## Agent Node
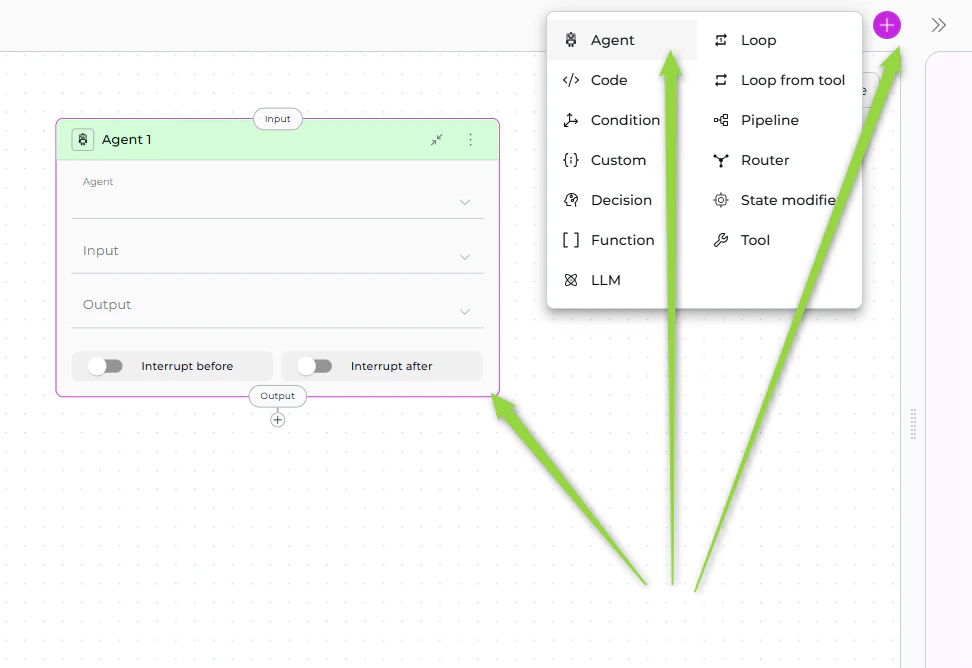
The Agent Node allows you to delegate tasks to pre-configured AI agents that have been added to your pipeline. Instead of configuring LLM behavior from scratch, you leverage existing agents with specialized capabilities, prompts, and toolkits.
### Best Practices
#### 1. Always Include `messages` in Output for Interrupts
When using structured output with interrupts:
✅ **Correct**:
```yaml theme={null}
output: ["extracted_data", "status", "messages"]
structured_output: true
```
❌ **Avoid**:
```yaml theme={null}
output: ["extracted_data", "status"] # Missing messages
structured_output: true
```
#### 2. Use Appropriate Prompt Types
* **Fixed**: For static, unchanging instructions
* **F-String**: When you need to inject specific state variables
* **Variable**: When the entire prompt comes from state
#### 3. Limit Tool Binding
Only bind tools the LLM actually needs:
✅ **Good**: Select specific relevant tools
```yaml theme={null}
toolkits:
jira_toolkit:
- create_issue
- update_issue
```
❌ **Avoid**: Binding all tools unnecessarily
```yaml theme={null}
toolkits:
jira_toolkit:
- [all 50+ tools selected] # Confuses LLM
```
#### 4. Structure Your Prompts
Use clear, structured prompts:
✅ **Good**:
```yaml theme={null}
prompt:
type: "fstring"
value: |
## Task
Analyze the user story: {user_story}
## Requirements
Extract:
1. Title
2. Description
3. Acceptance Criteria
## Output Format
Provide structured data for each field.
```
❌ **Avoid**: Vague prompts
```yaml theme={null}
prompt:
type: "fixed"
value: "Do something with the data"
```
#### 5. Specify Output Variables Clearly
Match output variables to what you're extracting:
✅ **Good**:
```yaml theme={null}
output: ["jira_project_id", "epic_id", "user_story_title", "messages"]
structured_output: true
```
#### 6. Use Chat History Wisely
* Include `messages` in input when context matters
* Use `[]` (empty array) for stateless single-turn requests
#### 7. Test with Interrupts
Use interrupts during development to verify LLM outputs:
```yaml theme={null}
interrupt_after: true # Pause after this node to inspect results
```
#### 8. Handle Tool Calling Errors
When using toolkits, account for potential tool failures in your prompt:
```yaml theme={null}
prompt:
type: "fixed"
value: |
Use available tools to complete the task.
If a tool fails, explain what went wrong and suggest alternatives.
```
***
## Agent Node
The Agent Node allows you to delegate tasks to pre-configured AI agents that have been added to your pipeline. Instead of configuring LLM behavior from scratch, you leverage existing agents with specialized capabilities, prompts, and toolkits.
 ### Purpose
Use the Agent Node to:
* **Delegate complex tasks** to specialized agents
* **Reuse existing agents** across multiple pipelines
* **Maintain consistency** with pre-configured agent behavior
* **Simplify workflows** by avoiding duplicate LLM configuration
* **Leverage agent-specific toolkits** and integrations
### Parameters
| Parameter | Purpose | Type Options & Examples |
| ------------------------------------ | ----------------------------------------------------------------- | --------------------------------------------------------------------------------------------------------------------------------------------------------------------------------------------------------------------------------------------------------------------------- |
| **Agent** | Select which pre-configured agent to execute | Only agents added to the pipeline appear in dropdown
### Purpose
Use the Agent Node to:
* **Delegate complex tasks** to specialized agents
* **Reuse existing agents** across multiple pipelines
* **Maintain consistency** with pre-configured agent behavior
* **Simplify workflows** by avoiding duplicate LLM configuration
* **Leverage agent-specific toolkits** and integrations
### Parameters
| Parameter | Purpose | Type Options & Examples |
| ------------------------------------ | ----------------------------------------------------------------- | --------------------------------------------------------------------------------------------------------------------------------------------------------------------------------------------------------------------------------------------------------------------------- |
| **Agent** | Select which pre-configured agent to execute | Only agents added to the pipeline appear in dropdown
**How to Add:**
1. Go to Pipeline Configuration > Toolkits
2. Select agents
3. Added agents become available
Example: `jira_assistant_agent` |
| **Input** | Specify which state variables the agent reads from | **Default states:** `input`, `messages`
**Custom states:** Any defined state variables
Example:
`- project_id`
`- input` |
| **Output** | Define which state variables the agent's response should populate | **Default:** `messages`
**Custom states:** Specific variables
Example:
`- jira_ticket_id`
`- ticket_url`
`- messages` |
| **Task (Input Mapping)** | Map the specific task instruction for the agent | **`Fixed`** - Static task
Example: "Create a Jira ticket for this issue."
**`F-String`** - Task with variables
Example: "Create Jira ticket in {project_id}: {user_story}"
**`Variable`** - Task from state
Example: task\_instruction |
| **Chat History (Input Mapping)** | Map conversation context to provide to the agent | **`Fixed`** - No history
Example: \[]
**`F-String`** - Formatted history
Example: "Previous context: {messages}"
**`Variable`** - Use conversation history
Example: messages |
| **Custom Variables (Input Mapping)** | Map agent-specific custom variables if defined | **`Fixed`** - Static value
**`F-String`** - Value with variables
**`Variable`** - Value from state
Example (if agent has `jira_project`):
`jira_project: PROJ-123` |
| **Interrupt Before** | Pause pipeline execution before this node | **Enabled** / **Disabled**
Example: `enabled` or `disabled` |
| **Interrupt After** | Pause pipeline execution after this node for inspection | **Enabled** / **Disabled**
Example: `enabled` or `disabled` |
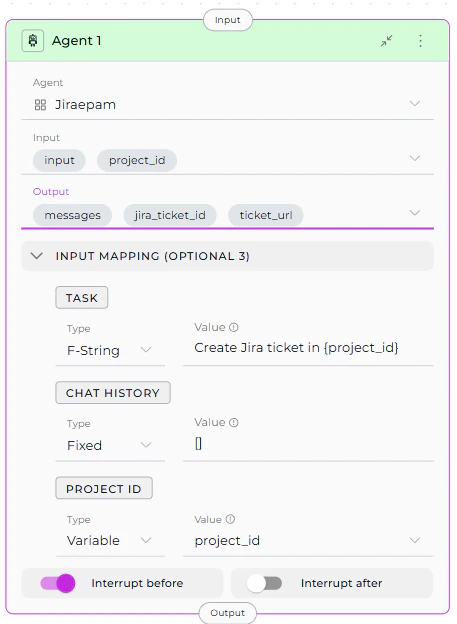 **Yaml Configuration**
```yaml theme={null}
nodes:
- id: Agent 1
type: agent
input:
- input
- project_id
output:
- jira_ticket_id
- ticket_url
- messages
transition: END
input_mapping:
task:
type: fstring
value: Create Jira ticket in {project_id}
chat_history:
type: fixed
value: []
project_id:
type: variable
value: project_id
tool: Jiraepam
interrupt_before:
- Agent 1
state:
messages:
type: list
input:
type: str
project_id:
type: str
value: ''
jira_ticket_id:
type: str
value: ''
ticket_url:
type: str
value: ''
```
The Input Mapping section appears **after** you select an agent. Every agent includes **TASK** and **CHAT\_HISTORY** mappings. If the agent has custom variables, they also appear as mapping options.
Before using Agent Node, ensure agents are added in **Pipeline Configuration > Toolkits** section. Only added agents appear in the dropdown.
### Best Practices
#### 1. Add Agents to Pipeline First
Ensure the agent is added in Pipeline Configuration > Toolkits section before using Agent Node.
#### 2. Map Task Clearly
Provide clear, specific task instructions:
✅ **Good**:
```yaml theme={null}
task:
type: "fstring"
value: "Create Jira ticket in project {project_id} with title '{title}', description '{description}', and priority {priority}."
```
❌ **Avoid**:
```yaml theme={null}
task:
type: "variable"
value: "input" # Too vague
```
#### 3. Use Chat History Appropriately
* **With History**: Use when agent needs conversation context
* **Without History**: Use `[]` for independent, stateless tasks
#### 4. Map Custom Variables Correctly
If agent has custom variables, map them to pipeline state:
✅ **Good**:
```yaml theme={null}
input_mapping:
jira_project:
type: "variable"
value: "project_id"
sprint_number:
type: "variable"
value: "current_sprint"
```
#### 5. Include `messages` in Output
For debugging and continuity, include `messages`:
```yaml theme={null}
output: ["agent_result", "messages"]
```
#### 6. Use Interrupts for Testing
Test agent behavior with interrupts:
```yaml theme={null}
interrupt_after: true # Review agent output
```
#### 7. Reuse Agents Across Pipelines
Create specialized agents once, reuse in multiple pipelines for consistency.
#### 8. Handle Agent Failures
Consider error handling in subsequent nodes:
```yaml theme={null}
- id: "check_agent_result"
type: "router"
condition: "agent_result is not None"
routes: ["success_path", "error_path"]
```
***
## Interaction Nodes Comparison
| Feature | LLM Node | Agent Node |
| ------------------------ | --------------------------------------------- | ----------------------------------------------------------------------------- |
| **Purpose** | Direct LLM interaction with full control | Delegate to pre-configured specialized agents |
| **Configuration** | Configure prompt, system, task from scratch | Use existing agent configuration |
| **Prompt** | Define in node (Fixed/F-String/Variable) | Inherited from agent, customized via Task mapping |
| **Toolkits** | Select Toolkits & MCPs, choose specific tools | Agent's toolkits are pre-configured |
| **Input** | State variables (input, messages, custom) | State variables (input, messages, custom) |
| **Output** | State variables (messages, custom) | State variables (messages, custom) |
| **Input Mapping** | Not applicable (direct state access) | Map pipeline state to agent parameters (Task, Chat History, custom variables) |
| **Structured Output** | Supported (enable via toggle) | Depends on agent configuration |
| **Conversation History** | Controlled via Chat history parameter | Controlled via CHAT\_HISTORY mapping |
| **Reusability** | Node-specific configuration | Agent can be reused across pipelines |
| **Flexibility** | Highly flexible, configure everything | Limited to agent's design |
| **Complexity** | More setup required | Simpler, leverages existing agent |
| **Use Case** | Custom tasks, one-off requests, full control | Specialized tasks, consistent behavior, reusable workflows |
### When to Use LLM Node
✅ **Choose LLM Node when you need**:
* Full control over prompts and behavior
* Custom tool binding for specific workflow
* One-off or unique LLM interactions
* Structured output extraction
* Simple text generation without pre-configuration
### When to Use Agent Node
✅ **Choose Agent Node when you**:
* Have an existing agent that does exactly what you need
* Want to reuse agent logic across multiple pipelines
* Need consistent behavior from pre-configured agents
* Want to simplify pipeline by delegating to specialists
* Have agents with specific domain knowledge or toolkits
You can use both node types in the same pipeline:
* **LLM Node** for custom, ad-hoc processing
* **Agent Node** for specialized, reusable tasks
***
* **[Nodes Overview](./overview)** - Understand all available node types
* **[Execution Nodes](./execution-nodes)** - Call external tools and execute code
* **[States](../states)** - Manage data flow through pipeline state
* **[Connections](../nodes-connectors)** - Link nodes together
* **[YAML Configuration](../yaml)** - See complete node syntax examples
* **[Updating LLM Nodes (v2.0.0 Migration)](../../../migration/v2.0.0/update-llm-nodes)** - Guide for migrating old LLM nodes to new format
**Yaml Configuration**
```yaml theme={null}
nodes:
- id: Agent 1
type: agent
input:
- input
- project_id
output:
- jira_ticket_id
- ticket_url
- messages
transition: END
input_mapping:
task:
type: fstring
value: Create Jira ticket in {project_id}
chat_history:
type: fixed
value: []
project_id:
type: variable
value: project_id
tool: Jiraepam
interrupt_before:
- Agent 1
state:
messages:
type: list
input:
type: str
project_id:
type: str
value: ''
jira_ticket_id:
type: str
value: ''
ticket_url:
type: str
value: ''
```
The Input Mapping section appears **after** you select an agent. Every agent includes **TASK** and **CHAT\_HISTORY** mappings. If the agent has custom variables, they also appear as mapping options.
Before using Agent Node, ensure agents are added in **Pipeline Configuration > Toolkits** section. Only added agents appear in the dropdown.
### Best Practices
#### 1. Add Agents to Pipeline First
Ensure the agent is added in Pipeline Configuration > Toolkits section before using Agent Node.
#### 2. Map Task Clearly
Provide clear, specific task instructions:
✅ **Good**:
```yaml theme={null}
task:
type: "fstring"
value: "Create Jira ticket in project {project_id} with title '{title}', description '{description}', and priority {priority}."
```
❌ **Avoid**:
```yaml theme={null}
task:
type: "variable"
value: "input" # Too vague
```
#### 3. Use Chat History Appropriately
* **With History**: Use when agent needs conversation context
* **Without History**: Use `[]` for independent, stateless tasks
#### 4. Map Custom Variables Correctly
If agent has custom variables, map them to pipeline state:
✅ **Good**:
```yaml theme={null}
input_mapping:
jira_project:
type: "variable"
value: "project_id"
sprint_number:
type: "variable"
value: "current_sprint"
```
#### 5. Include `messages` in Output
For debugging and continuity, include `messages`:
```yaml theme={null}
output: ["agent_result", "messages"]
```
#### 6. Use Interrupts for Testing
Test agent behavior with interrupts:
```yaml theme={null}
interrupt_after: true # Review agent output
```
#### 7. Reuse Agents Across Pipelines
Create specialized agents once, reuse in multiple pipelines for consistency.
#### 8. Handle Agent Failures
Consider error handling in subsequent nodes:
```yaml theme={null}
- id: "check_agent_result"
type: "router"
condition: "agent_result is not None"
routes: ["success_path", "error_path"]
```
***
## Interaction Nodes Comparison
| Feature | LLM Node | Agent Node |
| ------------------------ | --------------------------------------------- | ----------------------------------------------------------------------------- |
| **Purpose** | Direct LLM interaction with full control | Delegate to pre-configured specialized agents |
| **Configuration** | Configure prompt, system, task from scratch | Use existing agent configuration |
| **Prompt** | Define in node (Fixed/F-String/Variable) | Inherited from agent, customized via Task mapping |
| **Toolkits** | Select Toolkits & MCPs, choose specific tools | Agent's toolkits are pre-configured |
| **Input** | State variables (input, messages, custom) | State variables (input, messages, custom) |
| **Output** | State variables (messages, custom) | State variables (messages, custom) |
| **Input Mapping** | Not applicable (direct state access) | Map pipeline state to agent parameters (Task, Chat History, custom variables) |
| **Structured Output** | Supported (enable via toggle) | Depends on agent configuration |
| **Conversation History** | Controlled via Chat history parameter | Controlled via CHAT\_HISTORY mapping |
| **Reusability** | Node-specific configuration | Agent can be reused across pipelines |
| **Flexibility** | Highly flexible, configure everything | Limited to agent's design |
| **Complexity** | More setup required | Simpler, leverages existing agent |
| **Use Case** | Custom tasks, one-off requests, full control | Specialized tasks, consistent behavior, reusable workflows |
### When to Use LLM Node
✅ **Choose LLM Node when you need**:
* Full control over prompts and behavior
* Custom tool binding for specific workflow
* One-off or unique LLM interactions
* Structured output extraction
* Simple text generation without pre-configuration
### When to Use Agent Node
✅ **Choose Agent Node when you**:
* Have an existing agent that does exactly what you need
* Want to reuse agent logic across multiple pipelines
* Need consistent behavior from pre-configured agents
* Want to simplify pipeline by delegating to specialists
* Have agents with specific domain knowledge or toolkits
You can use both node types in the same pipeline:
* **LLM Node** for custom, ad-hoc processing
* **Agent Node** for specialized, reusable tasks
***
* **[Nodes Overview](./overview)** - Understand all available node types
* **[Execution Nodes](./execution-nodes)** - Call external tools and execute code
* **[States](../states)** - Manage data flow through pipeline state
* **[Connections](../nodes-connectors)** - Link nodes together
* **[YAML Configuration](../yaml)** - See complete node syntax examples
* **[Updating LLM Nodes (v2.0.0 Migration)](../../../migration/v2.0.0/update-llm-nodes)** - Guide for migrating old LLM nodes to new format