> ## Documentation Index
> Fetch the complete documentation index at: https://docs.elitea.ai/llms.txt
> Use this file to discover all available pages before exploring further.
# Node Connectors
> Node connectors link nodes together to define your pipeline's execution flow. They determine which node runs next, how data flows between nodes, and when the pi
**Key Concepts:**
* **[Entry Point](#entry-point-node)** - Where pipeline execution begins
* **[Transitions](#yaml-connection-syntax)** - Connections between nodes
* **[END Node](#end-node)** - Where pipeline execution stops
* **[Connection Patterns](#connection-patterns)** - Common workflow structures
Every pipeline requires: (1) Entry Point to start execution, (2) Transitions to connect nodes, (3) END to terminate execution
***
## Entry Point Node
The Entry Point is the first node that executes when your pipeline runs. Every pipeline must have exactly one entry point.
### Setting an Entry Point
**Visual Method:**
1. Open your pipeline in Flow Editor
2. Click the three-dots menu (⋮) on the node
3. Select **Make entrypoint**
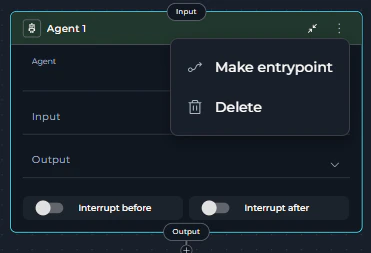 **YAML Method:**
```yaml theme={null}
entry_point: Validate Input
```
* Only **one node** can be the entry point
* **Router** node **cannot** be entry point (they require input from previous nodes)
* All other node types can serve as entry points
* Entry point must be set before running the pipeline
Making a different node the entry point automatically removes the previous entry point designation.
**See Also:** [Entry Point Guide](./entry-point) for detailed configuration
***
## END Node
The END node terminates pipeline execution. It's not a physical node but a special target for connections.
### When to Use END
Use `END` as the connection target when:
* Pipeline has completed all work
* No further processing is needed
* You want to explicitly stop execution
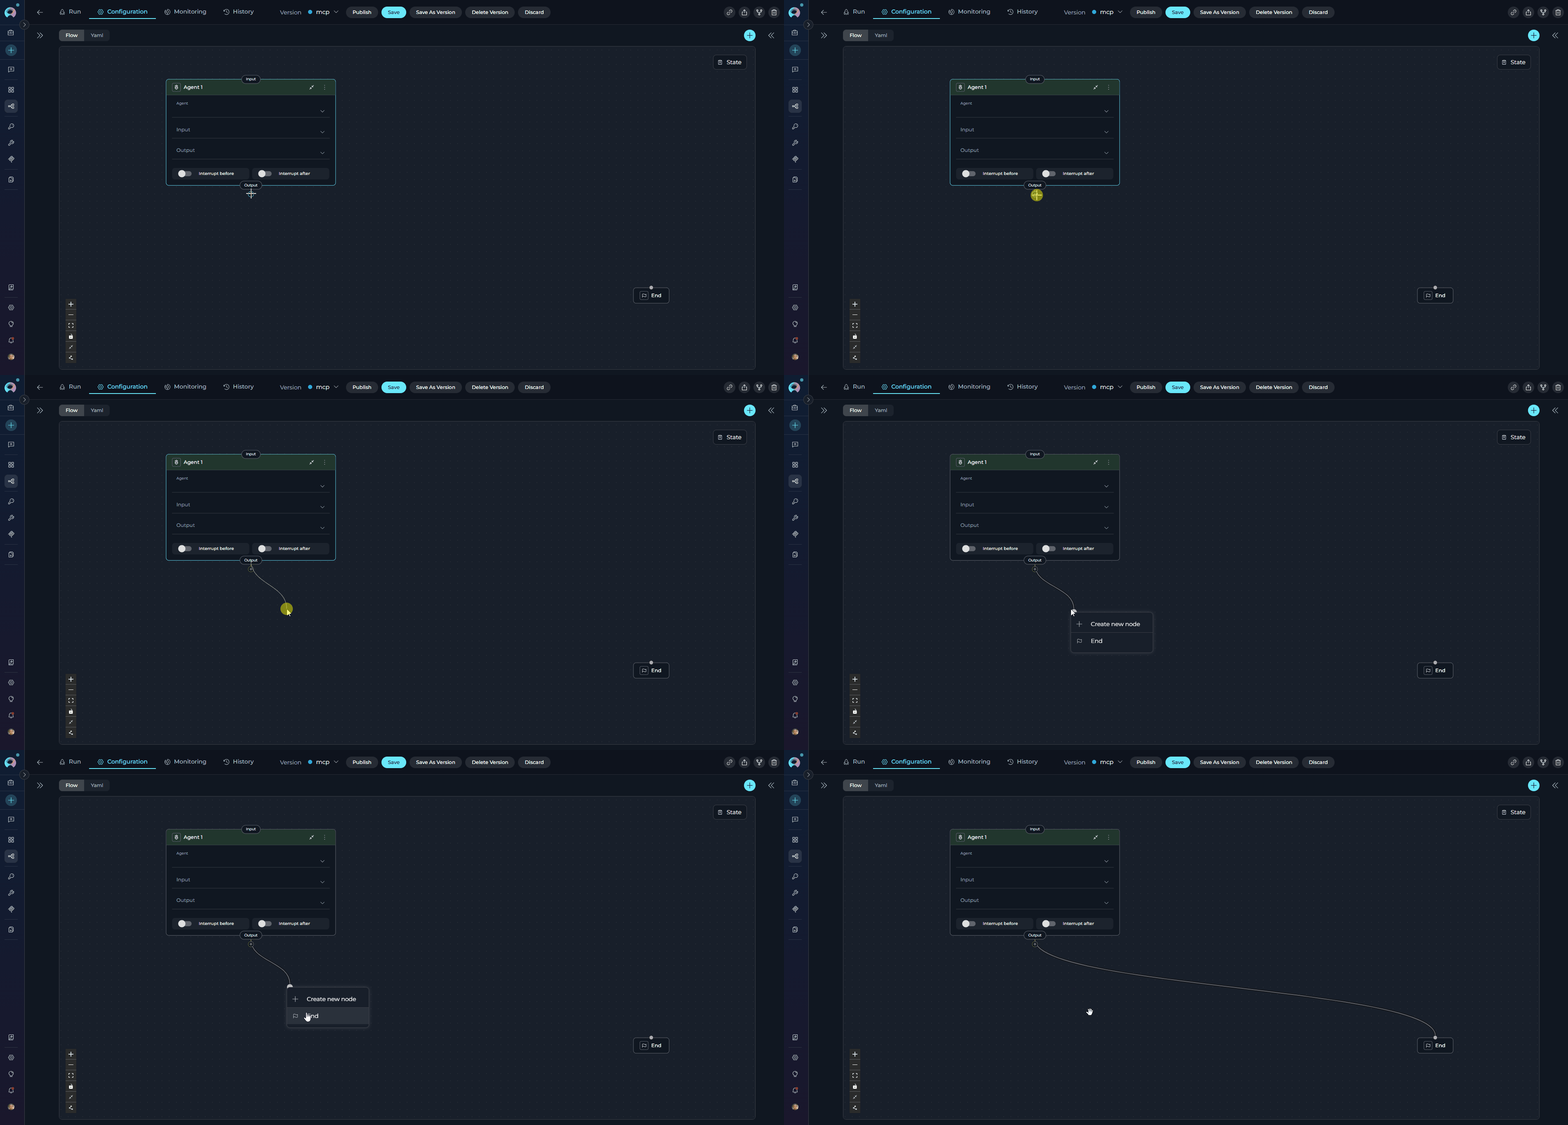
### How to Connect to END
**Visual Method:**
1. Drag a connector from a node
2. Release in the canvas
3. Select **END** from the dropdown
**YAML Method:**
```yaml theme={null}
transition: END
```
Every execution path must eventually reach END. Paths without termination may cause unexpected behavior.
**YAML Method:**
```yaml theme={null}
entry_point: Validate Input
```
* Only **one node** can be the entry point
* **Router** node **cannot** be entry point (they require input from previous nodes)
* All other node types can serve as entry points
* Entry point must be set before running the pipeline
Making a different node the entry point automatically removes the previous entry point designation.
**See Also:** [Entry Point Guide](./entry-point) for detailed configuration
***
## END Node
The END node terminates pipeline execution. It's not a physical node but a special target for connections.
### When to Use END
Use `END` as the connection target when:
* Pipeline has completed all work
* No further processing is needed
* You want to explicitly stop execution
### How to Connect to END
**Visual Method:**
1. Drag a connector from a node
2. Release in the canvas
3. Select **END** from the dropdown
**YAML Method:**
```yaml theme={null}
transition: END
```
Every execution path must eventually reach END. Paths without termination may cause unexpected behavior.
 ***
## Node Input and Output Ports
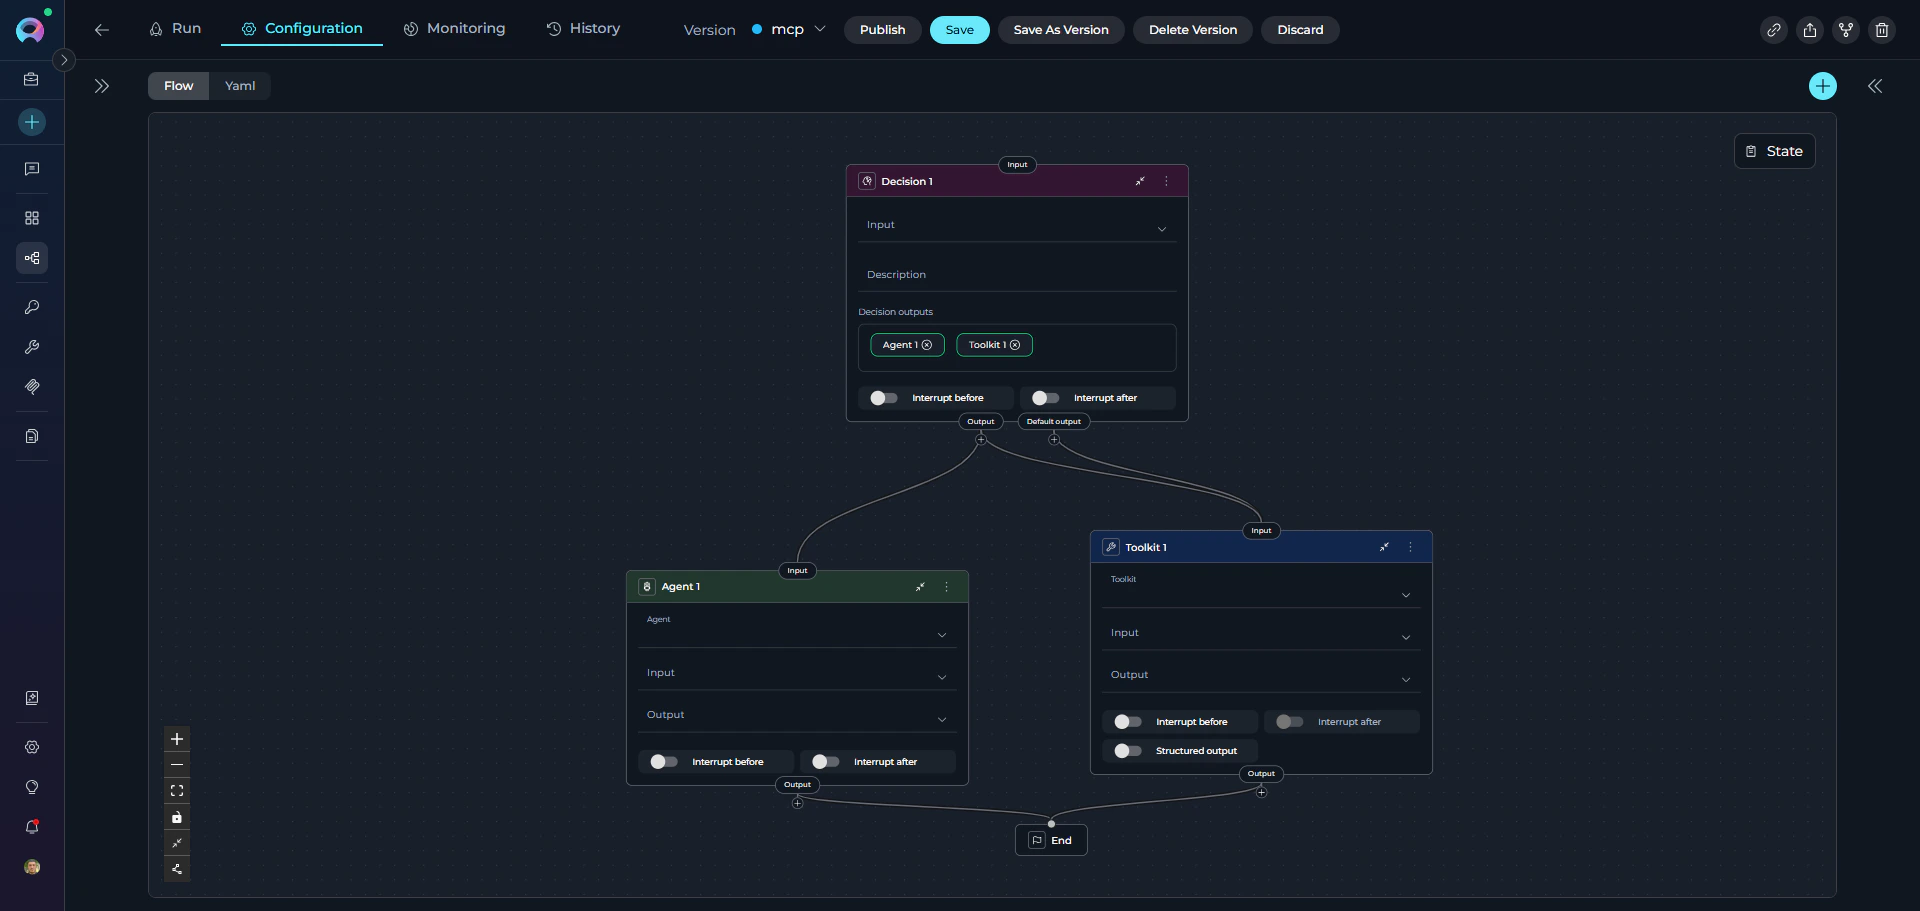
All nodes have **input** and **output** ports for connectors:
| Port Type | Purpose | Visual Indicator |
| ------------------ | ----------------------------------------- | ------------------- |
| **Input** | Receives data/control from previous nodes | Top of node card |
| **Output** | Sends data/control to next nodes | Bottom of node card |
| **Default Output** | Fallback path (Router, Decision only) | Labeled separately |
***
## Connection Rules by Node Type
### Standard Nodes (Single Output)
Most nodes can have **only ONE output connection**:
* LLM
* Agent
* Toolkit
* MCP
* Code
* Custom
* State Modifier
* Printer
* Decision
* Hitl
**YAML Example:**
```yaml theme={null}
- id: Process Data
type: code
transition: Display Results
```
### Multi-Output Nodes
Two node types support **multiple outputs**:
#### 1. Router Node
Routes execution based on conditional logic. Can have:
* **Multiple conditional outputs**: One for each defined route
* **Default output**: Fallback when no conditions match
**YAML Example:**
```yaml theme={null}
- id: Route Request
type: router
condition: "{{ request_type }}"
routes:
- when: "{{ request_type == 'urgent' }}"
transition: Priority Handler
- when: "{{ request_type == 'standard' }}"
transition: Standard Handler
default: Error Handler # Default output
```
#### 2. Decision Node
LLM-powered routing to multiple destinations.
**YAML Example:**
```yaml theme={null}
- id: Classify Intent
type: decision
description: "Analyze user intent and route appropriately"
decision:
nodes:
- Bug Report Handler
- Feature Request Handler
- Question Handler
```
#### 3. HITL Node
Human-in-the-Loop routing to up to three destinations based on the user's action. Can have:
* **Approve output**: Routes to the next node when the user approves
* **Edit output**: Routes to the next node when the user edits a state variable
* **Reject output**: Routes to the next node when the user rejects
HITL does not use `transition` or `routes`. Instead it uses a `routes` block with `approve`, `edit`, and `reject` keys. No `default_output` is needed — the user's action determines the path.
**YAML Example:**
```yaml theme={null}
- id: Review_ticket
type: hitl
input:
- ticket_title
- ticket_description
user_message:
type: fstring
value: |
**Title:** {ticket_title}
**Description:** {ticket_description}
Approve to create, Edit to modify, or Reject to cancel.
routes:
approve: Create_ticket
edit: Create_ticket
reject: END
edit_state_key: ticket_description
```
### Multiple Inputs
All nodes can accept **multiple input connections**, allowing:
* Convergence of different execution paths
* Merging results from parallel branches
* Reusing nodes in different contexts
**Example:**
```yaml theme={null}
- id: Generate Report
type: toolkit
# Can receive input from multiple nodes
transition: Email Results
# Both paths lead to same node:
- id: Process Type A
transition: Generate Report
- id: Process Type B
transition: Generate Report
```
***
## Node Input and Output Ports
All nodes have **input** and **output** ports for connectors:
| Port Type | Purpose | Visual Indicator |
| ------------------ | ----------------------------------------- | ------------------- |
| **Input** | Receives data/control from previous nodes | Top of node card |
| **Output** | Sends data/control to next nodes | Bottom of node card |
| **Default Output** | Fallback path (Router, Decision only) | Labeled separately |
***
## Connection Rules by Node Type
### Standard Nodes (Single Output)
Most nodes can have **only ONE output connection**:
* LLM
* Agent
* Toolkit
* MCP
* Code
* Custom
* State Modifier
* Printer
* Decision
* Hitl
**YAML Example:**
```yaml theme={null}
- id: Process Data
type: code
transition: Display Results
```
### Multi-Output Nodes
Two node types support **multiple outputs**:
#### 1. Router Node
Routes execution based on conditional logic. Can have:
* **Multiple conditional outputs**: One for each defined route
* **Default output**: Fallback when no conditions match
**YAML Example:**
```yaml theme={null}
- id: Route Request
type: router
condition: "{{ request_type }}"
routes:
- when: "{{ request_type == 'urgent' }}"
transition: Priority Handler
- when: "{{ request_type == 'standard' }}"
transition: Standard Handler
default: Error Handler # Default output
```
#### 2. Decision Node
LLM-powered routing to multiple destinations.
**YAML Example:**
```yaml theme={null}
- id: Classify Intent
type: decision
description: "Analyze user intent and route appropriately"
decision:
nodes:
- Bug Report Handler
- Feature Request Handler
- Question Handler
```
#### 3. HITL Node
Human-in-the-Loop routing to up to three destinations based on the user's action. Can have:
* **Approve output**: Routes to the next node when the user approves
* **Edit output**: Routes to the next node when the user edits a state variable
* **Reject output**: Routes to the next node when the user rejects
HITL does not use `transition` or `routes`. Instead it uses a `routes` block with `approve`, `edit`, and `reject` keys. No `default_output` is needed — the user's action determines the path.
**YAML Example:**
```yaml theme={null}
- id: Review_ticket
type: hitl
input:
- ticket_title
- ticket_description
user_message:
type: fstring
value: |
**Title:** {ticket_title}
**Description:** {ticket_description}
Approve to create, Edit to modify, or Reject to cancel.
routes:
approve: Create_ticket
edit: Create_ticket
reject: END
edit_state_key: ticket_description
```
### Multiple Inputs
All nodes can accept **multiple input connections**, allowing:
* Convergence of different execution paths
* Merging results from parallel branches
* Reusing nodes in different contexts
**Example:**
```yaml theme={null}
- id: Generate Report
type: toolkit
# Can receive input from multiple nodes
transition: Email Results
# Both paths lead to same node:
- id: Process Type A
transition: Generate Report
- id: Process Type B
transition: Generate Report
```
 ***
## YAML Connection Syntax
### Basic Transition
Connect one node to another:
```yaml theme={null}
transition:
```
**Example:**
```yaml theme={null}
- id: Fetch Data
type: toolkit
transition: Process Data # Next node ID
```
### Conditional Transitions (Router)
Multiple routes with default fallback:
```yaml theme={null}
condition: "{{ variable }}"
routes:
- when: "{{ condition_1 }}"
transition: Node A
- when: "{{ condition_2 }}"
transition: Node B
default: Default Node # Optional fallback
```
### Decision-Based Transitions
LLM chooses from options:
```yaml theme={null}
decision:
nodes:
- Option 1 Node
- Option 2 Node
- Option 3 Node
```
### HITL Routes
Human chooses from up to three actions:
```yaml theme={null}
routes:
approve: Next_node # Required — any node or END
edit: Next_node # Optional — cannot be END
reject: END # Optional — any node or END
edit_state_key: state_var # Required when edit route is set
```
### Terminate Pipeline
```yaml theme={null}
transition: END
```
***
## Creating Connections Visually
ELITEA provides multiple ways to create connections in Flow mode:
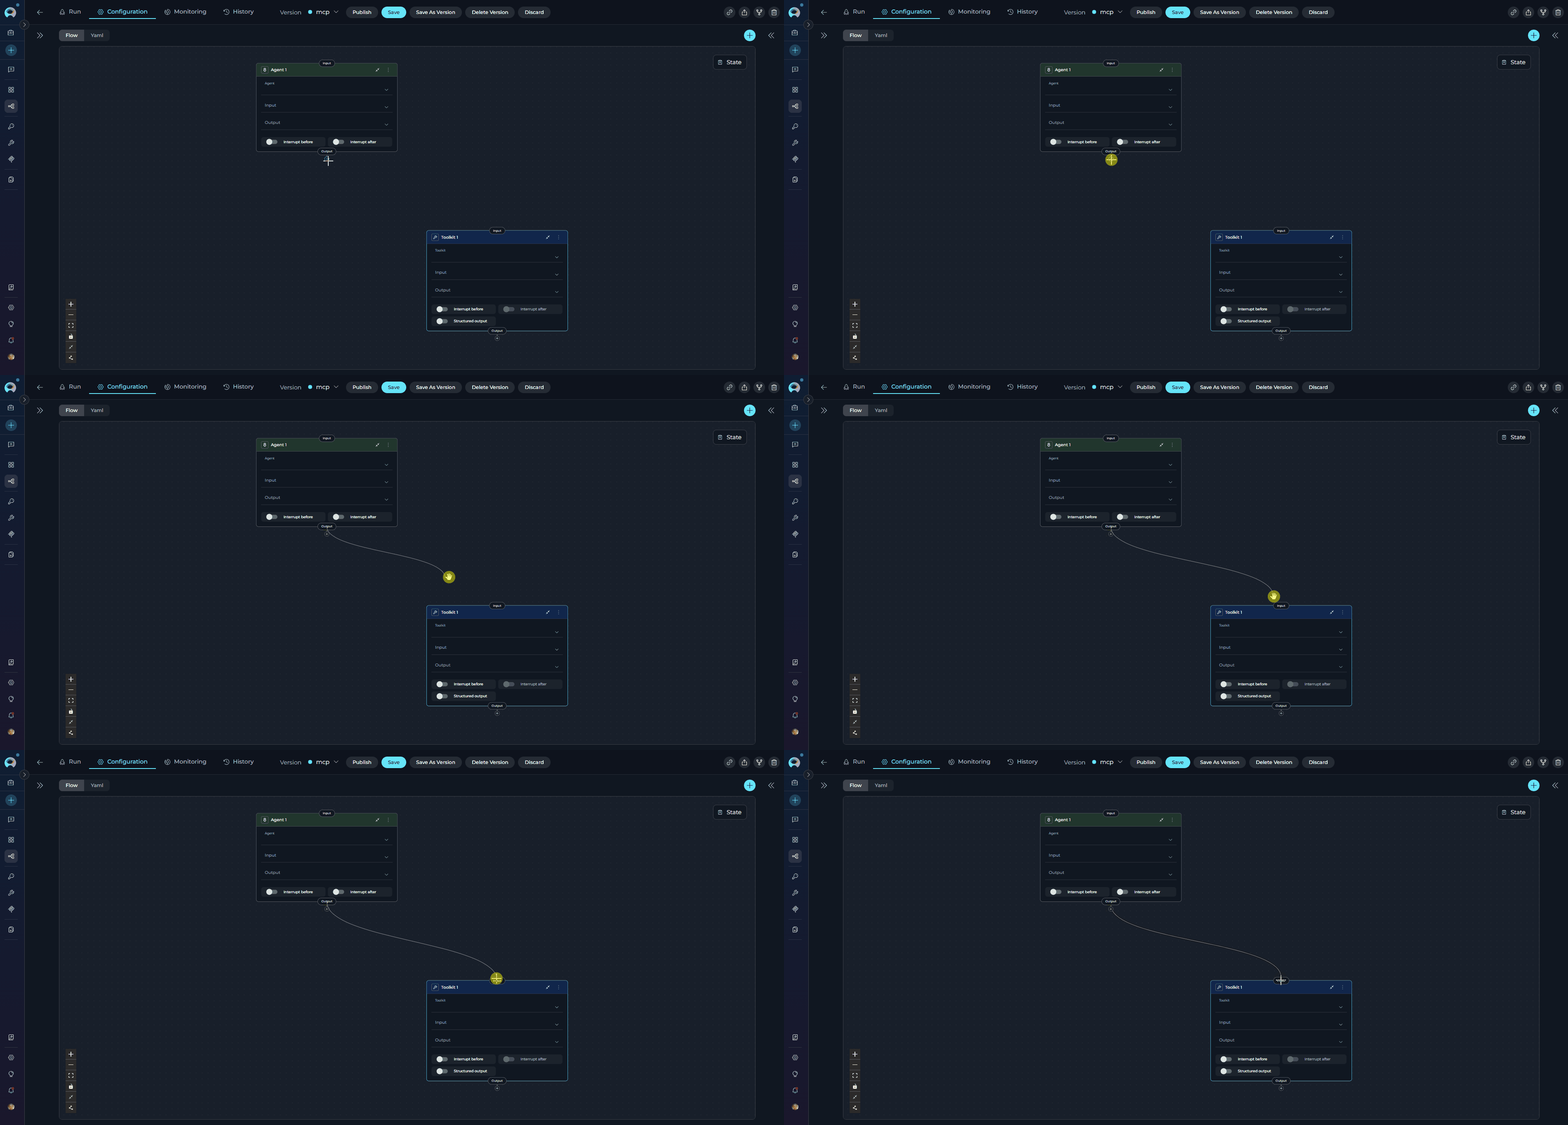
### Method 1: Drag from Node
1. Click and drag the **output port** (bottom of node)
2. Drag the connector line across the canvas
3. Release on the **input port** (top of target node)
***
## YAML Connection Syntax
### Basic Transition
Connect one node to another:
```yaml theme={null}
transition:
```
**Example:**
```yaml theme={null}
- id: Fetch Data
type: toolkit
transition: Process Data # Next node ID
```
### Conditional Transitions (Router)
Multiple routes with default fallback:
```yaml theme={null}
condition: "{{ variable }}"
routes:
- when: "{{ condition_1 }}"
transition: Node A
- when: "{{ condition_2 }}"
transition: Node B
default: Default Node # Optional fallback
```
### Decision-Based Transitions
LLM chooses from options:
```yaml theme={null}
decision:
nodes:
- Option 1 Node
- Option 2 Node
- Option 3 Node
```
### HITL Routes
Human chooses from up to three actions:
```yaml theme={null}
routes:
approve: Next_node # Required — any node or END
edit: Next_node # Optional — cannot be END
reject: END # Optional — any node or END
edit_state_key: state_var # Required when edit route is set
```
### Terminate Pipeline
```yaml theme={null}
transition: END
```
***
## Creating Connections Visually
ELITEA provides multiple ways to create connections in Flow mode:
### Method 1: Drag from Node
1. Click and drag the **output port** (bottom of node)
2. Drag the connector line across the canvas
3. Release on the **input port** (top of target node)
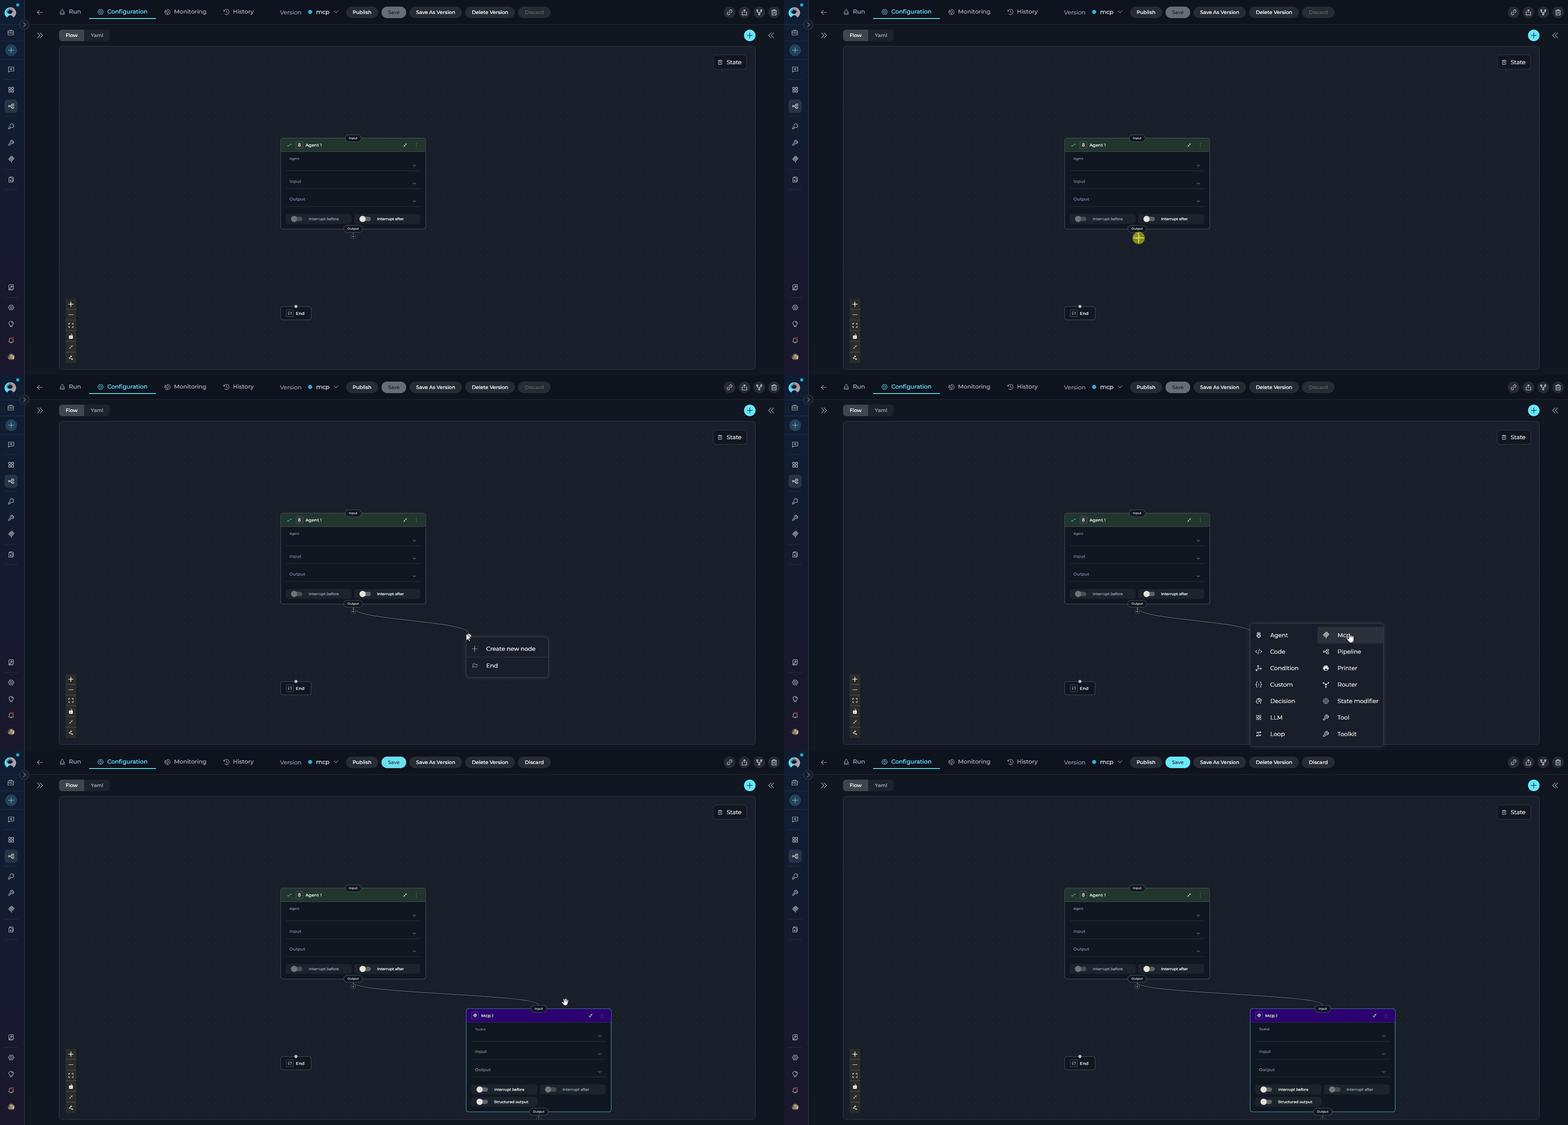
 **Method 2: Dropdown Menu**
1. Drag connector from output port
2. Release in empty canvas area
3. Select from dropdown:
* **Existing nodes** - Connect to available node
* **Create New Node** - Add and connect new node
* **END** - Terminate pipeline
**Method 2: Dropdown Menu**
1. Drag connector from output port
2. Release in empty canvas area
3. Select from dropdown:
* **Existing nodes** - Connect to available node
* **Create New Node** - Add and connect new node
* **END** - Terminate pipeline
 ***
## Interrupt Options
**Interrupt Before** and **Interrupt After** are advanced options that pause pipeline execution for human review or intervention.
### Interrupt Before
Pauses **before** a node runs. Useful for:
* Reviewing inputs before critical operations
* Confirming decisions before irreversible actions
* Manual data validation
**YAML:**
```yaml theme={null}
interrupt_before:
- Node Name
```
**Visual:** Toggle **Interrupt Before** in node's Advanced settings
***
## Interrupt Options
**Interrupt Before** and **Interrupt After** are advanced options that pause pipeline execution for human review or intervention.
### Interrupt Before
Pauses **before** a node runs. Useful for:
* Reviewing inputs before critical operations
* Confirming decisions before irreversible actions
* Manual data validation
**YAML:**
```yaml theme={null}
interrupt_before:
- Node Name
```
**Visual:** Toggle **Interrupt Before** in node's Advanced settings
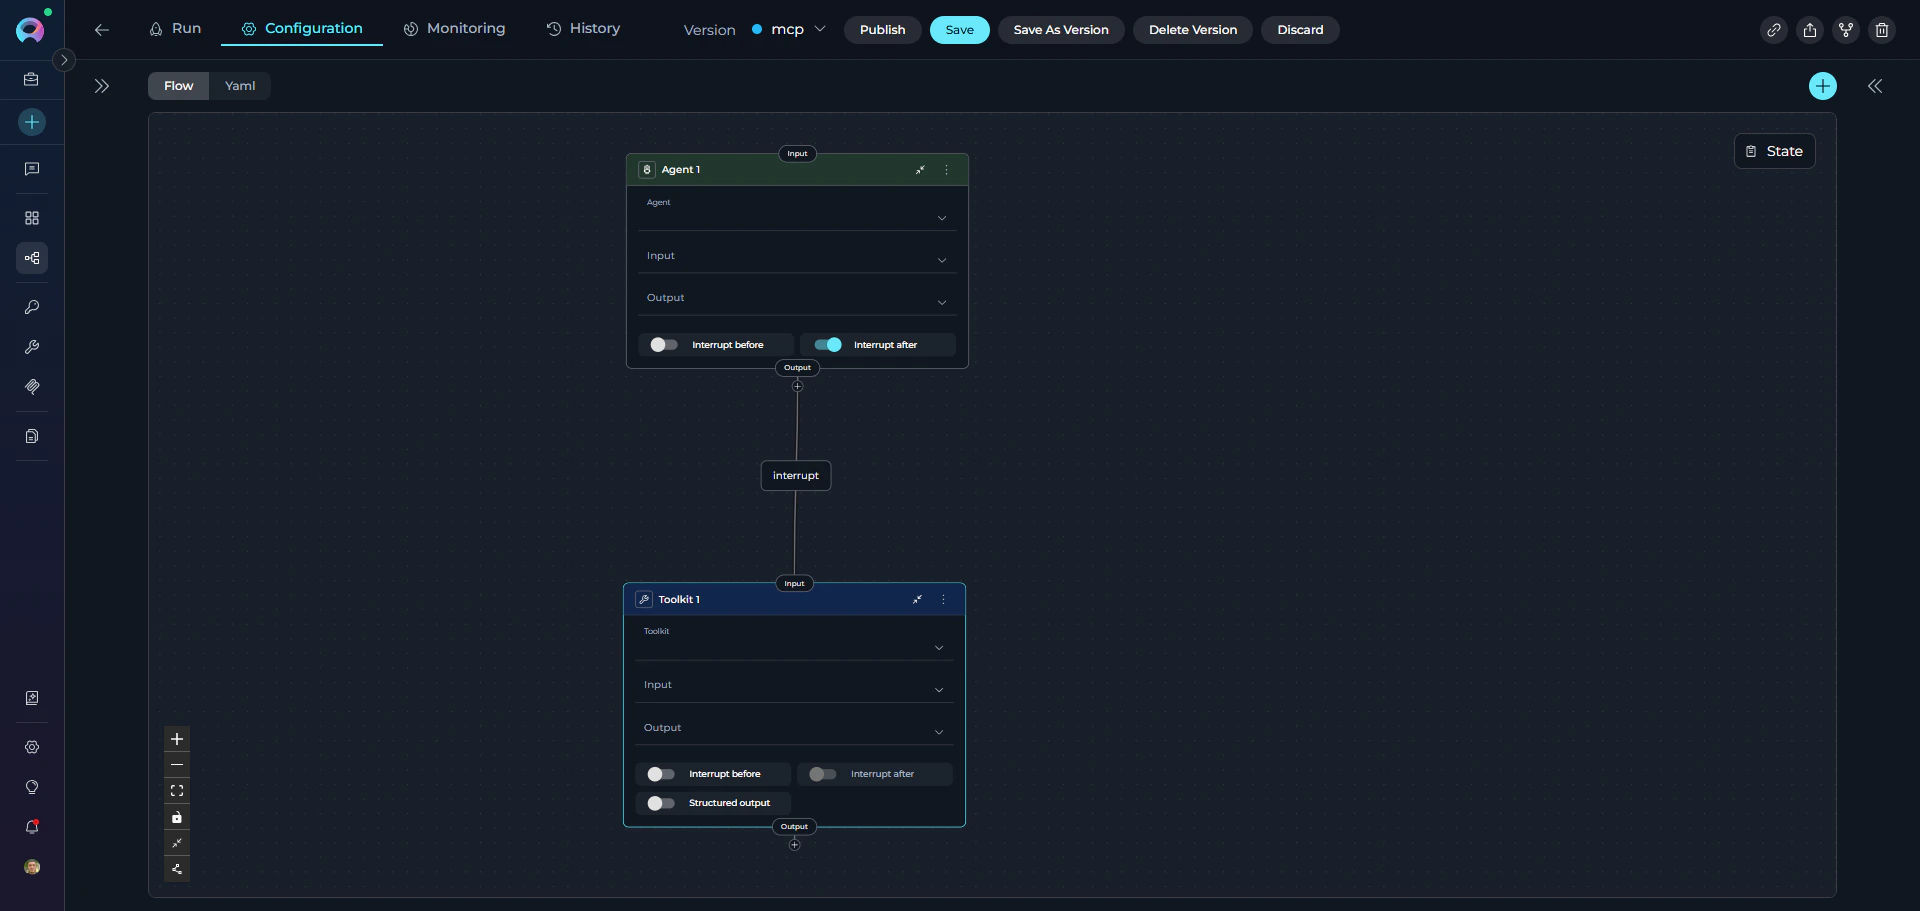 ### Interrupt After
Pauses execution **after a node completes**. Useful for:
* Reviewing outputs before proceeding
* Verifying LLM results
* Allowing human feedback
**YAML Syntax:**
```yaml theme={null}
interrupt_after:
- Node Name
```
**Visual:** Toggle **Interrupt After** in node's Advanced settings
* Only works in **interactive mode** (Chat interface)
* Programmatic/API executions may ignore interrupts
* Use sparingly to avoid breaking automated workflows
***
## Connection Patterns
### Linear Flow
Sequential execution through nodes.
```yaml theme={null}
entry_point: Step 1
nodes:
- id: Step 1
type: code
transition: Step 2
- id: Step 2
type: llm
transition: Step 3
- id: Step 3
type: code
transition: END
```
### Interrupt After
Pauses execution **after a node completes**. Useful for:
* Reviewing outputs before proceeding
* Verifying LLM results
* Allowing human feedback
**YAML Syntax:**
```yaml theme={null}
interrupt_after:
- Node Name
```
**Visual:** Toggle **Interrupt After** in node's Advanced settings
* Only works in **interactive mode** (Chat interface)
* Programmatic/API executions may ignore interrupts
* Use sparingly to avoid breaking automated workflows
***
## Connection Patterns
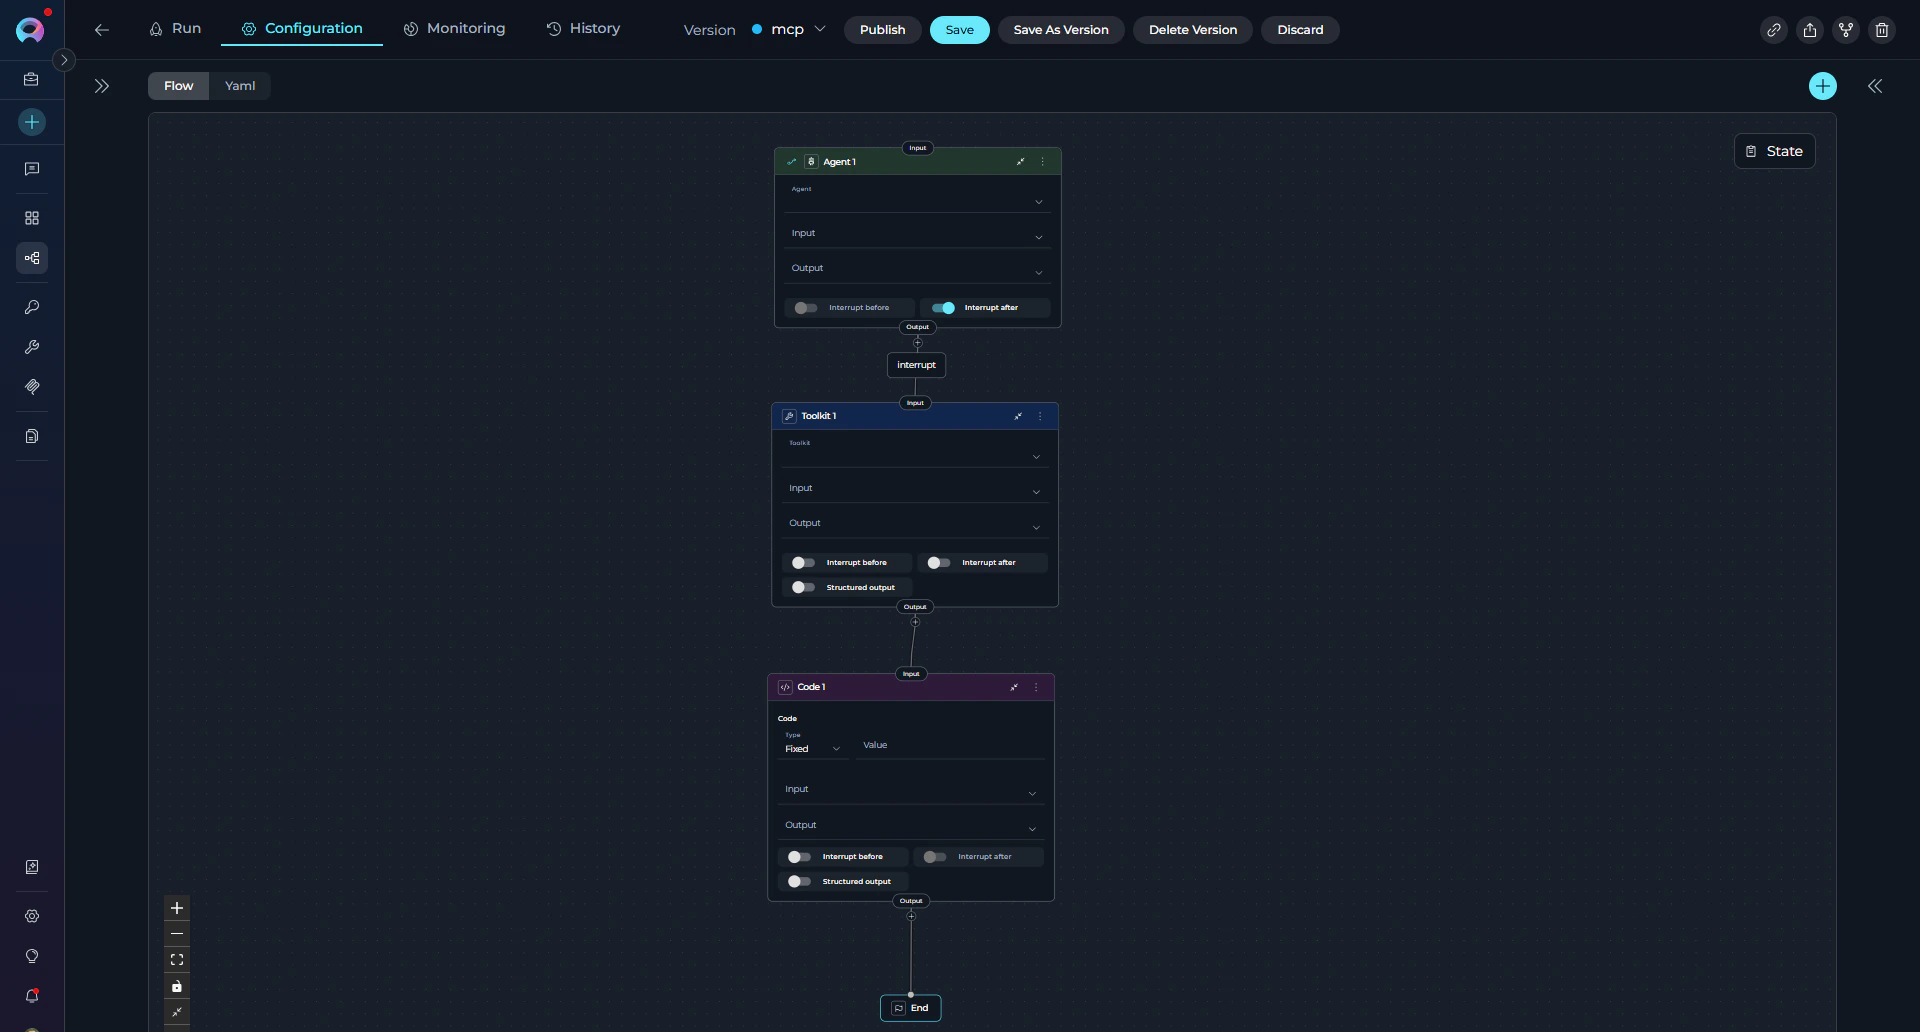
### Linear Flow
Sequential execution through nodes.
```yaml theme={null}
entry_point: Step 1
nodes:
- id: Step 1
type: code
transition: Step 2
- id: Step 2
type: llm
transition: Step 3
- id: Step 3
type: code
transition: END
```
 ### Multi-Path Routing
Multiple branches based on complex logic.
```yaml theme={null}
entry_point: Classify Request
nodes:
- id: Classify Request
type: router
condition: "{{ request_type }}"
routes:
- Bug Handler
- Feature Handler
- Question Handler
default_output: General Handler
```
### Converging Paths
Multiple branches merge into single node.
```yaml theme={null}
entry_point: Route Input
nodes:
- id: Route Input
type: decision
decision:
nodes:
- Process Type A
- Process Type B
- id: Process Type A
type: toolkit
transition: Generate Report
- id: Process Type B
type: toolkit
transition: Generate Report
- id: Generate Report
type: toolkit
transition: END
```
### Human Approval Gate
Pause execution for a human decision before proceeding.
```yaml theme={null}
entry_point: Generate_draft
nodes:
- id: Generate_draft
type: llm
transition: Review_draft
- id: Review_draft
type: hitl
routes:
approve: Publish # Approved — continue
edit: Publish # Edited — continue with updated value
reject: END # Rejected — cancel
edit_state_key: draft
- id: Publish
type: toolkit
transition: END
```
## Best Practices
### Essential Rules
* **Set Entry Point**: Pipeline won't run without one
* **All Paths to END**: Every branch must terminate
* **Avoid Infinite Loops**: Ensure loops eventually reach END
### Connection Guidelines
* **Use Descriptive Names**: `Validate User Input` instead of `Node1`
* **Add Default Routes**: Provide fallback for Router nodes
* **Test Incrementally**: Build and test step-by-step
* **Limit Nesting**: Keep pipeline structure clear and maintainable
**Good Example:**
```yaml theme={null}
entry_point: Validate User Input
nodes:
- id: Validate User Input
type: code
transition: Process Valid Data
- id: Process Valid Data
type: llm
transition: END
```
**Bad Example:**
```yaml theme={null}
# Missing entry_point
nodes:
- id: Node1
transition: Node2
- id: Node2
# Missing transition - pipeline hangs
```
***
## Related
* **[Entry Point Guide](./entry-point)** - Detailed entry point configuration
* **[State Management](./states)** - Data flow between nodes
* **[Control Flow Nodes](./nodes/control-flow-nodes)** - Router and Decision nodes
* **[Flow Editor](./flow-editor)** - Visual pipeline design
* **[YAML Configuration](./yaml)** - Complete YAML syntax reference
### Multi-Path Routing
Multiple branches based on complex logic.
```yaml theme={null}
entry_point: Classify Request
nodes:
- id: Classify Request
type: router
condition: "{{ request_type }}"
routes:
- Bug Handler
- Feature Handler
- Question Handler
default_output: General Handler
```
### Converging Paths
Multiple branches merge into single node.
```yaml theme={null}
entry_point: Route Input
nodes:
- id: Route Input
type: decision
decision:
nodes:
- Process Type A
- Process Type B
- id: Process Type A
type: toolkit
transition: Generate Report
- id: Process Type B
type: toolkit
transition: Generate Report
- id: Generate Report
type: toolkit
transition: END
```
### Human Approval Gate
Pause execution for a human decision before proceeding.
```yaml theme={null}
entry_point: Generate_draft
nodes:
- id: Generate_draft
type: llm
transition: Review_draft
- id: Review_draft
type: hitl
routes:
approve: Publish # Approved — continue
edit: Publish # Edited — continue with updated value
reject: END # Rejected — cancel
edit_state_key: draft
- id: Publish
type: toolkit
transition: END
```
## Best Practices
### Essential Rules
* **Set Entry Point**: Pipeline won't run without one
* **All Paths to END**: Every branch must terminate
* **Avoid Infinite Loops**: Ensure loops eventually reach END
### Connection Guidelines
* **Use Descriptive Names**: `Validate User Input` instead of `Node1`
* **Add Default Routes**: Provide fallback for Router nodes
* **Test Incrementally**: Build and test step-by-step
* **Limit Nesting**: Keep pipeline structure clear and maintainable
**Good Example:**
```yaml theme={null}
entry_point: Validate User Input
nodes:
- id: Validate User Input
type: code
transition: Process Valid Data
- id: Process Valid Data
type: llm
transition: END
```
**Bad Example:**
```yaml theme={null}
# Missing entry_point
nodes:
- id: Node1
transition: Node2
- id: Node2
# Missing transition - pipeline hangs
```
***
## Related
* **[Entry Point Guide](./entry-point)** - Detailed entry point configuration
* **[State Management](./states)** - Data flow between nodes
* **[Control Flow Nodes](./nodes/control-flow-nodes)** - Router and Decision nodes
* **[Flow Editor](./flow-editor)** - Visual pipeline design
* **[YAML Configuration](./yaml)** - Complete YAML syntax reference