> ## Documentation Index
> Fetch the complete documentation index at: https://docs.elitea.ai/llms.txt
> Use this file to discover all available pages before exploring further.
# Flow Editor
> The Flow Editor is ELITEA's visual pipeline builder that lets you design, configure, and manage pipelines without writing code. Create complex workflows by drag
## What is Flow Editor?
The **Flow Editor** is a visual workspace for building pipelines. It provides:
* **Drag-and-drop interface** for adding and arranging nodes
* **Visual connections** between nodes showing execution flow
* **Vertical layout** optimized for easy configuration
* **Instant YAML sync** - changes in Flow appear immediately in YAML (and vice versa)
* **Interactive configuration** - click nodes to configure their settings
***
## Accessing Flow Editor
1. Navigate to **Pipelines** menu
2. Open an existing pipeline or create a new one
3. Click the **Configuration** tab
4. Select **Flow** mode (appears alongside **YAML** tab)
Whatever you configure in Flow automatically appears in YAML format, and vice versa. Both views stay perfectly synchronized.
***
## Flow Editor Interface
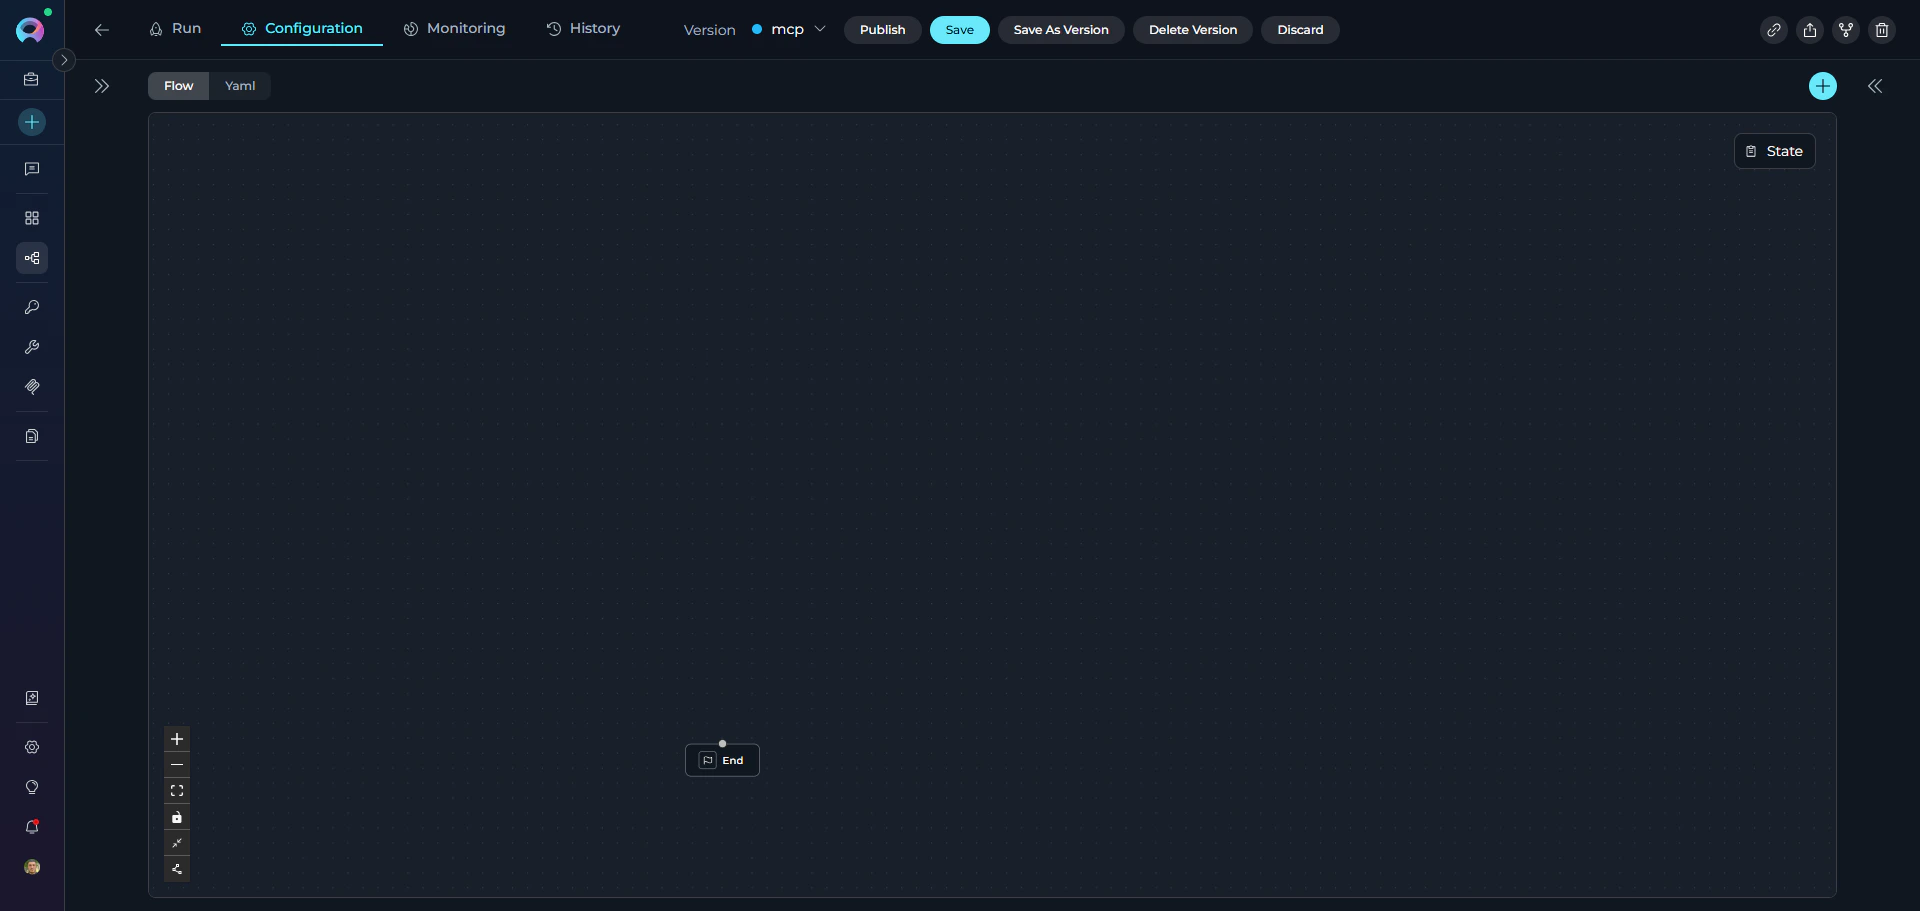
The Flow Editor consists of several key areas:
### Main Components
| # | Component | Location | Purpose |
| - | ------------------- | ------------- | --------------------------------------------- |
| 1 | **Canvas** | Center | Main workspace for arranging nodes |
| 2 | **Toolbar** | Left side | Tools for canvas control (zoom, layout, etc.) |
| 3 | **Add Node Button** | Top right (➕) | Opens node palette to add new nodes |
| 4 | **State Button** | Top right | Opens state configuration sidebar |
| 5 | **Flow/YAML Tabs** | Top center | Switch between visual and code views |
 ### Left Toolbar Buttons
| Icon | Action | Keyboard Shortcut |
| ------ | ------------------------- | ----------------- |
| **➕** | Add new node | - |
| **➖** | Zoom out | - |
| **⛶** | Fit view (auto-center) | - |
| **🔒** | Lock/Unlock editing | - |
| **⬜** | Collapse/Expand all cards | - |
| **🔧** | Auto-fix layout | - |
***
## Adding Nodes
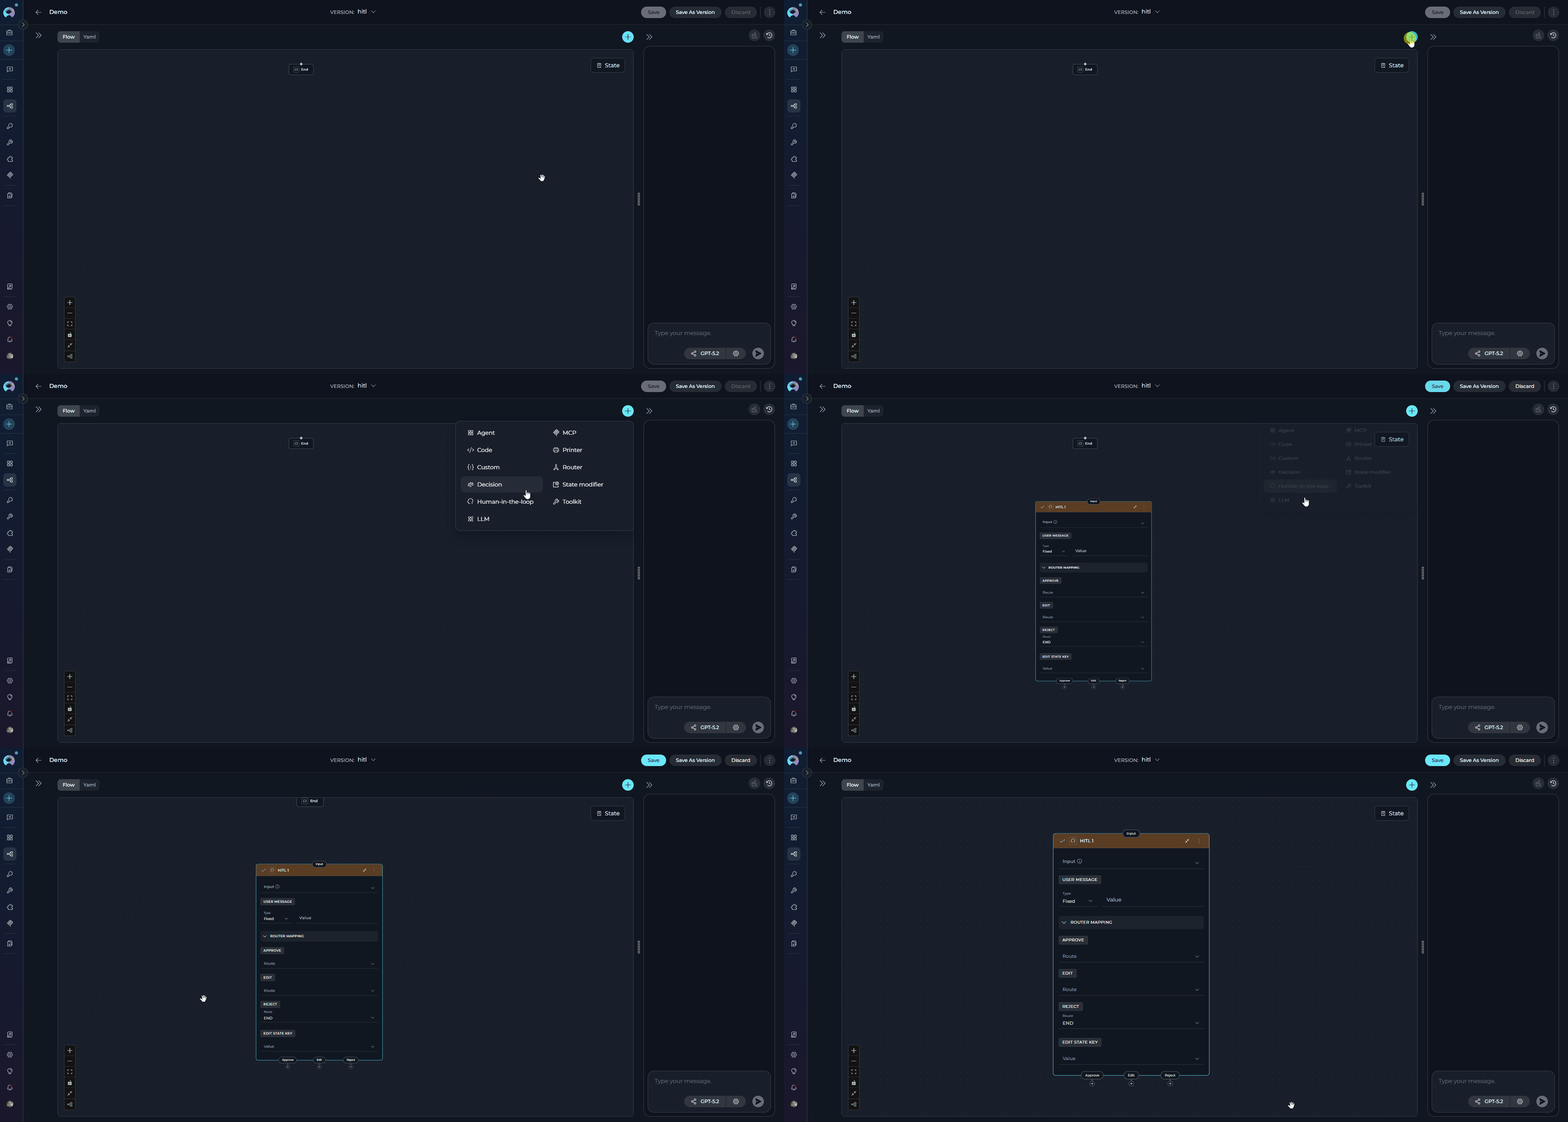
### Method 1: Add Node Button
1. Click the **➕** button (top right corner)
2. A node palette appears showing all available node types
3. Select the node type you want to add
4. Node appears on the canvas
**Available Node Types:**
* Agent
* Code
* Custom
* Decision
* HITL
* LLM
* MCP
* Printer
* Router
* State modifier
* Toolkit
### Left Toolbar Buttons
| Icon | Action | Keyboard Shortcut |
| ------ | ------------------------- | ----------------- |
| **➕** | Add new node | - |
| **➖** | Zoom out | - |
| **⛶** | Fit view (auto-center) | - |
| **🔒** | Lock/Unlock editing | - |
| **⬜** | Collapse/Expand all cards | - |
| **🔧** | Auto-fix layout | - |
***
## Adding Nodes
### Method 1: Add Node Button
1. Click the **➕** button (top right corner)
2. A node palette appears showing all available node types
3. Select the node type you want to add
4. Node appears on the canvas
**Available Node Types:**
* Agent
* Code
* Custom
* Decision
* HITL
* LLM
* MCP
* Printer
* Router
* State modifier
* Toolkit
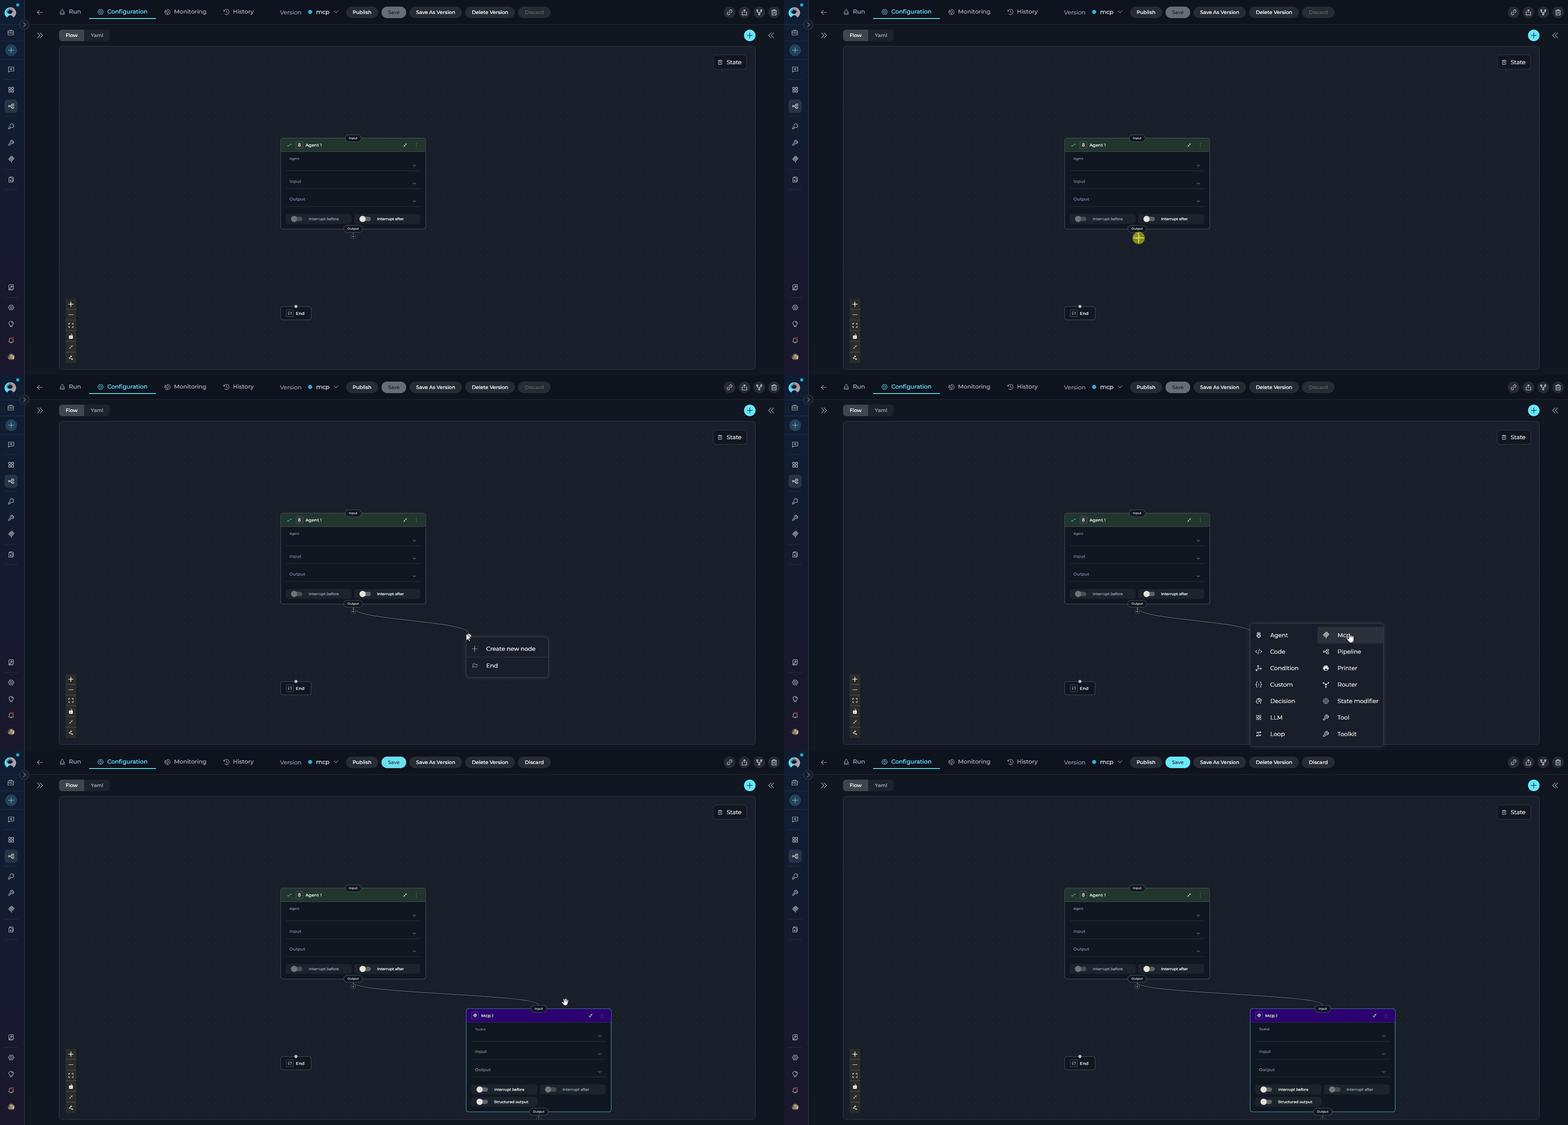
 ### Method 2: Drag from Connection
You can also add nodes while creating connections:
1. Drag a connector from an existing node
2. Release it in empty space on the canvas
3. Select **Create New Node** from the dropdown
4. Choose node type
5. New node is created with connection already attached
### Method 2: Drag from Connection
You can also add nodes while creating connections:
1. Drag a connector from an existing node
2. Release it in empty space on the canvas
3. Select **Create New Node** from the dropdown
4. Choose node type
5. New node is created with connection already attached
 ***
## Configuring Nodes
Click on any node card to open its configuration panel:
### Node Configuration Options
Each node type has specific configuration fields. Common options include:
* **Node Name** (click card title to rename)
* **Input/Output** state variables
* **Node-specific settings** (prompts, toolkits, conditions, etc.)
* **Advanced options** (Interrupt Before/After, Structured Output)
Click on the node card title to rename most nodes. **Decision** nodes cannot be renamed.
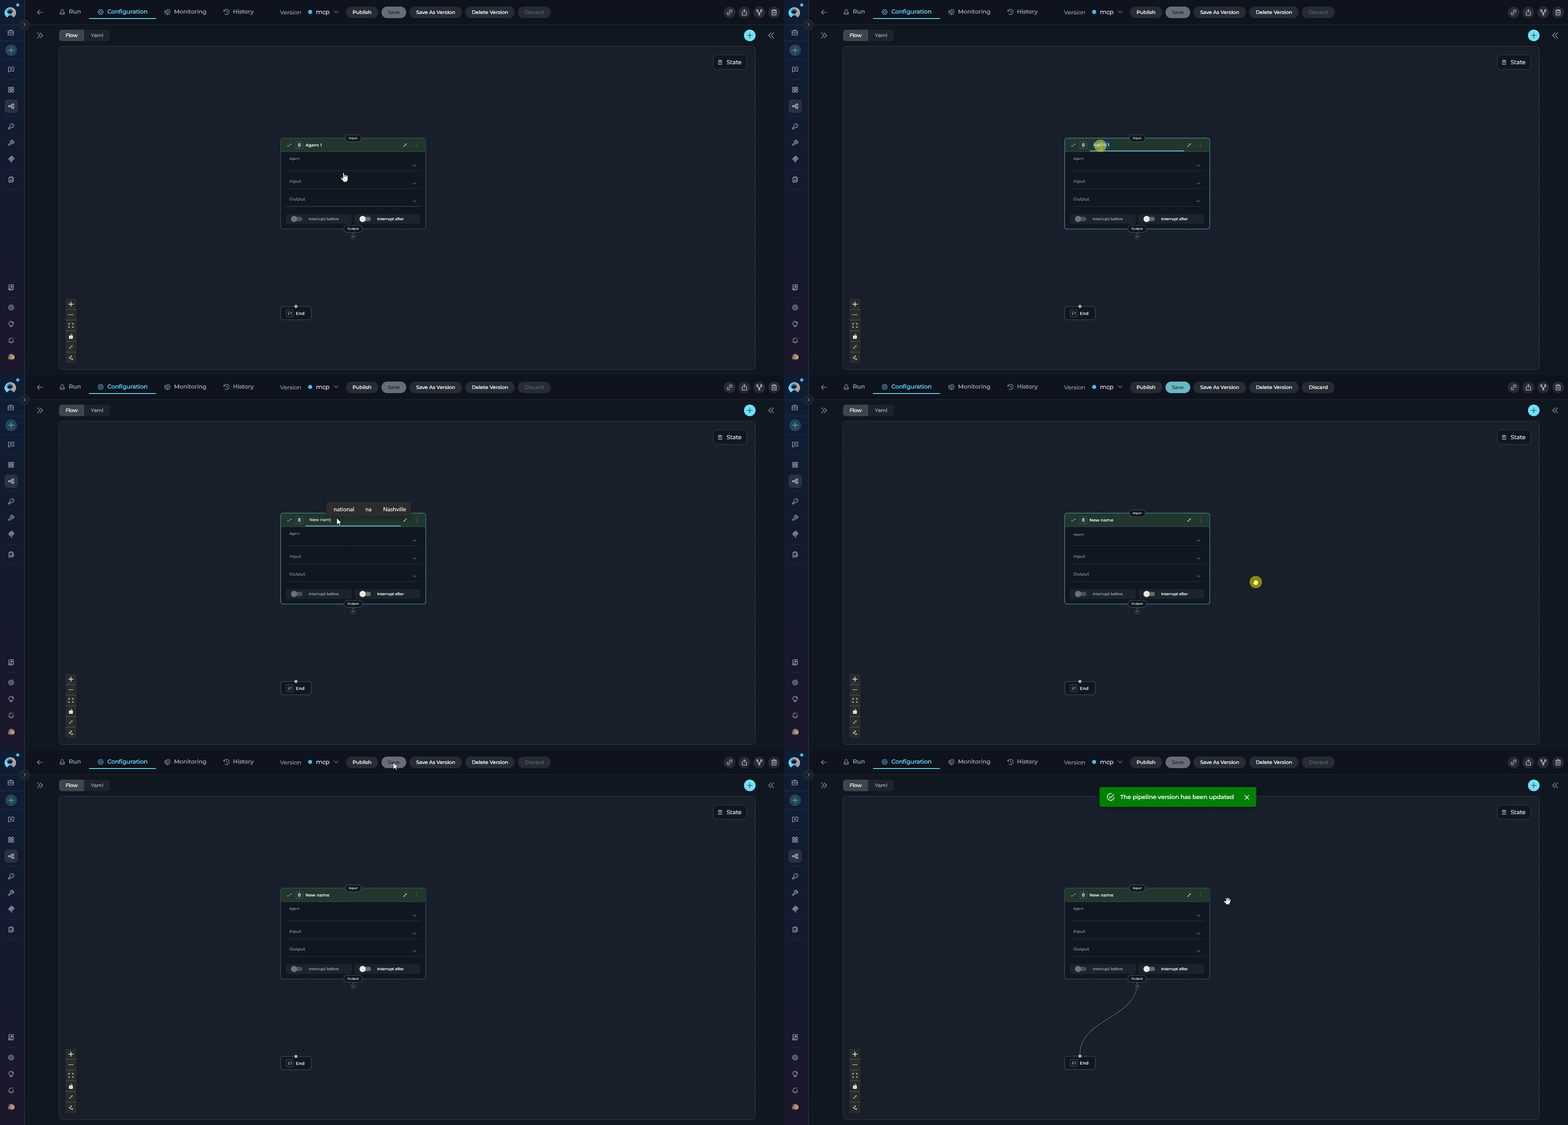
### Renaming a Node
1. Click the **node card title**
2. Type the new name
3. Press **Enter** or click outside to save
***
## Configuring Nodes
Click on any node card to open its configuration panel:
### Node Configuration Options
Each node type has specific configuration fields. Common options include:
* **Node Name** (click card title to rename)
* **Input/Output** state variables
* **Node-specific settings** (prompts, toolkits, conditions, etc.)
* **Advanced options** (Interrupt Before/After, Structured Output)
Click on the node card title to rename most nodes. **Decision** nodes cannot be renamed.
### Renaming a Node
1. Click the **node card title**
2. Type the new name
3. Press **Enter** or click outside to save
 ***
## Connecting Nodes
Nodes must be connected to define the execution flow. See the [Nodes Connectors Guide](./nodes-connectors) for complete details.
### Creating Connections
**Method 1: Drag and Drop**
1. Click and hold the **output port** (bottom of node card)
2. Drag the connector line to the **input port** (top of target node)
3. Release to create the connection
**Method 2: Drop on Canvas**
1. Drag connector from a node
2. Release in empty canvas space
3. Select existing node or create new node from dropdown
4. Connection auto-completes
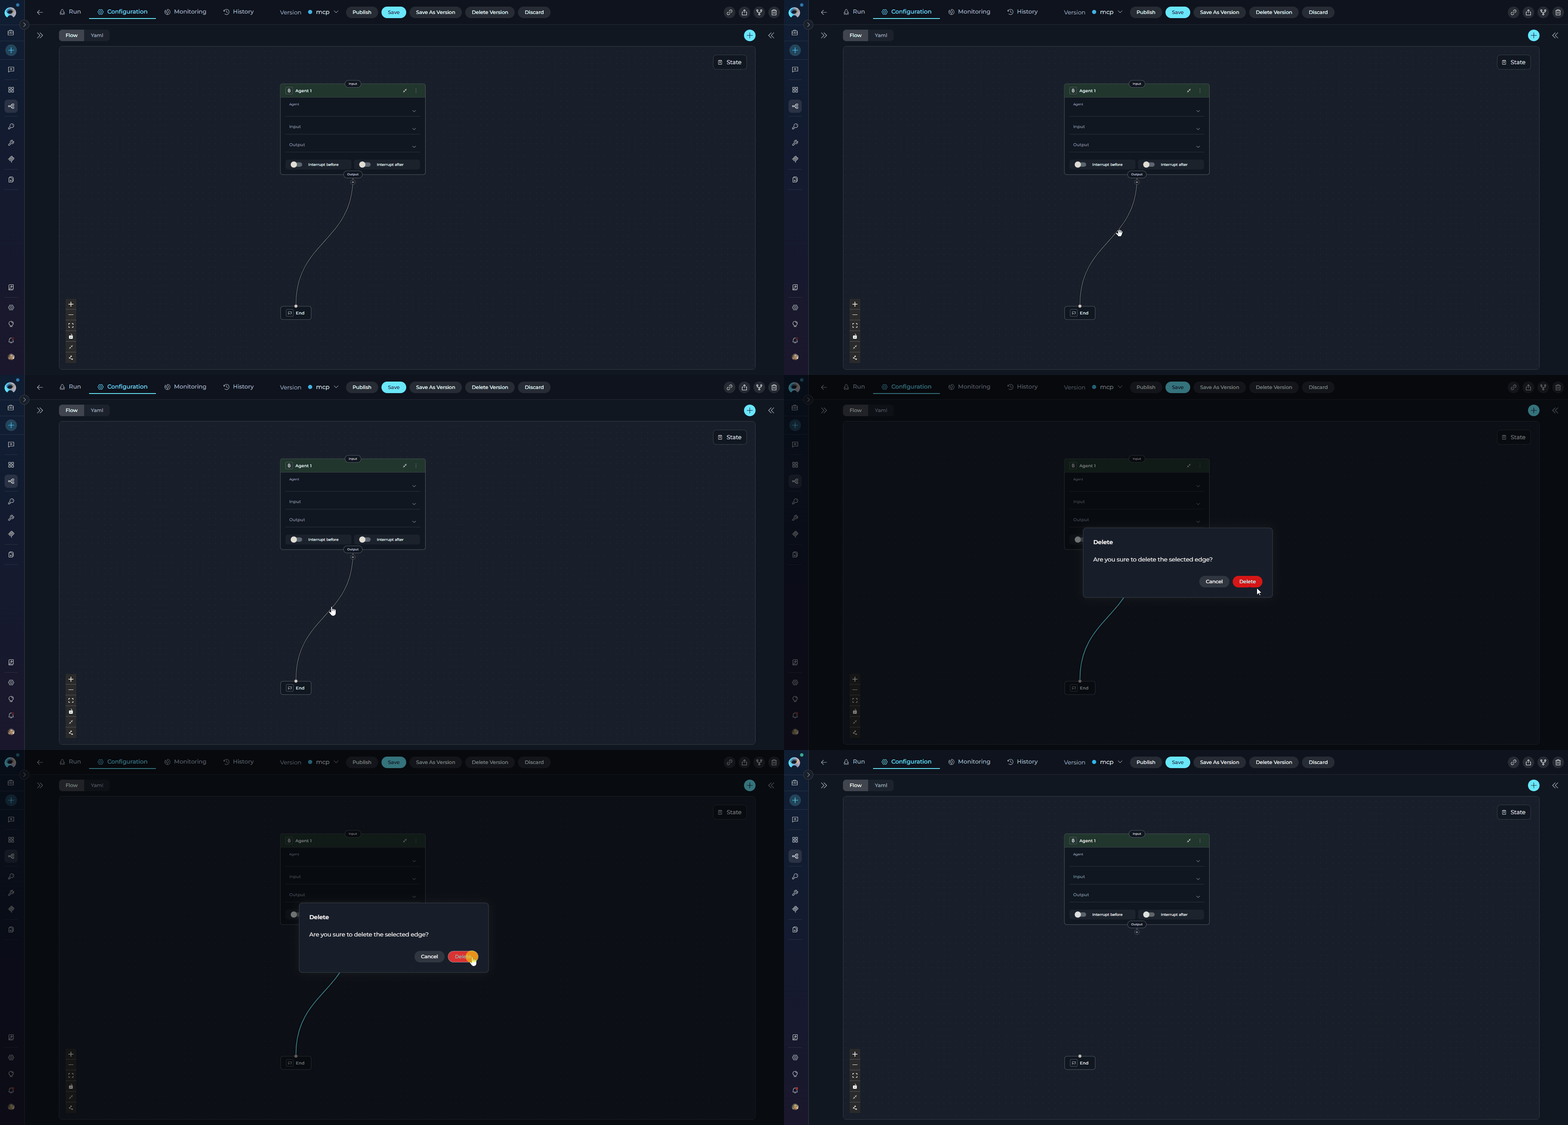
### Deleting Connections
Click on the connection line to select it, then press **Delete** on keyboard
***
## Connecting Nodes
Nodes must be connected to define the execution flow. See the [Nodes Connectors Guide](./nodes-connectors) for complete details.
### Creating Connections
**Method 1: Drag and Drop**
1. Click and hold the **output port** (bottom of node card)
2. Drag the connector line to the **input port** (top of target node)
3. Release to create the connection
**Method 2: Drop on Canvas**
1. Drag connector from a node
2. Release in empty canvas space
3. Select existing node or create new node from dropdown
4. Connection auto-completes
### Deleting Connections
Click on the connection line to select it, then press **Delete** on keyboard
 ***
## Managing Nodes
### Node Card Actions
Click the **three-dots menu (⋮)** on any node card to access node actions:
***
## Managing Nodes
### Node Card Actions
Click the **three-dots menu (⋮)** on any node card to access node actions:
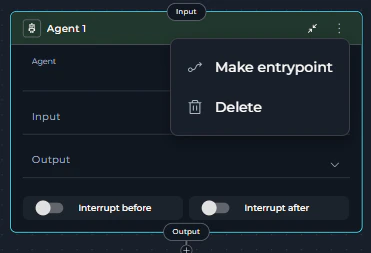 **Available Actions:**
| Action | Description |
| ------------------- | ----------------------------------------- |
| **Make entrypoint** | Set this node as the pipeline entry point |
| **Delete** | Remove the node from the pipeline |
Deleting a node also removes all its connections. Make sure to reconnect remaining nodes after deletion.
### Moving Nodes
Rearrange nodes to improve visual clarity:
1. Click on a node card
2. Drag it to a new position on the canvas
3. Release to place
The Flow Editor uses a **vertical (top-to-bottom) layout** for optimal readability. Nodes execute from top to bottom following the connections.
***
## Canvas Controls
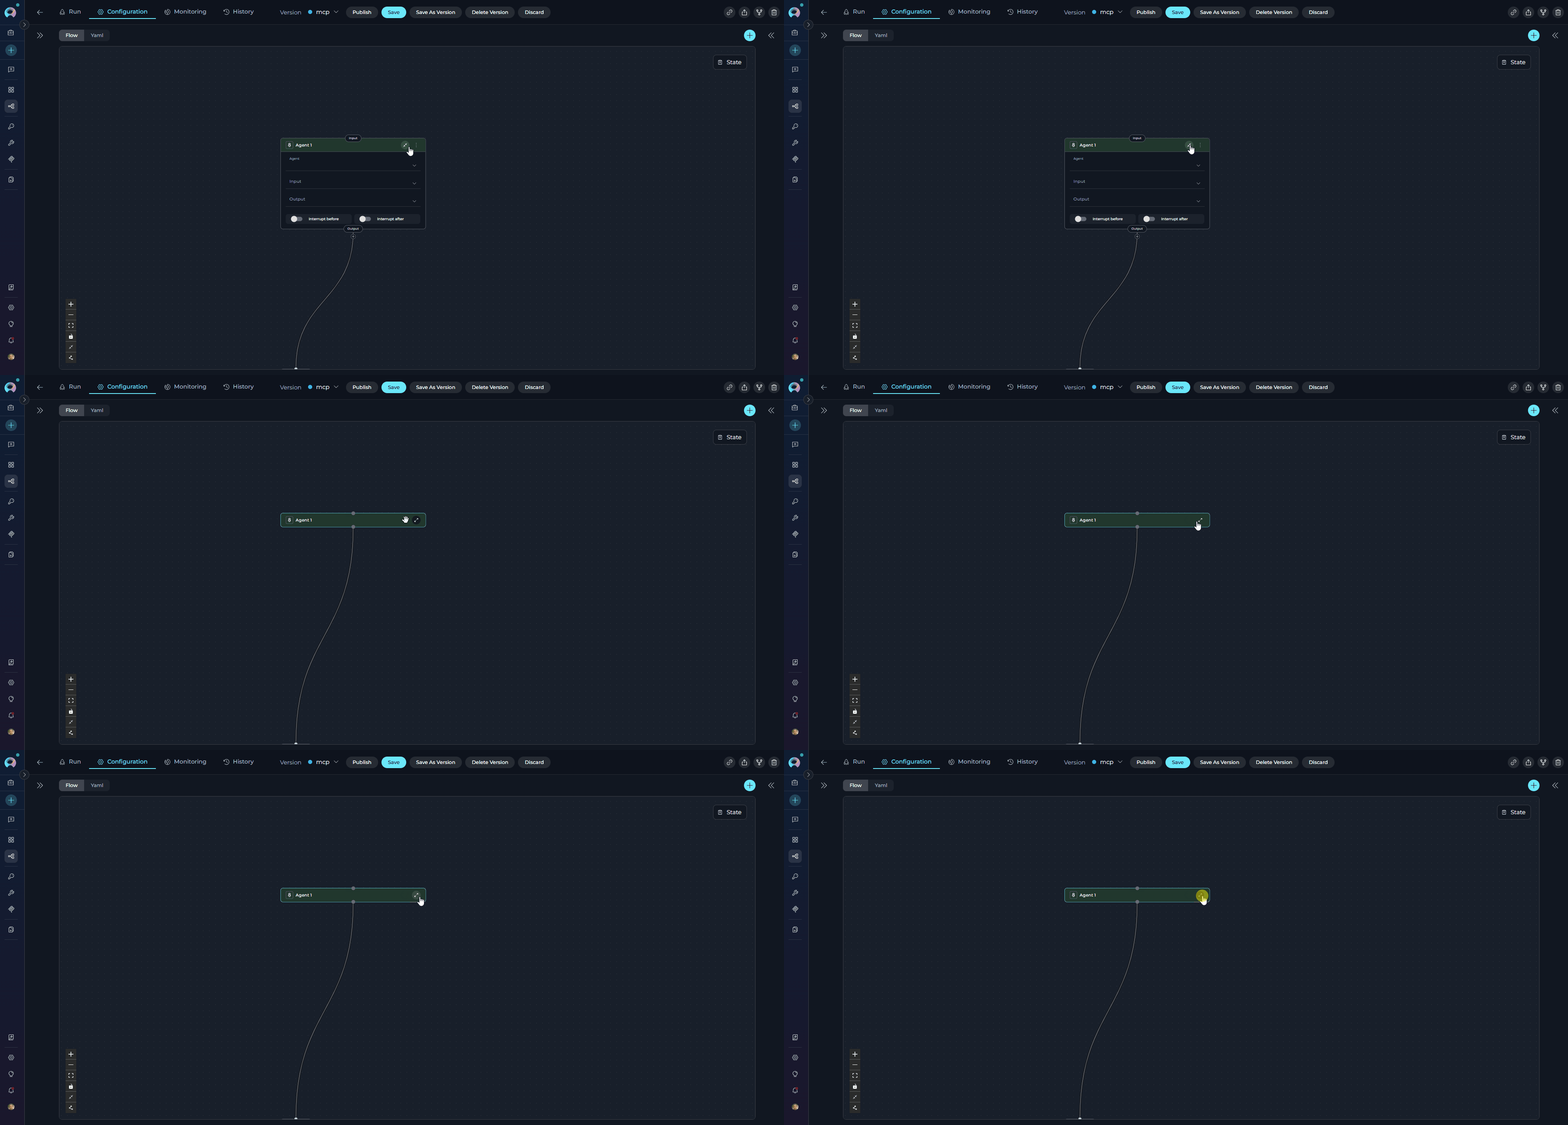
### Collapse/Expand Cards
Toggle between compact and detailed node views:
* **Collapsed**: Shows only node name and type icon
* **Expanded**: Shows all configuration fields
**Available Actions:**
| Action | Description |
| ------------------- | ----------------------------------------- |
| **Make entrypoint** | Set this node as the pipeline entry point |
| **Delete** | Remove the node from the pipeline |
Deleting a node also removes all its connections. Make sure to reconnect remaining nodes after deletion.
### Moving Nodes
Rearrange nodes to improve visual clarity:
1. Click on a node card
2. Drag it to a new position on the canvas
3. Release to place
The Flow Editor uses a **vertical (top-to-bottom) layout** for optimal readability. Nodes execute from top to bottom following the connections.
***
## Canvas Controls
### Collapse/Expand Cards
Toggle between compact and detailed node views:
* **Collapsed**: Shows only node name and type icon
* **Expanded**: Shows all configuration fields
 Click the **State** button (top right) to open the state configuration sidebar.
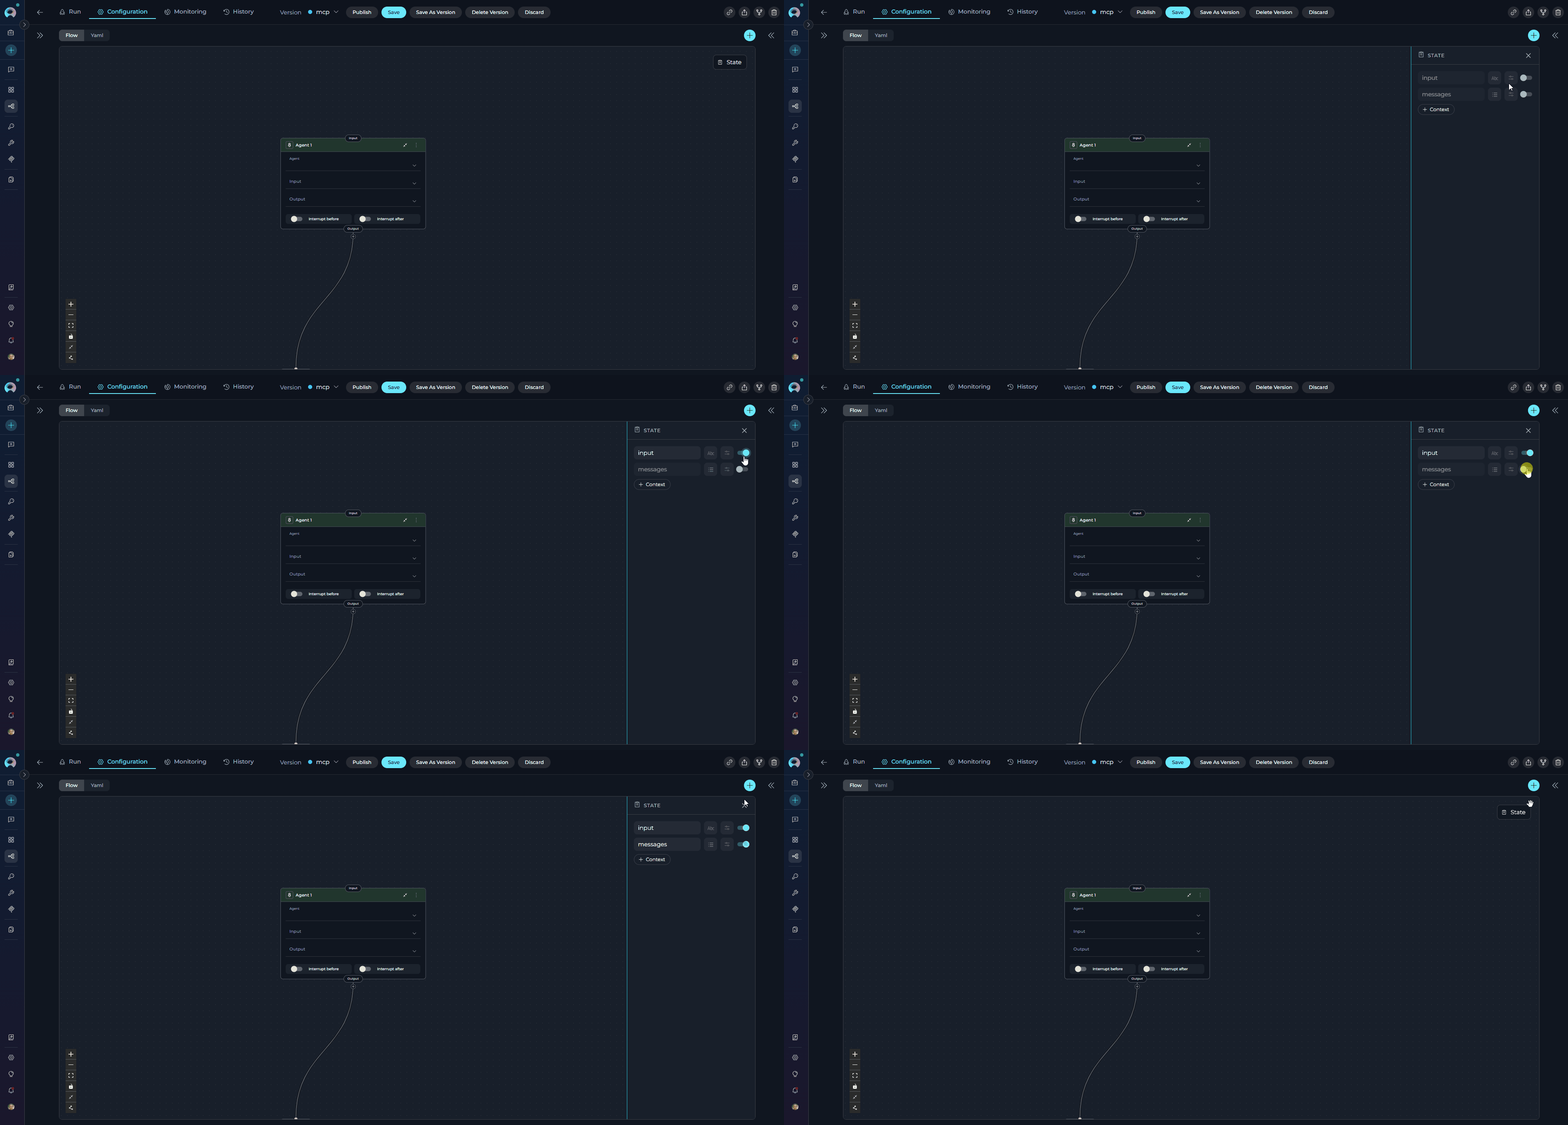 **In the State Sidebar:**
* View all pipeline state variables
* Add new custom states
* Configure default values
* Set state data types (String, Number, Array, Object)
See the [States Guide](./states) for complete state configuration details.
***
## Flow to YAML Synchronization
Changes made in Flow Editor **instantly appear in YAML**:
1. Add/modify nodes in Flow
2. Switch to **YAML** tab
3. See the updated YAML code
4. Switch back to **Flow** to continue visual editing
**In the State Sidebar:**
* View all pipeline state variables
* Add new custom states
* Configure default values
* Set state data types (String, Number, Array, Object)
See the [States Guide](./states) for complete state configuration details.
***
## Flow to YAML Synchronization
Changes made in Flow Editor **instantly appear in YAML**:
1. Add/modify nodes in Flow
2. Switch to **YAML** tab
3. See the updated YAML code
4. Switch back to **Flow** to continue visual editing
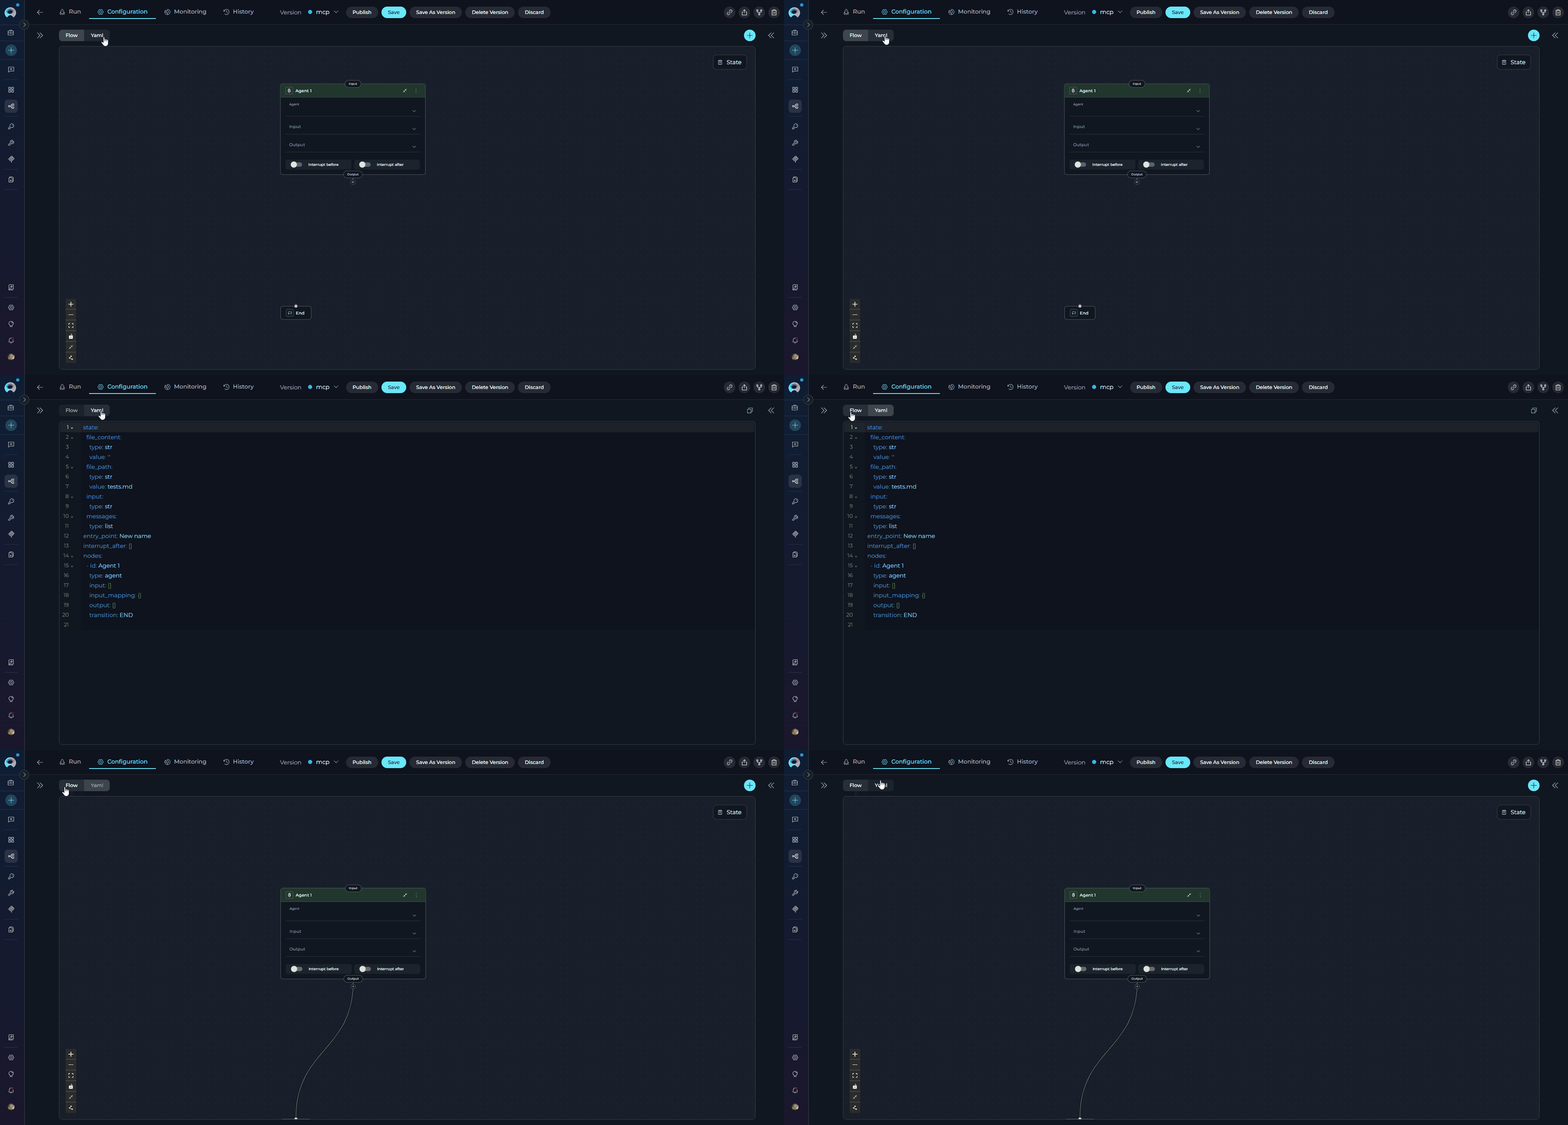 Edits in YAML also update the Flow view immediately. You can work in whichever mode you prefer.
***
## Keyboard Shortcuts
| Action | Shortcut |
| ------------------------------- | --------------------------- |
| Delete selected node/connection | **Delete** or **Backspace** |
| Save pipeline | **Ctrl/Cmd + S** |
| Undo | **Ctrl/Cmd + Z** |
| Redo | **Ctrl/Cmd + Shift + Z** |
***
## Best Practices
* **Use Descriptive Node Names**: "Validate User Input" instead of "LLM Node"
* **Organize Vertically**: Entry point at top, processing in middle, END at bottom
* **Collapse Side Panels**: Maximize canvas space for complex pipelines
* **Use Auto-Fix Layout**: Maintain clean alignment after adding/moving nodes
* **Test Incrementally**: Build step-by-step, test after adding each node
* **Save Frequently**: Prevent data loss by saving often
***
## Troubleshooting
**Problem**: Cannot create connection between nodes.
**Solutions**:
* Check if nodes are compatible (e.g., Router requires specific output nodes)
* Verify you're dragging from output port (bottom) to input port (top)
* Try **Auto-fix Layout** if nodes are overlapping
**Problem**: Flow Editor shows empty canvas.
**Solutions**:
* Switch to **YAML** tab to check if pipeline has nodes
* Click **Fit View** to center nodes
* Refresh the page
**Problem**: Edits disappear after closing pipeline.
**Solutions**:
* Click **Save** button before navigating away
* Check for error messages at top of screen
* Verify network connection
**Problem**: Clicking node doesn't show configuration panel.
**Solutions**:
* Click directly on the node card (not the connection lines)
* Unlock editing if canvas is locked (🔒 button)
* Expand the **GENERAL** section if collapsed
***
* **[Nodes Connectors](./nodes-connectors)**: Learn how to connect nodes and manage transitions
* **[States Guide](./states)**: Configure state variables for data flow
* **[YAML Configuration](./yaml)**: Work directly with YAML code
* **[Nodes Overview](./nodes/overview)**: Understand all 11 node types
* **[Entry Point Guide](./entry-point)**: Set up pipeline starting points
***
Edits in YAML also update the Flow view immediately. You can work in whichever mode you prefer.
***
## Keyboard Shortcuts
| Action | Shortcut |
| ------------------------------- | --------------------------- |
| Delete selected node/connection | **Delete** or **Backspace** |
| Save pipeline | **Ctrl/Cmd + S** |
| Undo | **Ctrl/Cmd + Z** |
| Redo | **Ctrl/Cmd + Shift + Z** |
***
## Best Practices
* **Use Descriptive Node Names**: "Validate User Input" instead of "LLM Node"
* **Organize Vertically**: Entry point at top, processing in middle, END at bottom
* **Collapse Side Panels**: Maximize canvas space for complex pipelines
* **Use Auto-Fix Layout**: Maintain clean alignment after adding/moving nodes
* **Test Incrementally**: Build step-by-step, test after adding each node
* **Save Frequently**: Prevent data loss by saving often
***
## Troubleshooting
**Problem**: Cannot create connection between nodes.
**Solutions**:
* Check if nodes are compatible (e.g., Router requires specific output nodes)
* Verify you're dragging from output port (bottom) to input port (top)
* Try **Auto-fix Layout** if nodes are overlapping
**Problem**: Flow Editor shows empty canvas.
**Solutions**:
* Switch to **YAML** tab to check if pipeline has nodes
* Click **Fit View** to center nodes
* Refresh the page
**Problem**: Edits disappear after closing pipeline.
**Solutions**:
* Click **Save** button before navigating away
* Check for error messages at top of screen
* Verify network connection
**Problem**: Clicking node doesn't show configuration panel.
**Solutions**:
* Click directly on the node card (not the connection lines)
* Unlock editing if canvas is locked (🔒 button)
* Expand the **GENERAL** section if collapsed
***
* **[Nodes Connectors](./nodes-connectors)**: Learn how to connect nodes and manage transitions
* **[States Guide](./states)**: Configure state variables for data flow
* **[YAML Configuration](./yaml)**: Work directly with YAML code
* **[Nodes Overview](./nodes/overview)**: Understand all 11 node types
* **[Entry Point Guide](./entry-point)**: Set up pipeline starting points
***