> ## Documentation Index
> Fetch the complete documentation index at: https://docs.elitea.ai/llms.txt
> Use this file to discover all available pages before exploring further.
# Pipeline Trigger Types
> The Entry Point is the first node that executes when your pipeline runs. It also controls how the pipeline is triggered—by a chat message, on a schedule, or via a webhook.
Every pipeline must have an entry point. Without one, the pipeline cannot execute.
***
## What is an Entry Point?
The entry point defines which node executes first when your pipeline runs and controls **how the pipeline is triggered**. When a node is designated as the entry point, a Trigger selector appears inside the node body, letting you choose between three trigger modes: `Chat Message`, `Schedule`, and `Webhook`.
### Key Rules
Exactly one node must be designated as the entry point. Pipeline execution always begins at this node. Setting a new entry point automatically removes the previous designation.
When the first node is added to an empty pipeline, it is automatically designated as the entry point. Only Condition and End nodes are excluded from auto-assignment.
LLM, Agent, Toolkit, MCP, Code, Printer, Router, State Modifier, HITL, Subgraph, Custom
Condition (deprecated), Decision
***
## Setting an Entry Point
### Visual Method (Flow Editor)
1. Open your pipeline in the Flow Editor
2. Expand the node card by clicking on it
3. Click the three dots (⋮) in the node header
4. Select **Make entrypoint** from the dropdown
Once a node is designated as the entry point, an entry point icon appears in its header and the **Trigger** selector becomes visible inside the node body.
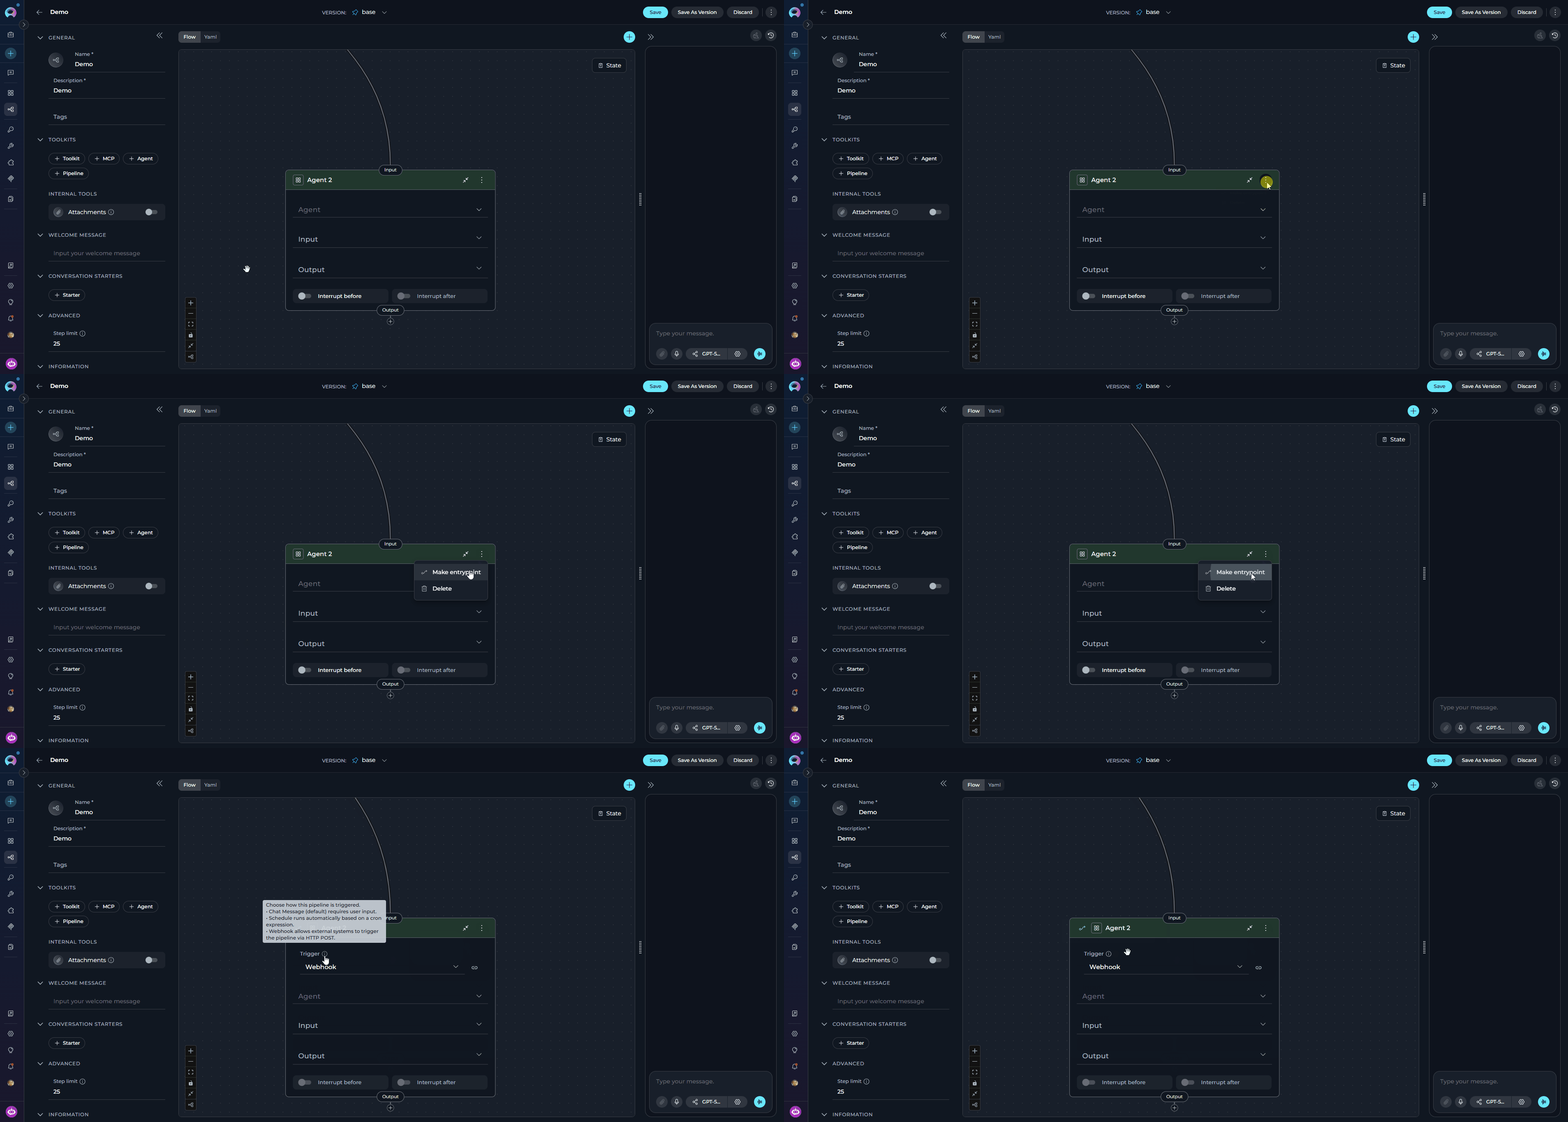 Setting a new entry point automatically removes the previous designation. The "Make entrypoint" option only appears when a node is expanded and is not already the entry point.
### YAML Method
In YAML configuration, declare the entry point at the top level using the node's `id`:
```yaml theme={null}
entry_point: greeting
nodes:
- id: greeting
type: llm
```
The YAML key order is: `state` → `entry_point` → `interrupt_after` → `interrupt_before` → `nodes`.
Trigger configuration (schedule, webhook) is stored server-side and is not part of the pipeline YAML. The YAML only contains the `entry_point` node ID.
***
## Trigger Type
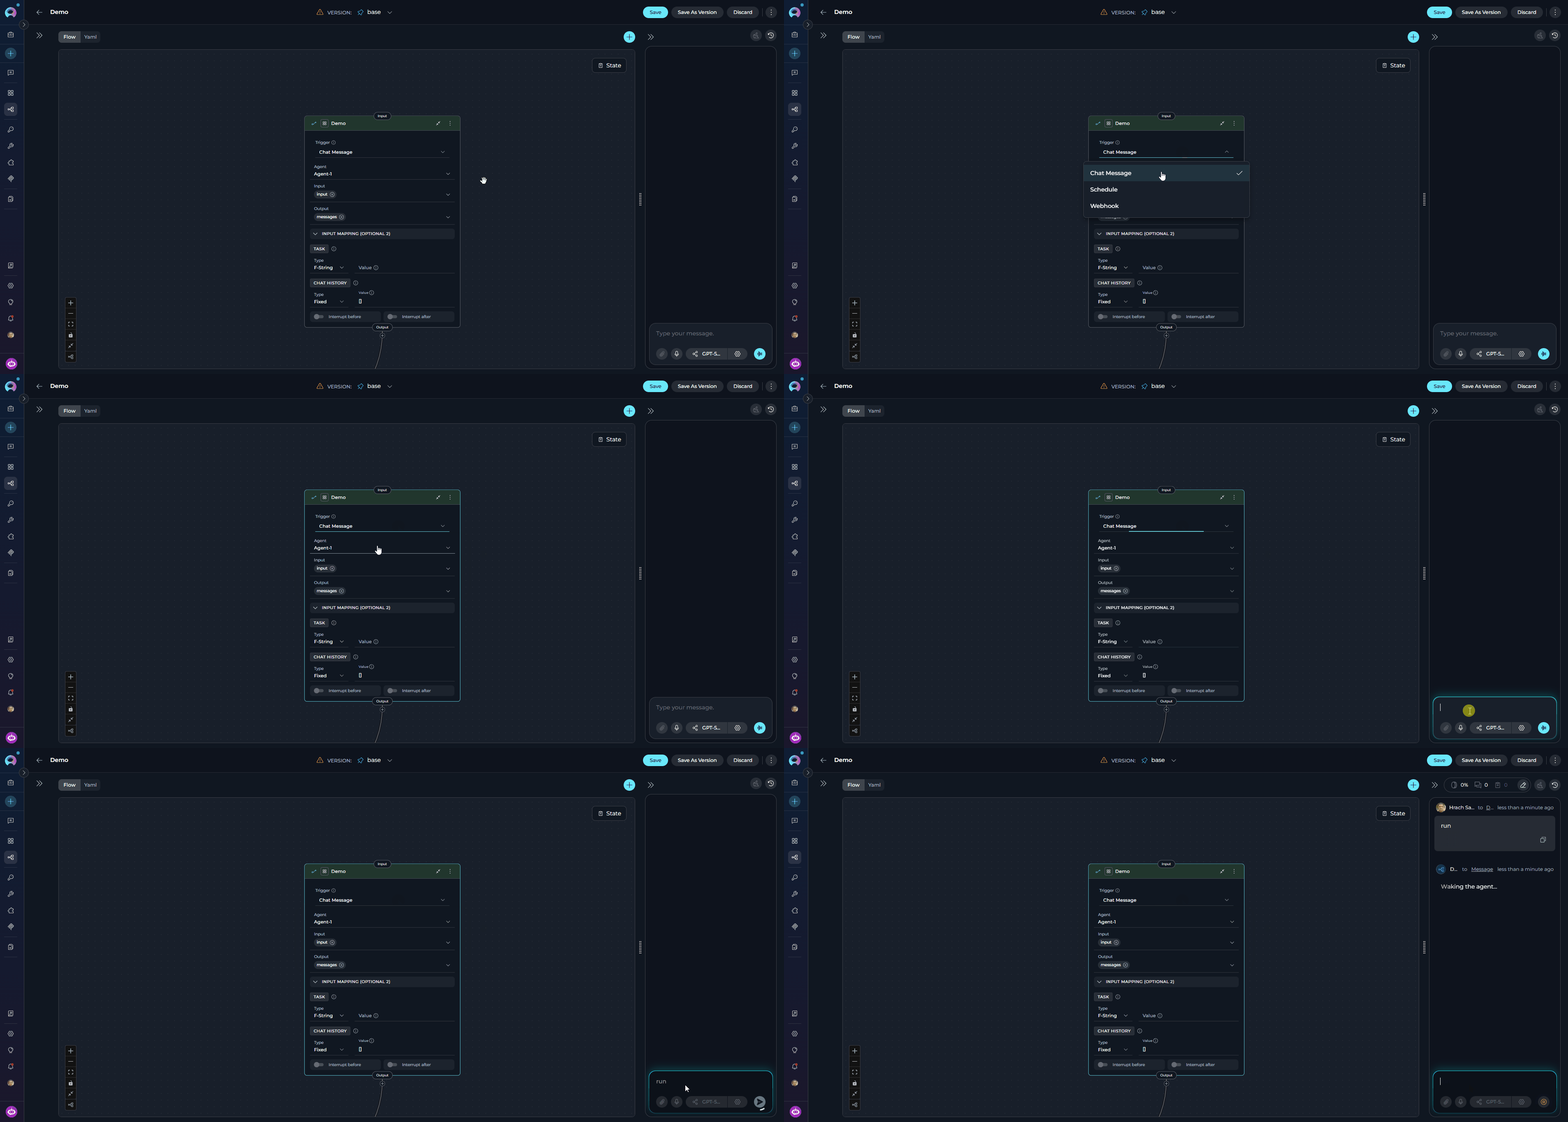
When a node is the entry point, a **Trigger** dropdown appears inside the node body. This controls how the pipeline is started.
Default trigger. The pipeline runs each time a user sends a message in a chat session. Required for interactive pipelines with HITL or Printer nodes.
Runs automatically at a defined time using a cron expression. Supports a visual cron builder or raw cron input.
Allows external systems to trigger the pipeline via HTTP POST. Supports GitHub, GitLab, and Custom webhook types.
Schedule and Webhook triggers are unavailable when the pipeline contains HITL nodes, Printer nodes, or interrupt configurations. Only Chat Message is available for interactive pipelines.
### Chat Message
The default trigger. The pipeline runs each time a user sends a message in a chat session.
* Required when the pipeline contains HITL nodes, Printer nodes, or any `interrupt_before` / `interrupt_after` configurations
* If an interactive element (HITL, Printer) is added while Schedule or Webhook is active, the trigger automatically resets to Chat Message
Setting a new entry point automatically removes the previous designation. The "Make entrypoint" option only appears when a node is expanded and is not already the entry point.
### YAML Method
In YAML configuration, declare the entry point at the top level using the node's `id`:
```yaml theme={null}
entry_point: greeting
nodes:
- id: greeting
type: llm
```
The YAML key order is: `state` → `entry_point` → `interrupt_after` → `interrupt_before` → `nodes`.
Trigger configuration (schedule, webhook) is stored server-side and is not part of the pipeline YAML. The YAML only contains the `entry_point` node ID.
***
## Trigger Type
When a node is the entry point, a **Trigger** dropdown appears inside the node body. This controls how the pipeline is started.
Default trigger. The pipeline runs each time a user sends a message in a chat session. Required for interactive pipelines with HITL or Printer nodes.
Runs automatically at a defined time using a cron expression. Supports a visual cron builder or raw cron input.
Allows external systems to trigger the pipeline via HTTP POST. Supports GitHub, GitLab, and Custom webhook types.
Schedule and Webhook triggers are unavailable when the pipeline contains HITL nodes, Printer nodes, or interrupt configurations. Only Chat Message is available for interactive pipelines.
### Chat Message
The default trigger. The pipeline runs each time a user sends a message in a chat session.
* Required when the pipeline contains HITL nodes, Printer nodes, or any `interrupt_before` / `interrupt_after` configurations
* If an interactive element (HITL, Printer) is added while Schedule or Webhook is active, the trigger automatically resets to Chat Message
 ### Schedule
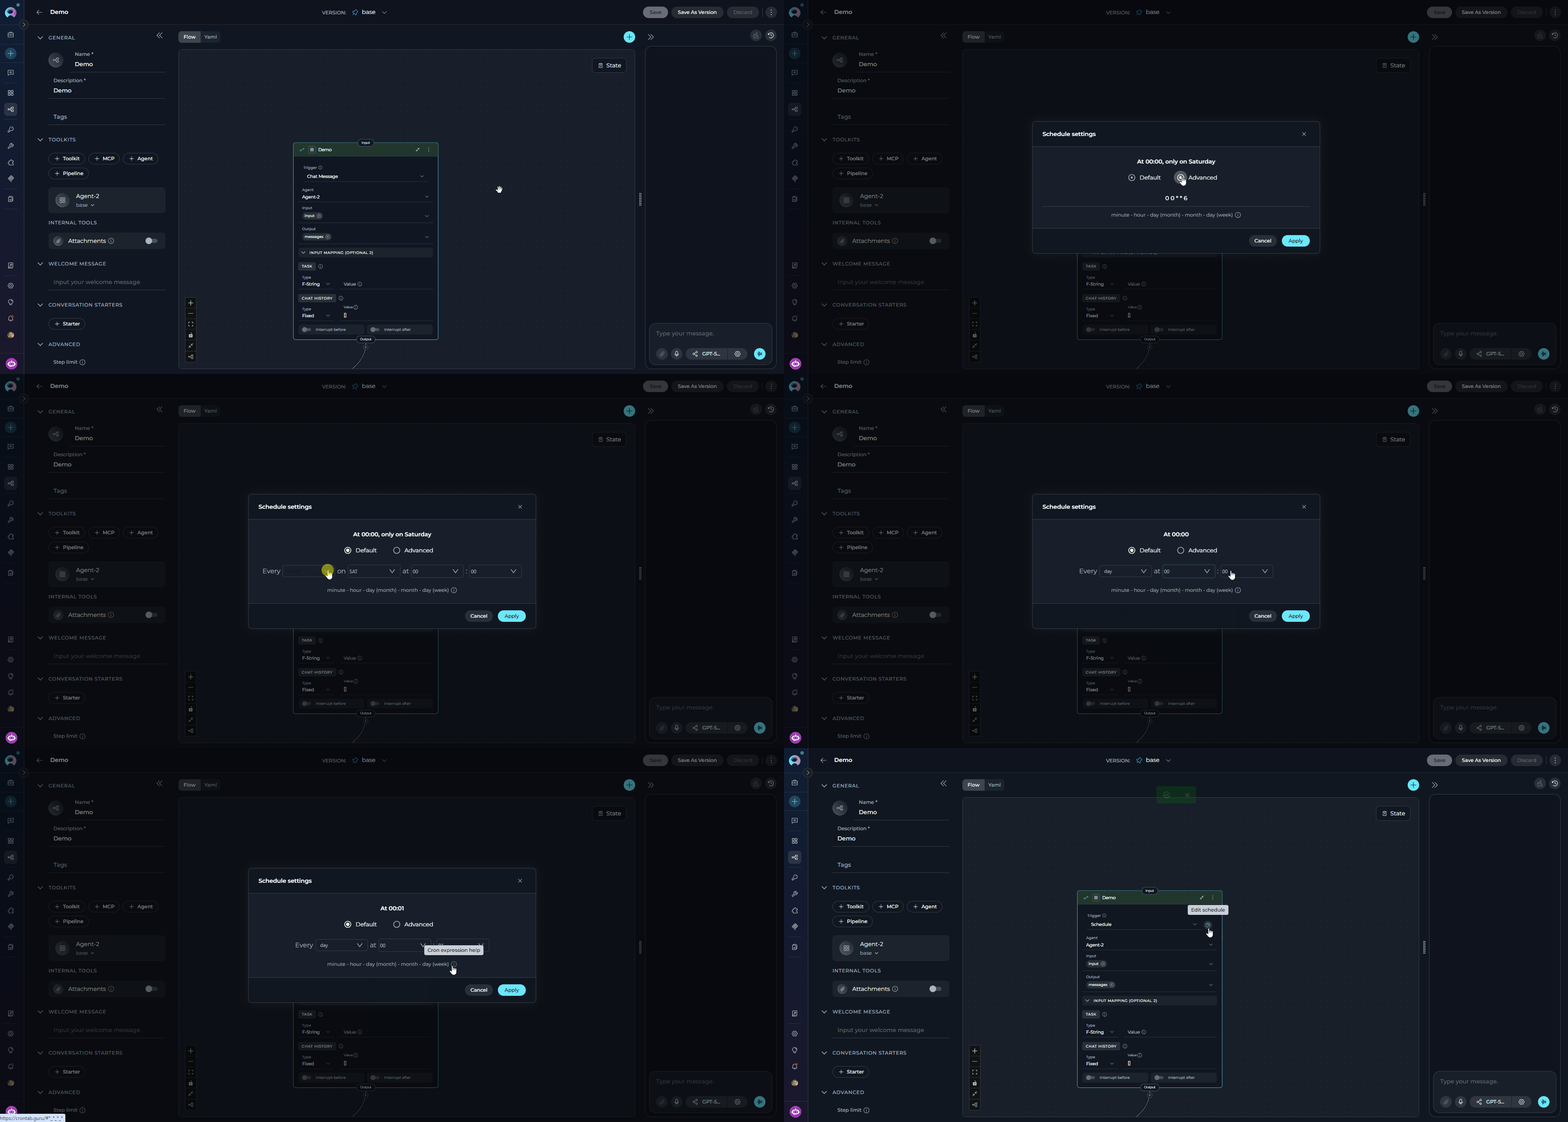
The pipeline runs automatically at a defined time using a cron expression.
Selecting **Schedule** opens a configuration modal with two modes:
| Mode | Description |
| ------------ | --------------------------------------------------------------------------------------- |
| **Default** | Visual cron builder — select minute, hour, day, month, and weekday fields interactively |
| **Advanced** | Enter a raw cron expression manually |
* Default cron expression: `0 0 * * 6` (every Saturday at midnight)
* Timezone is automatically detected from your browser settings
* Cron format: `minute – hour – day (month) – month – day (week)`
### Schedule
The pipeline runs automatically at a defined time using a cron expression.
Selecting **Schedule** opens a configuration modal with two modes:
| Mode | Description |
| ------------ | --------------------------------------------------------------------------------------- |
| **Default** | Visual cron builder — select minute, hour, day, month, and weekday fields interactively |
| **Advanced** | Enter a raw cron expression manually |
* Default cron expression: `0 0 * * 6` (every Saturday at midnight)
* Timezone is automatically detected from your browser settings
* Cron format: `minute – hour – day (month) – month – day (week)`
 ### Webhook
The pipeline runs when an external system sends an HTTP POST request to the generated webhook URL.
### Webhook
The pipeline runs when an external system sends an HTTP POST request to the generated webhook URL.
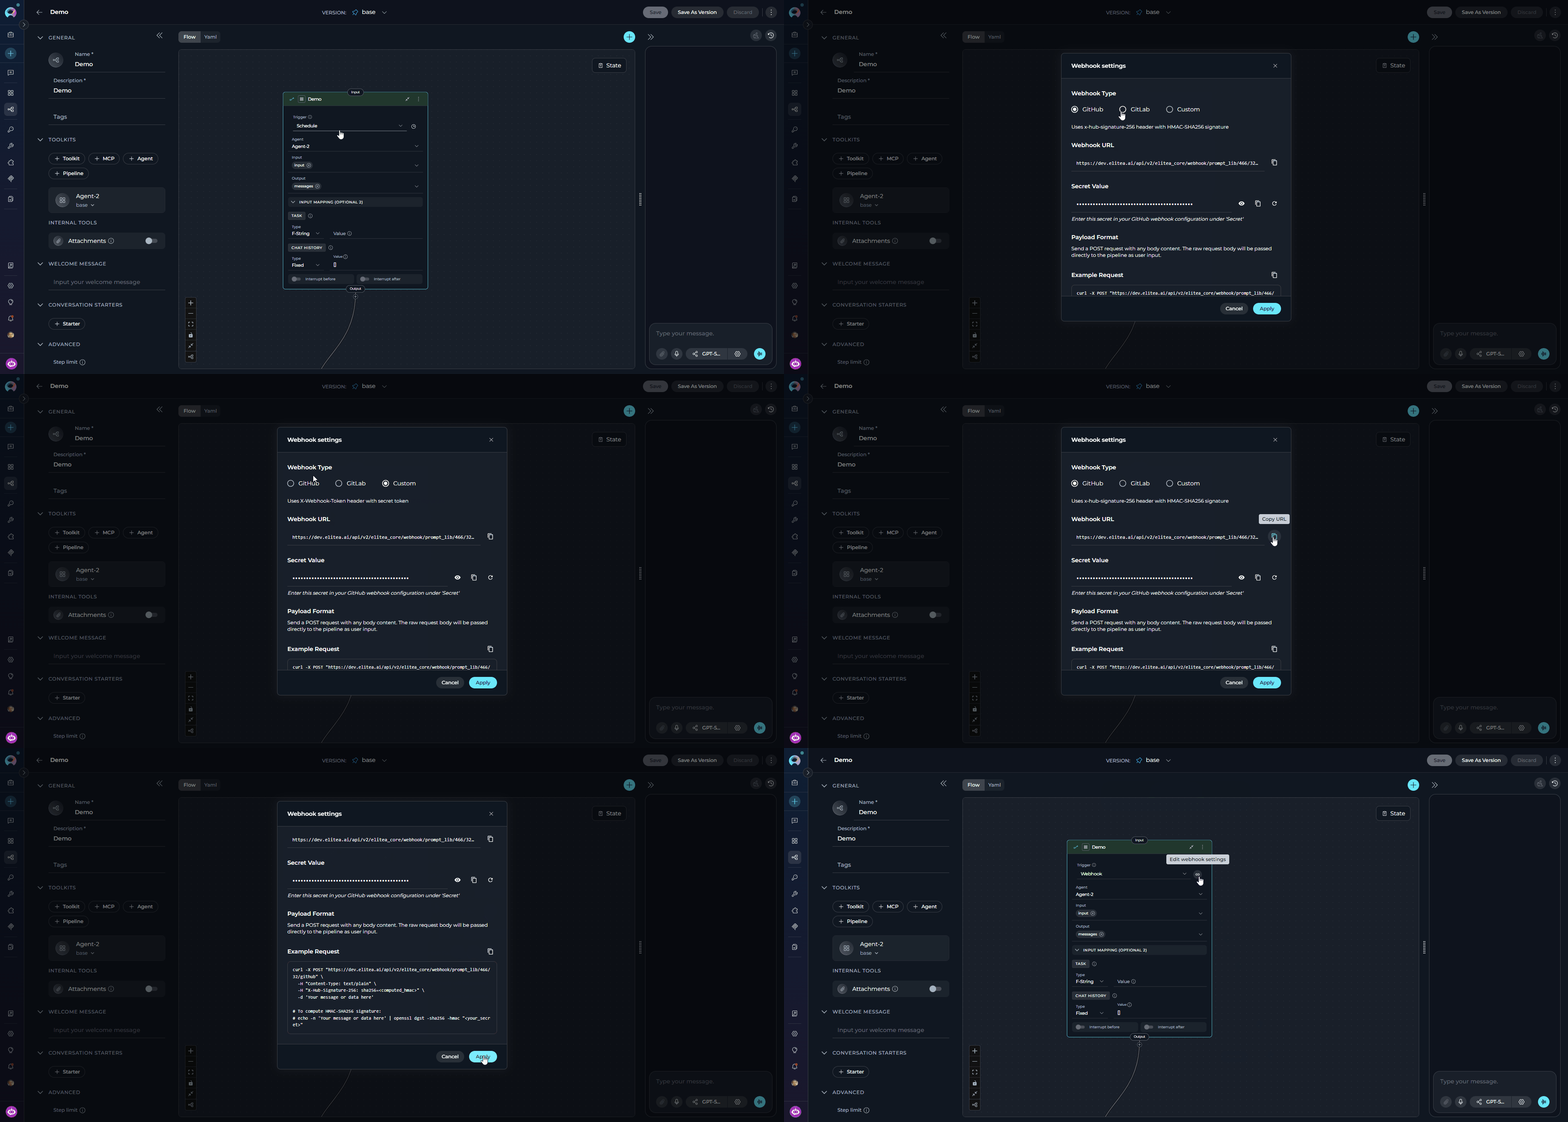 Selecting **Webhook** opens a configuration modal. Three webhook subtypes are available:
| Type | Auth Header | Signature Method |
| ---------- | --------------------- | ---------------------------------------- |
| **GitHub** | `X-Hub-Signature-256` | HMAC-SHA256 (`sha256=`) |
| **GitLab** | `X-Gitlab-Token` | Secret token sent directly in the header |
| **Custom** | `X-Webhook-Token` | Secret token sent directly in the header |
The modal shows:
| Field | Description |
| -------------------------- | ----------------------------------------------------------------------------------------------------------------------------------------------- |
| **Webhook URL** | Read-only, automatically constructed based on the selected type. Use the copy button to copy it. |
| **Secret token** | A 32-byte base64url token generated automatically. Can be shown or hidden, copied, or regenerated. Click **Apply** to save a regenerated token. |
| **Example `curl` request** | A ready-to-use example showing the exact headers and payload format for the selected webhook type. |
**GitHub example:**
```bash theme={null}
curl -X POST "https://your-elitea-instance/webhook/github" \
-H "Content-Type: text/plain" \
-H "X-Hub-Signature-256: sha256=" \
-d 'Your message or data here'
```
**GitLab example:**
```bash theme={null}
curl -X POST "https://your-elitea-instance/webhook/gitlab" \
-H "Content-Type: text/plain" \
-H "X-Gitlab-Token: " \
-d 'Your message or data here'
```
**Custom example:**
```bash theme={null}
curl -X POST "https://your-elitea-instance/webhook/custom" \
-H "Content-Type: text/plain" \
-H "X-Webhook-Token: " \
-d 'Your message or data here'
```
***
## Best Practices
Use `Chat Message` for interactive conversational pipelines; use `Schedule` for automated batch processing; use `Webhook` for event-driven integration with external systems.
Any pipeline with HITL or Printer nodes must use the `Chat Message` trigger. Schedule and Webhook triggers are automatically disabled for such pipelines.
In YAML configuration, ensure the `entry_point` value exactly matches a node `id` defined in the `nodes` list.
Regenerate the secret if it is ever exposed. Always copy it immediately after generation — it cannot be retrieved once the modal is closed without regenerating.
***
* **[Node Connectors](./nodes-connectors)** - Connect nodes to create workflows
* **[State Management](./states)** - Understand state in pipelines
* **[Flow Editor](./flow-editor)** - Visual pipeline building
* **[Control Flow Nodes](./nodes/control-flow-nodes)** - Router and Decision nodes
* **[YAML Configuration](./yaml)** - Complete YAML syntax reference
Selecting **Webhook** opens a configuration modal. Three webhook subtypes are available:
| Type | Auth Header | Signature Method |
| ---------- | --------------------- | ---------------------------------------- |
| **GitHub** | `X-Hub-Signature-256` | HMAC-SHA256 (`sha256=`) |
| **GitLab** | `X-Gitlab-Token` | Secret token sent directly in the header |
| **Custom** | `X-Webhook-Token` | Secret token sent directly in the header |
The modal shows:
| Field | Description |
| -------------------------- | ----------------------------------------------------------------------------------------------------------------------------------------------- |
| **Webhook URL** | Read-only, automatically constructed based on the selected type. Use the copy button to copy it. |
| **Secret token** | A 32-byte base64url token generated automatically. Can be shown or hidden, copied, or regenerated. Click **Apply** to save a regenerated token. |
| **Example `curl` request** | A ready-to-use example showing the exact headers and payload format for the selected webhook type. |
**GitHub example:**
```bash theme={null}
curl -X POST "https://your-elitea-instance/webhook/github" \
-H "Content-Type: text/plain" \
-H "X-Hub-Signature-256: sha256=" \
-d 'Your message or data here'
```
**GitLab example:**
```bash theme={null}
curl -X POST "https://your-elitea-instance/webhook/gitlab" \
-H "Content-Type: text/plain" \
-H "X-Gitlab-Token: " \
-d 'Your message or data here'
```
**Custom example:**
```bash theme={null}
curl -X POST "https://your-elitea-instance/webhook/custom" \
-H "Content-Type: text/plain" \
-H "X-Webhook-Token: " \
-d 'Your message or data here'
```
***
## Best Practices
Use `Chat Message` for interactive conversational pipelines; use `Schedule` for automated batch processing; use `Webhook` for event-driven integration with external systems.
Any pipeline with HITL or Printer nodes must use the `Chat Message` trigger. Schedule and Webhook triggers are automatically disabled for such pipelines.
In YAML configuration, ensure the `entry_point` value exactly matches a node `id` defined in the `nodes` list.
Regenerate the secret if it is ever exposed. Always copy it immediately after generation — it cannot be retrieved once the modal is closed without regenerating.
***
* **[Node Connectors](./nodes-connectors)** - Connect nodes to create workflows
* **[State Management](./states)** - Understand state in pipelines
* **[Flow Editor](./flow-editor)** - Visual pipeline building
* **[Control Flow Nodes](./nodes/control-flow-nodes)** - Router and Decision nodes
* **[YAML Configuration](./yaml)** - Complete YAML syntax reference