> ## Documentation Index
> Fetch the complete documentation index at: https://docs.elitea.ai/llms.txt
> Use this file to discover all available pages before exploring further.
# Import/Export Agents and Pipelines
> ELITEA provides Import and Export functionality that allows you to backup, migrate, share, and version-control your agents and pipelines. You can export agents
## Introduction
The Import/Export feature supports:
* **Individual agents and pipelines** - Export single entities
* **Nested dependencies** - Agents referencing other agents
* **Multiple file formats** - `.md` for single entities, `.zip` for multi-entity exports
***
## Export Functionality
### Exporting an Agent or Pipeline
1. **Navigate to the Entity:**
* Go to the **Agents** menu (or **Pipelines** menu for pipelines)
* Open the specific agent or pipeline you want to export
2. **Initiate Export:**
* Click the **three-dot menu (⋮)** in the toolbar
* Select **Export** from the dropdown menu
* The file will automatically download to your local device
3. **File Format:**
* Agents and pipelines are exported as **Markdown (`.md`)** files
* Only the **currently selected version** of the agent or pipeline is included in the export
* Each file contains YAML frontmatter with configuration and Markdown body with instructions
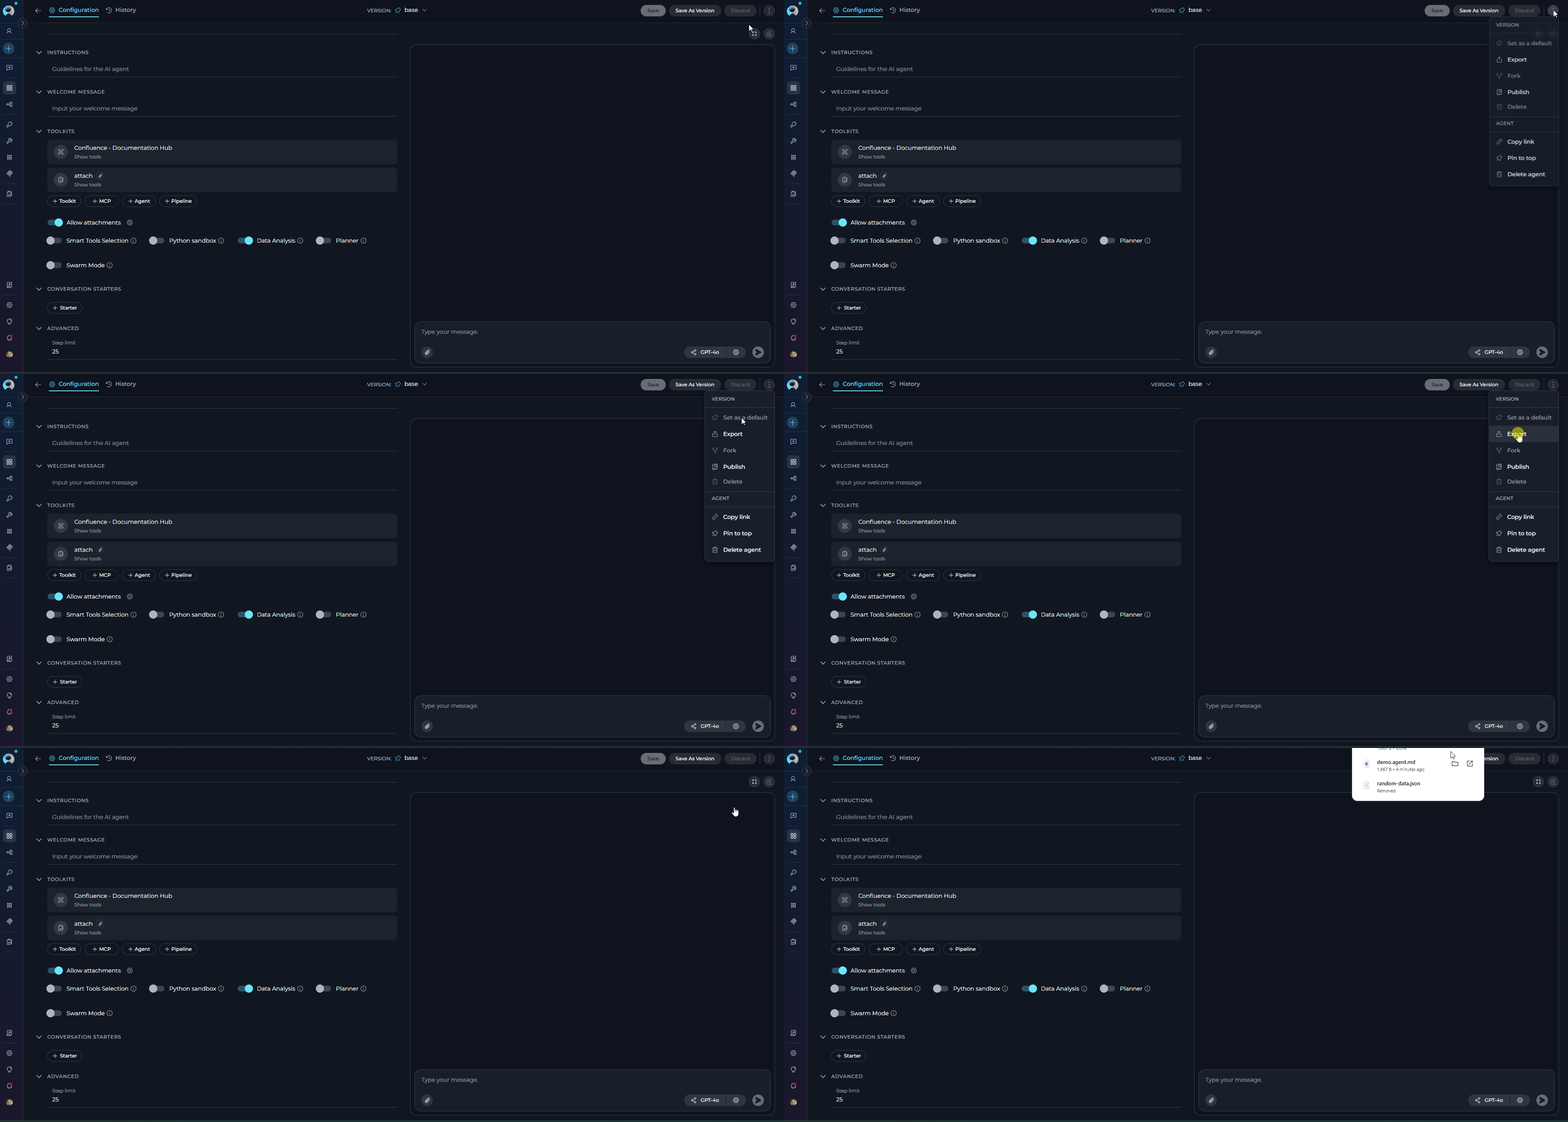 When you export an agent or pipeline that contains nested agents (agents referencing other agents), the system automatically includes all dependencies in the export:
* If the agent has **nested dependencies**, the export will be a **ZIP file** containing multiple `.md` files (one for the main agent and one for each nested dependency)
* If the agent has **no nested dependencies**, the export will be a single **`.md` file**
The system automatically detects and packages all required dependencies to ensure a complete export.
The exported `.md` file includes the **selected version** of the agent or pipeline:
```markdown theme={null}
---
name: Demo
description: Demo
model: gpt-4o-2024-11-20
temperature: 0.2
max_tokens: 2048
agent_type: openai
step_limit: 25
internal_tools:
- data_analysis
toolkits:
- toolkit: attach
type: artifact
settings:
bucket: attach
embedding_model: text-embedding-3-small
pgvector_configuration:
private: false
alita_title: elitea-pgvector
configuration_type: pgvector
tools:
- index_data
- search_index
- stepback_search_index
- stepback_summary_index
- appendData
- overwriteData
- createNewBucket
- toolkit: Confluence - Documentation Hub
type: confluence
settings:
cloud: true
limit: 5
space: DOCS
labels: null
max_pages: 10
custom_headers: {}
embedding_model: text-embedding-3-small
max_retry_seconds: 60
min_retry_seconds: 10
number_of_retries: 2
pgvector_configuration:
private: false
alita_title: elitea-pgvector
configuration_type: pgvector
confluence_configuration:
private: true
alita_title: confluenceepam
tools:
- index_data
- search_index
- stepback_search_index
- stepback_summary_index
- remove_index
- execute_generic_confluence
- get_page_id_by_title
- get_page_attachments
- delete_page
---
# Agent Instructions
Your instructions for the agent go here in Markdown format.
```
Authentication credentials and API keys for toolkits are **NOT** included in exports. You must reconfigure these during import.
***
## Import Functionality
ELITEA allows you to import agents and pipelines from exported files. Both agents and pipelines support single-entity (`.md`) and multi-entity (`.zip`) imports.
After importing agents or pipelines, you must manually reconfigure authentication credentials for all toolkits. Credentials are **NOT** included in exports for security reasons. Ensure you have the necessary API keys, tokens, and connection details ready before testing imported entities.
**What Gets Imported:**
1. Toolkit type and name are imported
2. Selected tools are preserved
3. Settings (non-credential) are imported
4. Model settings default to the destination project's configured LLM, Embedding, and PgVector settings — you can customize these individually after import
Importing requires the appropriate import permission in the destination project. The **Import** button is disabled if this permission is not granted. Contact your project administrator if you need access.
***
### Importing Agents
Agents can be imported individually from `.md` files or in bulk from `.zip` files with automatic dependency resolution.
#### Importing Agent from .md File (Single Entity)
Use `.md` file import when you want to import a single agent.
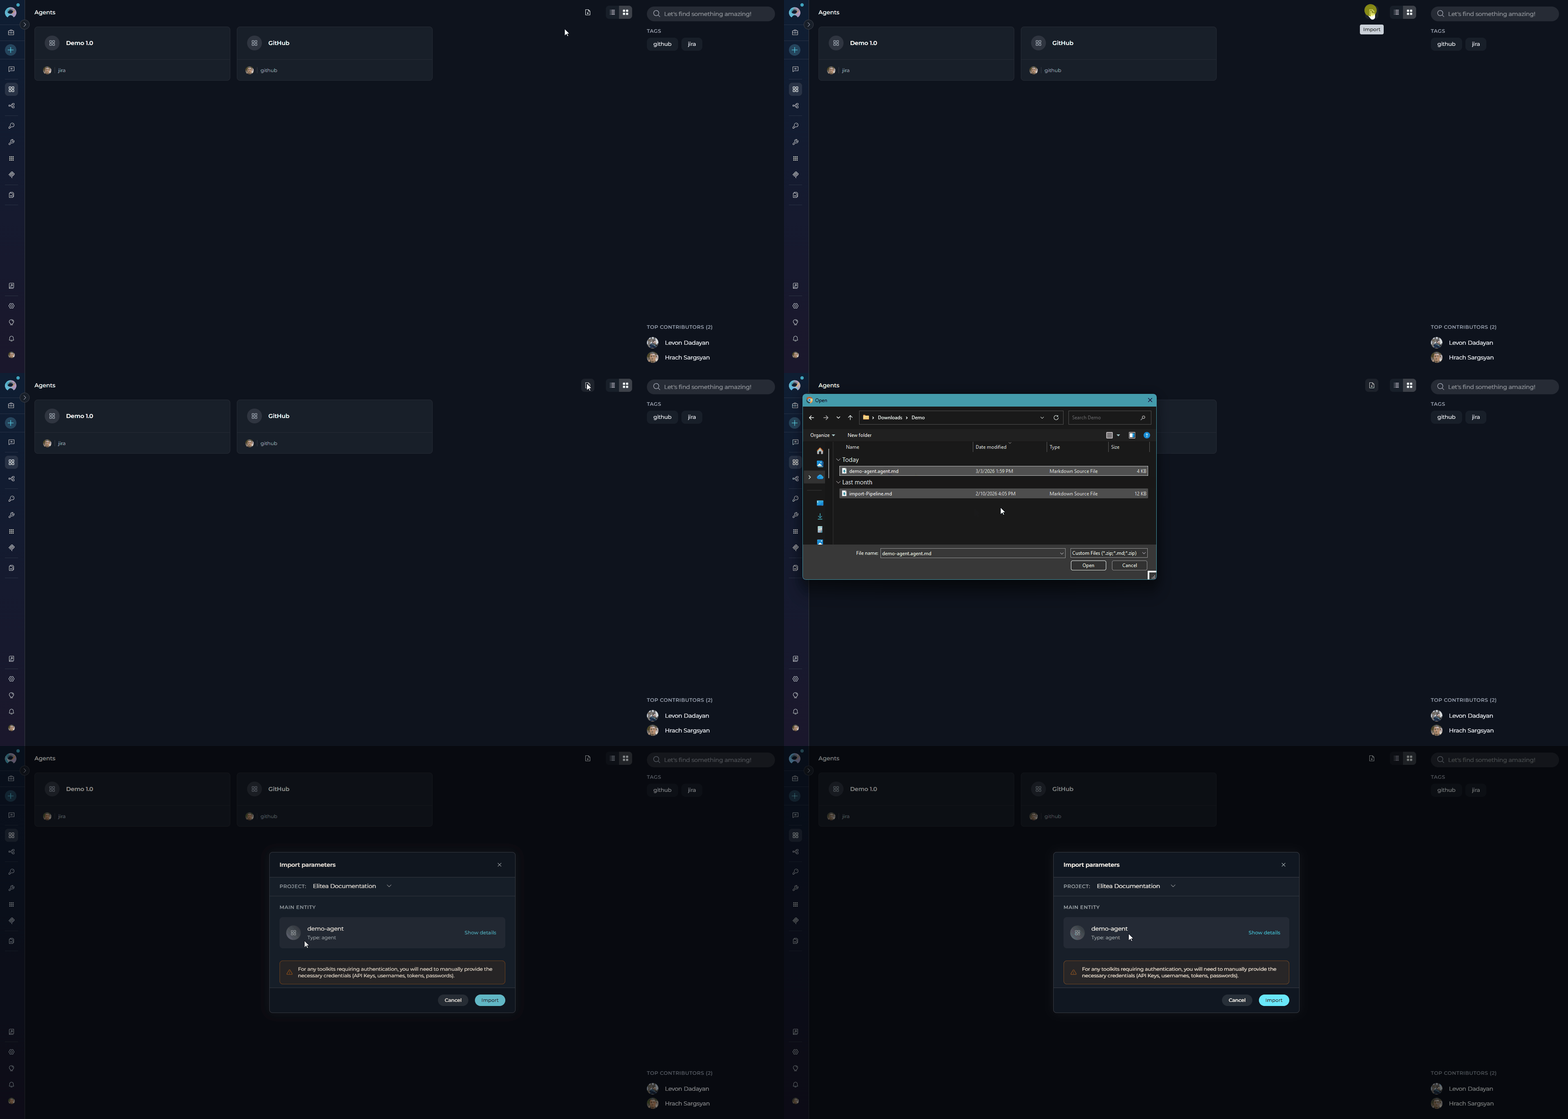
**Step 1: Select .md File**
1. Navigate to **Agents** menu
2. Click the **Import** button in the toolbar
3. Select the `.md` file from the file dialog
4. The file is parsed and the Import Wizard opens
When you export an agent or pipeline that contains nested agents (agents referencing other agents), the system automatically includes all dependencies in the export:
* If the agent has **nested dependencies**, the export will be a **ZIP file** containing multiple `.md` files (one for the main agent and one for each nested dependency)
* If the agent has **no nested dependencies**, the export will be a single **`.md` file**
The system automatically detects and packages all required dependencies to ensure a complete export.
The exported `.md` file includes the **selected version** of the agent or pipeline:
```markdown theme={null}
---
name: Demo
description: Demo
model: gpt-4o-2024-11-20
temperature: 0.2
max_tokens: 2048
agent_type: openai
step_limit: 25
internal_tools:
- data_analysis
toolkits:
- toolkit: attach
type: artifact
settings:
bucket: attach
embedding_model: text-embedding-3-small
pgvector_configuration:
private: false
alita_title: elitea-pgvector
configuration_type: pgvector
tools:
- index_data
- search_index
- stepback_search_index
- stepback_summary_index
- appendData
- overwriteData
- createNewBucket
- toolkit: Confluence - Documentation Hub
type: confluence
settings:
cloud: true
limit: 5
space: DOCS
labels: null
max_pages: 10
custom_headers: {}
embedding_model: text-embedding-3-small
max_retry_seconds: 60
min_retry_seconds: 10
number_of_retries: 2
pgvector_configuration:
private: false
alita_title: elitea-pgvector
configuration_type: pgvector
confluence_configuration:
private: true
alita_title: confluenceepam
tools:
- index_data
- search_index
- stepback_search_index
- stepback_summary_index
- remove_index
- execute_generic_confluence
- get_page_id_by_title
- get_page_attachments
- delete_page
---
# Agent Instructions
Your instructions for the agent go here in Markdown format.
```
Authentication credentials and API keys for toolkits are **NOT** included in exports. You must reconfigure these during import.
***
## Import Functionality
ELITEA allows you to import agents and pipelines from exported files. Both agents and pipelines support single-entity (`.md`) and multi-entity (`.zip`) imports.
After importing agents or pipelines, you must manually reconfigure authentication credentials for all toolkits. Credentials are **NOT** included in exports for security reasons. Ensure you have the necessary API keys, tokens, and connection details ready before testing imported entities.
**What Gets Imported:**
1. Toolkit type and name are imported
2. Selected tools are preserved
3. Settings (non-credential) are imported
4. Model settings default to the destination project's configured LLM, Embedding, and PgVector settings — you can customize these individually after import
Importing requires the appropriate import permission in the destination project. The **Import** button is disabled if this permission is not granted. Contact your project administrator if you need access.
***
### Importing Agents
Agents can be imported individually from `.md` files or in bulk from `.zip` files with automatic dependency resolution.
#### Importing Agent from .md File (Single Entity)
Use `.md` file import when you want to import a single agent.
**Step 1: Select .md File**
1. Navigate to **Agents** menu
2. Click the **Import** button in the toolbar
3. Select the `.md` file from the file dialog
4. The file is parsed and the Import Wizard opens
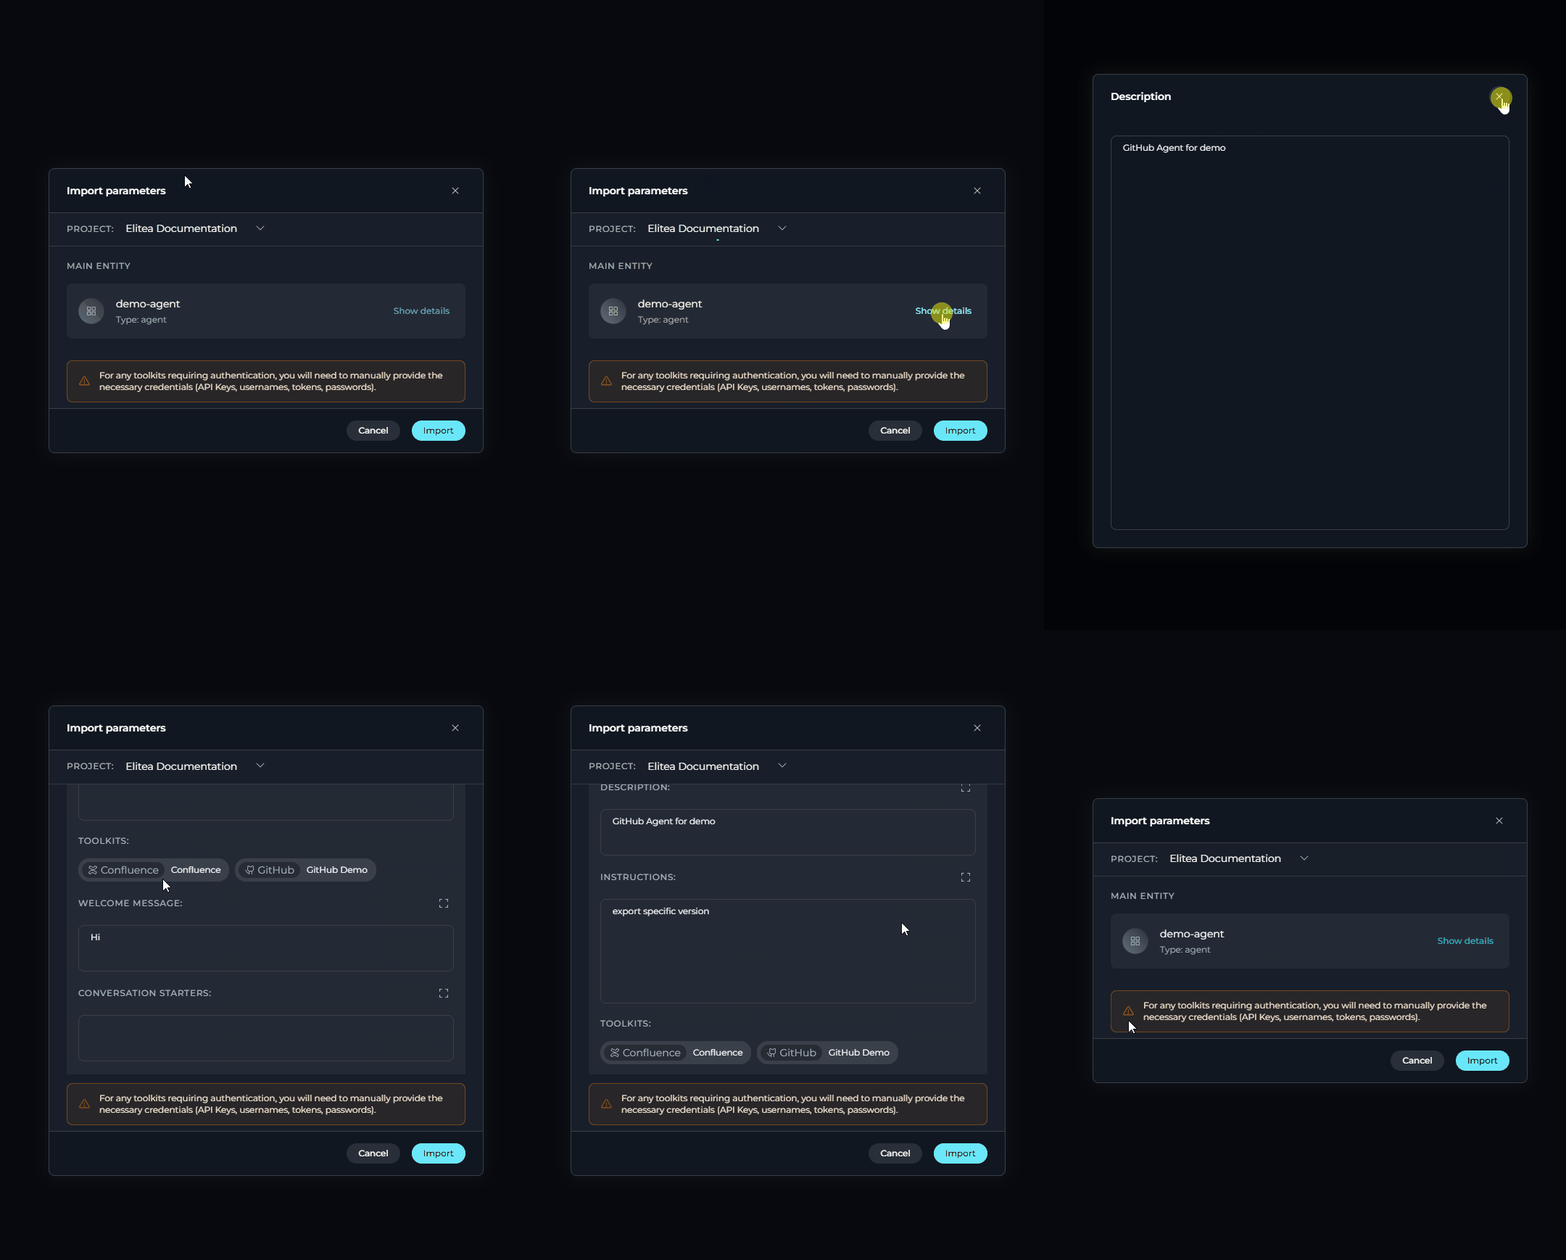
 The Import Wizard displays in a single-column modal dialog:
**Project Selector** — at the top of the modal, select the destination project.
**Entity Cards** — the modal shows one card per entity:
* **Main entity** — the primary agent or pipeline being imported
* **Nested entities** — any dependent agents (ZIP imports only)
Each card shows the entity name and type (agent/pipeline). Click **Show details** to expand the card and review:
* Description, Instructions (agents) or Pipeline Diagram (pipelines)
* Toolkits and their tools
* Welcome message, Conversation starters, Internal tools, Step limit
**Credentials warning** — a notice at the bottom reminds you to configure authentication for any toolkits that require it.
**Step 2: Select Project and Review Configuration**
1. **Select Project Destination:**
* At the top of the modal, find the **Project** selector
* Click the dropdown to select the destination project
2. **Review Entity Card:** The wizard displays the entity as a card showing its name and type (agent or pipeline)
* Click **Show details** on the card to expand full configuration
* Expanded details include: Description, Instructions, Toolkits and their tools, Welcome message, Conversation starters, Internal tools, and Step limit
The Import Wizard displays in a single-column modal dialog:
**Project Selector** — at the top of the modal, select the destination project.
**Entity Cards** — the modal shows one card per entity:
* **Main entity** — the primary agent or pipeline being imported
* **Nested entities** — any dependent agents (ZIP imports only)
Each card shows the entity name and type (agent/pipeline). Click **Show details** to expand the card and review:
* Description, Instructions (agents) or Pipeline Diagram (pipelines)
* Toolkits and their tools
* Welcome message, Conversation starters, Internal tools, Step limit
**Credentials warning** — a notice at the bottom reminds you to configure authentication for any toolkits that require it.
**Step 2: Select Project and Review Configuration**
1. **Select Project Destination:**
* At the top of the modal, find the **Project** selector
* Click the dropdown to select the destination project
2. **Review Entity Card:** The wizard displays the entity as a card showing its name and type (agent or pipeline)
* Click **Show details** on the card to expand full configuration
* Expanded details include: Description, Instructions, Toolkits and their tools, Welcome message, Conversation starters, Internal tools, and Step limit
 3. **Model and Embedding Remapping:** The system automatically maps LLM and embedding models to the destination project's defaults. You can adjust model settings individually after import.
4. **Credentials warning:** A warning at the bottom of the modal reminds you that any toolkits requiring authentication will need credentials configured manually after import
**Step 3: Import**
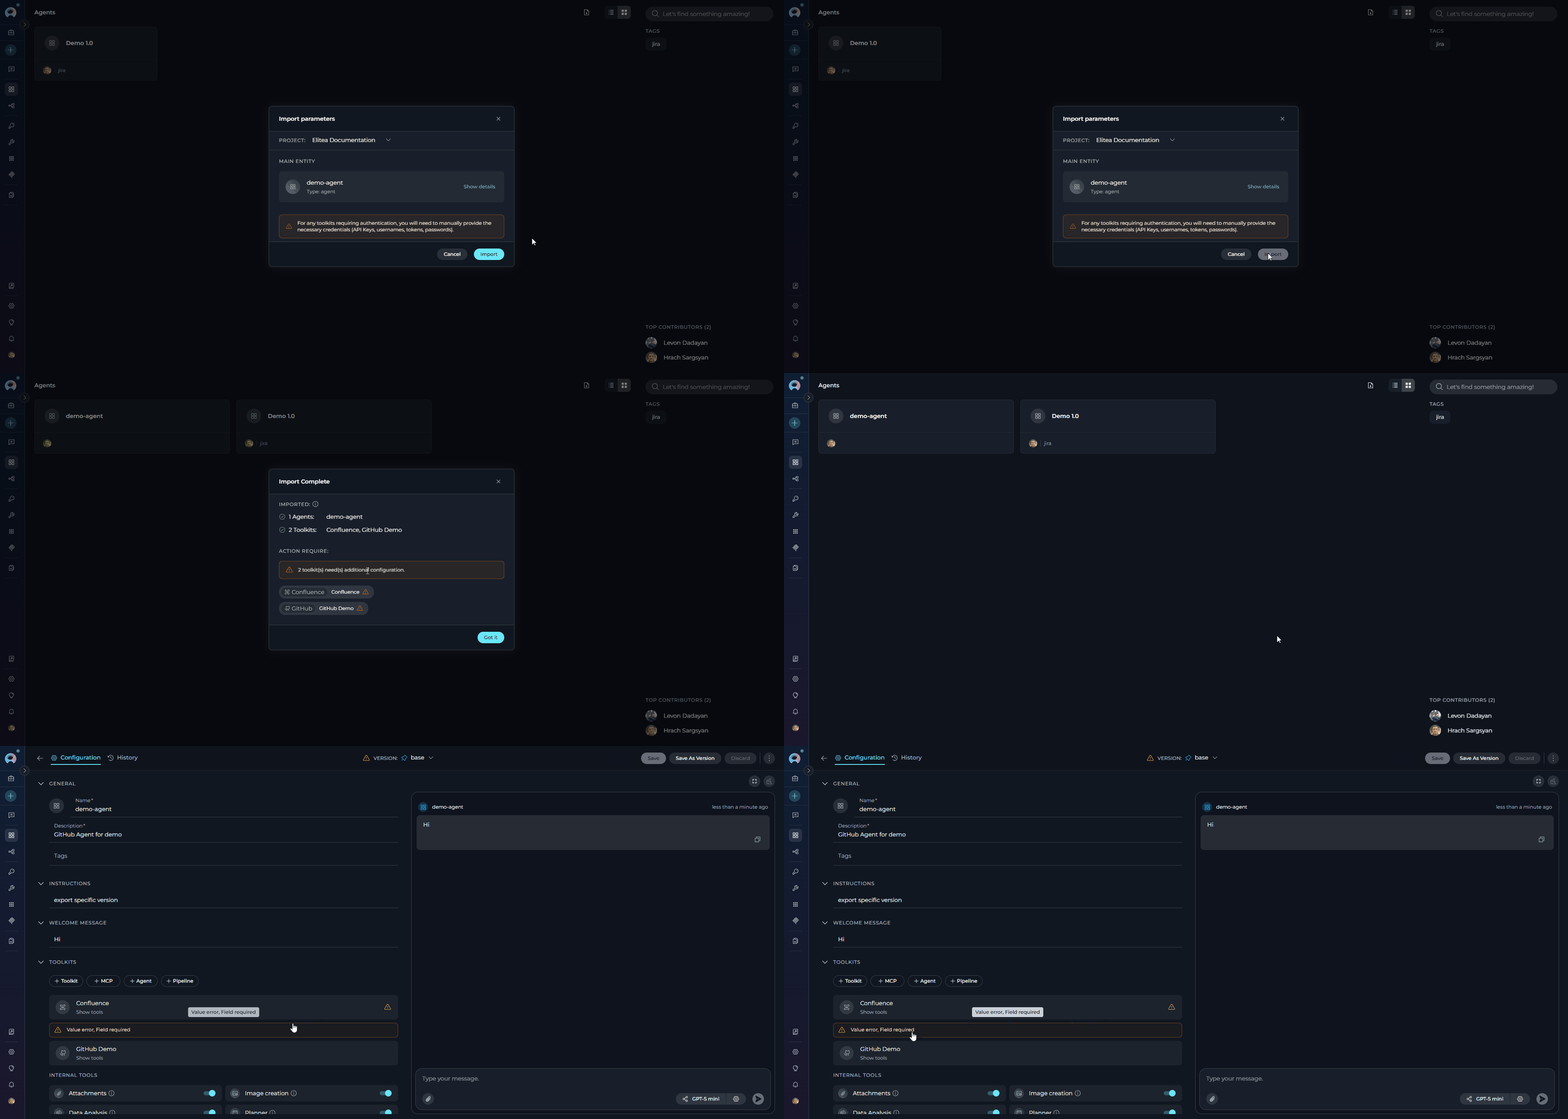
* **Click Import** at the bottom of the modal. Upon successful import, the modal transitions to an **Import Complete** screen showing the imported agents, pipelines, and toolkits. Toolkits that require additional credential configuration are highlighted in an "Action required" section.
3. **Model and Embedding Remapping:** The system automatically maps LLM and embedding models to the destination project's defaults. You can adjust model settings individually after import.
4. **Credentials warning:** A warning at the bottom of the modal reminds you that any toolkits requiring authentication will need credentials configured manually after import
**Step 3: Import**
* **Click Import** at the bottom of the modal. Upon successful import, the modal transitions to an **Import Complete** screen showing the imported agents, pipelines, and toolkits. Toolkits that require additional credential configuration are highlighted in an "Action required" section.
 ***
#### Importing Agents from .zip File (Multiple Entities)
Use `.zip` file import when you want to import multiple agents with dependencies (nested agents).
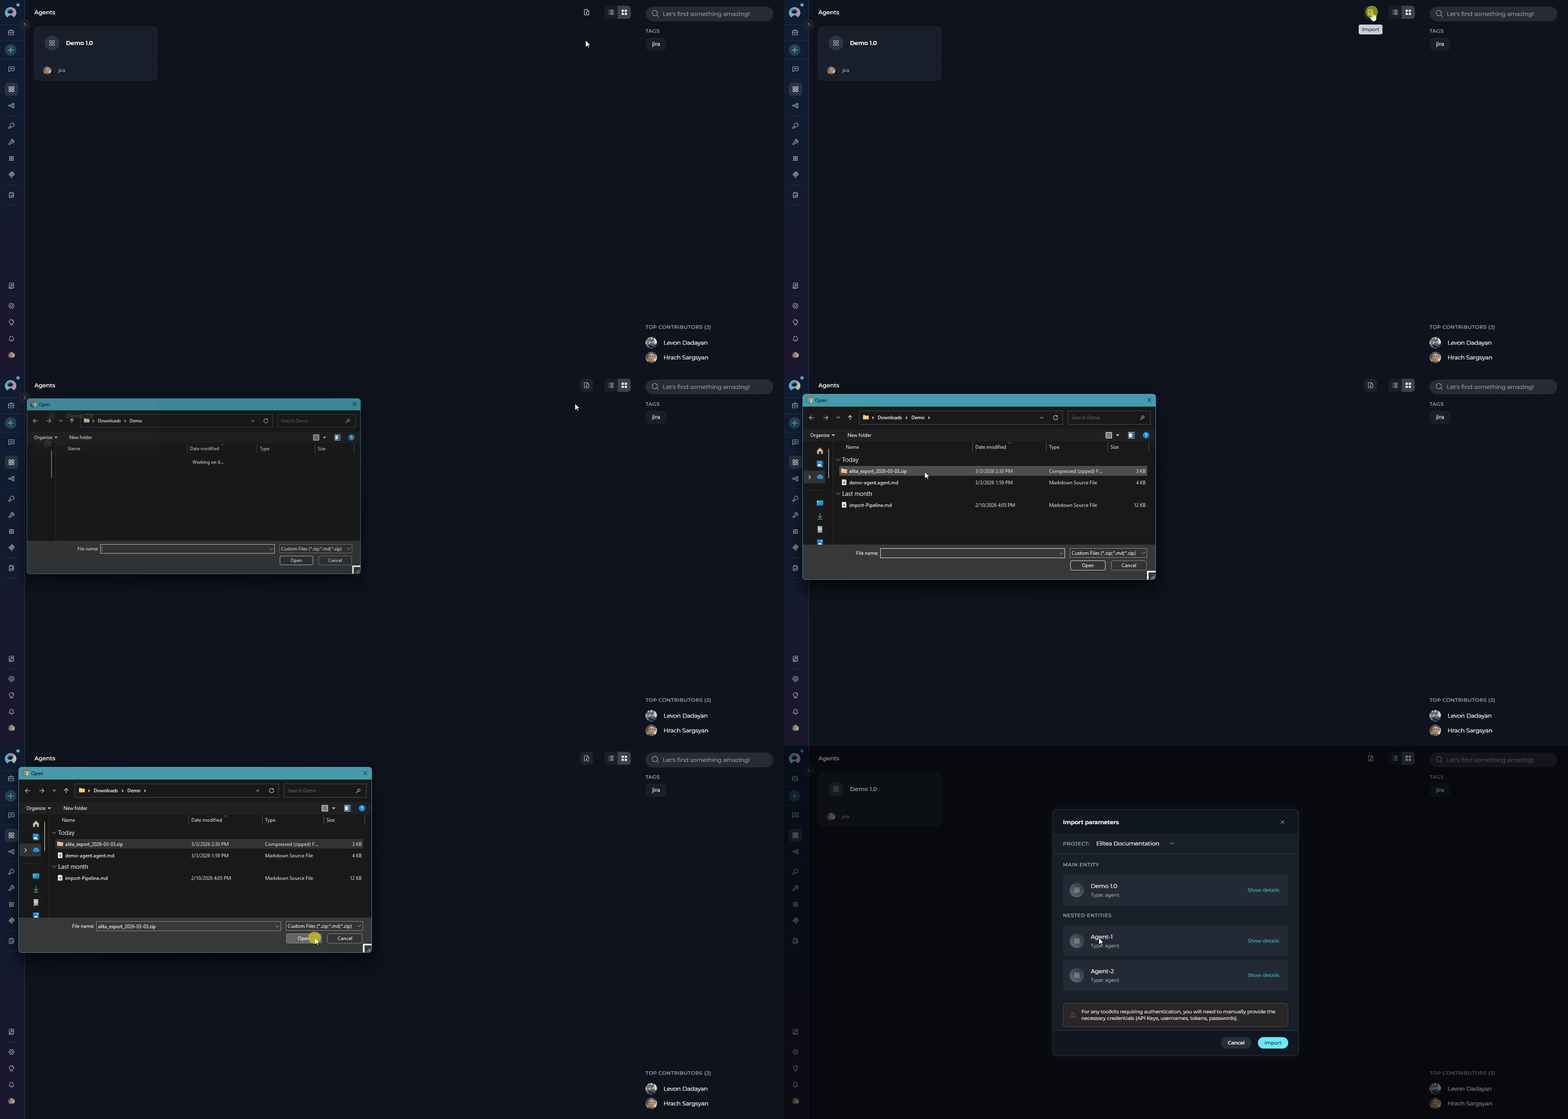
**Step 1: Select .zip File**
1. Navigate to **Agents** menu
2. Click the **Import** button in the toolbar
3. Select a `.zip` file from the file dialog
4. All `.md` files in the ZIP are extracted and parsed; versions from files with the same agent name are merged
5. The Import Wizard opens showing all agents
***
#### Importing Agents from .zip File (Multiple Entities)
Use `.zip` file import when you want to import multiple agents with dependencies (nested agents).
**Step 1: Select .zip File**
1. Navigate to **Agents** menu
2. Click the **Import** button in the toolbar
3. Select a `.zip` file from the file dialog
4. All `.md` files in the ZIP are extracted and parsed; versions from files with the same agent name are merged
5. The Import Wizard opens showing all agents
 **Step 2: Select Project and Review Configuration**
1. **Select Project Destination:**
* At the top of the modal, find the **Project** selector
* Click the dropdown to select the destination project
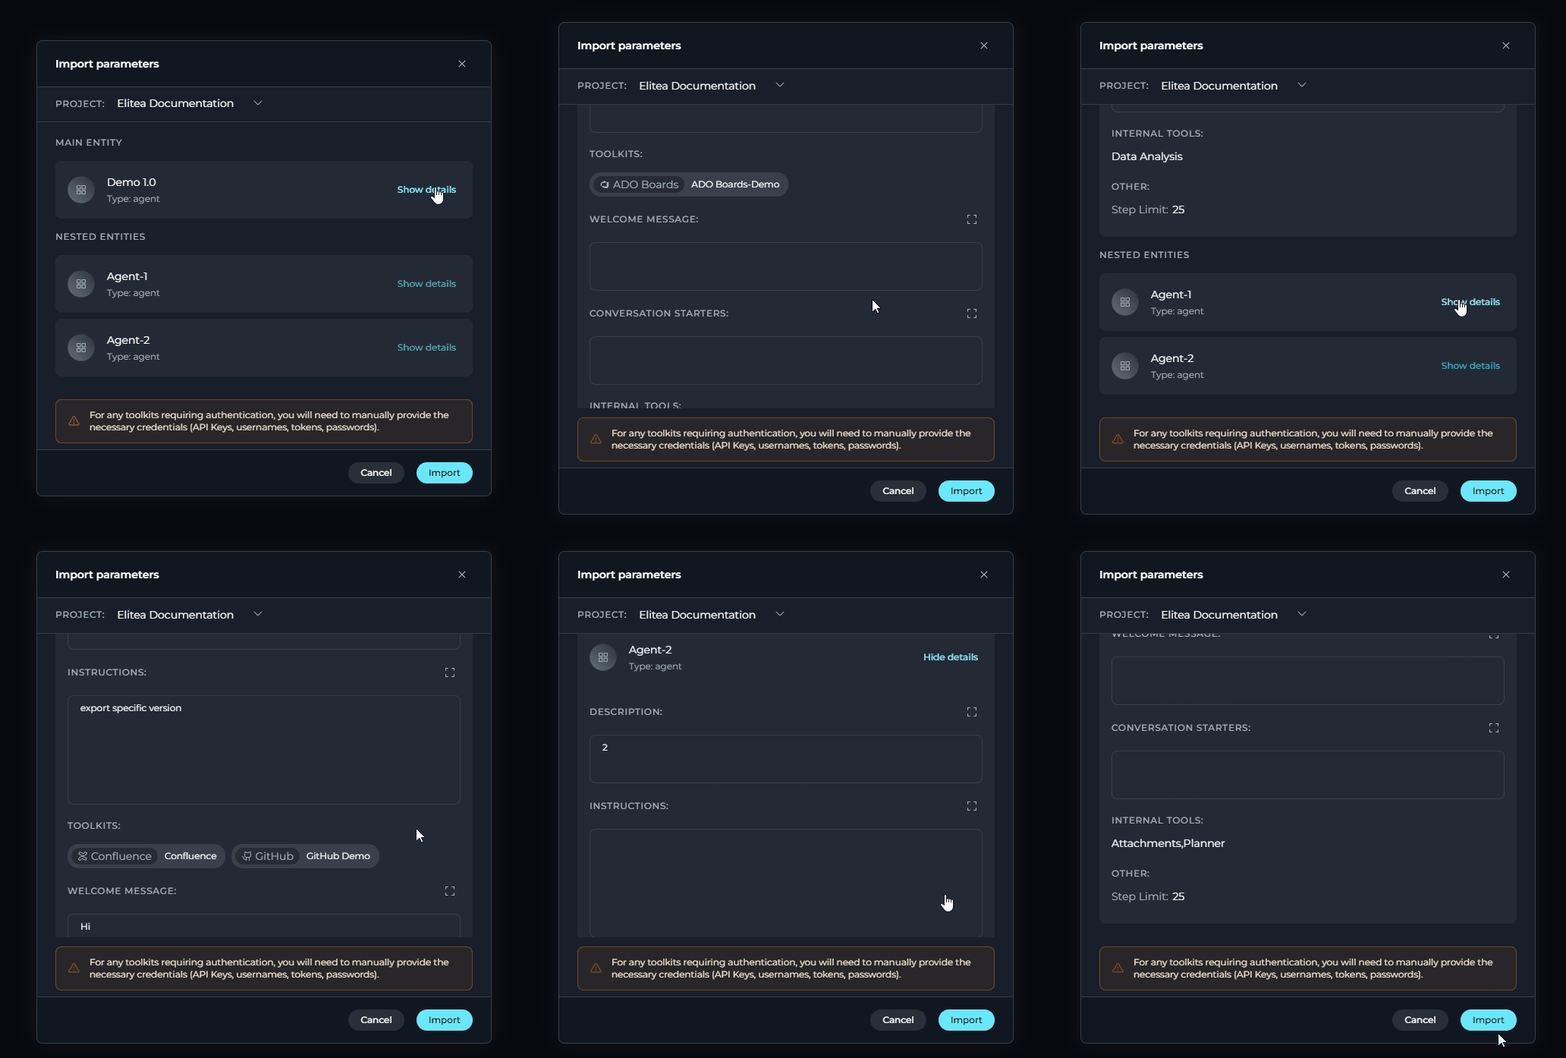
2. **Review Entity Cards:** The wizard displays a **Main entity** section for the primary agent and a **Nested entities** section for each dependency
* Click **Show details** on any card to expand its configuration
* Each card shows: Description, Instructions, Toolkits, Welcome message, Conversation starters, Internal tools, and Step limit
3. **Model and Embedding Remapping:** The system automatically maps LLM and embedding models to the destination project's defaults. You can adjust model settings individually after import.
**Step 2: Select Project and Review Configuration**
1. **Select Project Destination:**
* At the top of the modal, find the **Project** selector
* Click the dropdown to select the destination project
2. **Review Entity Cards:** The wizard displays a **Main entity** section for the primary agent and a **Nested entities** section for each dependency
* Click **Show details** on any card to expand its configuration
* Each card shows: Description, Instructions, Toolkits, Welcome message, Conversation starters, Internal tools, and Step limit
3. **Model and Embedding Remapping:** The system automatically maps LLM and embedding models to the destination project's defaults. You can adjust model settings individually after import.
 **Step 3: Import**
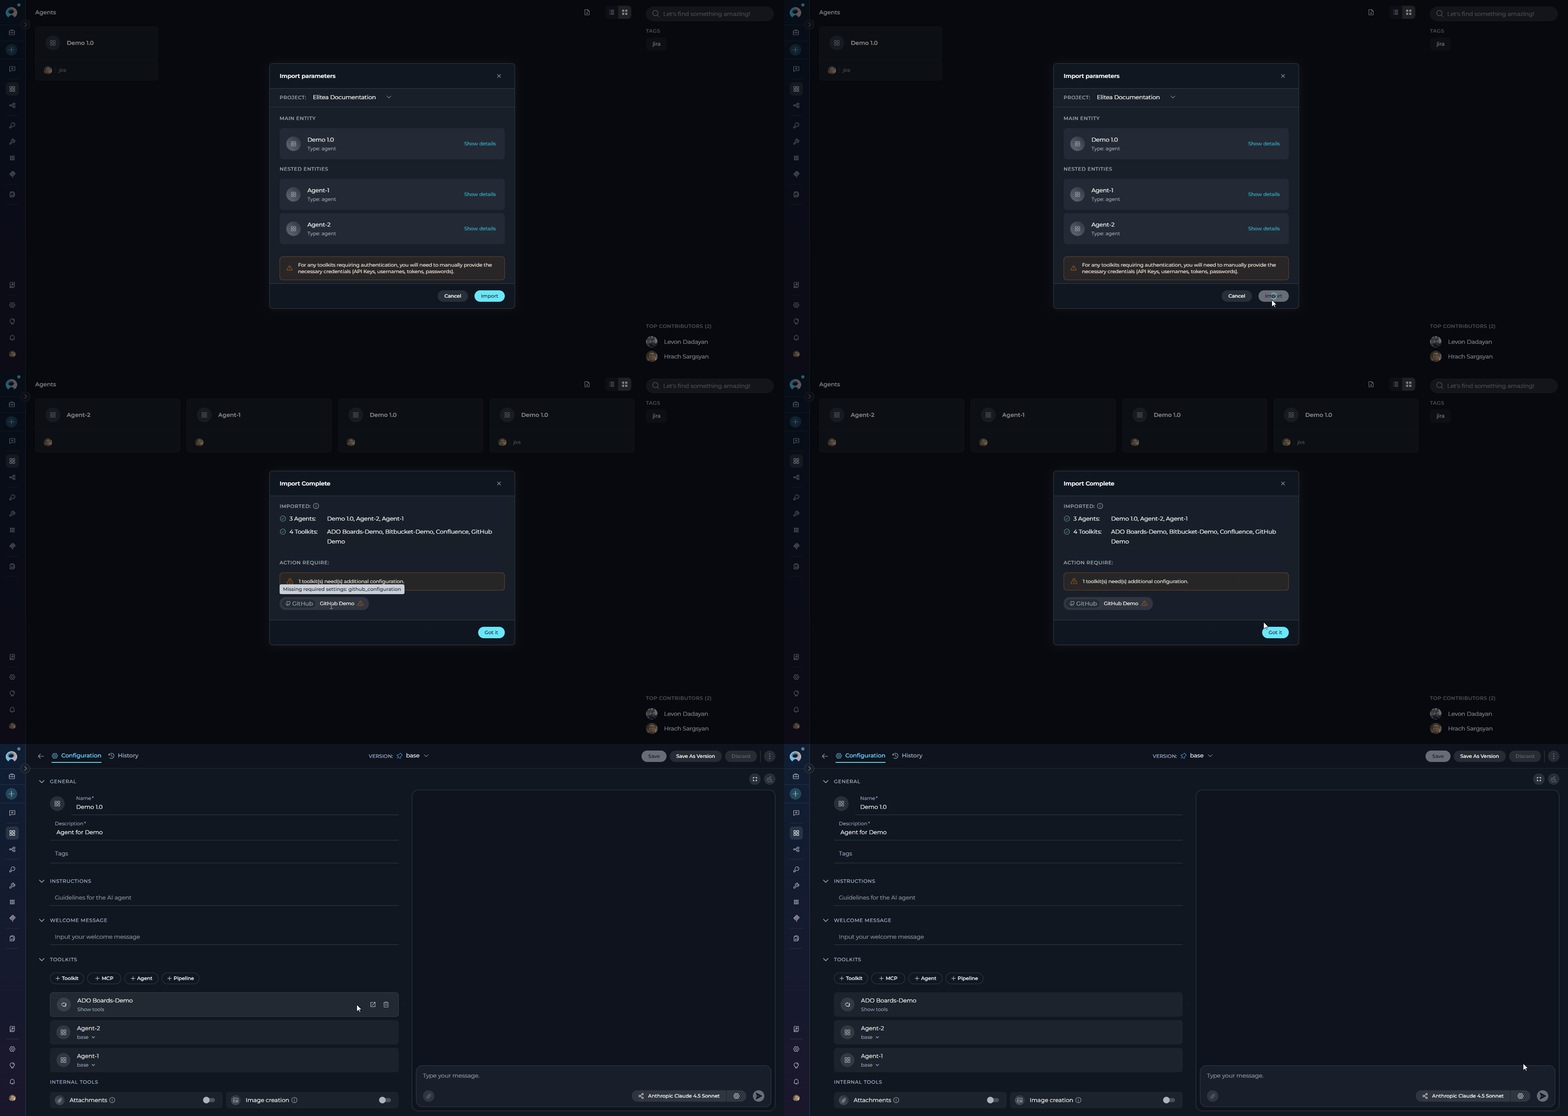
* **Click Import** at the bottom of the modal. Upon successful import, the modal transitions to an **Import Complete** screen showing all imported agents, pipelines, and toolkits. Toolkits that require credentials are highlighted in an "Action required" section.
**Step 3: Import**
* **Click Import** at the bottom of the modal. Upon successful import, the modal transitions to an **Import Complete** screen showing all imported agents, pipelines, and toolkits. Toolkits that require credentials are highlighted in an "Action required" section.
 ZIP files can contain multiple `.md` files representing different agents:
***
### Importing Pipelines
Pipelines are imported from `.md` or `.zip` files. If the pipeline has nested dependencies (referenced agents or pipelines), the export will be a ZIP archive containing all required entities.
**Step 1: Select Import File**
1. Navigate to **Pipelines** menu
2. Click the **Import** button in the toolbar
3. Select the `.md` or `.zip` file from the file dialog
4. The file is parsed and the Import Wizard opens
**Step 2: Select Project and Review Configuration**
1. **Select Project Destination:**
* At the top of the modal, find the **Project** selector
* Click the dropdown to select the destination project
* You must have the `models.applications.export_import.import` permission in the target project
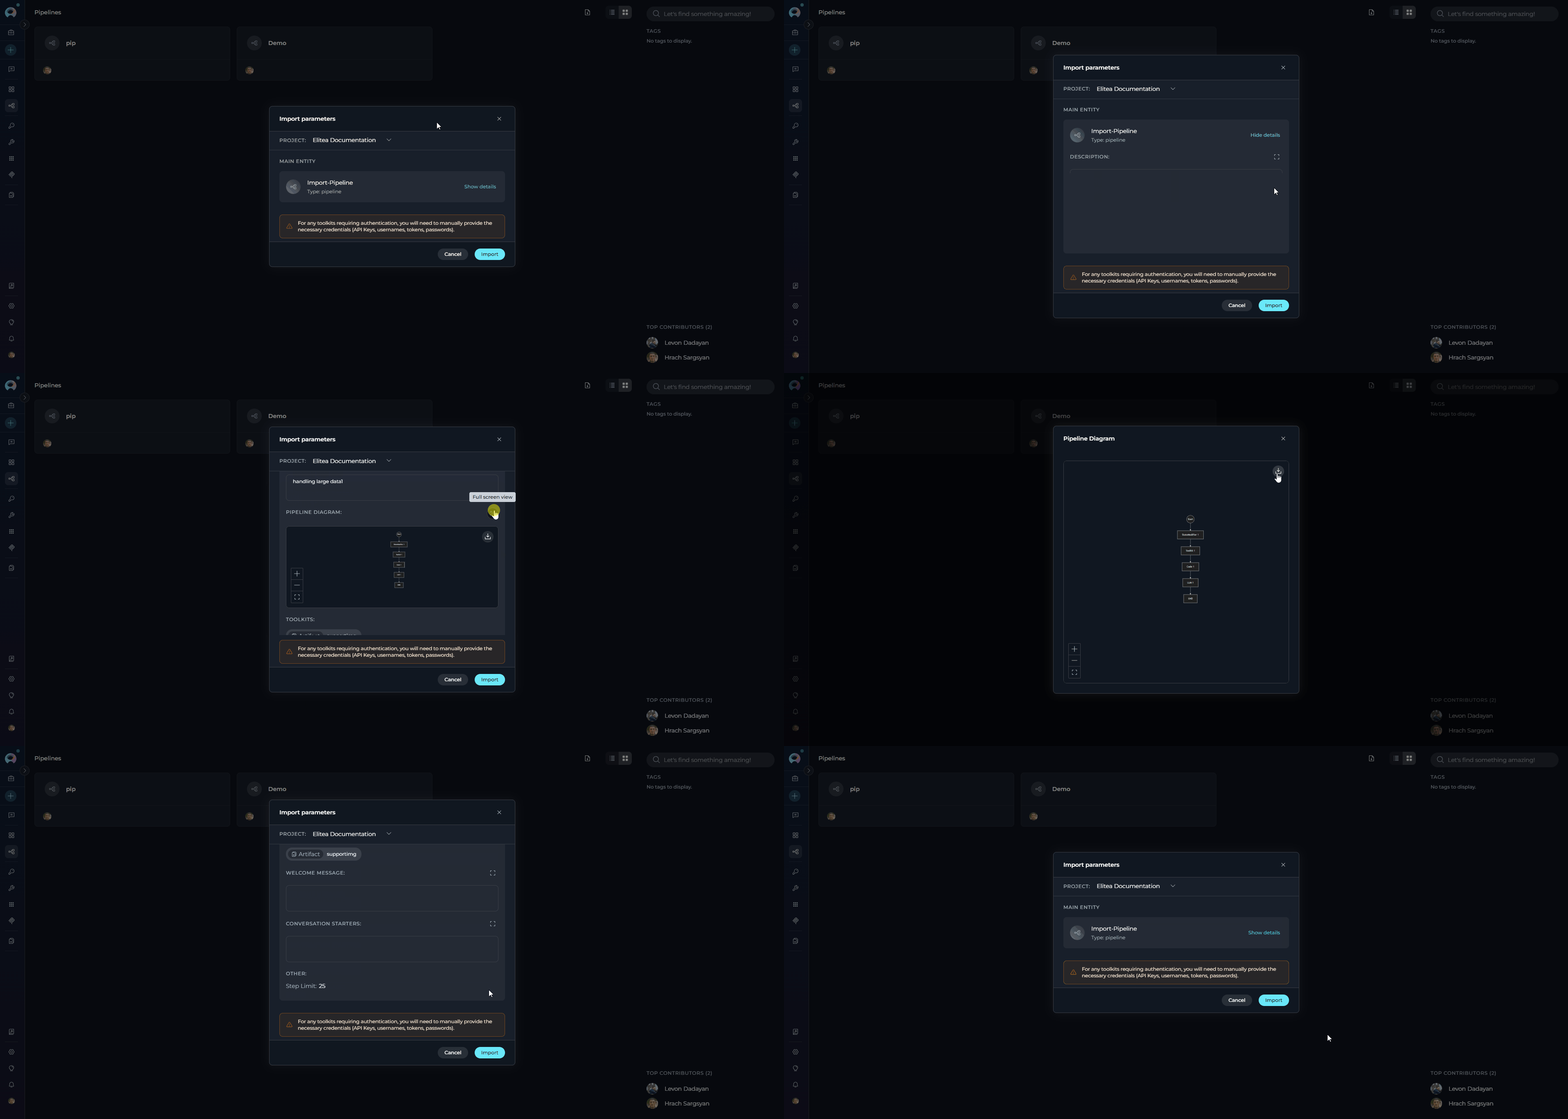
2. **Review Entity Card:** The wizard displays the pipeline as a card showing its name and type
* Click **Show details** to expand full configuration
* Expanded details include: Description, a live **Pipeline Diagram** (Mermaid, with fullscreen view option), Toolkits and their tools, Welcome message, Conversation starters, and Step limit
3. **Model and Embedding Remapping:** The system automatically maps LLM and embedding models to the destination project's defaults. You can adjust model settings individually after import.
ZIP files can contain multiple `.md` files representing different agents:
***
### Importing Pipelines
Pipelines are imported from `.md` or `.zip` files. If the pipeline has nested dependencies (referenced agents or pipelines), the export will be a ZIP archive containing all required entities.
**Step 1: Select Import File**
1. Navigate to **Pipelines** menu
2. Click the **Import** button in the toolbar
3. Select the `.md` or `.zip` file from the file dialog
4. The file is parsed and the Import Wizard opens
**Step 2: Select Project and Review Configuration**
1. **Select Project Destination:**
* At the top of the modal, find the **Project** selector
* Click the dropdown to select the destination project
* You must have the `models.applications.export_import.import` permission in the target project
2. **Review Entity Card:** The wizard displays the pipeline as a card showing its name and type
* Click **Show details** to expand full configuration
* Expanded details include: Description, a live **Pipeline Diagram** (Mermaid, with fullscreen view option), Toolkits and their tools, Welcome message, Conversation starters, and Step limit
3. **Model and Embedding Remapping:** The system automatically maps LLM and embedding models to the destination project's defaults. You can adjust model settings individually after import.
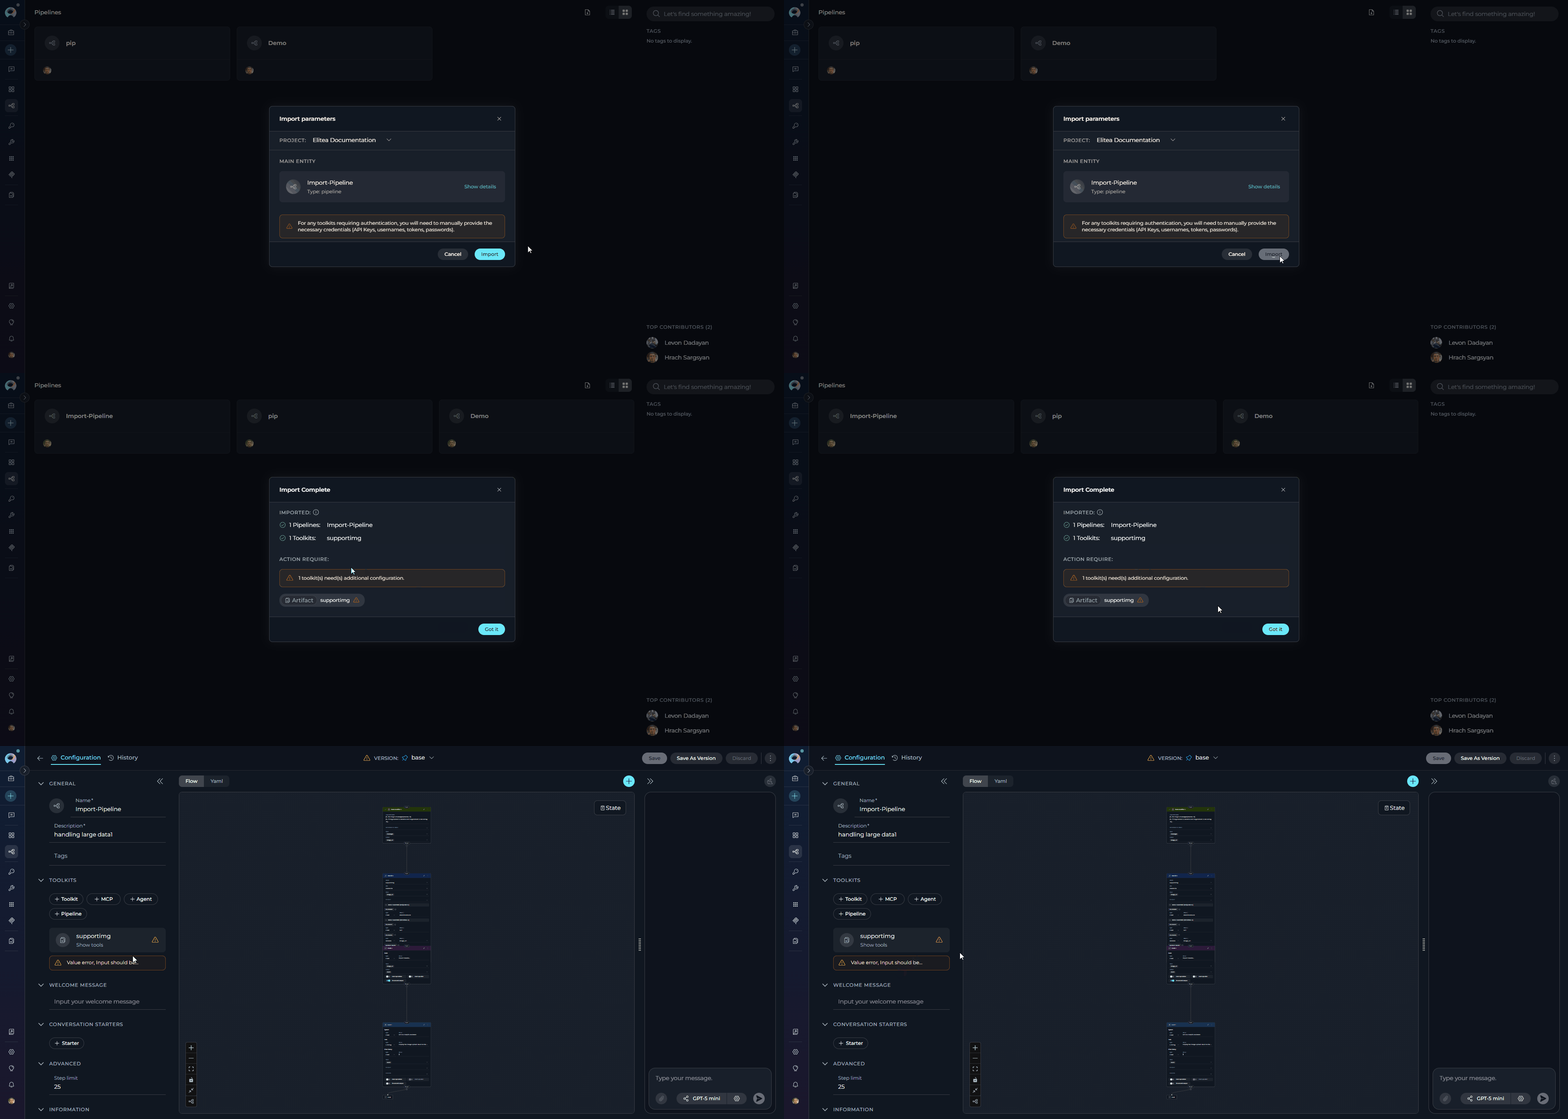
 **Step 3: Import**
* **Click Import** at the bottom of the modal. Upon successful import, the modal transitions to an **Import Complete** screen showing the imported pipeline and its toolkits. Toolkits that require credentials are highlighted in the "Action required" section.
**Step 3: Import**
* **Click Import** at the bottom of the modal. Upon successful import, the modal transitions to an **Import Complete** screen showing the imported pipeline and its toolkits. Toolkits that require credentials are highlighted in the "Action required" section.
 ***
## Best Practices
### Export Recommendations
* Export regularly to maintain backups
* Use descriptive naming for easy identification
* Add clear descriptions to your agents and pipelines
* Document dependencies and special requirements
* Store exports in secure locations
* Review content before sharing with others
### Import Recommendations
* Verify destination project has required toolkits
* Ensure necessary models are available
* Check you have appropriate permissions
* Expand entity cards using **Show details** to review configuration before importing
* Verify model remapping is correct for your destination project
* Reconfigure toolkit credentials
* Test imported agents/pipelines
* Verify nested dependencies work correctly
* Import related entities together
* Maintain consistent naming conventions
* Group by functionality or team
***
## Troubleshooting
**Cause:** The model specified in the import file doesn't exist in destination project
**Solution:**
* Select an alternative model from the dropdown
* Add the required model configuration to the project first
**Cause:** Referenced toolkit not installed in destination project
**Solution:**
* Install the missing toolkit in the destination project before importing
* Or import to a different project where the toolkit is available
**Cause:** The user does not have the `models.applications.export_import.import` permission in the destination project
**Solution:**
* Request the `models.applications.export_import.import` permission from your project administrator
* Import to a different project where you have this permission
**Cause:** The `.md` file doesn't have proper YAML frontmatter structure
**Solution:**
* Verify the file starts with `---`
* Check YAML syntax is valid
* Ensure closing `---` is present
**Possible Causes:**
* No project selected
* Missing `models.applications.export_import.import` permission in the destination project
**Solution:**
* Select a destination project from the dropdown
* Verify you have the `models.applications.export_import.import` permission in the target project
**Possible Causes:**
* Invalid YAML frontmatter
* Missing closing `---` delimiters
* Corrupted file encoding
**Solution:**
* Open file in text editor and verify format
* Ensure UTF-8 encoding
* Re-export from source if possible
**Possible Causes:**
* Referenced agent not included in ZIP
* Import UUID mismatch
* Agent imported to different project
**Solution:**
* Include all dependent agents in same import
* Verify all `.md` files are in ZIP
* Import all entities to same project
**Possible Causes:**
* Toolkit version mismatch
* Tool deprecated or renamed
* Toolkit not properly configured
**Solution:**
* Update toolkit to latest version
* Review toolkit configuration
* Select alternative tools if available
***
* **[Entity Versioning](./entity-versioning):** Learn about version management
* **[Credentials Menu](../../menus/credentials):** Configure authentication credentials for toolkits
* **[Agents Menu](../../menus/agents):** Complete agents documentation
* **[Pipelines Menu](../../menus/pipelines):** Complete pipelines documentation
* **[Toolkits Menu](../../menus/toolkits):** Complete toolkits documentation
***
***
## Best Practices
### Export Recommendations
* Export regularly to maintain backups
* Use descriptive naming for easy identification
* Add clear descriptions to your agents and pipelines
* Document dependencies and special requirements
* Store exports in secure locations
* Review content before sharing with others
### Import Recommendations
* Verify destination project has required toolkits
* Ensure necessary models are available
* Check you have appropriate permissions
* Expand entity cards using **Show details** to review configuration before importing
* Verify model remapping is correct for your destination project
* Reconfigure toolkit credentials
* Test imported agents/pipelines
* Verify nested dependencies work correctly
* Import related entities together
* Maintain consistent naming conventions
* Group by functionality or team
***
## Troubleshooting
**Cause:** The model specified in the import file doesn't exist in destination project
**Solution:**
* Select an alternative model from the dropdown
* Add the required model configuration to the project first
**Cause:** Referenced toolkit not installed in destination project
**Solution:**
* Install the missing toolkit in the destination project before importing
* Or import to a different project where the toolkit is available
**Cause:** The user does not have the `models.applications.export_import.import` permission in the destination project
**Solution:**
* Request the `models.applications.export_import.import` permission from your project administrator
* Import to a different project where you have this permission
**Cause:** The `.md` file doesn't have proper YAML frontmatter structure
**Solution:**
* Verify the file starts with `---`
* Check YAML syntax is valid
* Ensure closing `---` is present
**Possible Causes:**
* No project selected
* Missing `models.applications.export_import.import` permission in the destination project
**Solution:**
* Select a destination project from the dropdown
* Verify you have the `models.applications.export_import.import` permission in the target project
**Possible Causes:**
* Invalid YAML frontmatter
* Missing closing `---` delimiters
* Corrupted file encoding
**Solution:**
* Open file in text editor and verify format
* Ensure UTF-8 encoding
* Re-export from source if possible
**Possible Causes:**
* Referenced agent not included in ZIP
* Import UUID mismatch
* Agent imported to different project
**Solution:**
* Include all dependent agents in same import
* Verify all `.md` files are in ZIP
* Import all entities to same project
**Possible Causes:**
* Toolkit version mismatch
* Tool deprecated or renamed
* Toolkit not properly configured
**Solution:**
* Update toolkit to latest version
* Review toolkit configuration
* Select alternative tools if available
***
* **[Entity Versioning](./entity-versioning):** Learn about version management
* **[Credentials Menu](../../menus/credentials):** Configure authentication credentials for toolkits
* **[Agents Menu](../../menus/agents):** Complete agents documentation
* **[Pipelines Menu](../../menus/pipelines):** Complete pipelines documentation
* **[Toolkits Menu](../../menus/toolkits):** Complete toolkits documentation
***