> ## Documentation Index
> Fetch the complete documentation index at: https://docs.elitea.ai/llms.txt
> Use this file to discover all available pages before exploring further.
# Quick Start: Connect Toolkits
> Learn how to connect external tools and services to ELITEA through toolkits. This guide covers the most commonly used integrations: Jira, Confluence, GitHub, Fi
## What are Toolkits?
Toolkits connect ELITEA to external services, enabling you to:
* Fetch data from project management tools
* Search documentation
* Analyze code repositories
* Read design files
* Manage test cases
* Store and retrieve files
***
## Before You Begin
Requirements vary by toolkit type. Depending on the service you're connecting to, you may need:
* **Credentials**: Account credentials for the external service
* **Authentication**: API tokens, access keys, or passwords
* **Service URLs**: Base URLs for self-hosted or enterprise services
* **Service-Specific Info**: Repository names, space keys, project IDs, bucket names, etc.
* **Permissions**: Appropriate access rights in the external service
Refer to each toolkit section below for specific requirements.
***
## Jira Toolkit
Connect to Jira for issue tracking, project management, and agile workflows.
* **Jira Base URL** (e.g., `https://yourcompany.atlassian.net`)
* **Authentication** (choose one):
* **Basic Auth**: Username + API Key(server)
* **Bearer Token**: Personal Access Token(cloud)
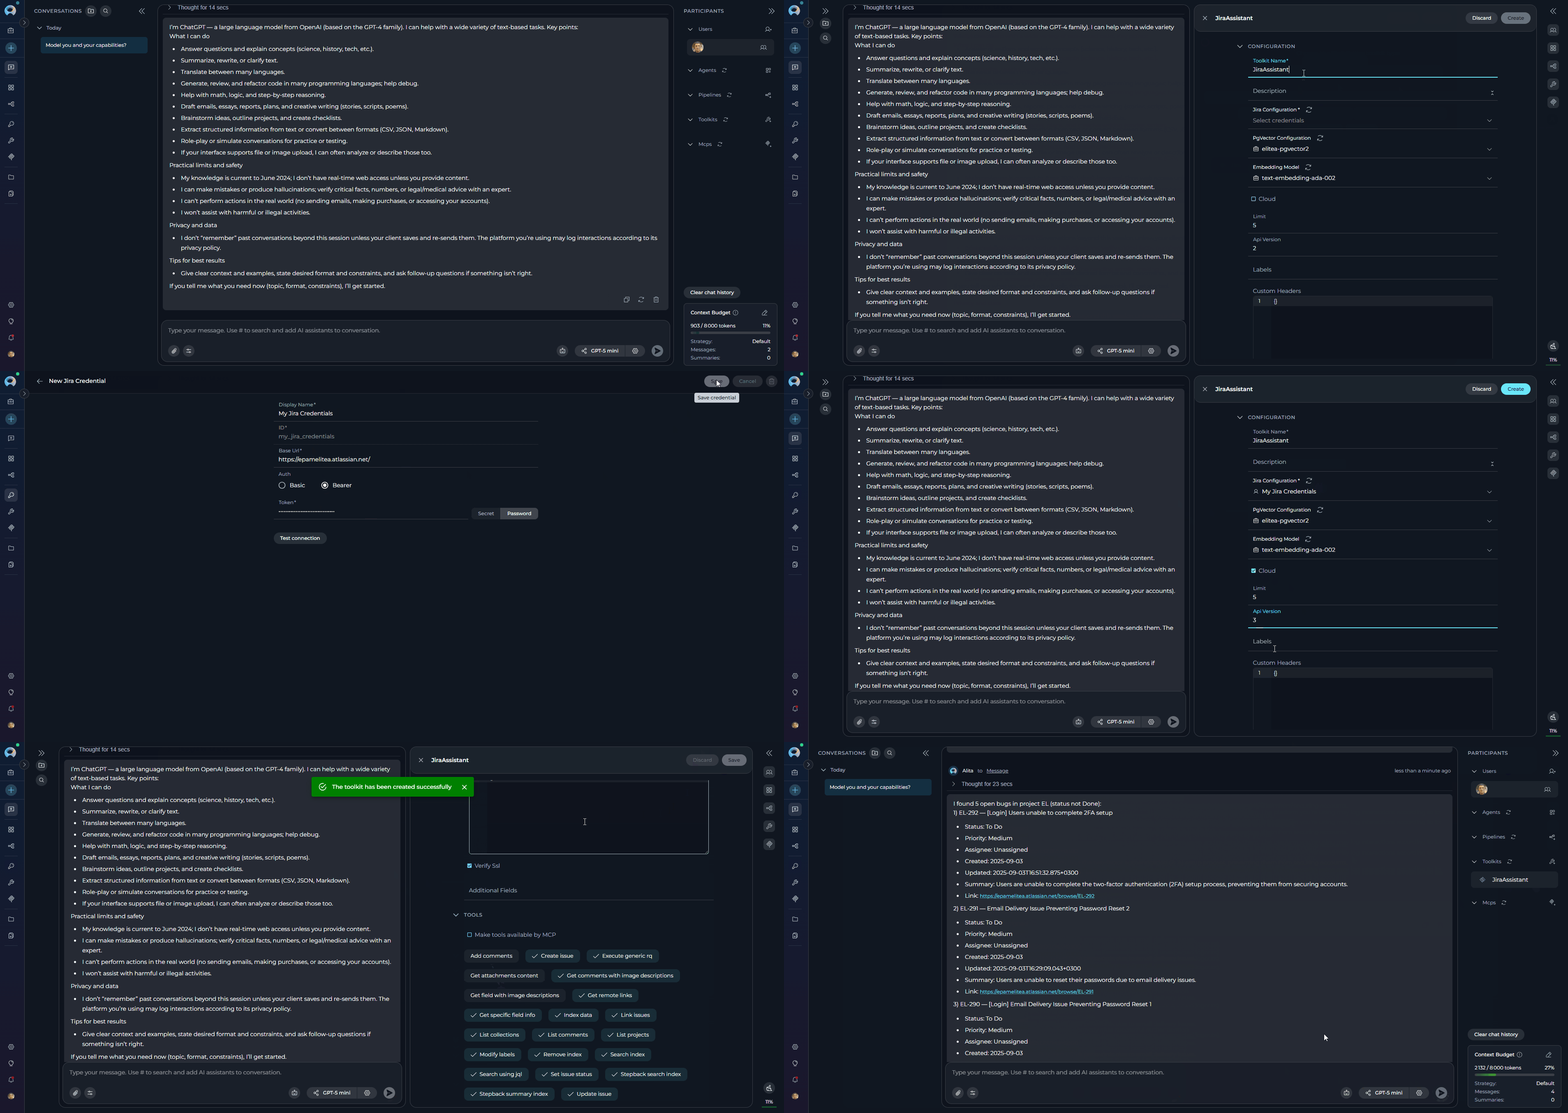
**How to Connect**
1. **Access Chat**: Click **Chat** in the left sidebar
2. **Create a Toolkit from Chat**:
* In the **PARTICIPANTS** panel on the right, find **toolkits**
* Click the **+ Add toolkit** icon
* Click **+ Create new Toolkit**
* Select **Jira** as the toolkit type
* Enter a name (e.g., `MyJiraToolkit`)
3. **Create Credentials**:
* In the **CONFIGURATION** section, click the credentials dropdown
* Select **+ New credentials** (or **+ New private credentials**)
* You'll be redirected to the **Create Credentials** page
* Select **Jira** as the credential type
* Give it a name like `My Jira Credentials`
* Fill in:
* **Base URL**: Your Jira instance URL
* **For Basic Auth**: Username + API Key
* **For Bearer Token**: Token only
* Click **Save**
4. **Complete Toolkit Configuration**:
* Return to the toolkit canvas (or refresh if needed)
* Click the **refresh icon** next to the Jira configuration field
* Select your newly created credential from the dropdown
* Select an **Embedding Model** (e.g., `text-embedding-3-small`)
* Choose a **Vector Store** (PostgreSQL with pgvector extension)
* Enable the tools you need (e.g., Search using JQL, Create issue)
* Click **Create**
* Close the Canvas interface
5. **Use it**:
* Type: `Find all open bugs in project ABC`
* The toolkit will search Jira and return results
 * **Search using JQL**: Query issues with Jira Query Language
* **Create issue**: Create new Jira issues
* **Update issue**: Modify existing issues
* **Set issue status**: Change issue workflow status
* **Add comments**: Add comments to issues
* **Get comments with image descriptions**: Retrieve comments including AI-generated image descriptions
* **Link issues**: Create relationships between issues
* **Modify labels**: Add or remove issue labels
* **Get attachments content**: Download and access file attachments
* **List projects**: View available Jira projects
* **Search index**: Perform semantic search using vector embeddings (requires indexing)
***
## Confluence Toolkit
Connect to Confluence for documentation search and knowledge base access.
* **Confluence Base URL** (e.g., `https://yourcompany.atlassian.net/wiki`)
* **Authentication** (choose one):
* **Basic Auth**: Username + API Key(server)
* **Bearer Token**: Personal Access Token(cloud)
**How to Connect**
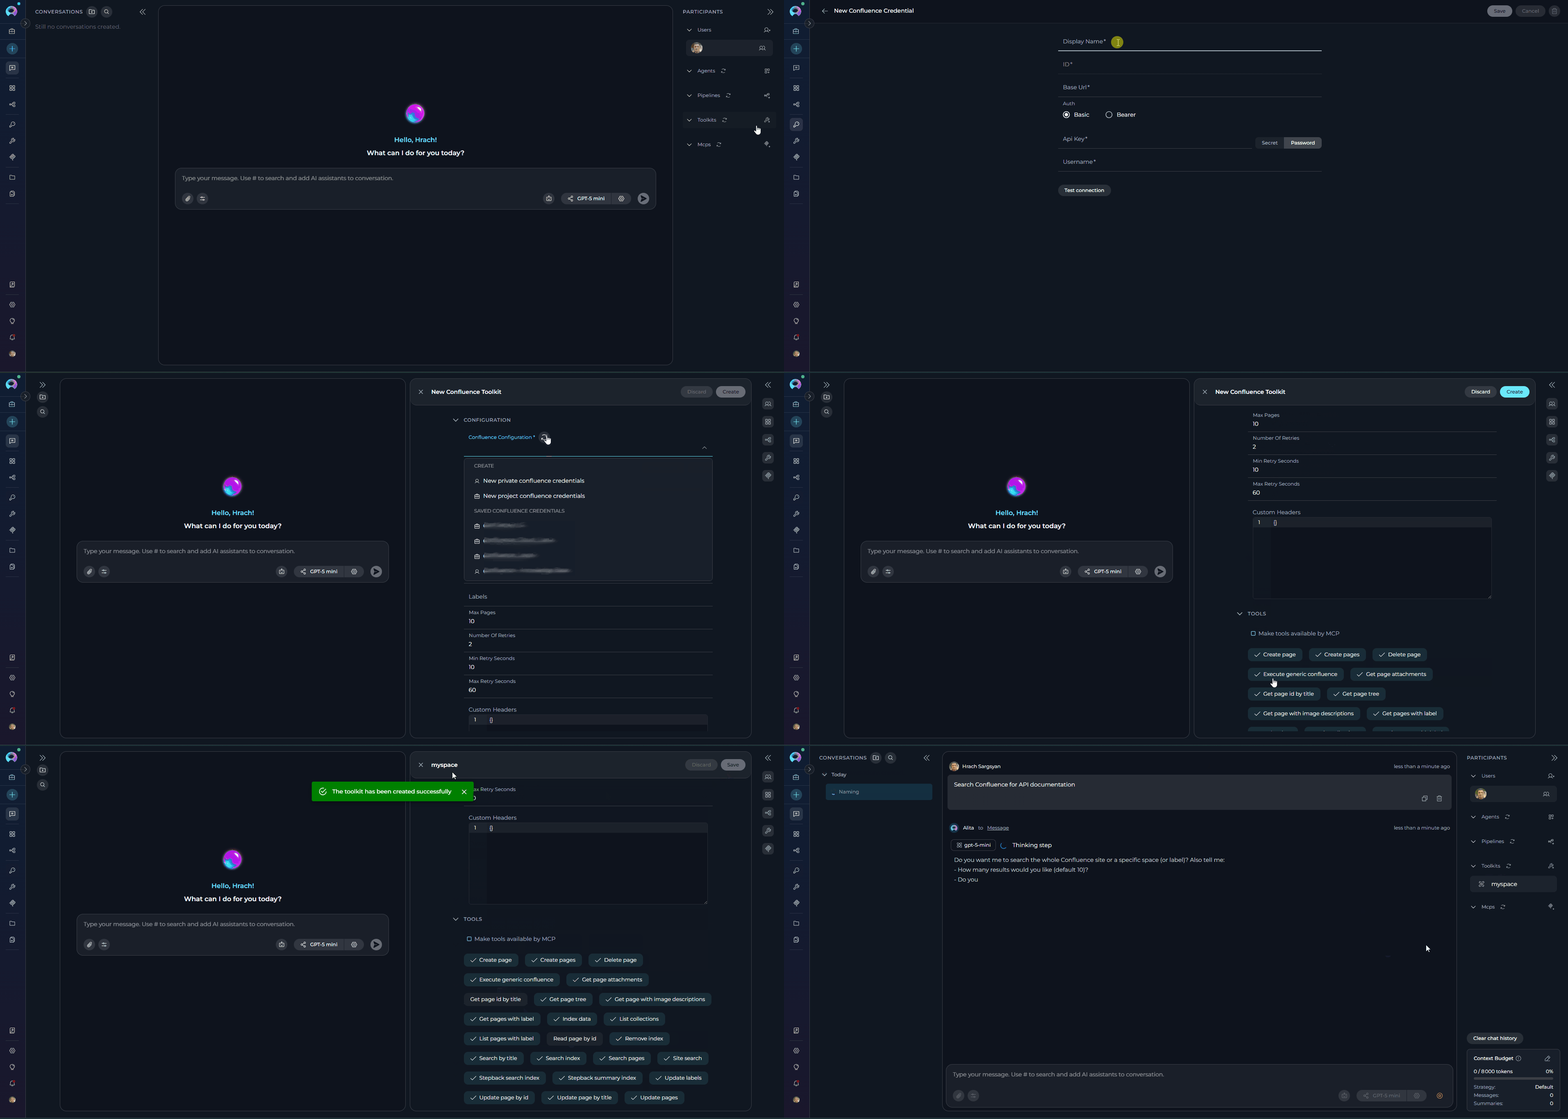
1. **Access Chat**: Click **Chat** in the left sidebar
2. **Create a Toolkit from Chat**:
* In **PARTICIPANTS** panel, click **+ Add toolkit**
* Click **+ Create new Toolkit**
* Select **Confluence**
3. **Create Credentials**:
* Click credentials dropdown → **+ New credentials**
* Select **Confluence** as credential type
* Name it (e.g., `My Confluence Credentials`)
* Fill in:
* **Base URL**: Your Confluence instance URL
* **For Basic Auth**: Username + API Key
* **For Bearer Token**: Token only
* Click **Save**
4. **Complete Toolkit Configuration**:
* Return to toolkit canvas
* Refresh and select your credential
* Specify a Confluence space to limit searches-the toolkit will be automatically named with this space name
* Select an **Embedding Model** (e.g., `text-embedding-3-small`)
* Choose a **Vector Store** (PostgreSQL with pgvector extension)
* Enable the tools you need (e.g., Read page by id, Update page by title)
* Click **Create**
5. **Use it**:
* Type: `Search Confluence for API documentation`
* The toolkit will search and return relevant pages
* **Search using JQL**: Query issues with Jira Query Language
* **Create issue**: Create new Jira issues
* **Update issue**: Modify existing issues
* **Set issue status**: Change issue workflow status
* **Add comments**: Add comments to issues
* **Get comments with image descriptions**: Retrieve comments including AI-generated image descriptions
* **Link issues**: Create relationships between issues
* **Modify labels**: Add or remove issue labels
* **Get attachments content**: Download and access file attachments
* **List projects**: View available Jira projects
* **Search index**: Perform semantic search using vector embeddings (requires indexing)
***
## Confluence Toolkit
Connect to Confluence for documentation search and knowledge base access.
* **Confluence Base URL** (e.g., `https://yourcompany.atlassian.net/wiki`)
* **Authentication** (choose one):
* **Basic Auth**: Username + API Key(server)
* **Bearer Token**: Personal Access Token(cloud)
**How to Connect**
1. **Access Chat**: Click **Chat** in the left sidebar
2. **Create a Toolkit from Chat**:
* In **PARTICIPANTS** panel, click **+ Add toolkit**
* Click **+ Create new Toolkit**
* Select **Confluence**
3. **Create Credentials**:
* Click credentials dropdown → **+ New credentials**
* Select **Confluence** as credential type
* Name it (e.g., `My Confluence Credentials`)
* Fill in:
* **Base URL**: Your Confluence instance URL
* **For Basic Auth**: Username + API Key
* **For Bearer Token**: Token only
* Click **Save**
4. **Complete Toolkit Configuration**:
* Return to toolkit canvas
* Refresh and select your credential
* Specify a Confluence space to limit searches-the toolkit will be automatically named with this space name
* Select an **Embedding Model** (e.g., `text-embedding-3-small`)
* Choose a **Vector Store** (PostgreSQL with pgvector extension)
* Enable the tools you need (e.g., Read page by id, Update page by title)
* Click **Create**
5. **Use it**:
* Type: `Search Confluence for API documentation`
* The toolkit will search and return relevant pages
 * **Search pages**: Find pages across Confluence
* **Site search**: Perform full-text search across all content
* **Read page by id**: Retrieve specific page content
* **Get page with image descriptions**: Get page content including AI-generated image descriptions
* **Create pages**: Create new Confluence pages
* **Update page by id**: Modify existing pages by ID
* **Update page by title**: Modify existing pages by title
* **Get page attachments**: Access page attachments
* **Get pages with label**: Retrieve pages by label
* **Search by title**: Find pages by title
* **Search index**: Perform semantic search using vector embeddings (requires indexing)
***
## GitHub Toolkit
Connect to GitHub repositories for code analysis, issue management, and pull request operations.
* **Base URL** (default: `https://api.github.com`, or your GitHub Enterprise URL)
* **Authentication** (choose one):
* **Access Token**: Personal Access Token (recommended)
* **Username + Password**: Basic authentication
* **App Private Key**: GitHub App ID + Private Key
* **Anonymous**: No authentication (public repositories only)
**How to Connect**
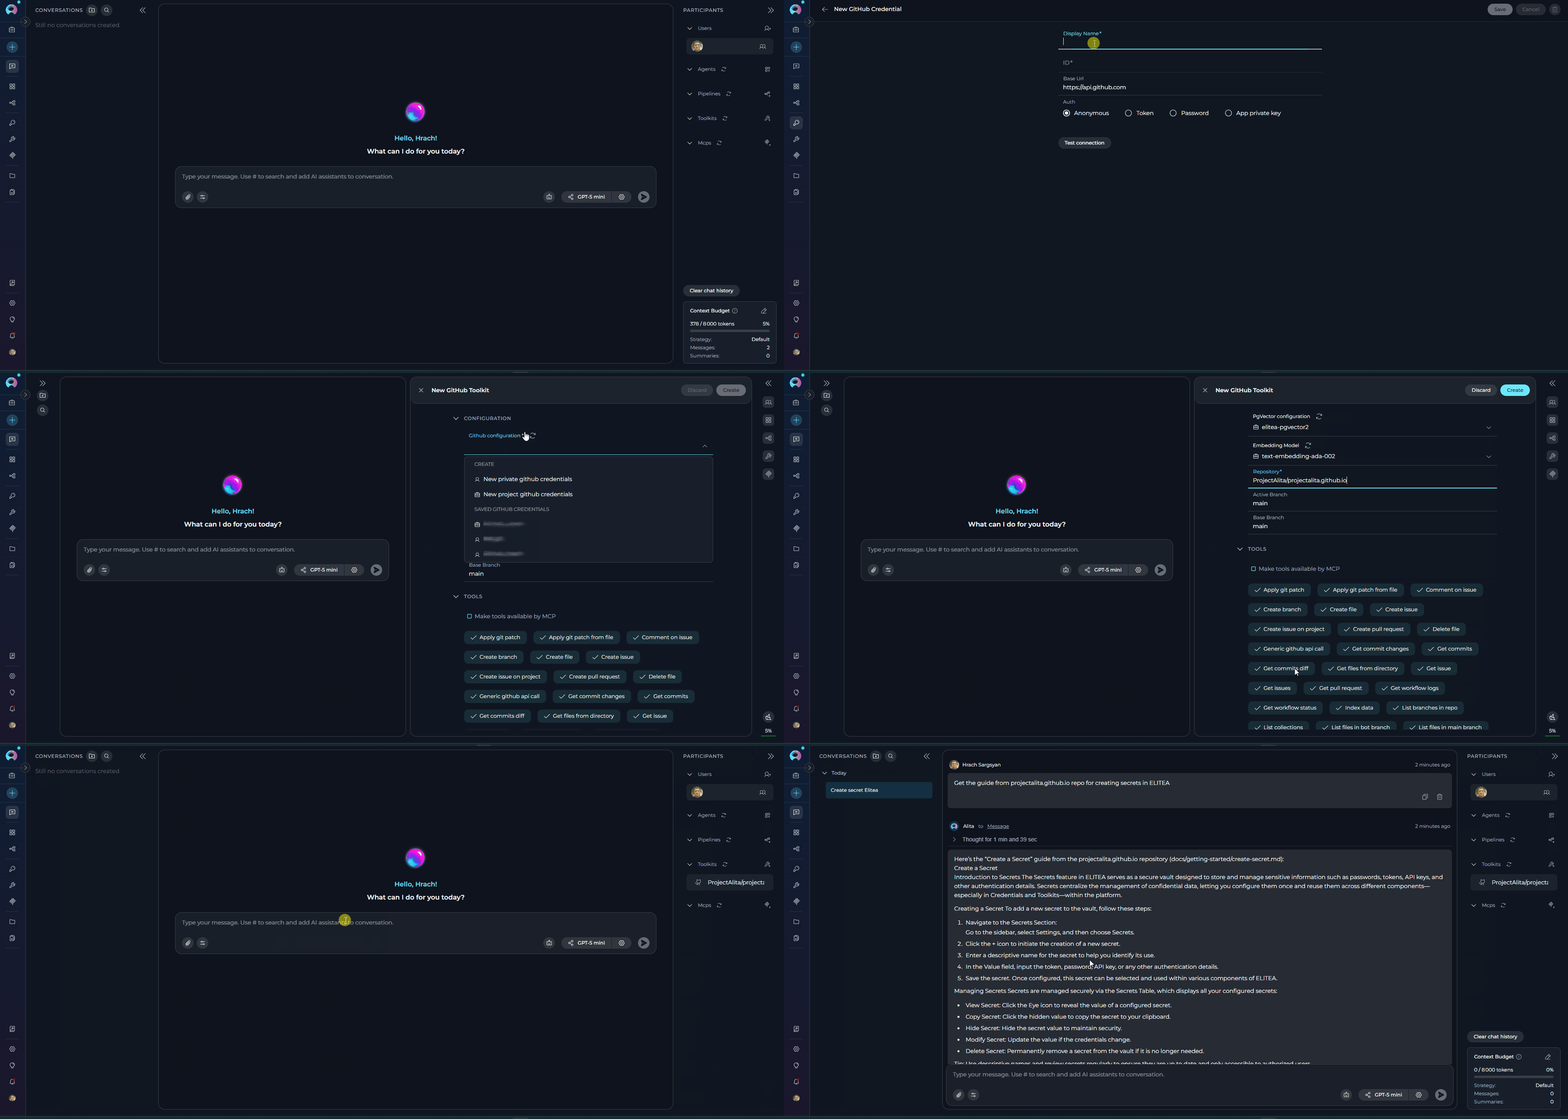
1. **Access Chat**: Click **Chat** in the left sidebar
2. **Create a Toolkit from Chat**:
* In **PARTICIPANTS** panel, click **+ Add toolkit**
* Click **+ Create new Toolkit**
* Select **GitHub**
3. **Create Credentials** (optional for public repos):
* Click credentials dropdown → **+ New credentials**
* Select **GitHub** as credential type
* Name it (e.g., `My GitHub Credentials`)
* Fill in (choose one method):
* **Token**: Access Token only
* **Password**: Username + Password
* **App Private Key**: App ID + Private Key
* Click **Save**
4. **Complete Toolkit Configuration**:
* Return to toolkit canvas
* Refresh and select your credential (or leave empty for public access)
* Configure:
* **Project**: Organization or username
* **Repository**: Repository name(e.g., `ProjectAlita/projectalita.github.io`)
* **Branch**: Default branch (e.g., `main`)
* Select an **Embedding Model** (e.g., `text-embedding-3-small`)
* Choose a **Vector Store** (PostgreSQL with pgvector extension)
* Enable the tools you need (e.g., Read file, List pull request diffs)
* Click **Create**
5. **Use it**:
* Type: `Get the guide from projectalita.github.io repo for creating secrets in ELITEA`
* The toolkit will fetch and display the secret creation documentation
* **Search pages**: Find pages across Confluence
* **Site search**: Perform full-text search across all content
* **Read page by id**: Retrieve specific page content
* **Get page with image descriptions**: Get page content including AI-generated image descriptions
* **Create pages**: Create new Confluence pages
* **Update page by id**: Modify existing pages by ID
* **Update page by title**: Modify existing pages by title
* **Get page attachments**: Access page attachments
* **Get pages with label**: Retrieve pages by label
* **Search by title**: Find pages by title
* **Search index**: Perform semantic search using vector embeddings (requires indexing)
***
## GitHub Toolkit
Connect to GitHub repositories for code analysis, issue management, and pull request operations.
* **Base URL** (default: `https://api.github.com`, or your GitHub Enterprise URL)
* **Authentication** (choose one):
* **Access Token**: Personal Access Token (recommended)
* **Username + Password**: Basic authentication
* **App Private Key**: GitHub App ID + Private Key
* **Anonymous**: No authentication (public repositories only)
**How to Connect**
1. **Access Chat**: Click **Chat** in the left sidebar
2. **Create a Toolkit from Chat**:
* In **PARTICIPANTS** panel, click **+ Add toolkit**
* Click **+ Create new Toolkit**
* Select **GitHub**
3. **Create Credentials** (optional for public repos):
* Click credentials dropdown → **+ New credentials**
* Select **GitHub** as credential type
* Name it (e.g., `My GitHub Credentials`)
* Fill in (choose one method):
* **Token**: Access Token only
* **Password**: Username + Password
* **App Private Key**: App ID + Private Key
* Click **Save**
4. **Complete Toolkit Configuration**:
* Return to toolkit canvas
* Refresh and select your credential (or leave empty for public access)
* Configure:
* **Project**: Organization or username
* **Repository**: Repository name(e.g., `ProjectAlita/projectalita.github.io`)
* **Branch**: Default branch (e.g., `main`)
* Select an **Embedding Model** (e.g., `text-embedding-3-small`)
* Choose a **Vector Store** (PostgreSQL with pgvector extension)
* Enable the tools you need (e.g., Read file, List pull request diffs)
* Click **Create**
5. **Use it**:
* Type: `Get the guide from projectalita.github.io repo for creating secrets in ELITEA`
* The toolkit will fetch and display the secret creation documentation
 * **Read file**: Read files from repository
* **List files in bot branch**: Browse repository contents
* **Create issue**: Create new GitHub issues
* **Update issue**: Modify existing issues
* **Comment on issue**: Add comments to issues
* **Get issue**: Retrieve issue details
* **List open pull requests**: View open PRs
* **List pull request diffs**: View changes in PRs
* **Get commits**: View commit history
* **Create branch**: Create new branches
* **Update file**: Modify repository files
* **Search index**: Perform semantic search using vector embeddings (requires indexing)
***
## Figma Toolkit
Connect to Figma for design file access and collaboration.
* **Figma Token**: Personal Access Token from Figma account settings
**How to Connect**
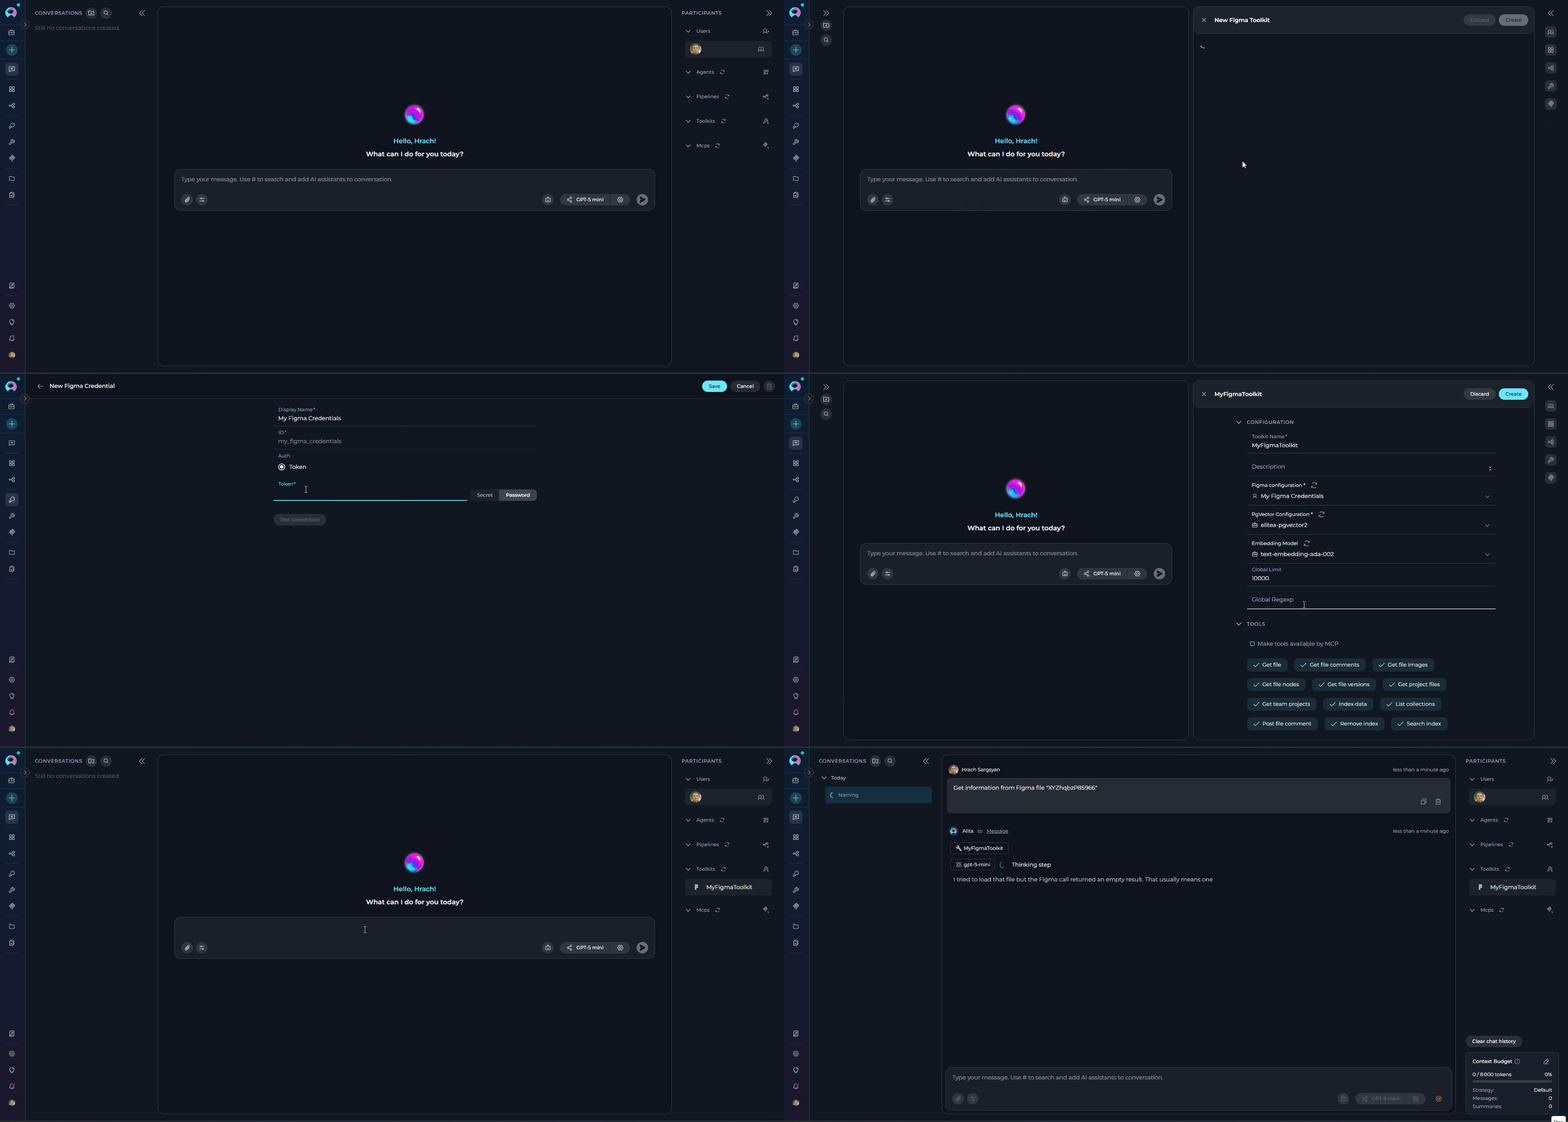
1. **Access Chat**: Click **Chat** in the left sidebar
2. **Create a Toolkit from Chat**:
* In **PARTICIPANTS** panel, click **+ Add toolkit**
* Click **+ Create new Toolkit**
* Select **Figma**
* Enter a name (e.g., `MyFigmaToolkit`)
3. **Create Credentials**:
* Click credentials dropdown → **+ New credentials**
* Select **Figma** as credential type
* Name it (e.g., `My Figma Credentials`)
* Fill in:
* **Token**: Your Figma Personal Access Token
* Click **Save**
4. **Complete Toolkit Configuration**:
* Return to toolkit canvas
* Refresh and select your credential
* Select an **Embedding Model** (e.g., `text-embedding-3-small`)
* Choose a **Vector Store** (PostgreSQL with pgvector extension)
* Enable tools for accessing Figma files(e.g. Get file, Get project files)
* Click **Create**
5. **Use it**:
* Type: `Get information from Figma file XYZ`
* The toolkit will access Figma and retrieve file data
* **Read file**: Read files from repository
* **List files in bot branch**: Browse repository contents
* **Create issue**: Create new GitHub issues
* **Update issue**: Modify existing issues
* **Comment on issue**: Add comments to issues
* **Get issue**: Retrieve issue details
* **List open pull requests**: View open PRs
* **List pull request diffs**: View changes in PRs
* **Get commits**: View commit history
* **Create branch**: Create new branches
* **Update file**: Modify repository files
* **Search index**: Perform semantic search using vector embeddings (requires indexing)
***
## Figma Toolkit
Connect to Figma for design file access and collaboration.
* **Figma Token**: Personal Access Token from Figma account settings
**How to Connect**
1. **Access Chat**: Click **Chat** in the left sidebar
2. **Create a Toolkit from Chat**:
* In **PARTICIPANTS** panel, click **+ Add toolkit**
* Click **+ Create new Toolkit**
* Select **Figma**
* Enter a name (e.g., `MyFigmaToolkit`)
3. **Create Credentials**:
* Click credentials dropdown → **+ New credentials**
* Select **Figma** as credential type
* Name it (e.g., `My Figma Credentials`)
* Fill in:
* **Token**: Your Figma Personal Access Token
* Click **Save**
4. **Complete Toolkit Configuration**:
* Return to toolkit canvas
* Refresh and select your credential
* Select an **Embedding Model** (e.g., `text-embedding-3-small`)
* Choose a **Vector Store** (PostgreSQL with pgvector extension)
* Enable tools for accessing Figma files(e.g. Get file, Get project files)
* Click **Create**
5. **Use it**:
* Type: `Get information from Figma file XYZ`
* The toolkit will access Figma and retrieve file data
 1) Go to Figma account settings
2) Navigate to **Personal Access Tokens**
3) Click **Generate new token**
4) Copy the token immediately (it won't be shown again)
* **Get file**: Retrieve Figma file information
* **Get file images**: Extract images from Figma files
* **Get file nodes**: Access specific nodes within files
* **Get file comments**: View comments on designs
* **Post file comment**: Add comments to Figma files
* **Get file versions**: View version history
* **Get project files**: List files in a project
* **Get team projects**: View team projects
* **Search index**: Perform semantic search using vector embeddings (requires indexing)
***
## TestRail Toolkit
Connect to TestRail for test case management and test execution tracking.
* **TestRail URL** (e.g., `https://yourcompany.testrail.io`)
* **Email**: Your TestRail account email
* **Password**: Your TestRail password or API key
**How to Connect**
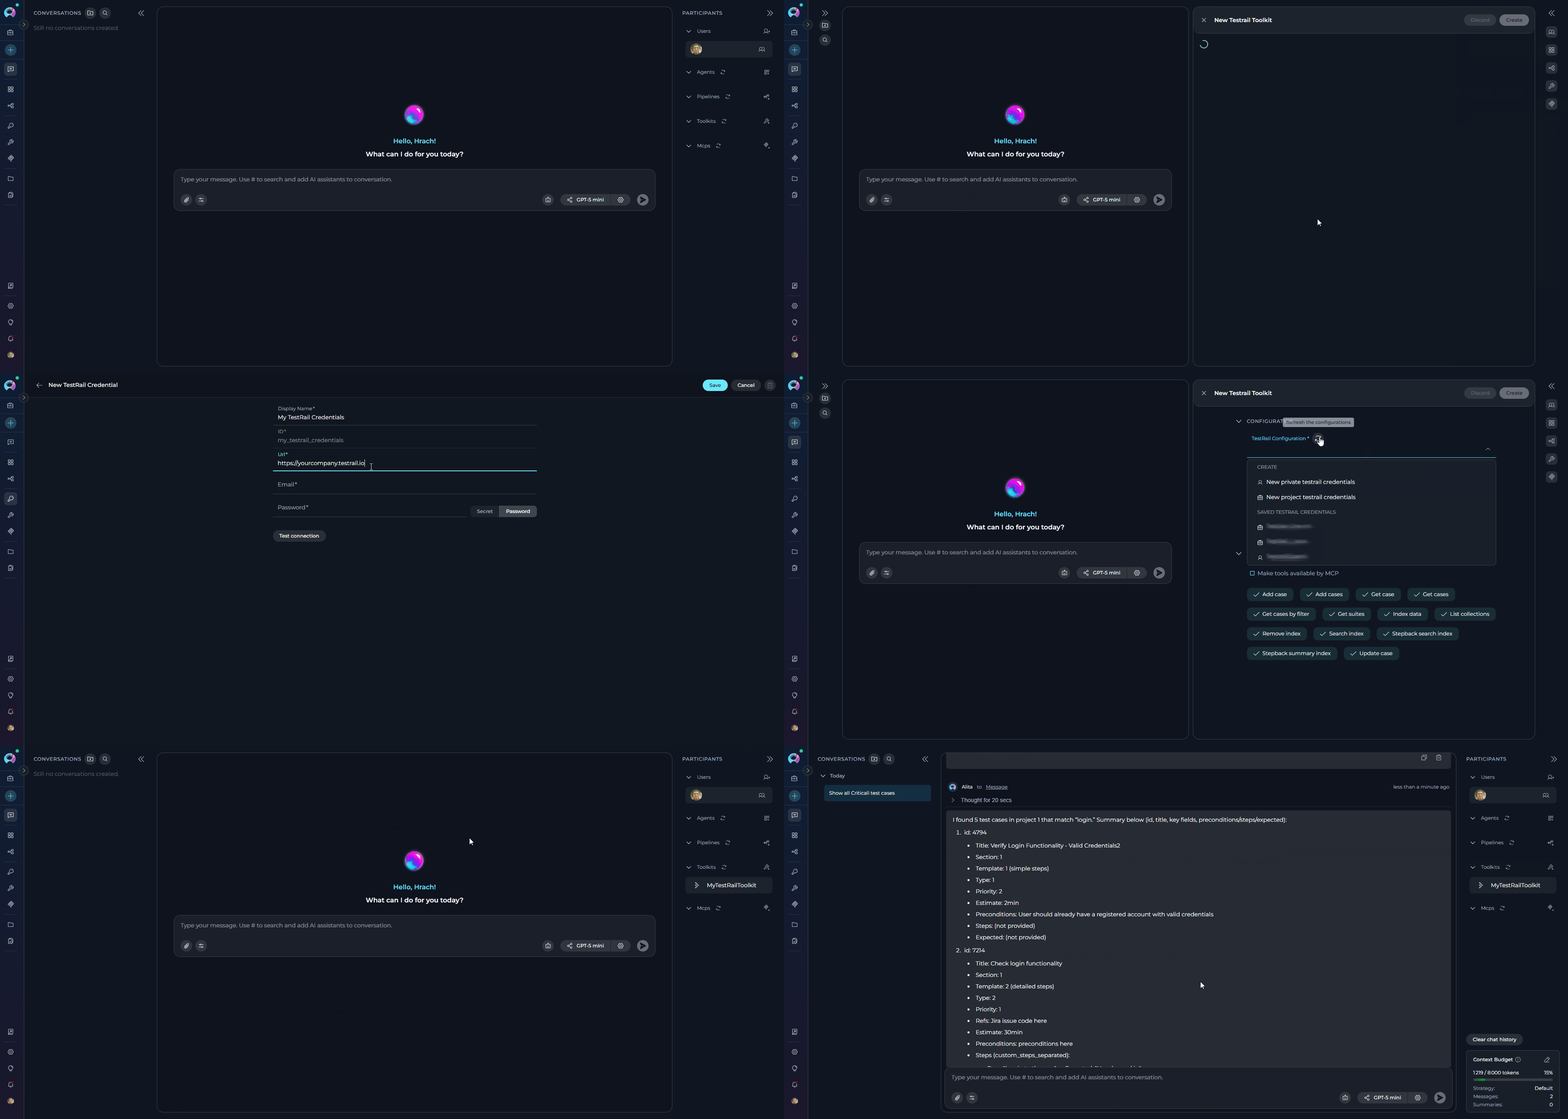
1. **Access Chat**: Click **Chat** in the left sidebar
2. **Create a Toolkit from Chat**:
* In **PARTICIPANTS** panel, click **+ Add toolkit**
* Click **+ Create new Toolkit**
* Select **TestRail**
3. **Create Credentials**:
* Click credentials dropdown → **+ New credentials**
* Select **TestRail** as credential type
* Name it (e.g., `My TestRail Credentials`)
* Fill in:
* **URL**: Your TestRail instance URL (e.g., `https://yourcompany.testrail.io`)
* **Email**: Your account email (e.g., `user@company.com`)
* **Password**: Your password or API key
* Click **Save**
4. **Complete Toolkit Configuration**:
* Return to toolkit canvas
* Refresh and select your credential
* Enter a name (e.g., `MyTestRailToolkit`)
* Select an **Embedding Model** (e.g., `text-embedding-3-small`)
* Choose a **Vector Store** (PostgreSQL with pgvector extension)
* Enable the tools you need (e.g., Get cases, Add case)
* Click **Create**
5. **Use it**:
* Type: `Show me all test cases related to log-in functionality from project with id 1`
* The toolkit will fetch and display test case information
1) Go to Figma account settings
2) Navigate to **Personal Access Tokens**
3) Click **Generate new token**
4) Copy the token immediately (it won't be shown again)
* **Get file**: Retrieve Figma file information
* **Get file images**: Extract images from Figma files
* **Get file nodes**: Access specific nodes within files
* **Get file comments**: View comments on designs
* **Post file comment**: Add comments to Figma files
* **Get file versions**: View version history
* **Get project files**: List files in a project
* **Get team projects**: View team projects
* **Search index**: Perform semantic search using vector embeddings (requires indexing)
***
## TestRail Toolkit
Connect to TestRail for test case management and test execution tracking.
* **TestRail URL** (e.g., `https://yourcompany.testrail.io`)
* **Email**: Your TestRail account email
* **Password**: Your TestRail password or API key
**How to Connect**
1. **Access Chat**: Click **Chat** in the left sidebar
2. **Create a Toolkit from Chat**:
* In **PARTICIPANTS** panel, click **+ Add toolkit**
* Click **+ Create new Toolkit**
* Select **TestRail**
3. **Create Credentials**:
* Click credentials dropdown → **+ New credentials**
* Select **TestRail** as credential type
* Name it (e.g., `My TestRail Credentials`)
* Fill in:
* **URL**: Your TestRail instance URL (e.g., `https://yourcompany.testrail.io`)
* **Email**: Your account email (e.g., `user@company.com`)
* **Password**: Your password or API key
* Click **Save**
4. **Complete Toolkit Configuration**:
* Return to toolkit canvas
* Refresh and select your credential
* Enter a name (e.g., `MyTestRailToolkit`)
* Select an **Embedding Model** (e.g., `text-embedding-3-small`)
* Choose a **Vector Store** (PostgreSQL with pgvector extension)
* Enable the tools you need (e.g., Get cases, Add case)
* Click **Create**
5. **Use it**:
* Type: `Show me all test cases related to log-in functionality from project with id 1`
* The toolkit will fetch and display test case information
 * **Get cases**: Retrieve test case information
* **Get case**: Get specific test case details
* **Get cases by filter**: Filter and search test cases
* **Add case**: Create new test case
* **Add cases**: Create multiple test cases
* **Update case**: Modify existing test cases
* **Get suites**: List test suites
* **Search index**: Perform semantic search using vector embeddings (requires indexing)
***
## Artifact Toolkit
Create storage buckets for file attachments in chat conversations.
* **Bucket Name**: A unique identifier (lowercase letters, numbers, hyphens only)
The Artifact Toolkit is essential for:
* Enabling file attachments in chat
* Storing uploaded images and documents
* Managing conversation artifacts
* File retention and organization
**How to Connect**
**Manual Setup from Toolkit Canvas:**
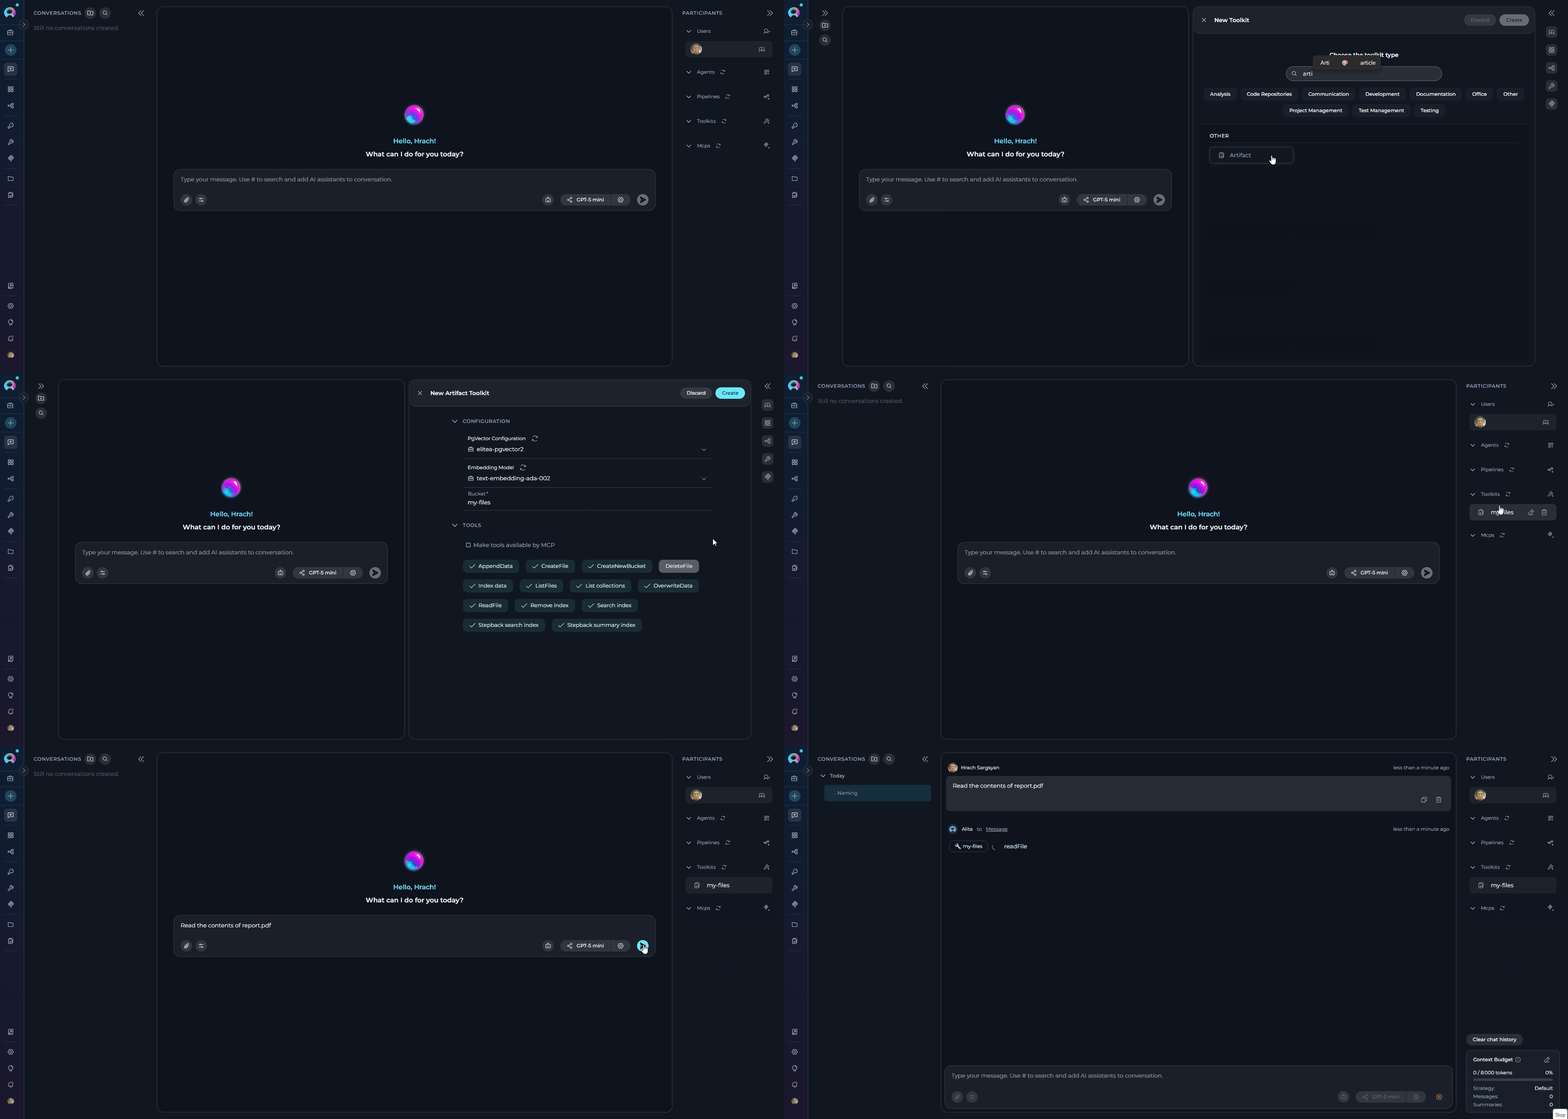
1. **Access Chat**: Click **Chat** in the left sidebar
2. **Create a Toolkit**:
* In **PARTICIPANTS** panel, click **+ Add toolkit**
* Click **+ Create new Toolkit**
* Select **Artifact**
* Enter a name that matches your bucket name
3. **Configure Bucket**:
* **Bucket**: Enter a unique name (lowercase, alphanumeric, hyphens)
* ✔️ Valid: `my-files`, `project-2024`, `team-assets`
* ✘ Invalid: `My Files`, `project_2024`, `Team@Assets`
* Select an **Embedding Model** (e.g., `text-embedding-3-small`)
* Choose a **Vector Store** (PostgreSQL with pgvector extension)
* Enable the tools you need (e.g., CreateFile, ListFiles)
* Click **Create**
4. **Use it**:
* Files uploaded via chat are stored in this bucket
* Agents can read, create, and manage files programmatically
* Example: `List all files in my artifact bucket` or `Read the contents of report.pdf`
* **Get cases**: Retrieve test case information
* **Get case**: Get specific test case details
* **Get cases by filter**: Filter and search test cases
* **Add case**: Create new test case
* **Add cases**: Create multiple test cases
* **Update case**: Modify existing test cases
* **Get suites**: List test suites
* **Search index**: Perform semantic search using vector embeddings (requires indexing)
***
## Artifact Toolkit
Create storage buckets for file attachments in chat conversations.
* **Bucket Name**: A unique identifier (lowercase letters, numbers, hyphens only)
The Artifact Toolkit is essential for:
* Enabling file attachments in chat
* Storing uploaded images and documents
* Managing conversation artifacts
* File retention and organization
**How to Connect**
**Manual Setup from Toolkit Canvas:**
1. **Access Chat**: Click **Chat** in the left sidebar
2. **Create a Toolkit**:
* In **PARTICIPANTS** panel, click **+ Add toolkit**
* Click **+ Create new Toolkit**
* Select **Artifact**
* Enter a name that matches your bucket name
3. **Configure Bucket**:
* **Bucket**: Enter a unique name (lowercase, alphanumeric, hyphens)
* ✔️ Valid: `my-files`, `project-2024`, `team-assets`
* ✘ Invalid: `My Files`, `project_2024`, `Team@Assets`
* Select an **Embedding Model** (e.g., `text-embedding-3-small`)
* Choose a **Vector Store** (PostgreSQL with pgvector extension)
* Enable the tools you need (e.g., CreateFile, ListFiles)
* Click **Create**
4. **Use it**:
* Files uploaded via chat are stored in this bucket
* Agents can read, create, and manage files programmatically
* Example: `List all files in my artifact bucket` or `Read the contents of report.pdf`
 * **CreateFile**: Write new files to bucket
* **ReadFile**: Read file contents
* **ListFiles**: Browse bucket contents
* **DeleteFile**: Remove files
* **AppendData**: Add data to existing files
* **OverwriteData**: Replace file contents
* **CreateNewBucket**: Create additional storage buckets
* **Search index**: Perform semantic search using vector embeddings (requires indexing)
The easiest way to create an Artifact Toolkit is directly from chat when attaching files. See **[Send an Attachment](./chat-quick-start#step-4-send-an-attachment)**.
***
## Troubleshooting
**Authentication Errors (401/403)**
* Verify credentials are correct
* Check API token hasn't expired
* Ensure user has required permissions
* For Atlassian tools, verify correct authentication method
**Connection Issues**
* Verify base URL is correct\*\* (must include `http://` or `https://`)
* Check firewall/proxy settings
* Test connection from browser first
* Ensure service is accessible from your network
**Toolkit Not Appearing**
* Click refresh icon next to credential selector
* Verify toolkit was created successfully
* Check project permissions
* Reload the page
**Tools Return No Results**
* Check the "Limit" field in toolkit configuration
* Verify search parameters are correct
* Ensure you have access to the requested data
* Check service-specific query syntax (e.g., JQL for Jira)
- **Use private credentials** for personal API tokens to keep them secure
- **Use secrets** to securely store sensitive data like API keys and
- **Create separate toolkits** for different projects or contexts
- **Test connections** using the "Test Connection" button in credentials
- **Start with read-only tools** before enabling create/update operations
- **Use descriptive names** for toolkits and credentials to stay organized
***
* **[Toolkits Menu](../menus/toolkits)**: Manage and view all your toolkits
* **[Credential Configuration Guide](../how-tos/credentials-toolkits/how-to-use-credentials)**: Advanced configuration options
* **[AI Configuration](../menus/settings/ai-configuration)**: Configure PgVector, embedding models, and LLM settings
* **[Chat Menu](../menus/chat)**: Explore all chat features in detail
* **[Create Secrets](./create-secret)**: Securely store sensitive data
***
* **CreateFile**: Write new files to bucket
* **ReadFile**: Read file contents
* **ListFiles**: Browse bucket contents
* **DeleteFile**: Remove files
* **AppendData**: Add data to existing files
* **OverwriteData**: Replace file contents
* **CreateNewBucket**: Create additional storage buckets
* **Search index**: Perform semantic search using vector embeddings (requires indexing)
The easiest way to create an Artifact Toolkit is directly from chat when attaching files. See **[Send an Attachment](./chat-quick-start#step-4-send-an-attachment)**.
***
## Troubleshooting
**Authentication Errors (401/403)**
* Verify credentials are correct
* Check API token hasn't expired
* Ensure user has required permissions
* For Atlassian tools, verify correct authentication method
**Connection Issues**
* Verify base URL is correct\*\* (must include `http://` or `https://`)
* Check firewall/proxy settings
* Test connection from browser first
* Ensure service is accessible from your network
**Toolkit Not Appearing**
* Click refresh icon next to credential selector
* Verify toolkit was created successfully
* Check project permissions
* Reload the page
**Tools Return No Results**
* Check the "Limit" field in toolkit configuration
* Verify search parameters are correct
* Ensure you have access to the requested data
* Check service-specific query syntax (e.g., JQL for Jira)
- **Use private credentials** for personal API tokens to keep them secure
- **Use secrets** to securely store sensitive data like API keys and
- **Create separate toolkits** for different projects or contexts
- **Test connections** using the "Test Connection" button in credentials
- **Start with read-only tools** before enabling create/update operations
- **Use descriptive names** for toolkits and credentials to stay organized
***
* **[Toolkits Menu](../menus/toolkits)**: Manage and view all your toolkits
* **[Credential Configuration Guide](../how-tos/credentials-toolkits/how-to-use-credentials)**: Advanced configuration options
* **[AI Configuration](../menus/settings/ai-configuration)**: Configure PgVector, embedding models, and LLM settings
* **[Chat Menu](../menus/chat)**: Explore all chat features in detail
* **[Create Secrets](./create-secret)**: Securely store sensitive data
***