> ## Documentation Index
> Fetch the complete documentation index at: https://docs.elitea.ai/llms.txt
> Use this file to discover all available pages before exploring further.
# Quick Start
> Get started with ELITEA by sending your first chat message. This hands-on guide will walk you through the essentials of using Chat, the heart of the ELITEA plat
## Step 1: Open Chat
1. **Navigate to ELITEA**: Open your browser and go to your ELITEA instance (e.g., [https://next.elitea.ai/](https://next.elitea.ai/))
2. **Sign In**: Enter your account credentials.
3. **Access Chat**: Click **Chat** in the left sidebar (or you'll be redirected there automatically).
You'll see the Chat interface with three main areas:
* **Left sidebar**: Your conversations list
* **Center area**: Message history and input box
* **Right sidebar**: Participants panel
***
## Step 2: Send Your First Message
1. **Locate the message input box** at the bottom of the center area.
2. **Select an LLM Model:** Look for the **LLM model selector** at the bottom of the chat interface
3. **Type** `Hello` or `What model are you and what are your capabilities?`
4. **Click the Send button** (paper airplane icon) or press **Enter**.
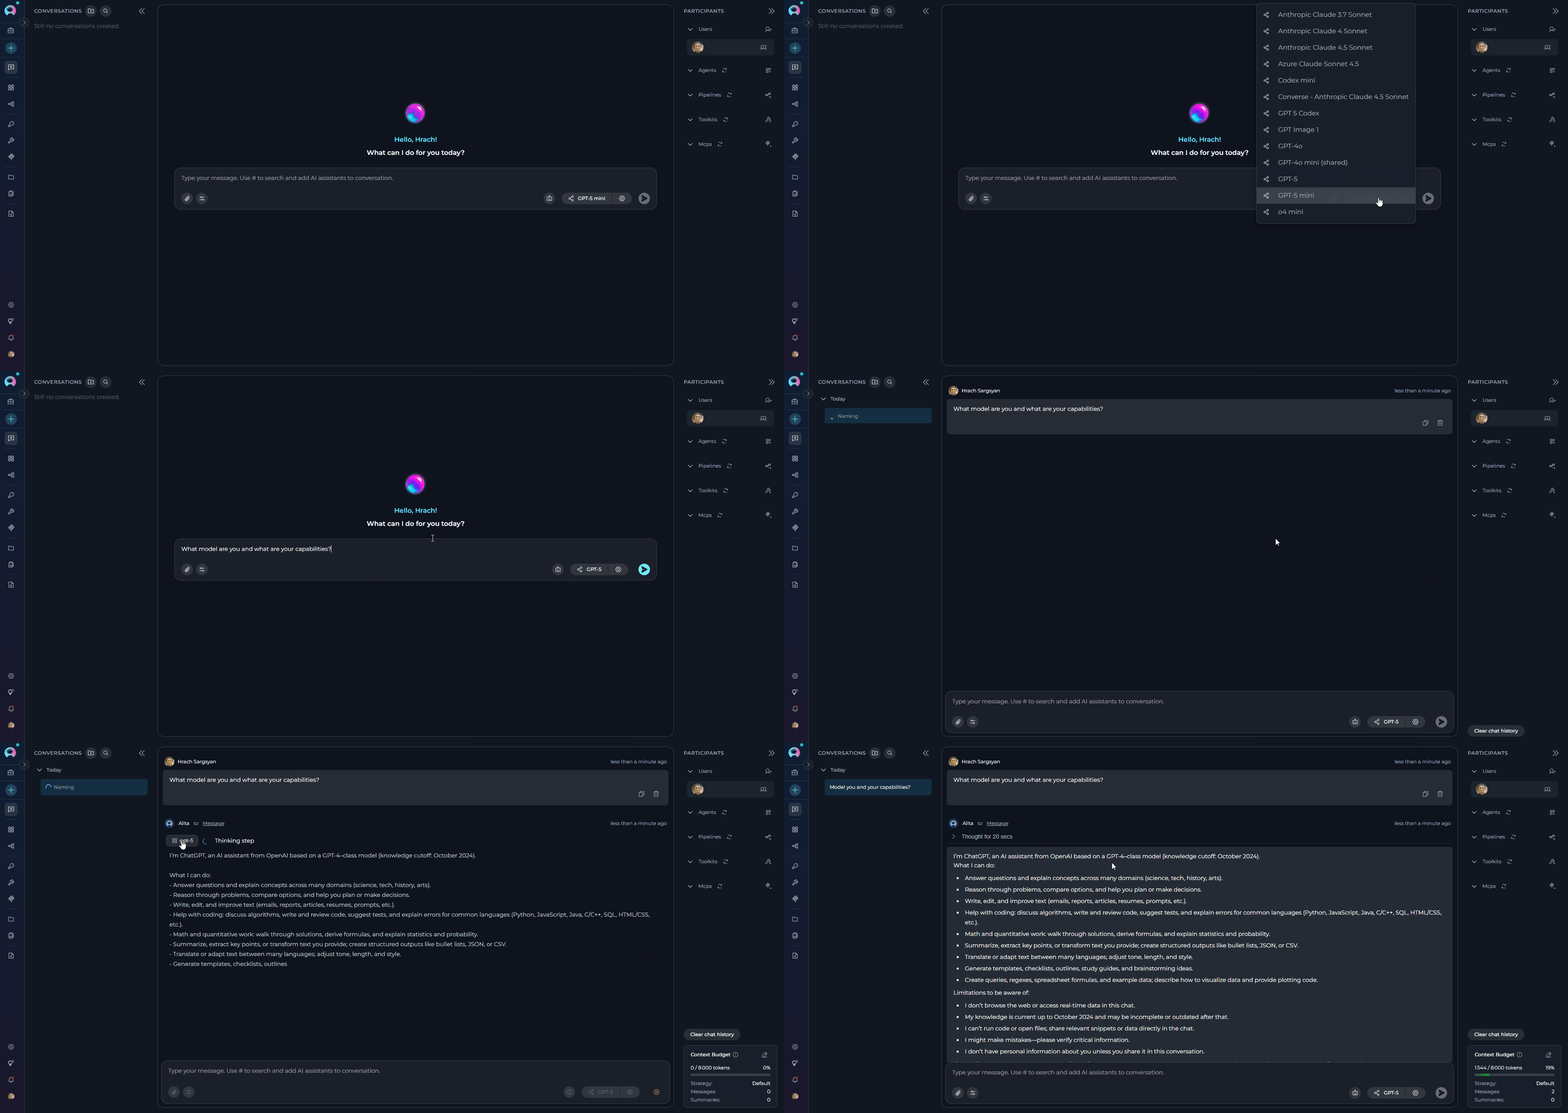 If you see a response from the AI, you've successfully sent your first message!
***
## Step 3: Connect a Toolkit (Jira)
Connecting tools enhances your chat capabilities by giving the AI access to external services like Jira, GitHub, or Confluence.
You'll need:
* Jira account credentials (base URL, username, API token)
**How to connect Jira:**
1. **Create a Toolkit from Canvas**:
* In the **PARTICIPANTS** panel on the right, find **toolkits**
* Click the **+ Add toolkit** icon
* Click **+ Create new Toolkit**
* Select **Jira** as the toolkit type
* Enter a name (e.g., `JiraAssistant`)
2. **Create a Credential** (when configuring the toolkit):
* In the **CONFIGURATION** section, click the credentials dropdown
* Select **+ New credentials** (or **+ New private credentials**)
* You'll be redirected to the **Create Credentials** page
* Select **Jira** as the credential type
* Give it a name like `My Jira Credentials`
* Fill in your Jira **Base URL**, and **Token**(Auth: Bearer) or **Api Key** and **Username** (Auth: Basic)
* Click **Save**
3. **Return to Toolkit Creation**:
* Go back to the toolkit creation canvas
* Click the **refresh icon** next to the Jira configuration field
* Your newly created credential will appear in the list
* Select it from the dropdown
4. **Complete Toolkit Configuration**:
* Select an **Embedding Model** (e.g., `text-embedding-3-small`)
* Choose a **Vector Store** (PostgreSQL with pgvector extension)
* Enable the tools you need (e.g., **Search using JQL**, **Create issue**)
* Click **Create**
* Click **X** to close the Toolkit Canvas interface
* The toolkit will appear in your **PARTICIPANTS** panel
5. **Use it**:
* Type: `Find all open bugs in project ABC`
* Click **Send**
* The toolkit will search Jira and return results
If you see a response from the AI, you've successfully sent your first message!
***
## Step 3: Connect a Toolkit (Jira)
Connecting tools enhances your chat capabilities by giving the AI access to external services like Jira, GitHub, or Confluence.
You'll need:
* Jira account credentials (base URL, username, API token)
**How to connect Jira:**
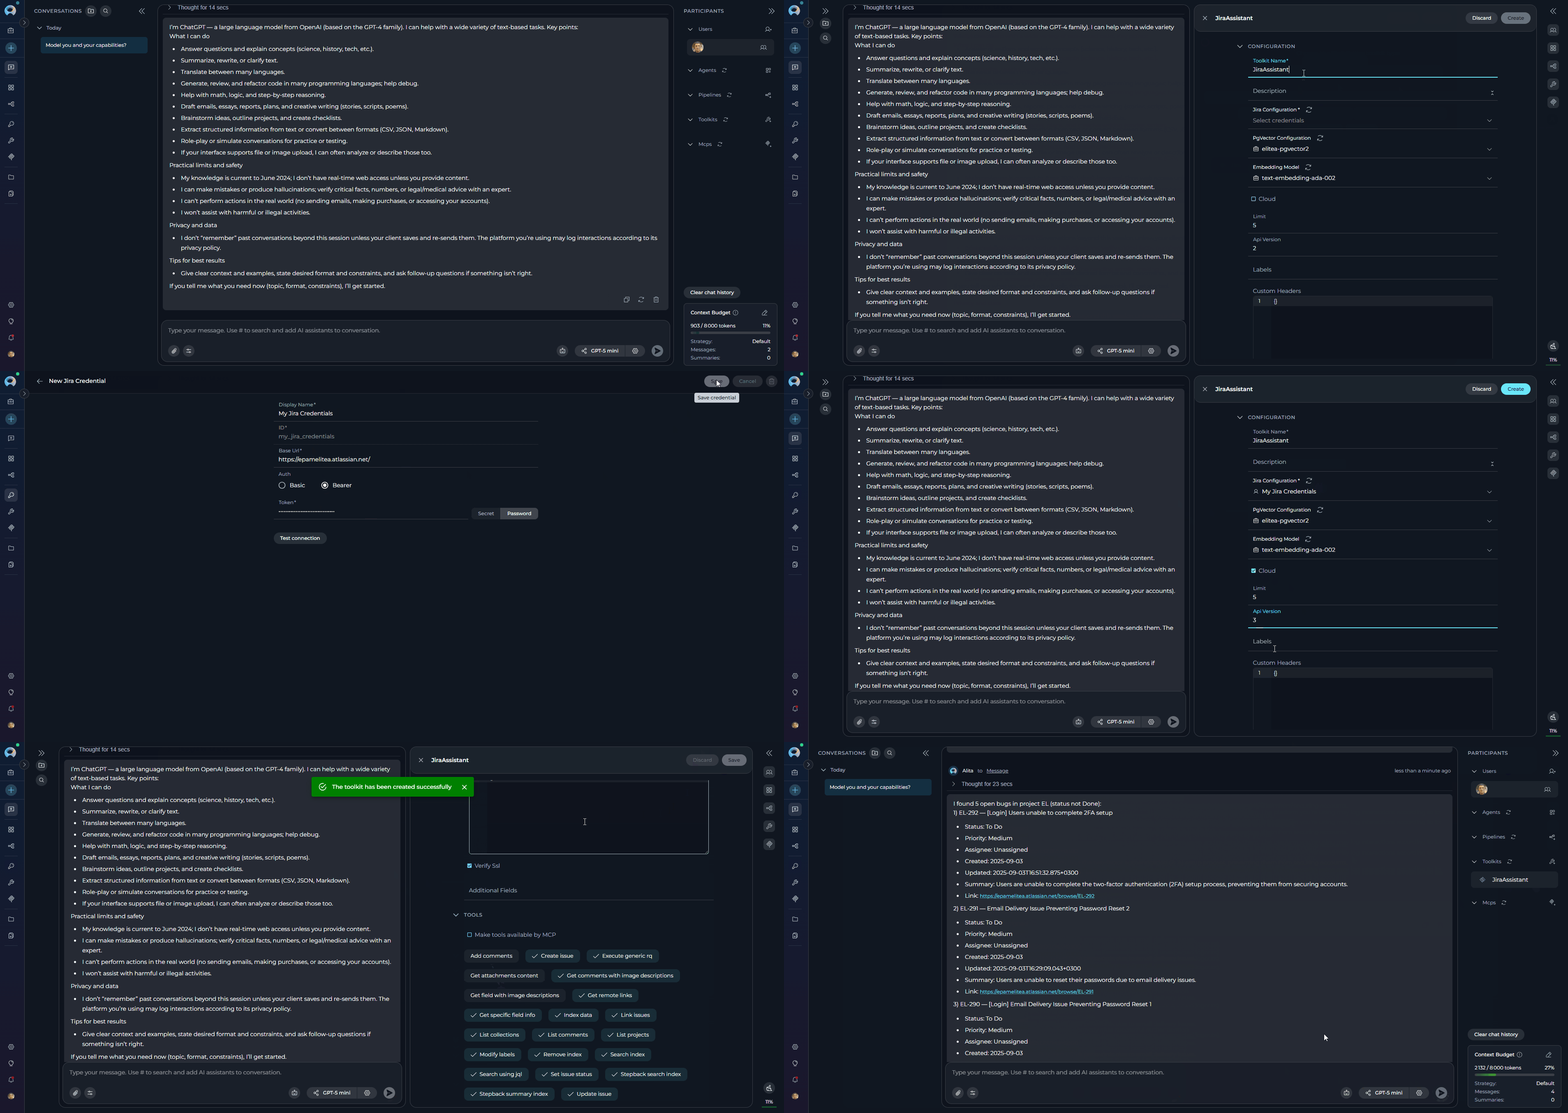
1. **Create a Toolkit from Canvas**:
* In the **PARTICIPANTS** panel on the right, find **toolkits**
* Click the **+ Add toolkit** icon
* Click **+ Create new Toolkit**
* Select **Jira** as the toolkit type
* Enter a name (e.g., `JiraAssistant`)
2. **Create a Credential** (when configuring the toolkit):
* In the **CONFIGURATION** section, click the credentials dropdown
* Select **+ New credentials** (or **+ New private credentials**)
* You'll be redirected to the **Create Credentials** page
* Select **Jira** as the credential type
* Give it a name like `My Jira Credentials`
* Fill in your Jira **Base URL**, and **Token**(Auth: Bearer) or **Api Key** and **Username** (Auth: Basic)
* Click **Save**
3. **Return to Toolkit Creation**:
* Go back to the toolkit creation canvas
* Click the **refresh icon** next to the Jira configuration field
* Your newly created credential will appear in the list
* Select it from the dropdown
4. **Complete Toolkit Configuration**:
* Select an **Embedding Model** (e.g., `text-embedding-3-small`)
* Choose a **Vector Store** (PostgreSQL with pgvector extension)
* Enable the tools you need (e.g., **Search using JQL**, **Create issue**)
* Click **Create**
* Click **X** to close the Toolkit Canvas interface
* The toolkit will appear in your **PARTICIPANTS** panel
5. **Use it**:
* Type: `Find all open bugs in project ABC`
* Click **Send**
* The toolkit will search Jira and return results
 ***
## Step 4: Send an Attachment
Attach files or images to your chat messages for AI-powered analysis.
* **Images**: JPEG, JPG, PNG, GIF, and more
* **Documents & Data**: JSON, TXT, MD, YAML, and more
* **Maximum**: 10 images per message
* **Size limits**: Vary by AI model (e.g., 5MB for Anthropic, 20MB for OpenAI)
**How to Attach Files**
1. **Enable Attachments** (first time only):
* Click the **paperclip icon** in the message input area
* The **Attachment settings** popup appears
* Select an existing **Artifact Toolkit** or create a new one
* Click **Save**
2. **Attach Files** (three ways):
* **Click**: Click the paperclip icon → select files
* **Drag & Drop**: Drag files from your computer into the message input area
* **Paste**: Copy an image (Ctrl+V or Cmd+V) and paste it
3. **Add Text Prompt** (required):
* Type a message describing what you want the AI to do
* Example: `Analyze this diagram and explain the workflow`
4. **Send**:
* Click the **Send button**
* The AI will analyze your attachment and respond
***
## Step 4: Send an Attachment
Attach files or images to your chat messages for AI-powered analysis.
* **Images**: JPEG, JPG, PNG, GIF, and more
* **Documents & Data**: JSON, TXT, MD, YAML, and more
* **Maximum**: 10 images per message
* **Size limits**: Vary by AI model (e.g., 5MB for Anthropic, 20MB for OpenAI)
**How to Attach Files**
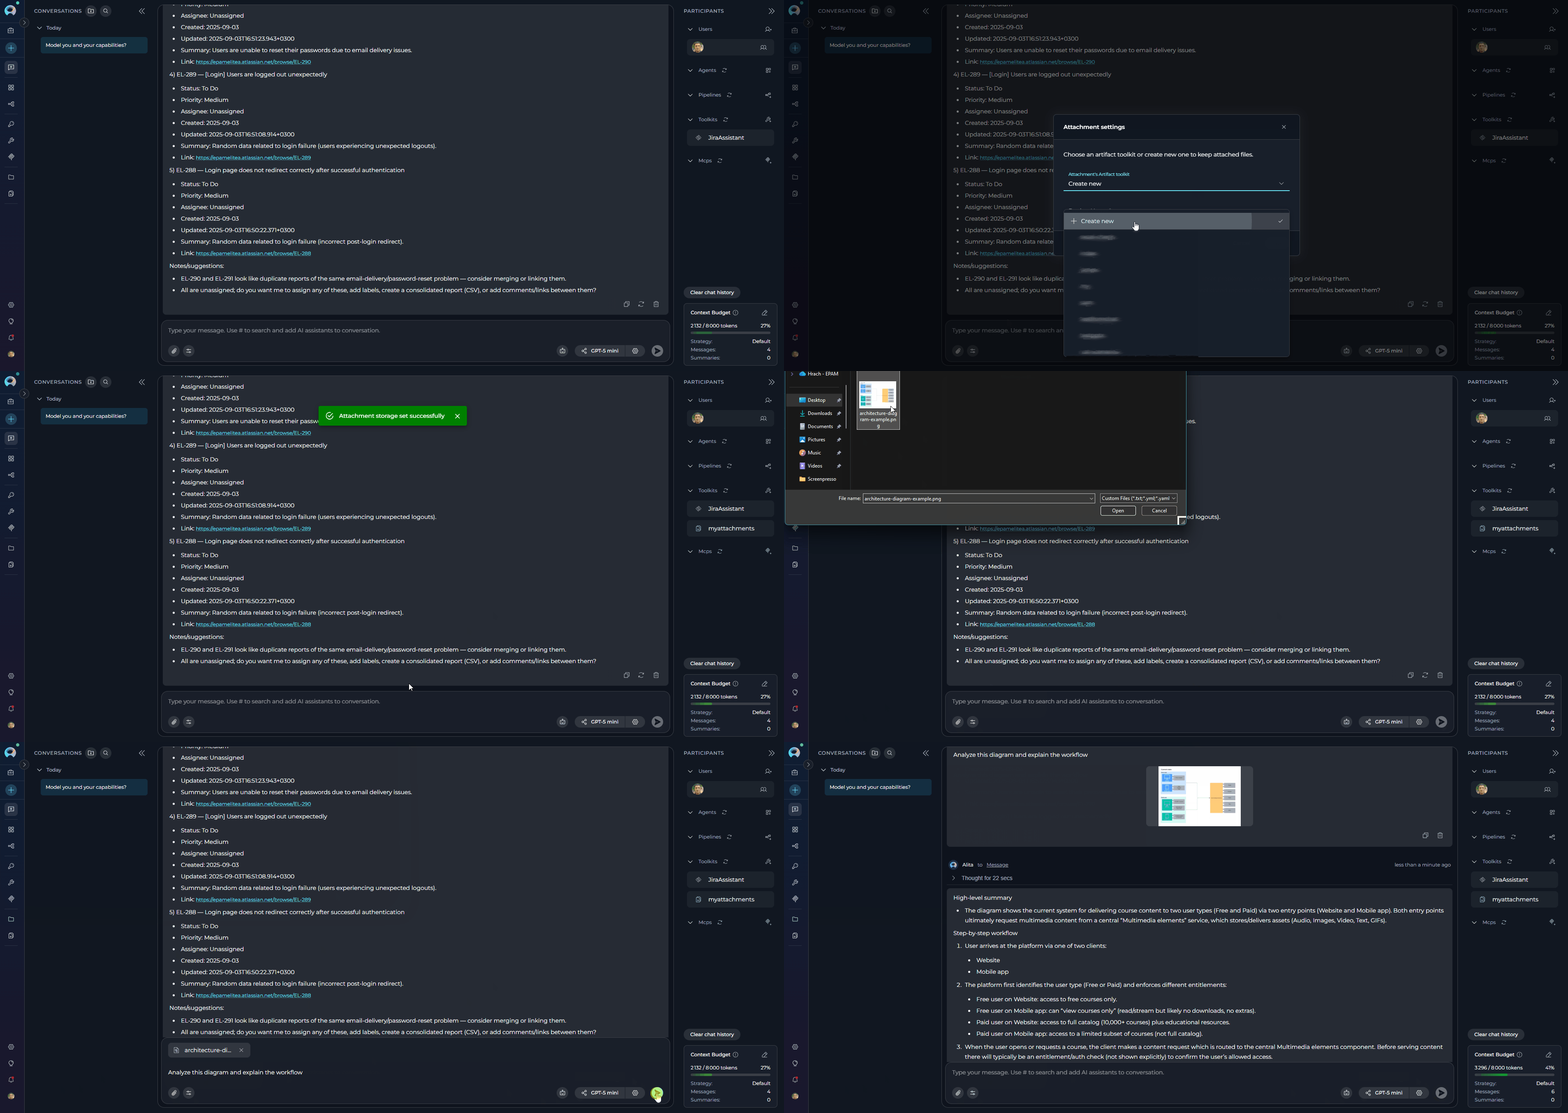
1. **Enable Attachments** (first time only):
* Click the **paperclip icon** in the message input area
* The **Attachment settings** popup appears
* Select an existing **Artifact Toolkit** or create a new one
* Click **Save**
2. **Attach Files** (three ways):
* **Click**: Click the paperclip icon → select files
* **Drag & Drop**: Drag files from your computer into the message input area
* **Paste**: Copy an image (Ctrl+V or Cmd+V) and paste it
3. **Add Text Prompt** (required):
* Type a message describing what you want the AI to do
* Example: `Analyze this diagram and explain the workflow`
4. **Send**:
* Click the **Send button**
* The AI will analyze your attachment and respond
 ***
## Step 5: Create an Agent from Chat (Optional)
Once you've had a successful chat session, you might want to reuse the same setup. Creating an agent saves your configuration for future use.
**How to create an agent**
1. **Have a conversation** with the desired tools and settings.
2. **Create Agent from Canvas**:
* In the **PARTICIPANTS** panel on the right, find **Agents**
* Click **+ Add agent** icon
* Click **Create new agent**
* This opens the Agent Canvas interface
3. **Configure Your Agent**:
* Give your agent a **name** (e.g., `Jira Assistant`)
* Add a **description** of what it does (e.g., `Helps manage Jira tickets and queries`)
* Add **instructions** that define its behavior (e.g., `You are a Jira assistant. Help users search for tickets, create issues, and analyze project data. Always use JQL syntax for searches.`)
* Click **Save** to proceed to advanced configuration
4. **Add Toolkits**
* In the advanced configuration, select toolkits to attach to your agent
* Configure LLM model and settings
* Click **Save**
* Click **X** to close the Agent Canvas interface
5. **Use Your Agent**:
* Select your agent in the **PARTICIPANTS** section (it will be highlighted)
* Type a message and send (e.g., `Find all high-priority tickets updated this week`)
***
## Step 5: Create an Agent from Chat (Optional)
Once you've had a successful chat session, you might want to reuse the same setup. Creating an agent saves your configuration for future use.
**How to create an agent**
1. **Have a conversation** with the desired tools and settings.
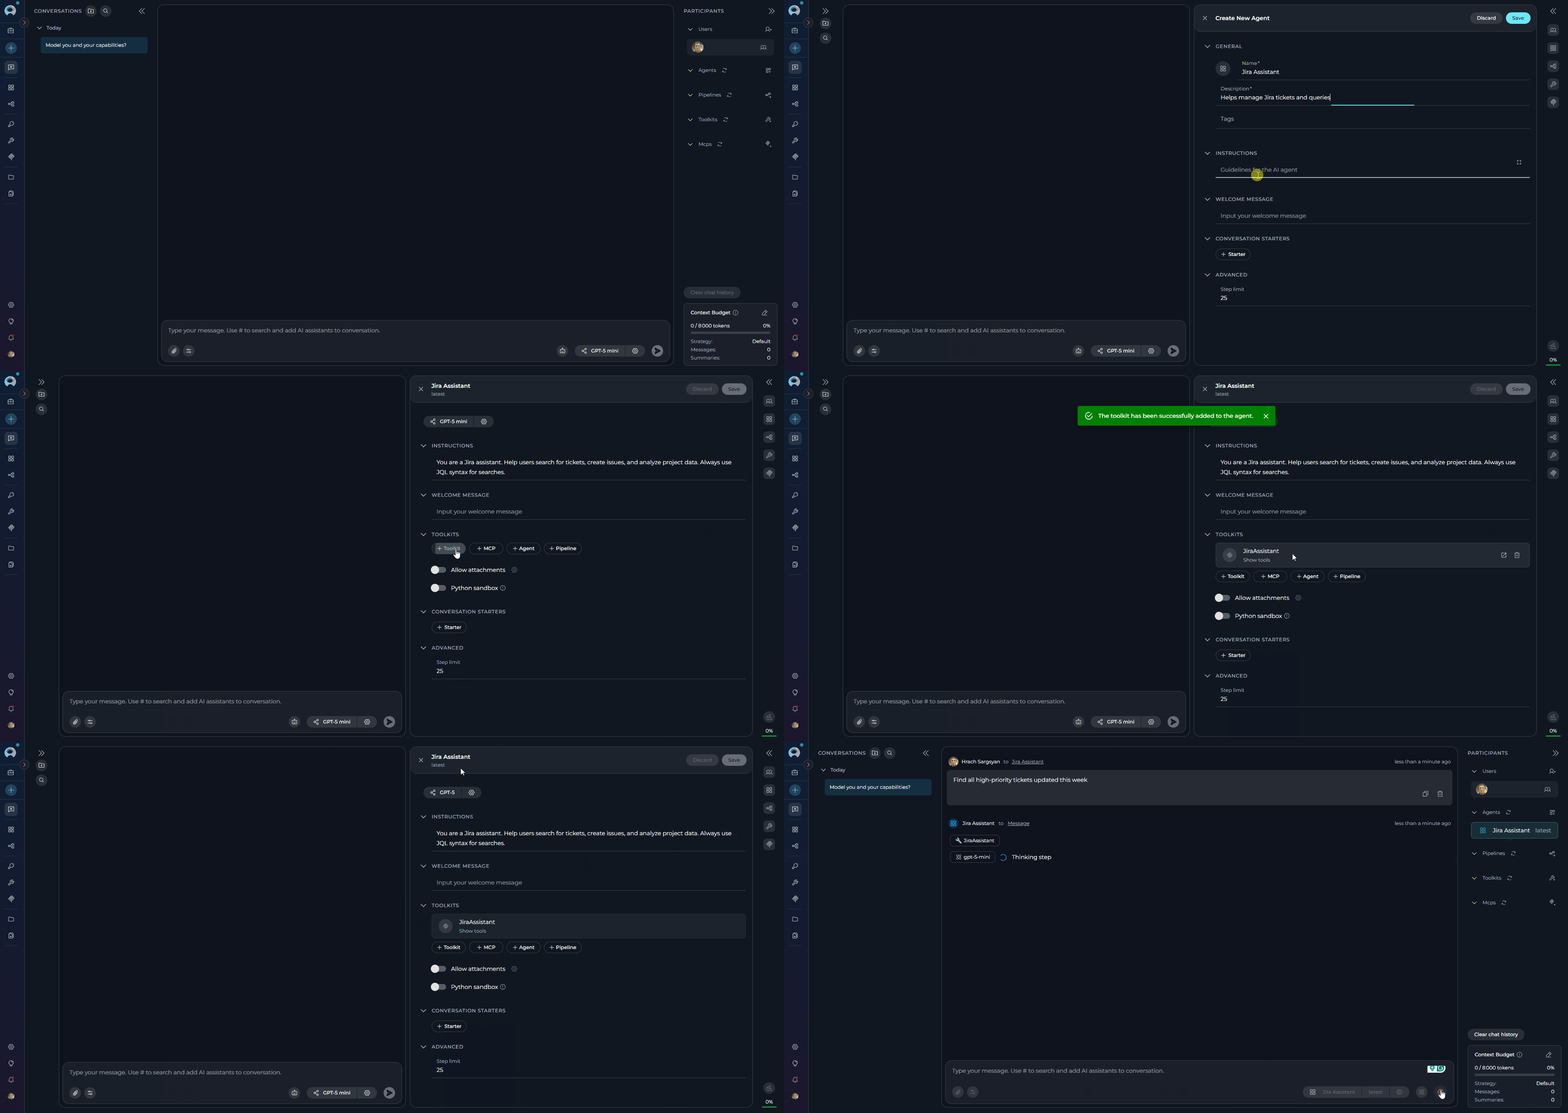
2. **Create Agent from Canvas**:
* In the **PARTICIPANTS** panel on the right, find **Agents**
* Click **+ Add agent** icon
* Click **Create new agent**
* This opens the Agent Canvas interface
3. **Configure Your Agent**:
* Give your agent a **name** (e.g., `Jira Assistant`)
* Add a **description** of what it does (e.g., `Helps manage Jira tickets and queries`)
* Add **instructions** that define its behavior (e.g., `You are a Jira assistant. Help users search for tickets, create issues, and analyze project data. Always use JQL syntax for searches.`)
* Click **Save** to proceed to advanced configuration
4. **Add Toolkits**
* In the advanced configuration, select toolkits to attach to your agent
* Configure LLM model and settings
* Click **Save**
* Click **X** to close the Agent Canvas interface
5. **Use Your Agent**:
* Select your agent in the **PARTICIPANTS** section (it will be highlighted)
* Type a message and send (e.g., `Find all high-priority tickets updated this week`)
 * **Reusability**: Use the same setup across multiple chats
* **Consistency**: Same instructions and tools every time
* **Sharing**: Share with teammates in team projects
* **Efficiency**: Skip setup and start working immediately
***
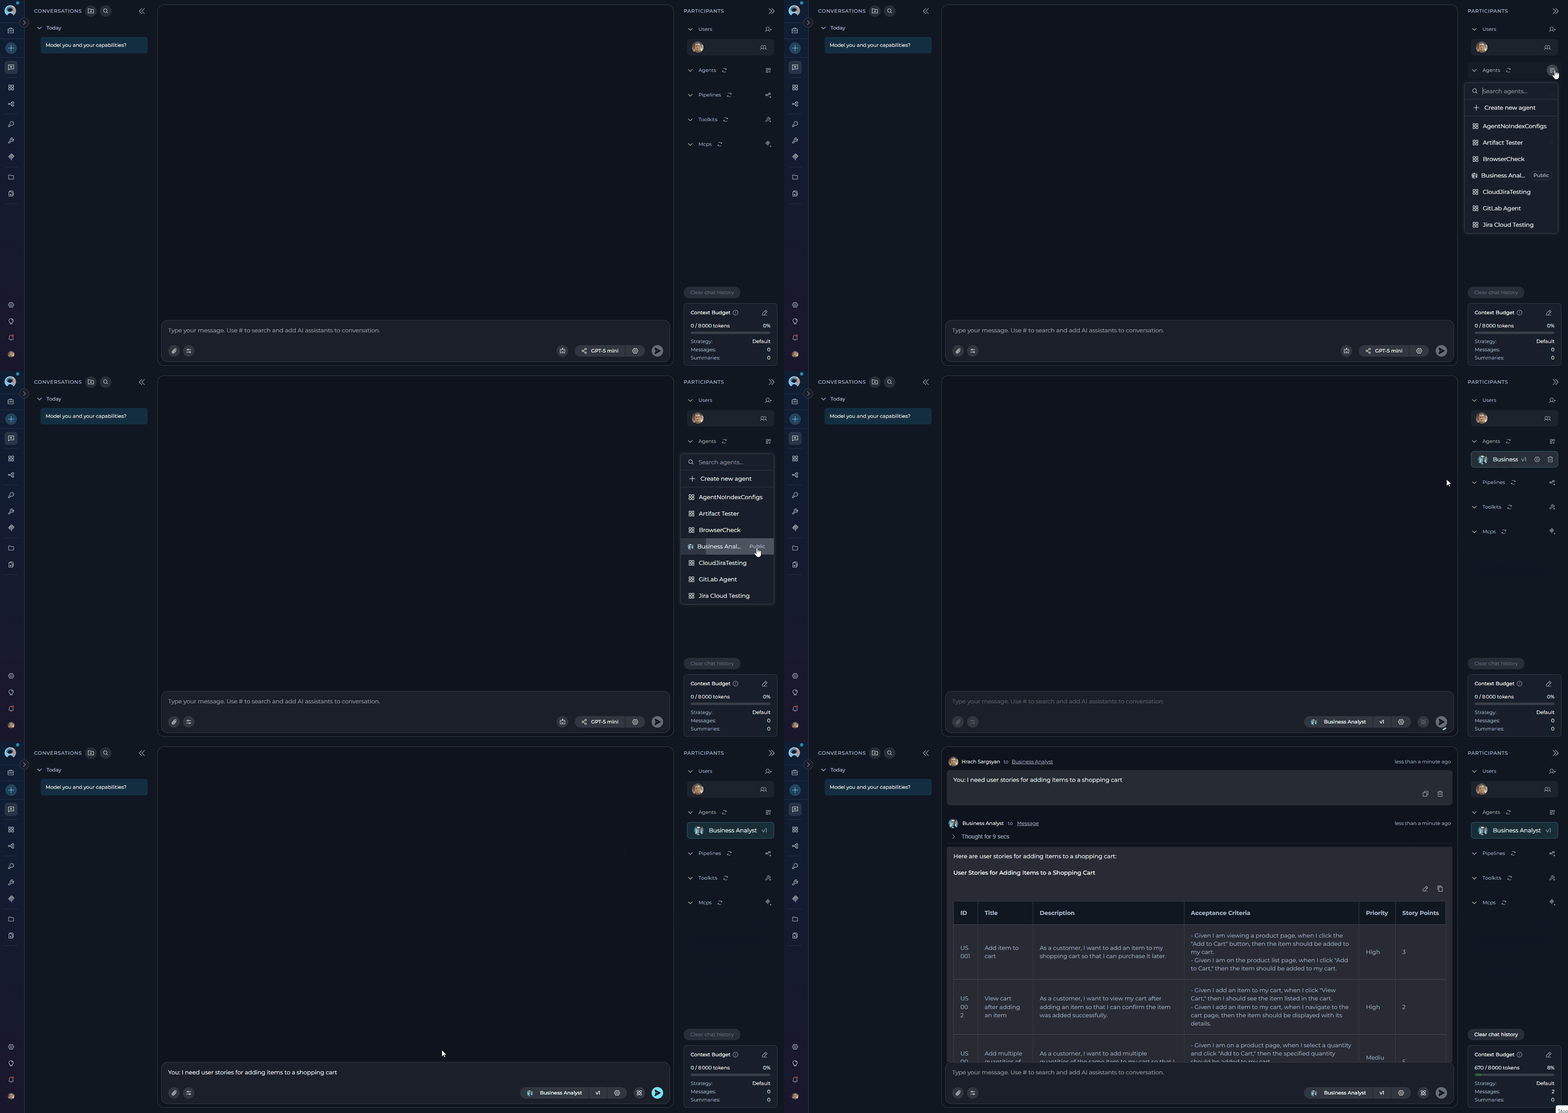
## Step 6: Use Public Agents (Optional)
Explore pre-built agents created by the ELITEA community to discover new capabilities.
**How to Find and Use Public Agents**
1. In the **PARTICIPANTS** panel on the right, find **agents**
2. Click the **+** icon
3. Browse the list of available agents
4. **Look for the "Public" badge** to identify community-shared agents
5. Select a public agent to add it to your conversation
6. Click the agent in the **PARTICIPANTS** list to activate it
7. Type your message or use conversation starters if available
8. The agent responds based on its specialized instructions and capabilities
* **Reusability**: Use the same setup across multiple chats
* **Consistency**: Same instructions and tools every time
* **Sharing**: Share with teammates in team projects
* **Efficiency**: Skip setup and start working immediately
***
## Step 6: Use Public Agents (Optional)
Explore pre-built agents created by the ELITEA community to discover new capabilities.
**How to Find and Use Public Agents**
1. In the **PARTICIPANTS** panel on the right, find **agents**
2. Click the **+** icon
3. Browse the list of available agents
4. **Look for the "Public" badge** to identify community-shared agents
5. Select a public agent to add it to your conversation
6. Click the agent in the **PARTICIPANTS** list to activate it
7. Type your message or use conversation starters if available
8. The agent responds based on its specialized instructions and capabilities
 Public agents are a great way to learn how others are using ELITEA. You can:
* View their configurations (read-only) by clicking the ⚙️ settings icon
* Understand their prompt engineering and structure
* Create your own versions with customizations
* Combine concepts from multiple public agents
***
* **[Chat Guide](../menus/chat)**: Explore all chat features in detail
* **[Create an Agent](../how-tos/chat-conversations/how-to-create-and-edit-agents-from-canvas)**: Learn advanced agent creation
* **[Use Public Items from Chat](../how-tos/chat-conversations/use-public-items-from-chat)**: Access and use shared agents, toolkits, and prompts
* **[Connect Toolkits](./connect-toolkits-quick-start)**: Connect more external services
* **[Create Credentials](./create-credential)**: Manage service credentials
* **[Create Secrets](./create-secret)**: Securely store sensitive data
***
Public agents are a great way to learn how others are using ELITEA. You can:
* View their configurations (read-only) by clicking the ⚙️ settings icon
* Understand their prompt engineering and structure
* Create your own versions with customizations
* Combine concepts from multiple public agents
***
* **[Chat Guide](../menus/chat)**: Explore all chat features in detail
* **[Create an Agent](../how-tos/chat-conversations/how-to-create-and-edit-agents-from-canvas)**: Learn advanced agent creation
* **[Use Public Items from Chat](../how-tos/chat-conversations/use-public-items-from-chat)**: Access and use shared agents, toolkits, and prompts
* **[Connect Toolkits](./connect-toolkits-quick-start)**: Connect more external services
* **[Create Credentials](./create-credential)**: Manage service credentials
* **[Create Secrets](./create-secret)**: Securely store sensitive data
***